Immigration Matter Management Quick Start Guide for Microsoft Dynamics 365
Are you ready to try the solution or have questions?

Introduction
This quick start guide provides an overview of how to manage immigration matters using Microsoft Dynamics 365. It is designed for legal professionals who need to efficiently track and manage immigration cases.
Getting Started
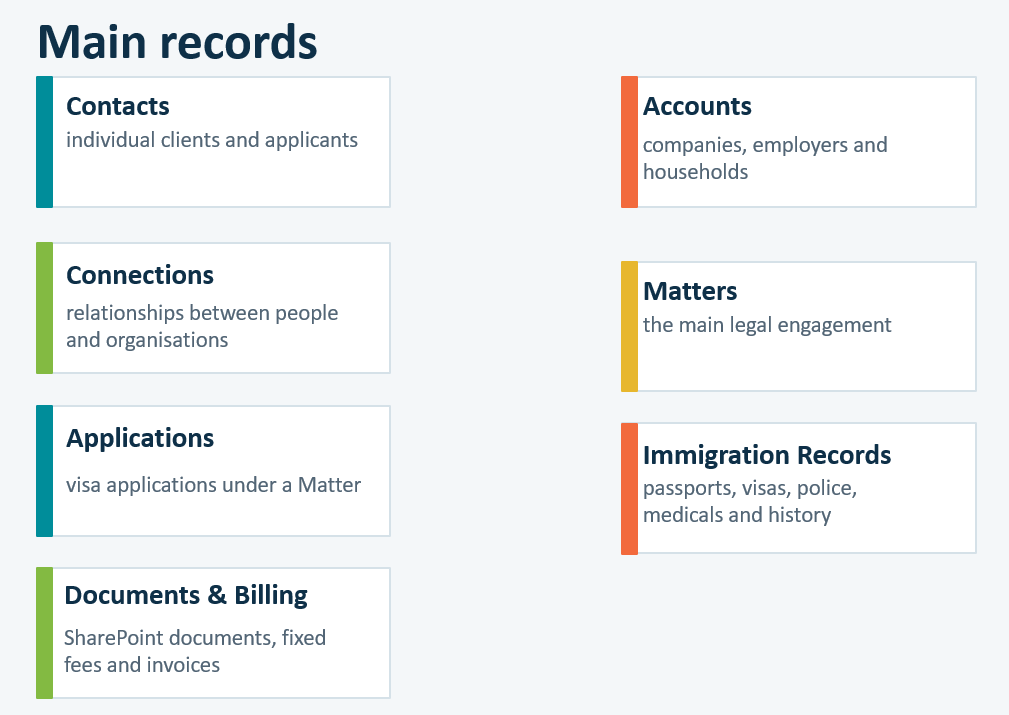
Manage the key parts of an immigration matter in one place. The system brings together clients, matters, applications, documents and billing so the team can work from a shared record.
User Journey
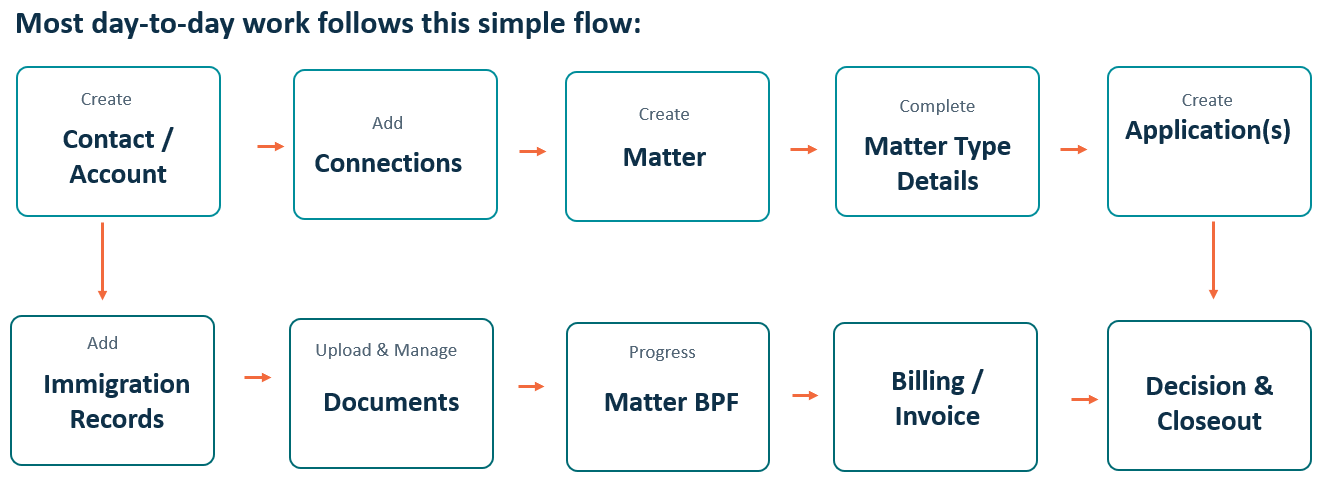
The user journey for managing an immigration matter follows processes.
Important Notes
- A Matter may have one Application or multiple Applications depending on the client journey.
- Documents can be uploaded against the relevant record and stored through SharePoint.
- Matter and contact folders are created automatically. Application folders are created under Matter Documents when Applications are created
Contacts
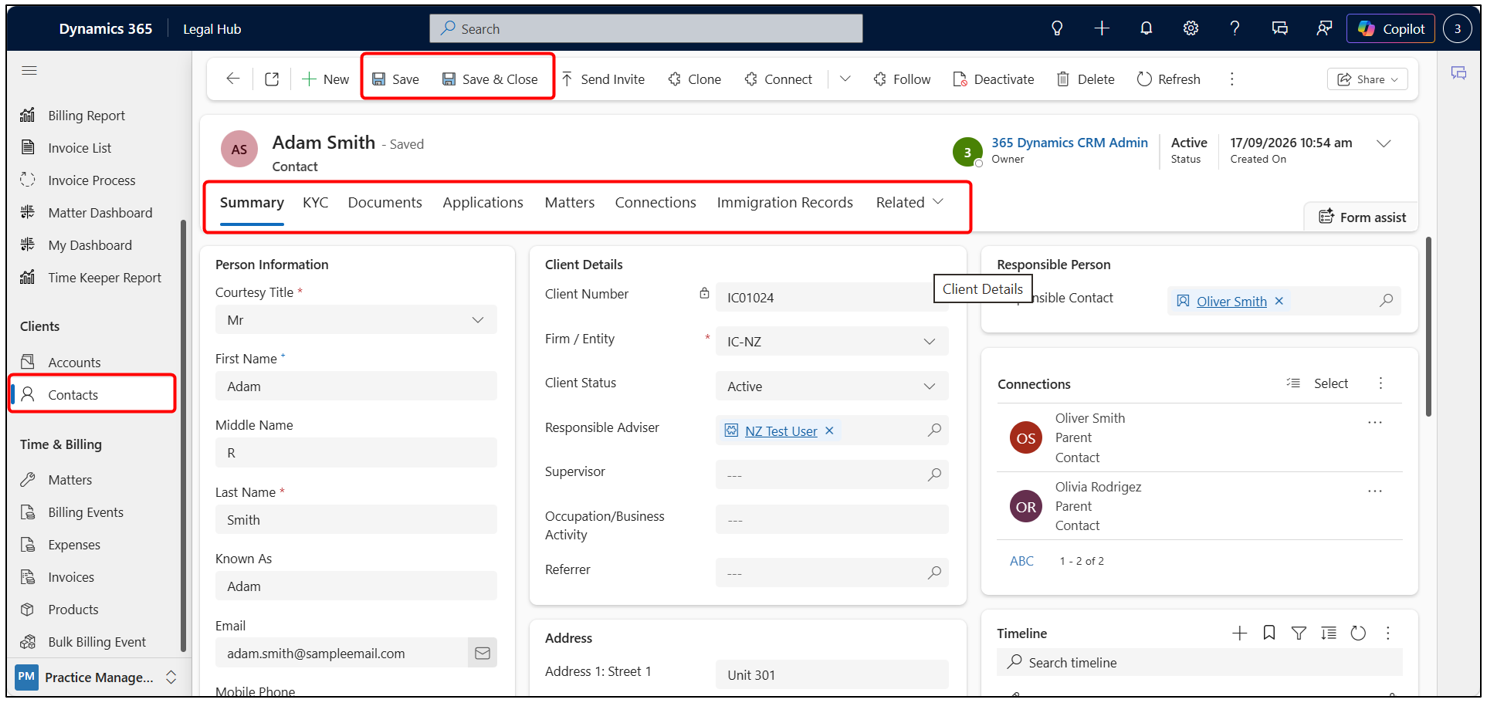
A Contact stores a client’s personal and important information details, and links to their Matters, Applications and Documents.
Creating a Contact
-
Navigate to Clients > Contacts.
-
Click + New to create a Contact, or open an existing record to edit.
-
Enter/update Person Information and important details.
-
Click Save or Save & Close.
To remove an item, select a record and click Delete.
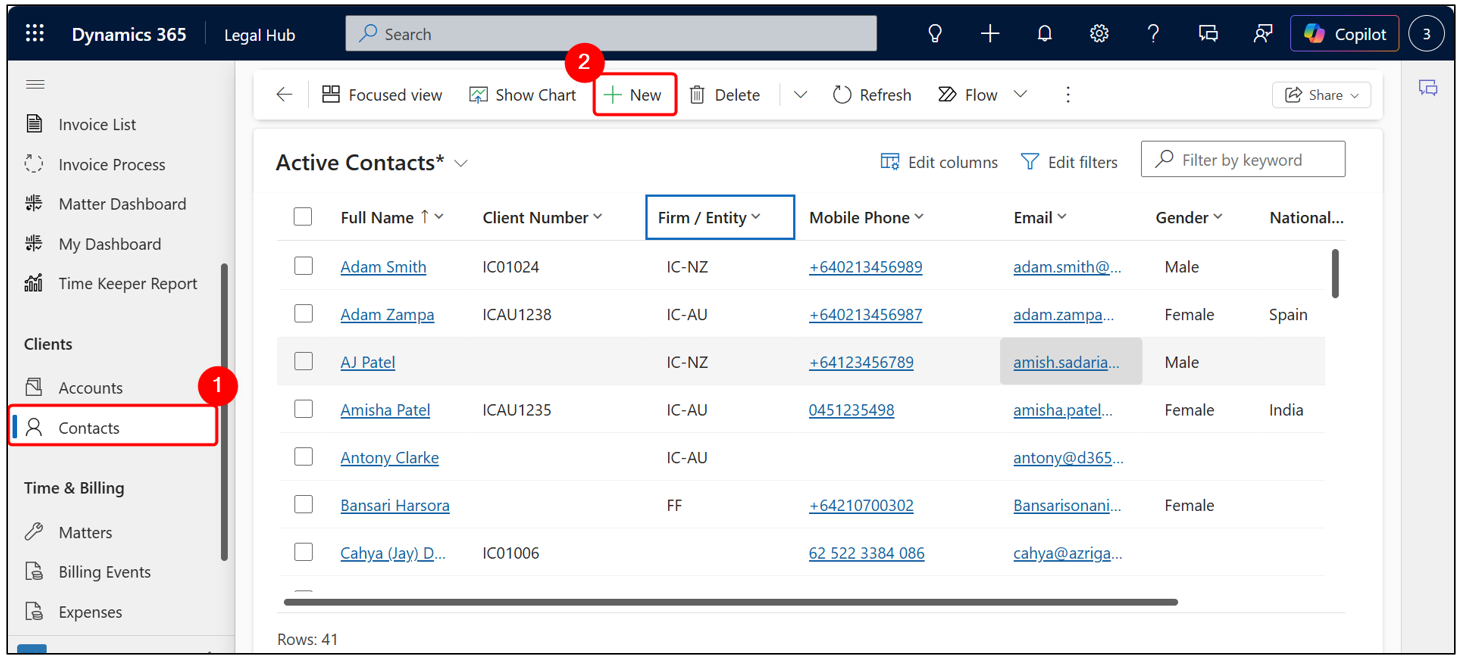
When a Contact is created, the client document folders are automatically generated.
Contact Form
The Contact form includes:
- Personal Information
- Multiple form tabs (Documents, Applications, Matters, etc.)
- Timeline (Notes, Emails, etc.)
- Ribbon actions (Save, Deactivate, Check Access, etc.)
You can add:
- Personal & contact details (Summary tab)
- Supporting documents (Documents tab)
- Linked Matters, Applications & Immigration Records
Responsible Person identifies who can act on behalf of the client in the portal.
Immigration Records
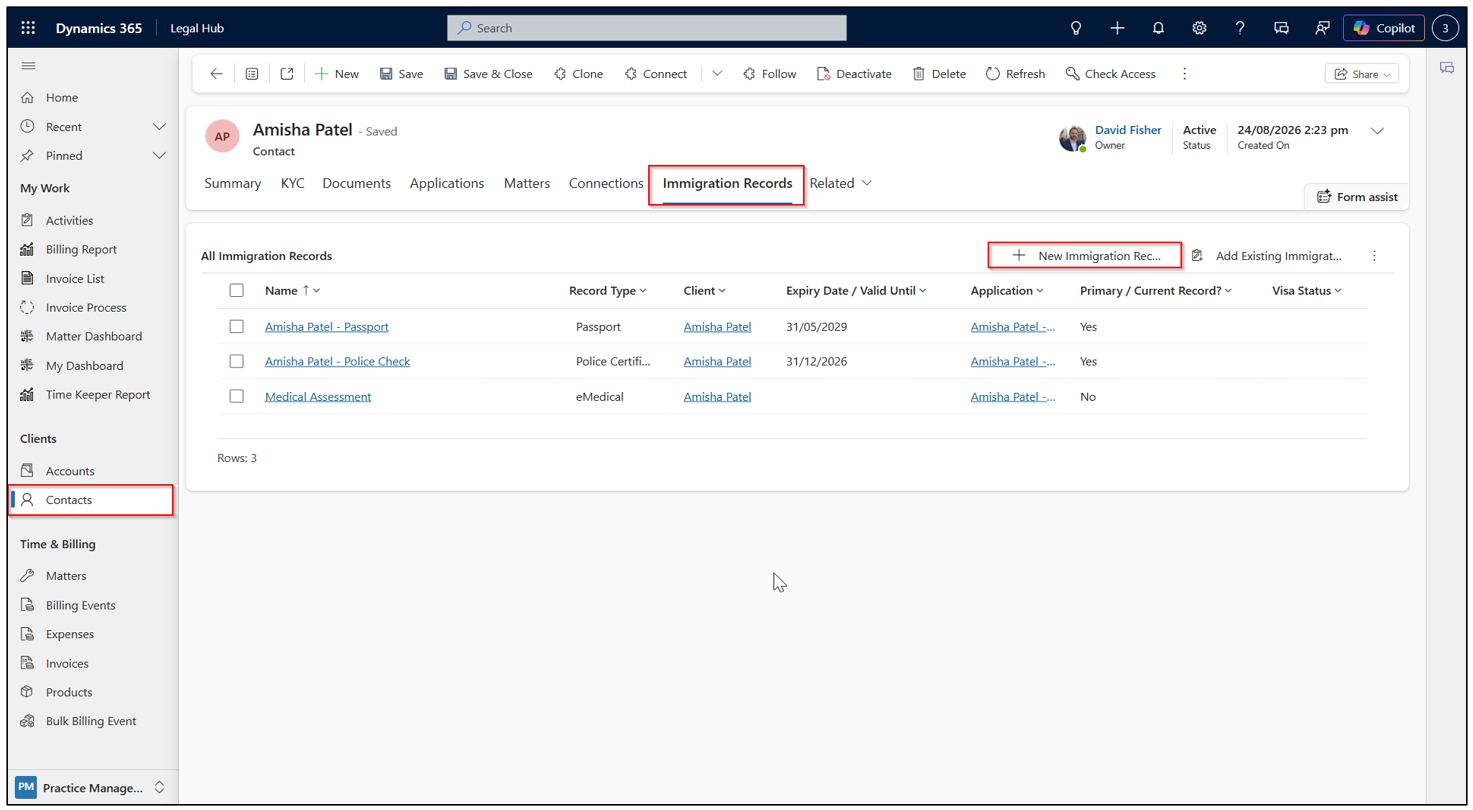
An Immigration Record is for identity and supporting document records (Passport, Police Check, Medical, etc.) for a Contact.
Creating an Immigration Record
-
Navigate to Clients > Contacts, and open the required Contact.
-
Click + New Immigration Record on the Immigration Records tab.
-
Select the Record Type (Passport, Police Check, Medical, etc.), Client, Matter and Application.
-
Complete the record details (dates, numbers) and then Save.
Immigration Record Form
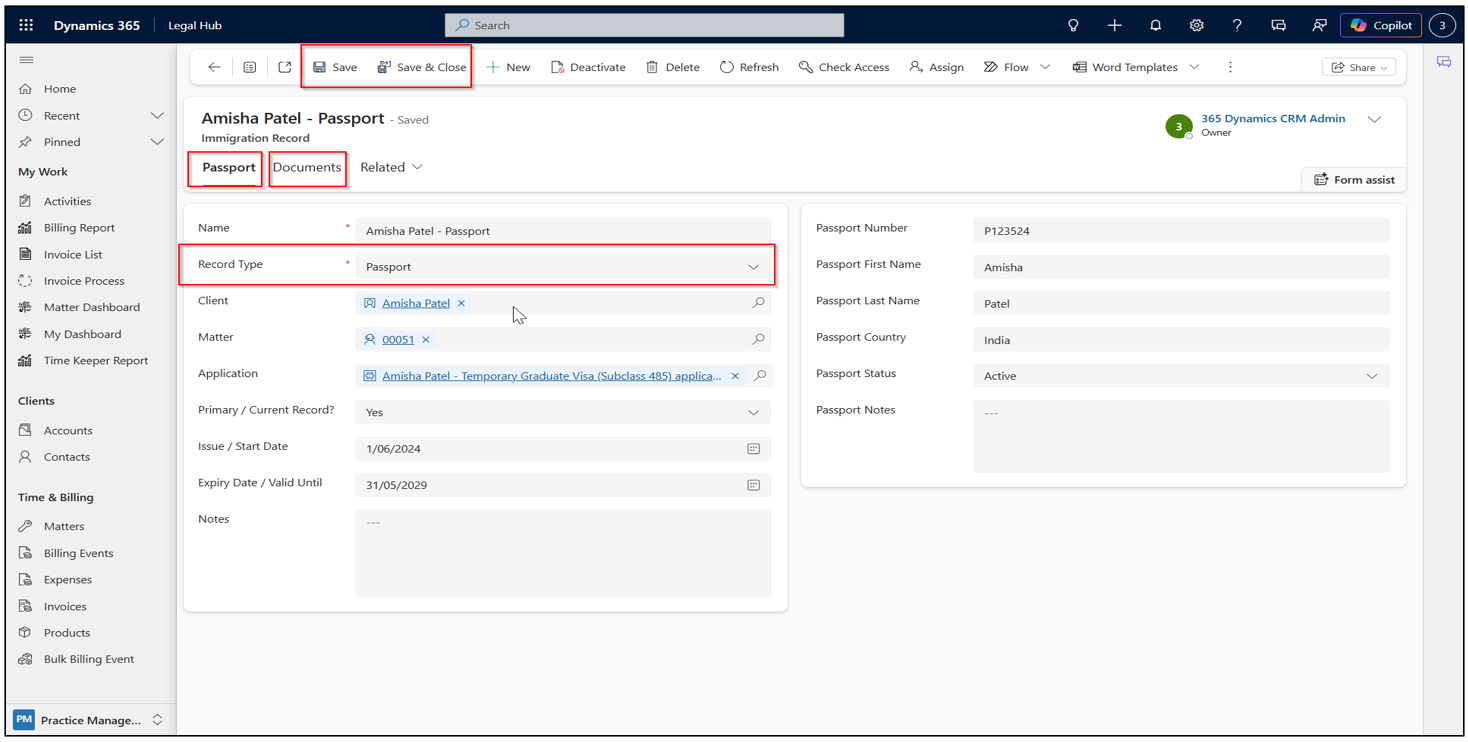
The Immigration Record form includes:
- Tabs: Passport/Record & Documents
- Record-specific fields (Number, Country, Status)
- Ribbon actions (Save, Deactivate, Assign,_ etc.)
You can add:
- Record Type, Client, Matter & Application
- Issue/Start & Expiry/Valid Until dates.
Client Documents
Each Contact has their own Documents tab for attaching supporting documents.
How to Add Documents
-
Navigate to Clients > Contacts, and open the required Contact.
-
Click the Documents tab.
-
Use Upload or New to add files or folders. Open in SharePoint when needed.
-
Files uploaded from the Client Portal appear in this same document area.
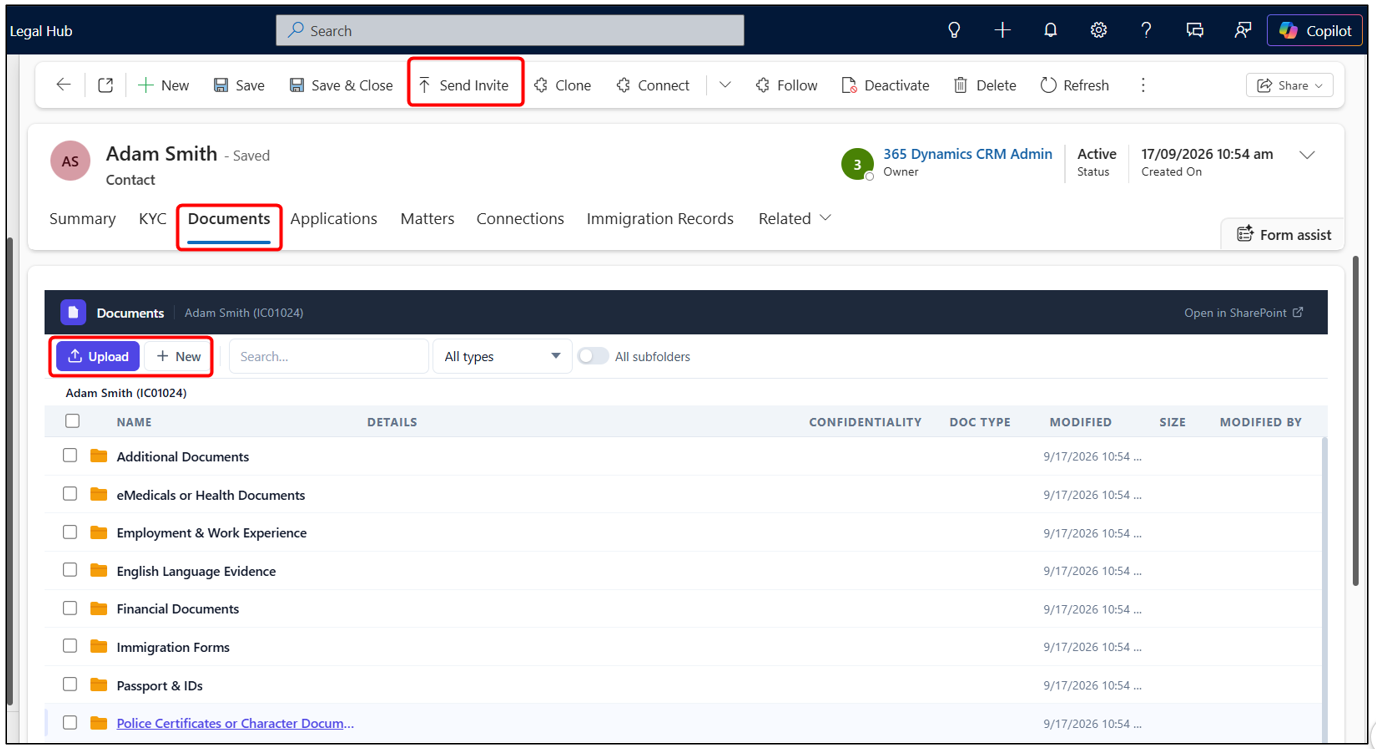
Use Send Invite on the Contact record to send Client Portal access to the client email.
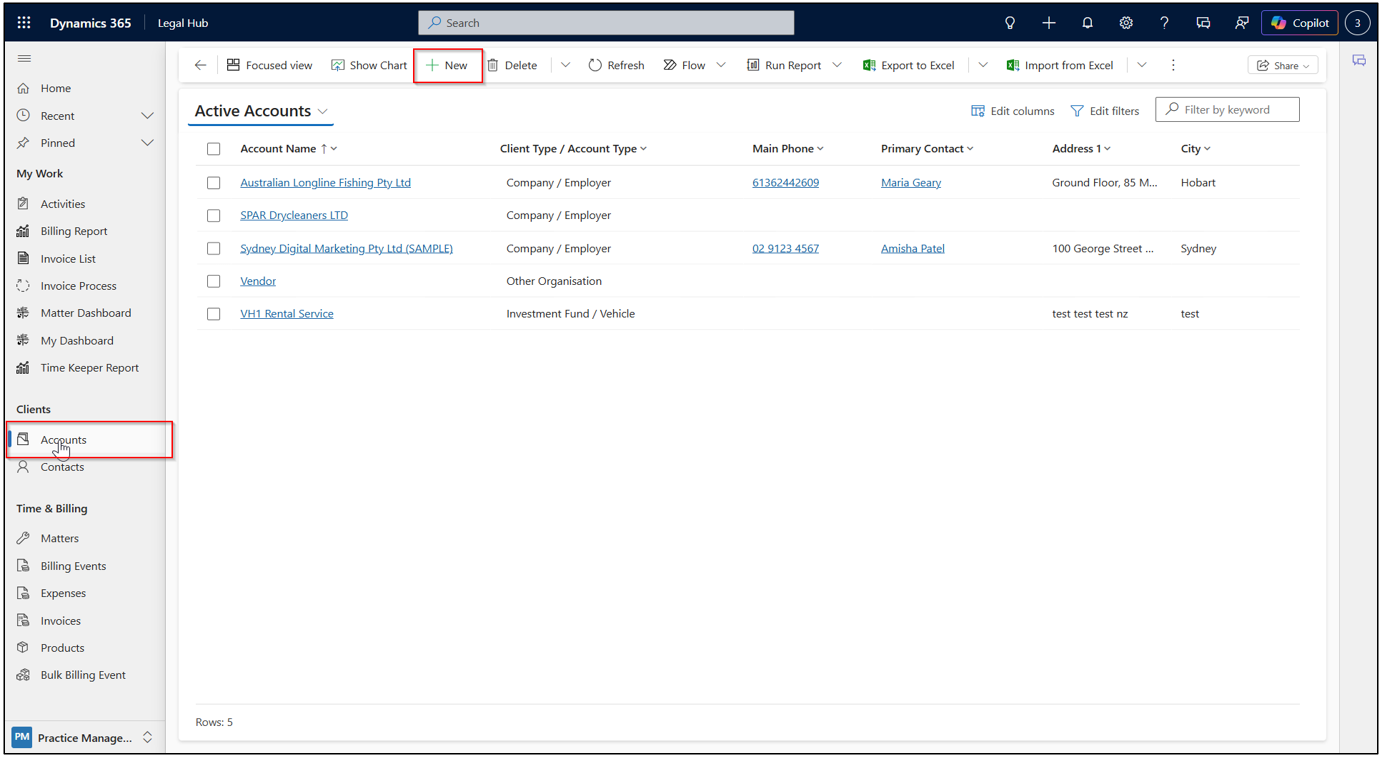
Accounts
An Account represents a company, employer or organisation client - linked to its Contacts, Matters and Immigration Records.
Creating a New Account
-
Navigate to Clients > Accounts.
-
Click + New to create an Account, or open an existing record to edit.
-
Enter/update Details, Summary and Company/Employer information.
-
Click Save or Save & Close.
To remove an item, select a record and click Delete.
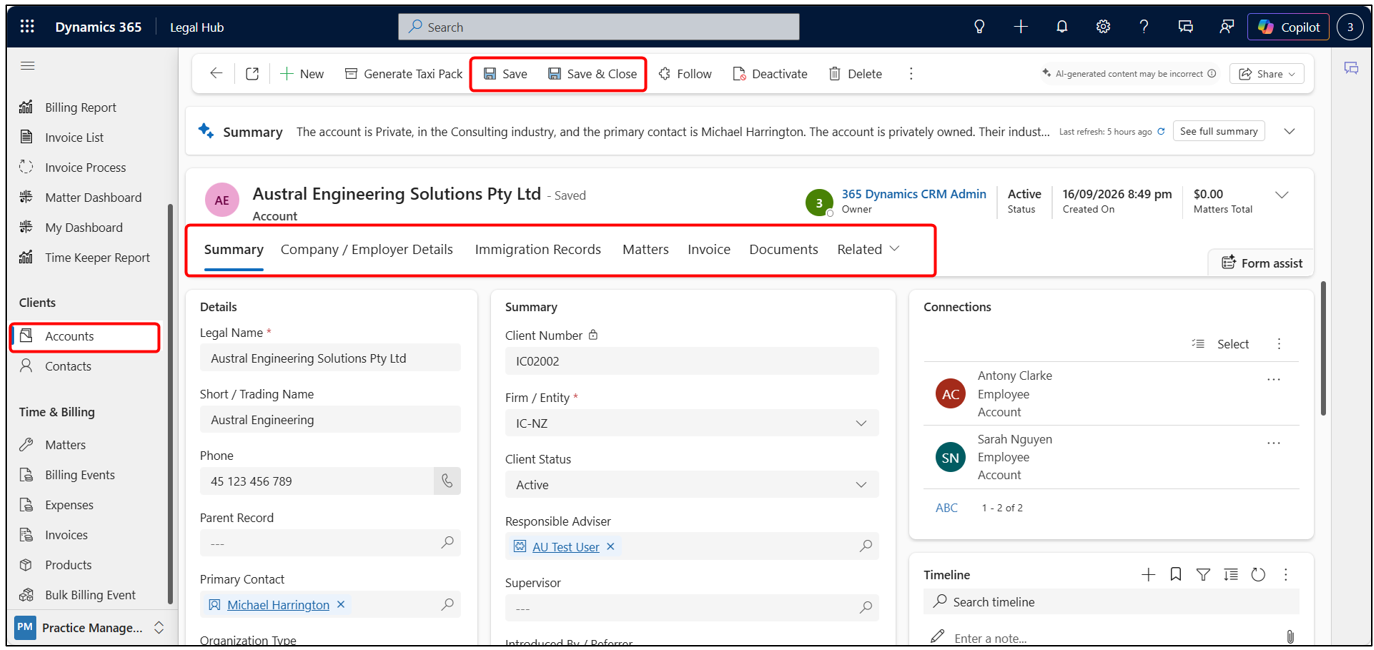
Account Form
The Account form includes:
- Details & Summary sections
- Tabs: Company/Employer Details, Matter, Invoice, Documents
- Timeline (Notes, Emails, etc.)
- Ribbon actions (Save, Deactivate, etc.)
You can add:
- Account details & primary contact (Summary tab)
- Company / employer details (Company tab)
- Supporting documents (Documents tab)
- linked Matters, Invoices & Immigration Records
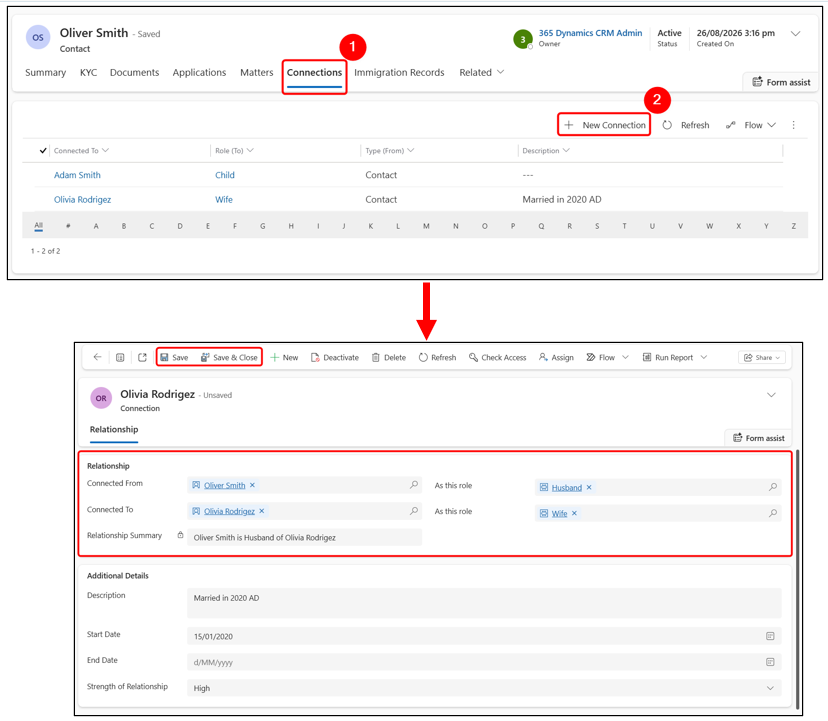
Use Connections to link employees, contacts or related people.
Connections
Connections are used to link people and organisations that are associated with a Client or Matter.
Creating a Connection
-
Open the required Contact or Account → open the Connections tab.
-
Click + New Connection.
-
Select the person or organization and the appropriate Connection Role.
-
Save the connection.
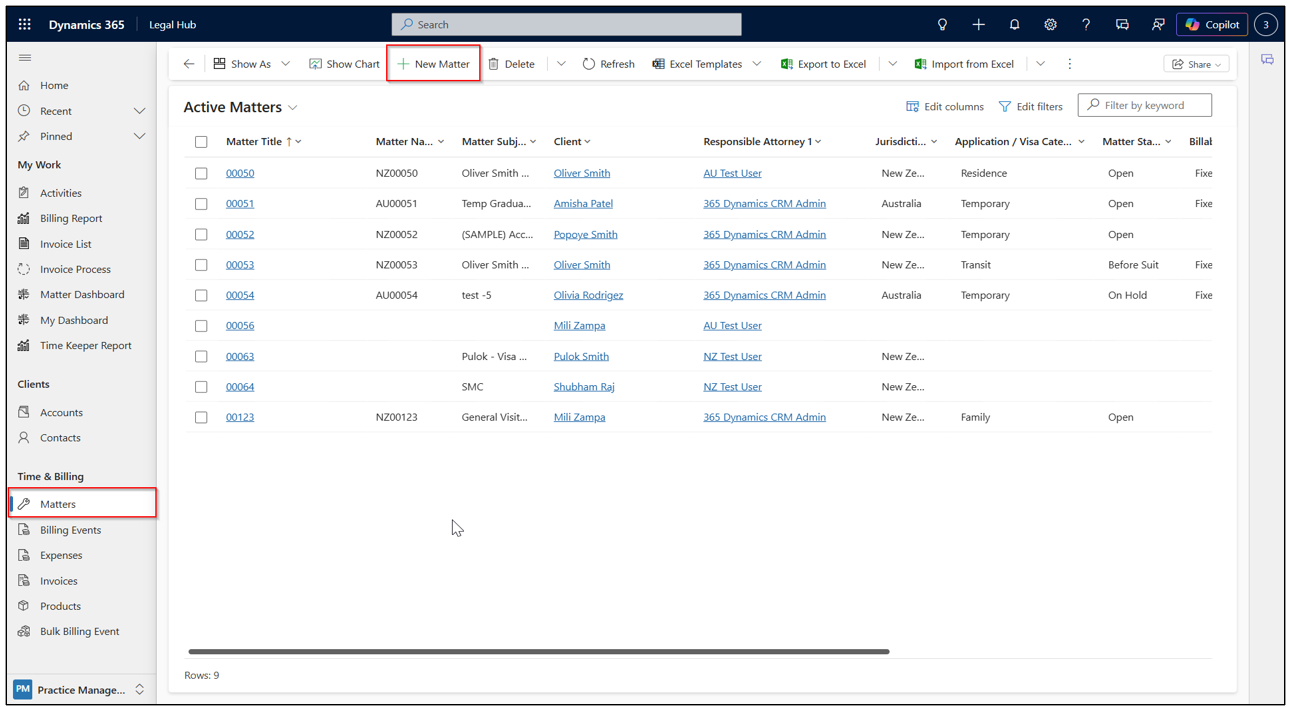
Matters
A Matter tracks a client’s case through its Business Process Flow (BPF), from Onboarding to Decision/Closeout.
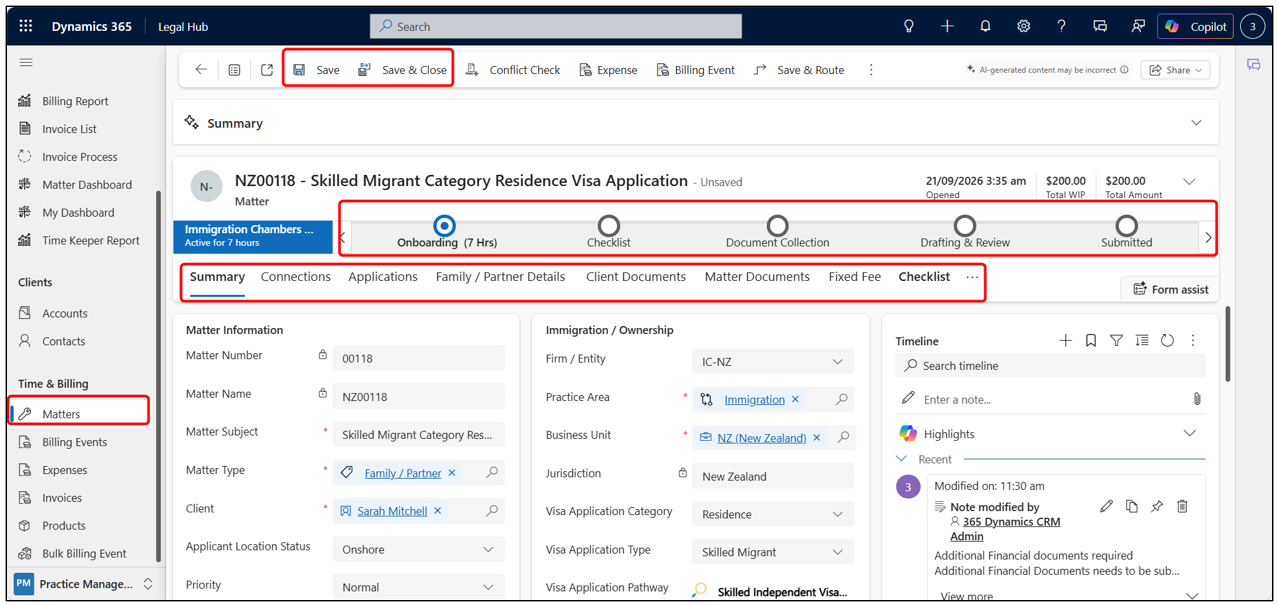
Creating a Matter
-
Navigate to Time & Billing > Matters.
-
Click + New Matter to start a new case.
-
Select the Matter Type and Jurisdiction, then complete Client, Practice Area and Application/Visa Category.
-
Upload supporting documents on the Documents tab, then click Save or Save & Close.
Matter Form
The Matter form includes:
- Business Process Flow (Onboarding to Decision)
- Tabs: Applications, Documents, Fixed Fee, Checklist, Billing Events, Invoices
- Timeline (Notes, Emails, etc.)
- Ribbon actions (Conflict Check, Expense, Billing Event, etc.)
You can add:
- Matter Type & Jurisdiction (Matter Information)
- Client & Primary Applicant
- Practice Area & Application/Visa Category
- Supporting documents (Client Documents and Matter Documents tab)
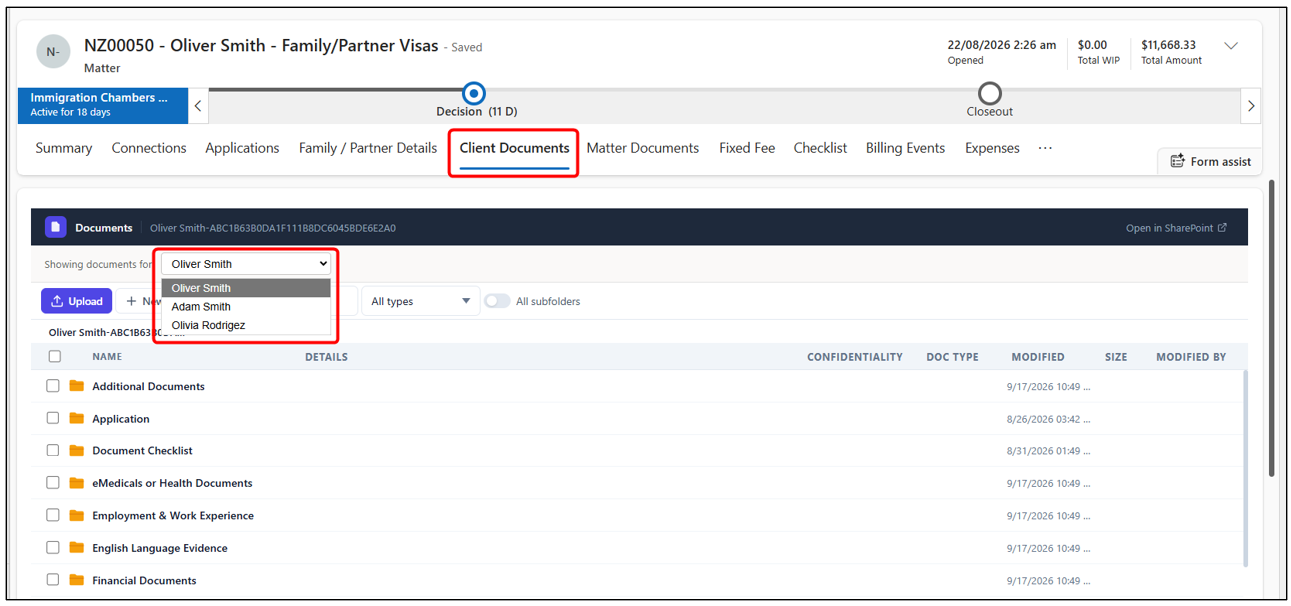
Client Documents in a Matter
Open Matter > Client Documents
- The primary client’s folders are shown by default.
- For family matters, change the client’s name to view another connected family member’s folders Useful for checking documents uploaded from the Client Portal.
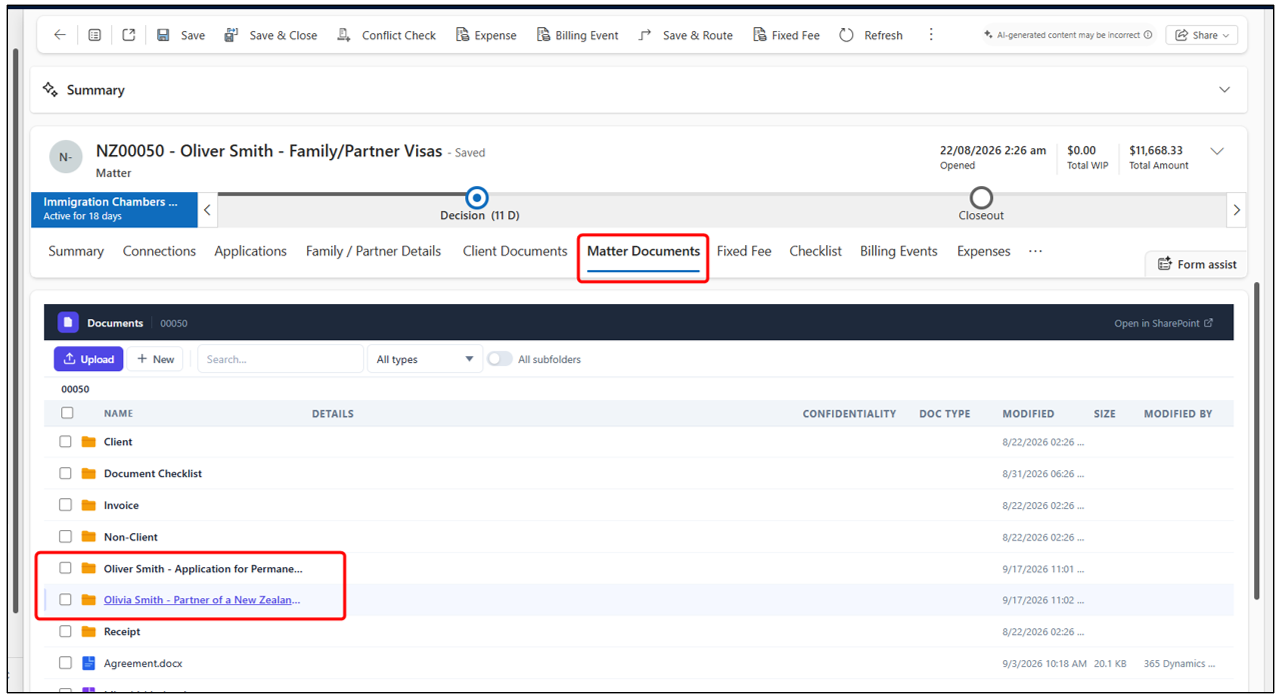
Matter Documents
Open Matter > Matter Documents
- Standard matter folders are generated automatically.
- Each Application creates its own folder under the Matter.
- Documents uploaded to the Application use the same linked folder.
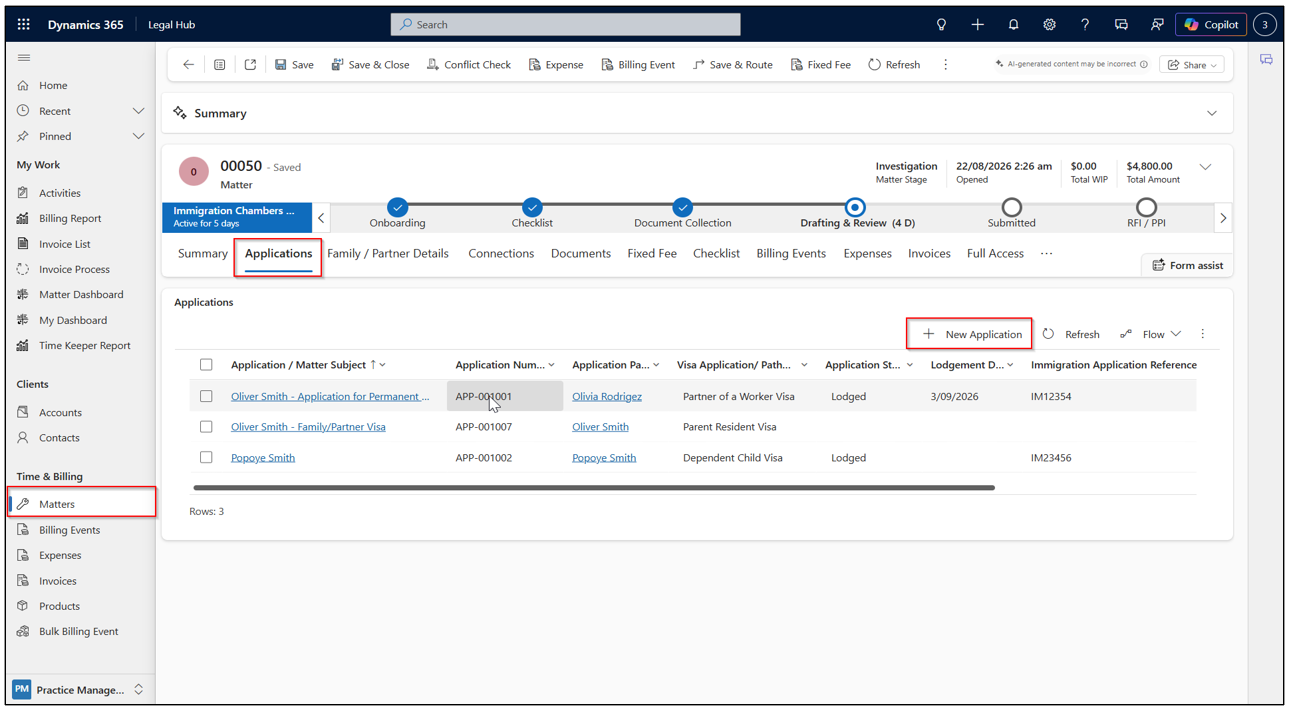
Applications
An Application records a visa or immigration application lodged for a client, linked to its Matter.
Creating an Application
-
Navigate to Matters → open the required Matter → go to Applications tab.
-
Click + New Application on the Applications tab’s applications subgrid.
-
Select the Application Party, Jurisdiction, Matter Type and Visa Application/Pathway.
-
Complete the Application/Visa Category and Type, upload documents on the Documents tab, then Save.
Application Form
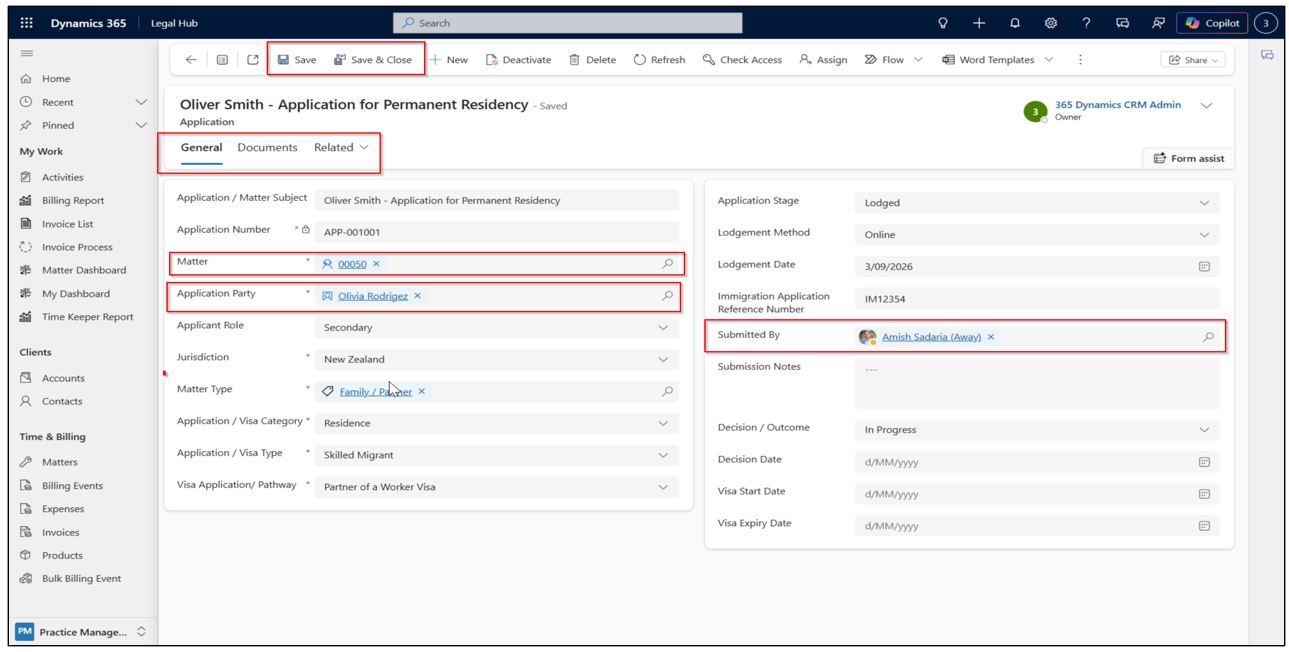
The Application form includes:
- Tabs: General, Documents, Related
- Application Stage & Lodgement details
- Timeline (Notes, Emails, etc.)
- Ribbon actions (Save, Deactivate, Check Access, Assign, etc.)
You can add:
- The linked Matter & Application Party
- Jurisdiction, Matter Type & Visa Application/Pathway
- Application/Visa Category & Type
- Supporting documents (Documents tab)
Full Access/Read Access
Add extra team members to a Matter using full access or read access.
| Feature / Privileges | Full Access | Read Access |
|---|---|---|
| Primary Target | Lead attorneys, assigned legal team members, paralegals, and matter administrators. | External auditors, secondary reviewers, management, and cross-departmental observers. |
| View Matter Details | Yes | Yes |
| Edit Matter Fields | Yes (e.g., status, description, key dates) | No (View-only) |
| Create & Edit Related Records | Yes (e.g., tasks, notes, billing, time entries, communications) | No |
| Upload / Delete Documents | Yes | View/Download only (subject to document-level sync permissions) |
| Manage Access Rights | Yes (Add/remove users from the access lists) | No |
Assigning a user or team to the Full Access list gives them complete operational control over the specific Matter.
Assigning a user or team to the Read Access list provides view-only visibility of a record.
Granting Access
-
Open Matter → go to Full Access or Read Access tab.
-
Add an existing or new user.
-
Use Full Access for broader matter access.
-
Use Read Access where view-only access is sufficient.
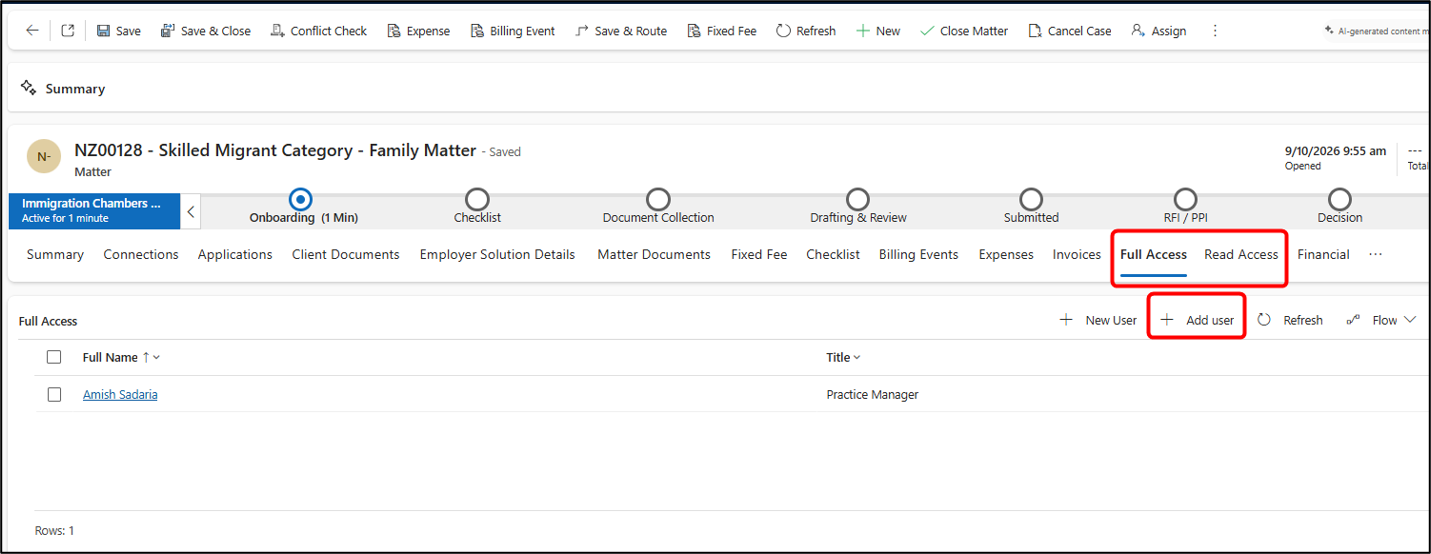
This is useful when someone other than the Responsible Attorney, Supervisor or core team needs access.
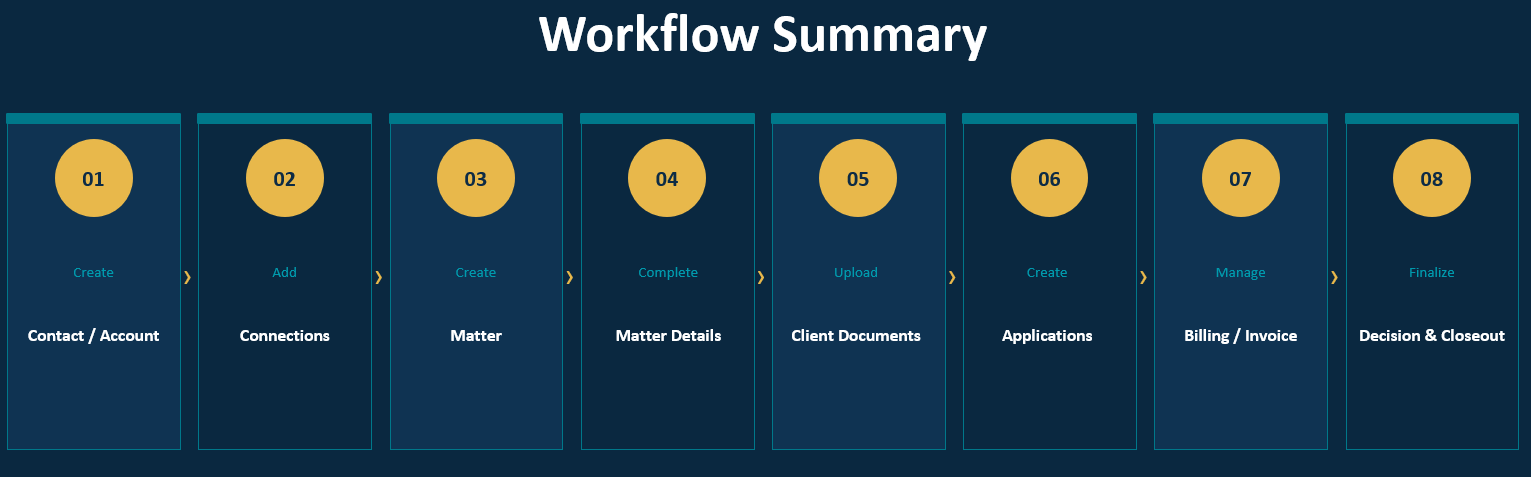
Workflow Summary
Here is a summary of the workflow for managing an immigration matter in Microsoft Dynamics 365: