Invoicing for Legal CRM and Case Management for Dynamics 365 Quick Start Guide
Record Billing Events and Expenses
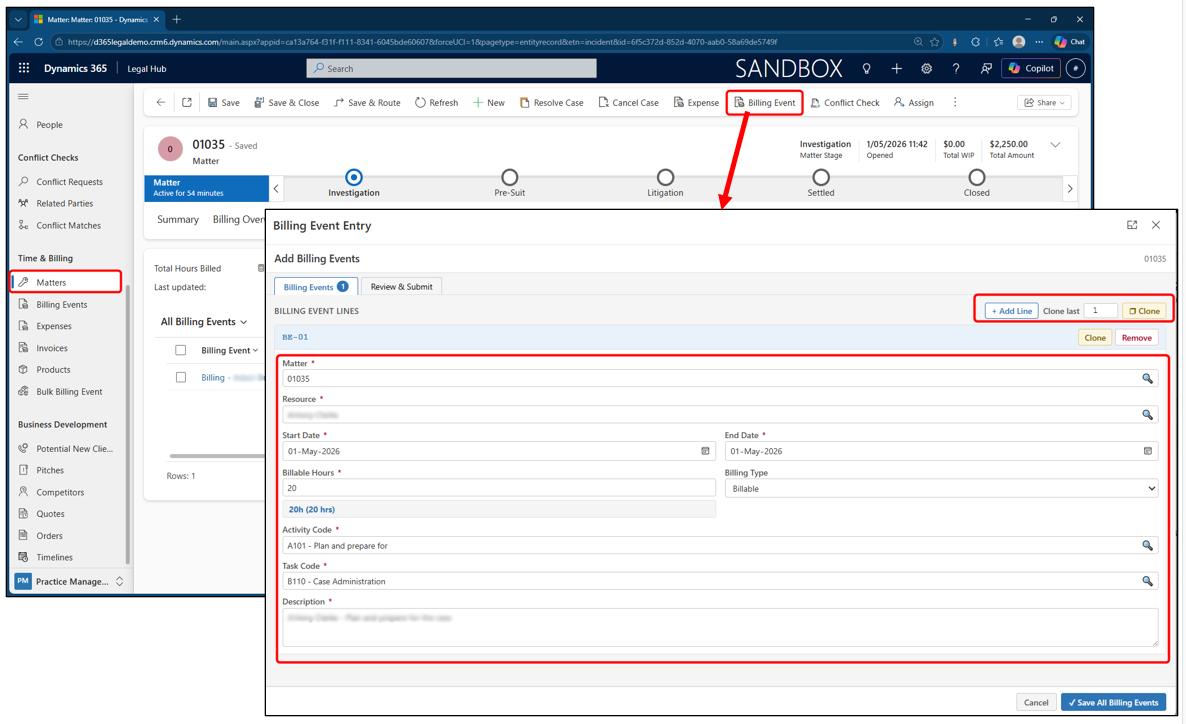
Record Billable Time
Before invoicing, lawyers must record all billable time and expenses against a Matter.
- Open the Matter and navigate to the Billing Events tab to view records.
- Click on Billing Event from the top command bar to add new billing event.
- Enter billing event details in the Billing Event Entry screen.
- Use + Add Line / Clone if needed for multiple entries.
- Click Review & Submit > Save All Billing Events.
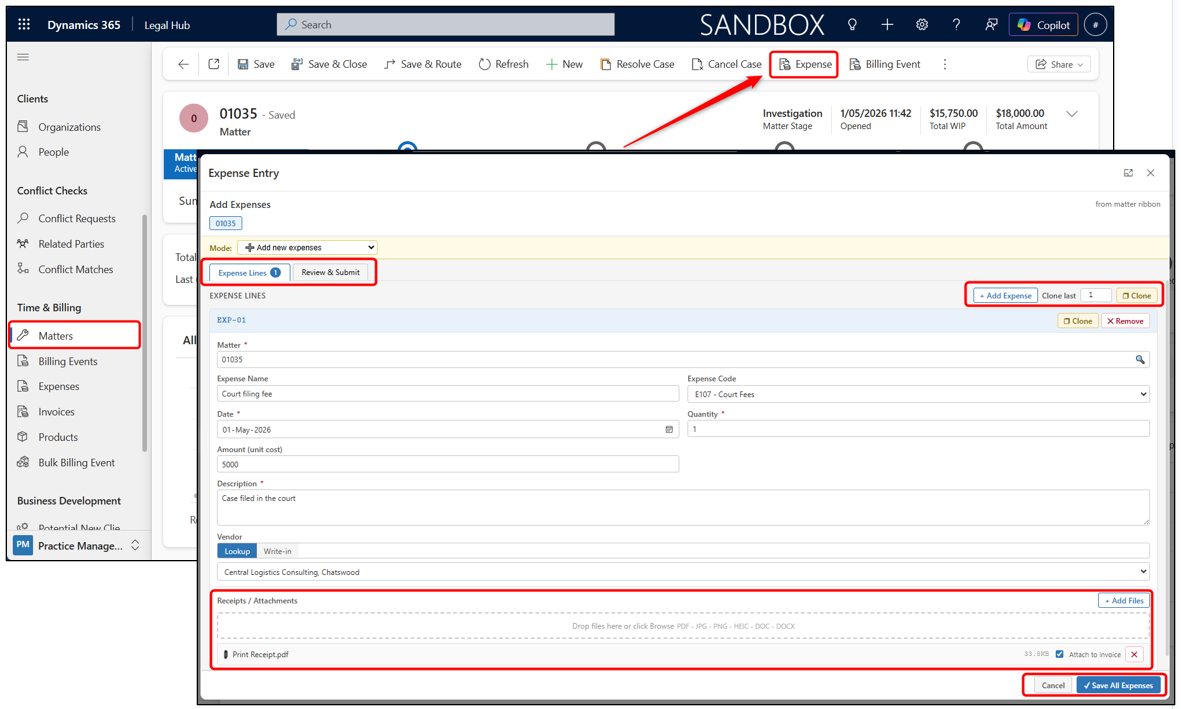
Add Expenses
Any disbursements or external costs can be recorded as Expenses.
- Open the Matter and Click Expense from the top command bar.
- In Expense Entry, make sure mode is Add new expenses.
- Enter expense details and Add receipts in the Attachments section if needed.
- Click Review & Submit > Save All Expenses.
Approve Billing Events and Expenses
Before generating an invoice, all billing entries and expenses must be approved.
- Open the Matter > Billing Events or Expenses tab.
- Select the relevant records.
- Click Edit from the toolbar.
- Set Billing Status or Expense Status = Approved.
- Click Save.
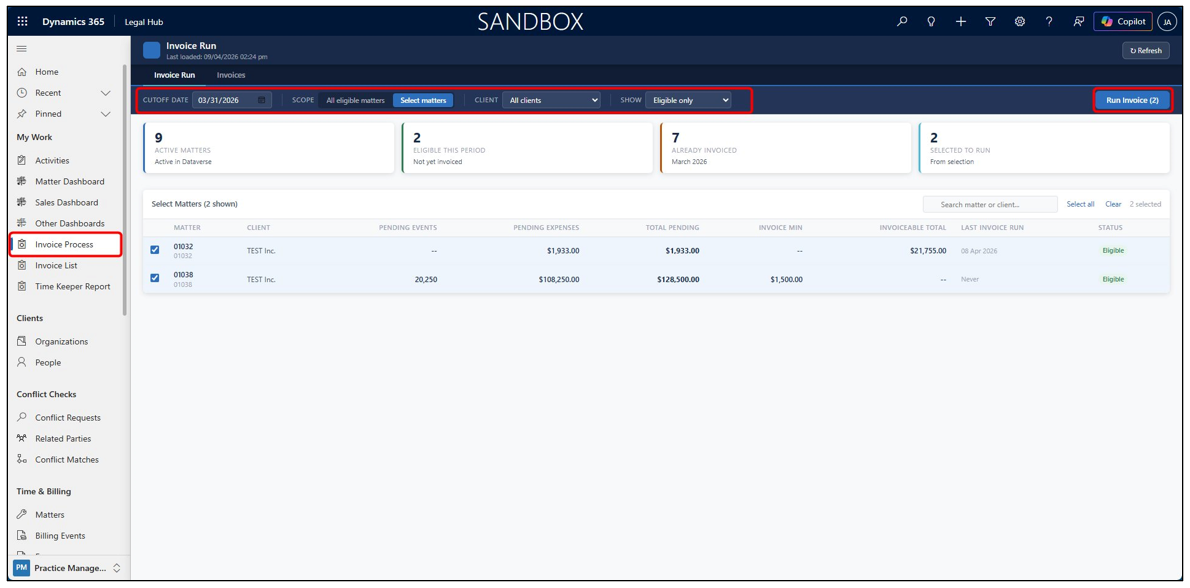
Run the Invoice Process
The Invoice Process screen lets you select eligible matters and generate invoices in bulk. This is faster than opening each Matter individually.
- Navigate to Invoice Process from the left navigation pane.
- Click Run Invoices in the top-right corner to process all eligible invoices at once.
- You can also set the Cutoff Date (by default, last day of the previous month) to control which billing events are included.
- Click Select Matters if you want to generate invoices only for specific matters.
- Select the matters you want and proceed to run invoices.
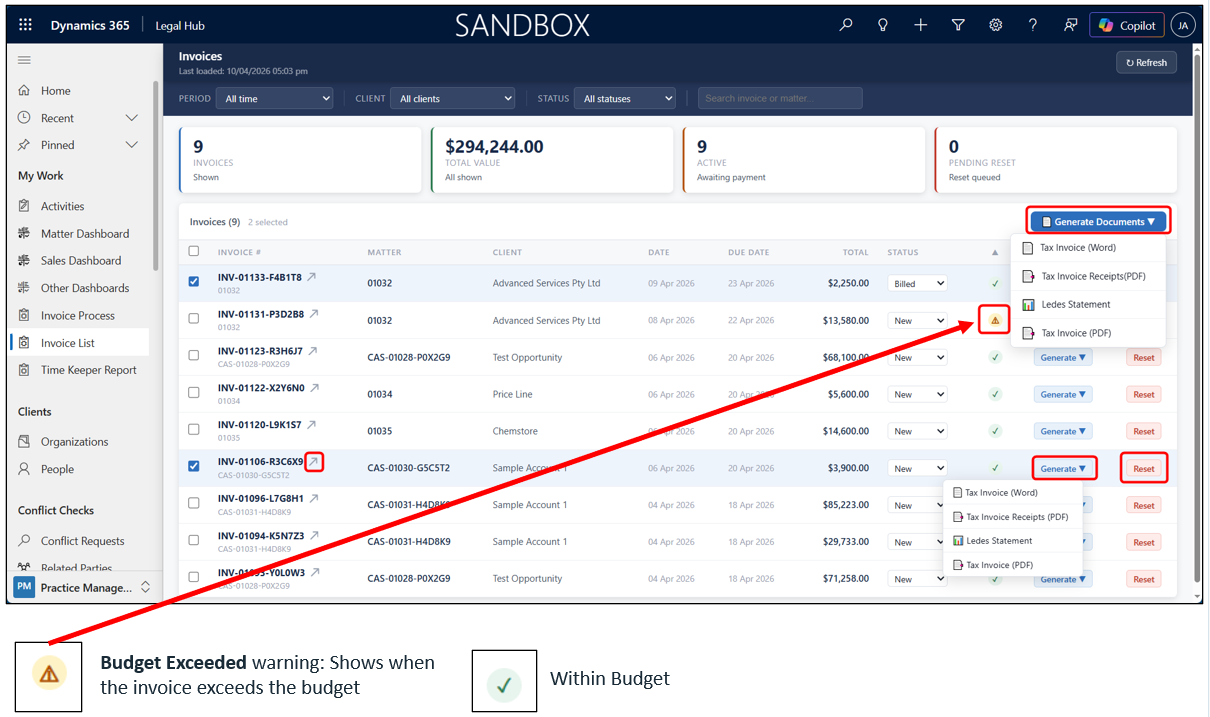
View and Manage Generated Invoices
Generating an Invoice
All generated invoices are accessible from Invoice List. From here you can generate documents, review line items, or reset an invoice.
- Navigate to Invoice List from the left navigation pane.
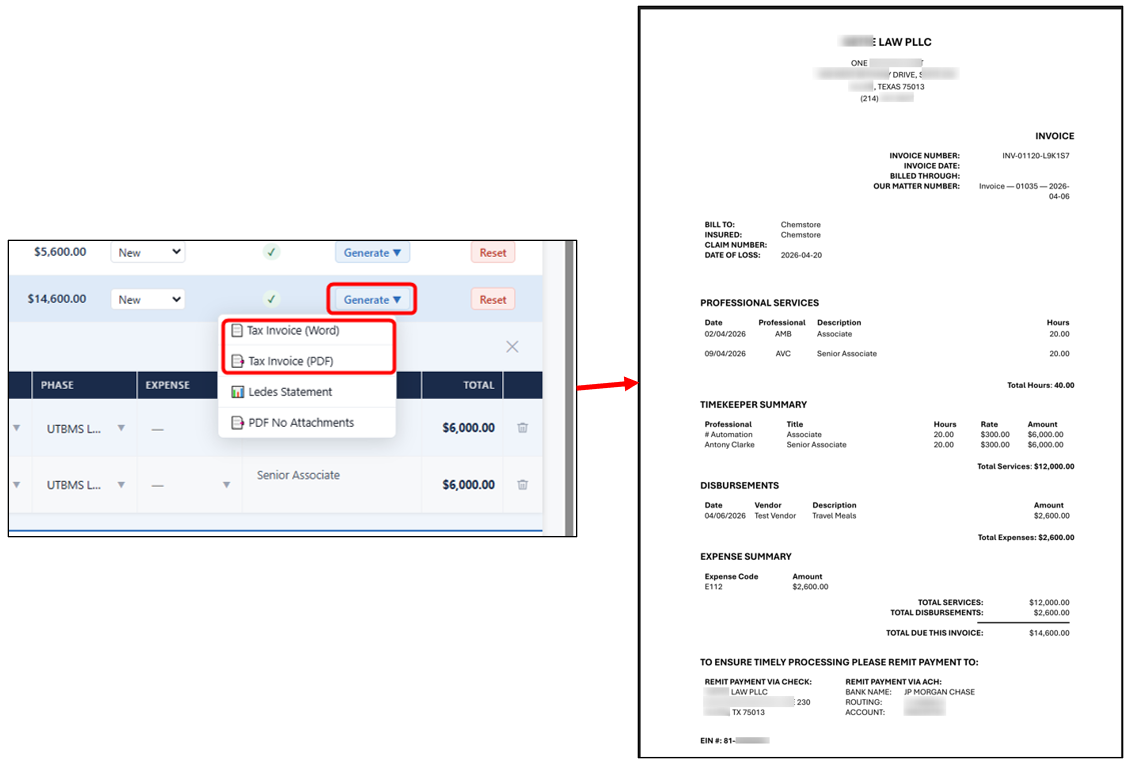
- Select multiple invoices → click Generate Documents → choose format (Tax Invoice Word/PDF, Ledes, PDF No Attachments).
- Click the arrow icon (↗) next to an invoice name to open the full invoice form.
- Click Reset on any invoice to reverse generation and return billing events to Pending.
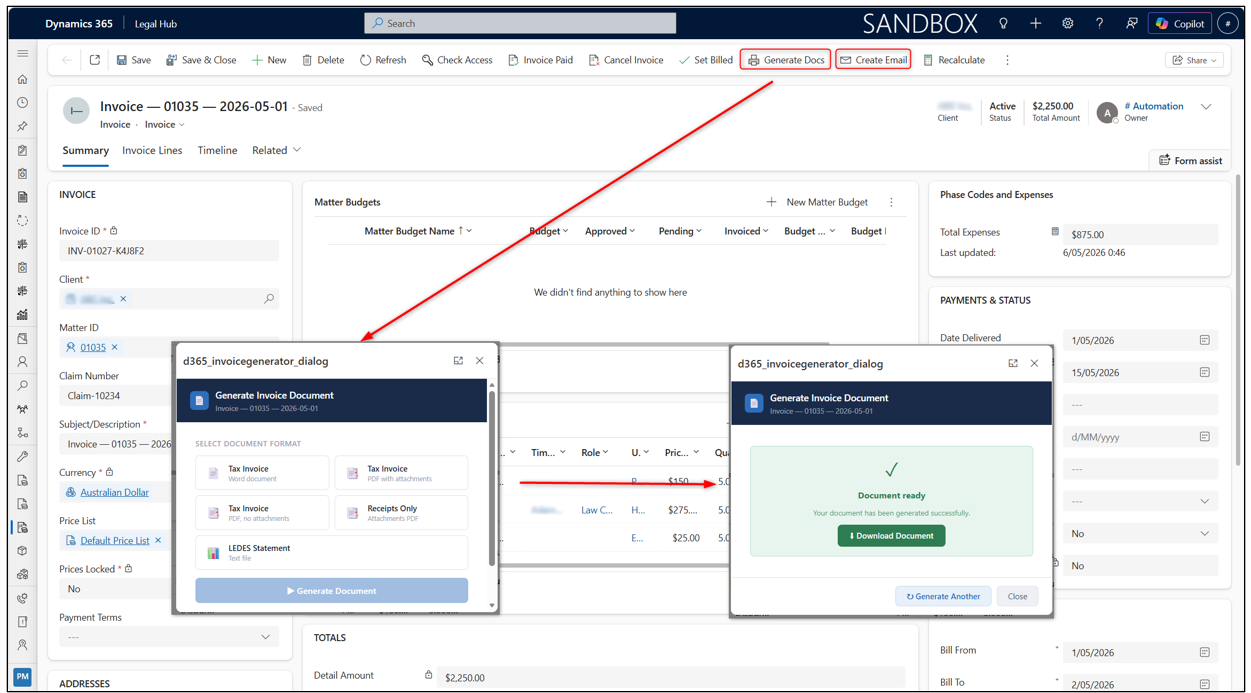
You can also generate Invoice documents from the actual Invoice form.
- Navigate to Invoice form.
- Click Generate Documents → choose format (Tax Invoice Word/PDF, Ledes, PDF No Attachments).
- A download link to the created document will appear.
- Click Create Email → a draft email will be created with the invoice attachment and will also be on Invoice timeline.
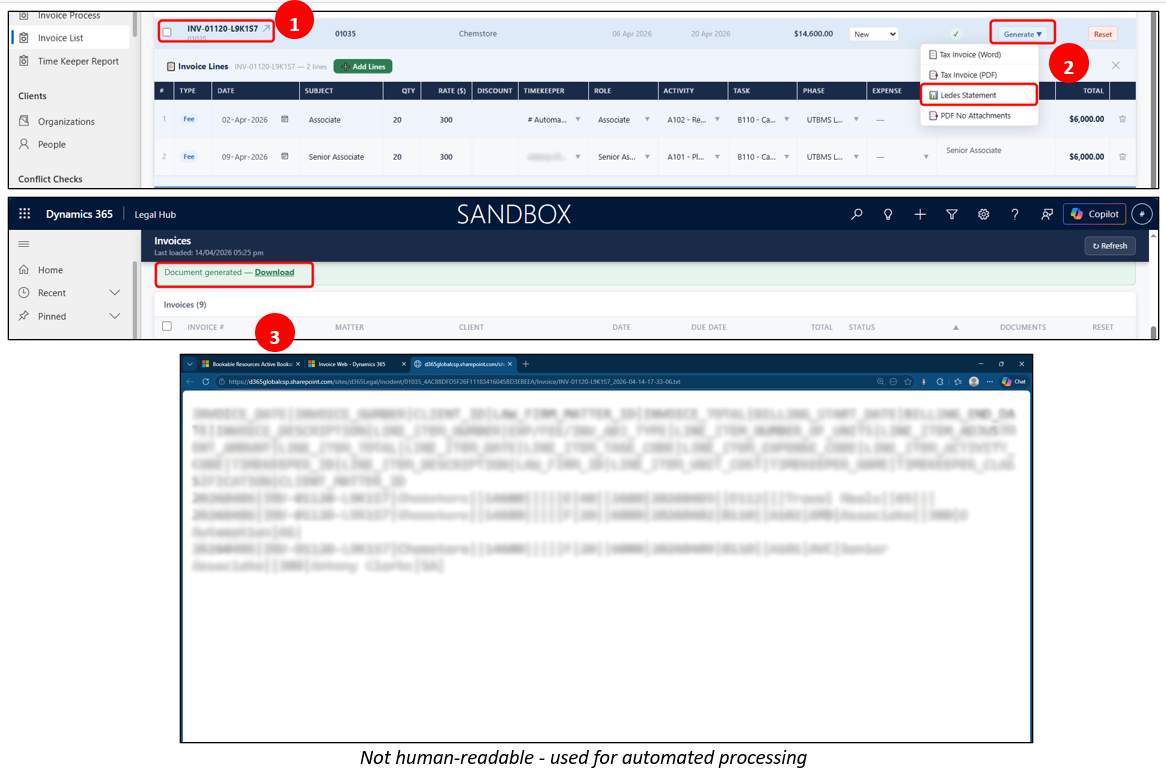
Invoice Output - LEDES Format
Invoices can be generated in LEDES format for standardized electronic billing submissions to corporate clients and insurance systems.
Key Components
- Invoice details (date, number, client)
- Line items (fees & expenses)
- Task, activity & expense codes
- Timekeeper & rates
- Navigate to Invoice List and select invoice(s).
- Click Generate Documents and Choose LEDES Statement.
- Click Download from confirmation message. A LEDES (.txt) file is generated.
Invoice Output - PDF / Word
Invoices can be generated as PDF or Word documents for client review, sharing, and payment processing.
Key Components
- Client & Matter details
- Billing Events (time entries)
- Expenses (disbursements)
- Total amount & payment details
- Navigate to Invoice List and select invoice(s).
- Click Generate Documents and choose Tax Invoice (PDF/Word).
- Click Download from confirmation message. A PDF (.pdf) or Word (.docx) invoice file is generated.
Invoice Adjustments
Edit Individual Line Items
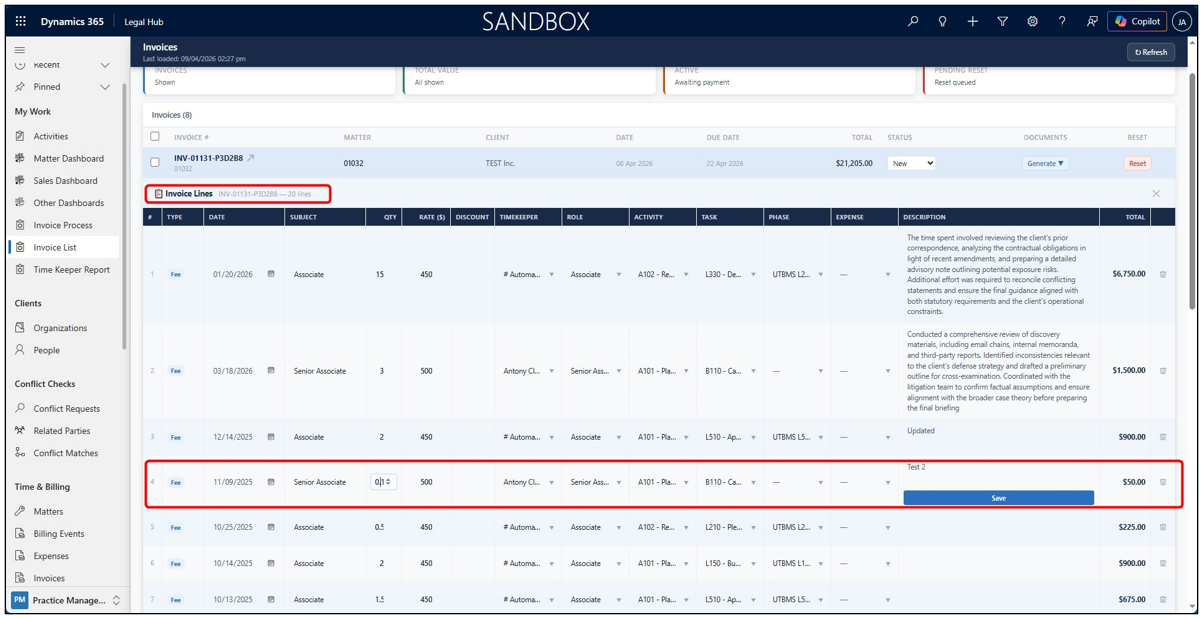
As long as an invoice status is set to New, its line items can be adjusted directly from the Invoice List.
- From Invoice List, click on an invoice row to expand it.
- Invoice Lines panel appears - click any field on a line item to edit it inline.
- A Save button appears - click it to confirm the change.
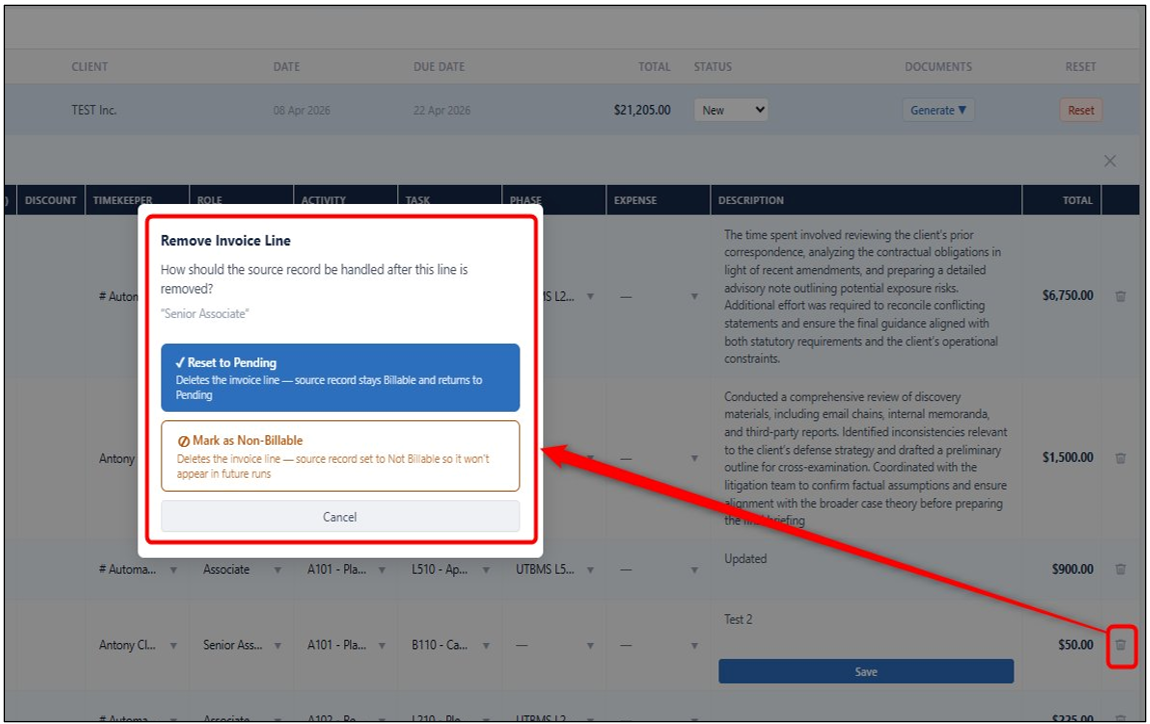
Remove Line Items from Invoice
Line items from invoice can be removed by pressing the delete icon.
- To remove a line item, click the delete (trash) icon on that line.
- Choose Reset to Pending (returns to billing events) or Mark as Non-Billable (excludes from future runs).
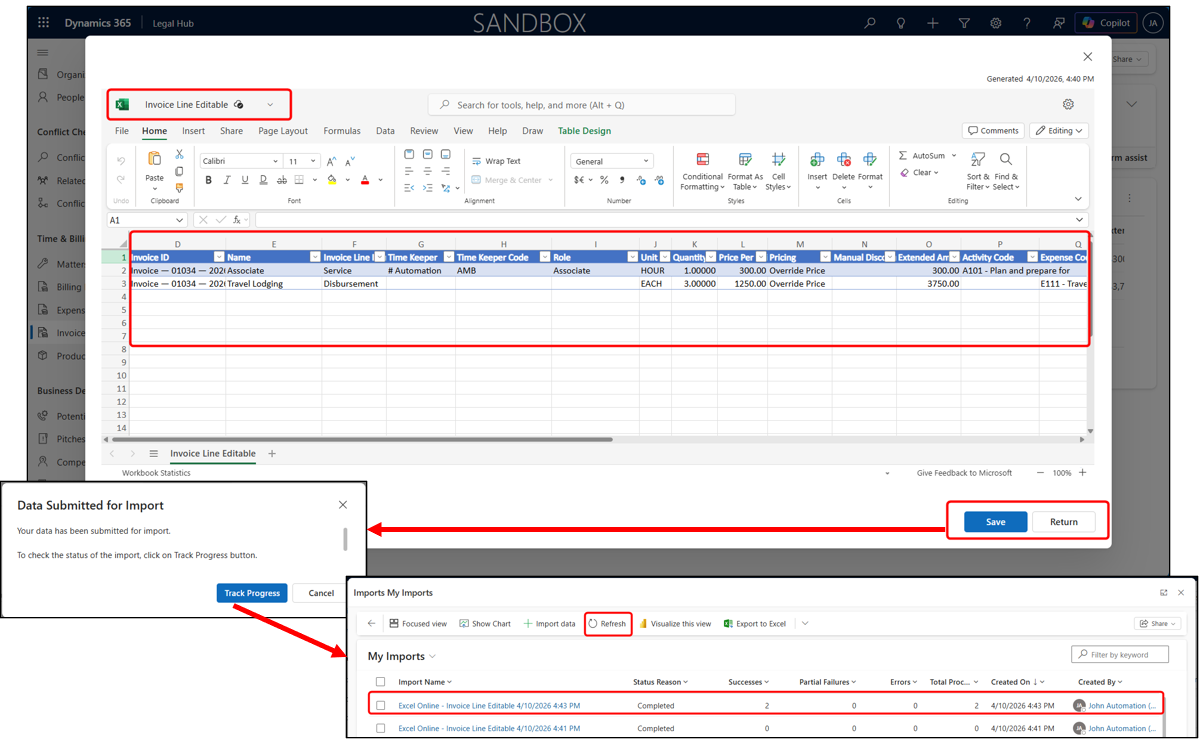
Bulk Edit Invoice Line Items
Part A
Bulk editing invoice line items using multi-select is no longer supported by Microsoft.
However, updates can still be performed using Excel Online export.
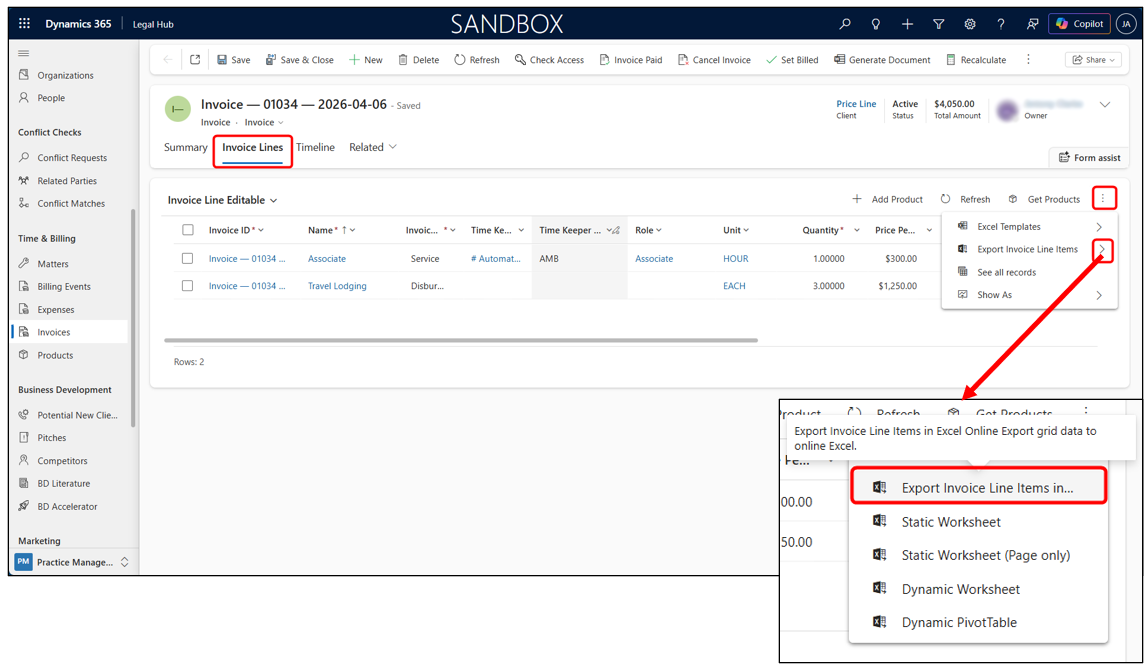
- From Invoice List, click the arrow icon (↗) next to an invoice to open the full form.
- Go to the Line Items tab.
- (Optional) Apply filters (e.g. Quantity, Activity Code) to narrow down the records you want to update.
- Click the three dots (⋯) → next to Export Invoice Line Items → select Export to Excel Online.
Part B
- The data will open in Excel Online.
- Make the required updates directly in Excel. Ensure lookup values (e.g. Time-Keeper) match exactly, otherwise updates will fail.
- Click Save to submit the changes.
- Click Track Progress to monitor the import process.
- Once completed, the Status Reason will show as Completed (refresh may be required), and changes will be reflected in the system.
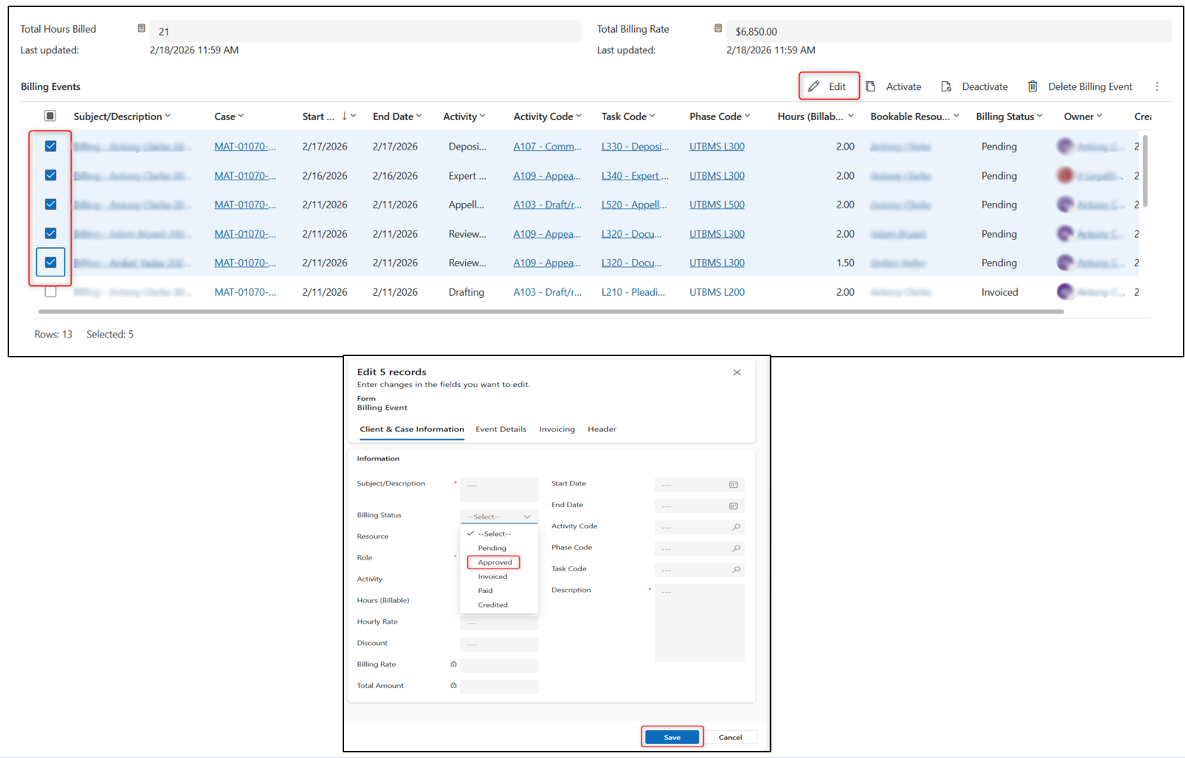
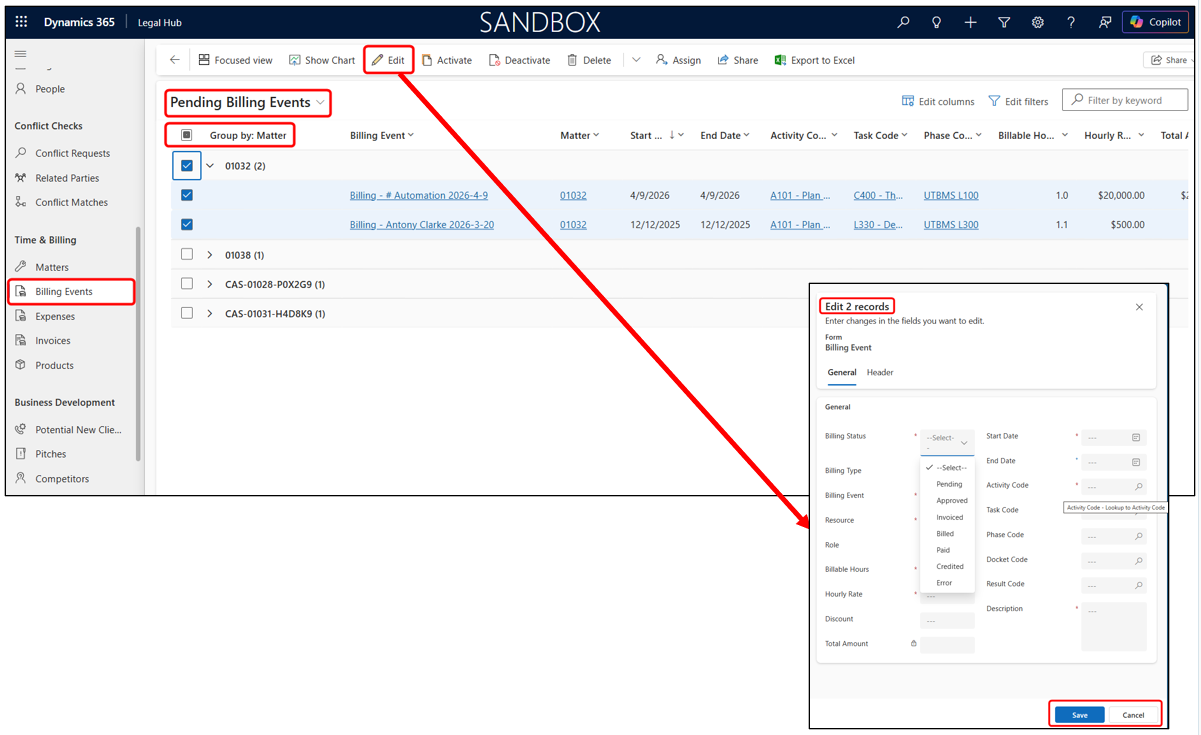
Bulk Edit Billing Events/Expenses (by Matter)
Pending billing events and expenses can be bulk-edited directly from the Billing Events view.
- Navigate to Time & Billing > Billing Events or Expenses.
- Change the View to Pending Billing Events (or Pending Expenses).
- Click the Matter column header → select Group by.
- Expand the Matter → tick the checkbox to select all events under it.
- Click Edit on the command bar → update fields in the quick edit panel → Save.
Change Invoice Status from Invoice List
Invoice status controls whether the invoice is still editable. Advance the status only when the invoice is finalised.
- Open the invoice from Invoice List or Time & Billing > Invoices.
- Change Status dropdown: New → Billed, Complete, or Cancel.
- Billed invoice becomes read-only; no further line-item edits possible.
-
- Complete - When invoice is marked as paid, it will show as complete.
- Cancelled - voids the invoice.
- To adjust the invoice, status of the invoice must be set to New.

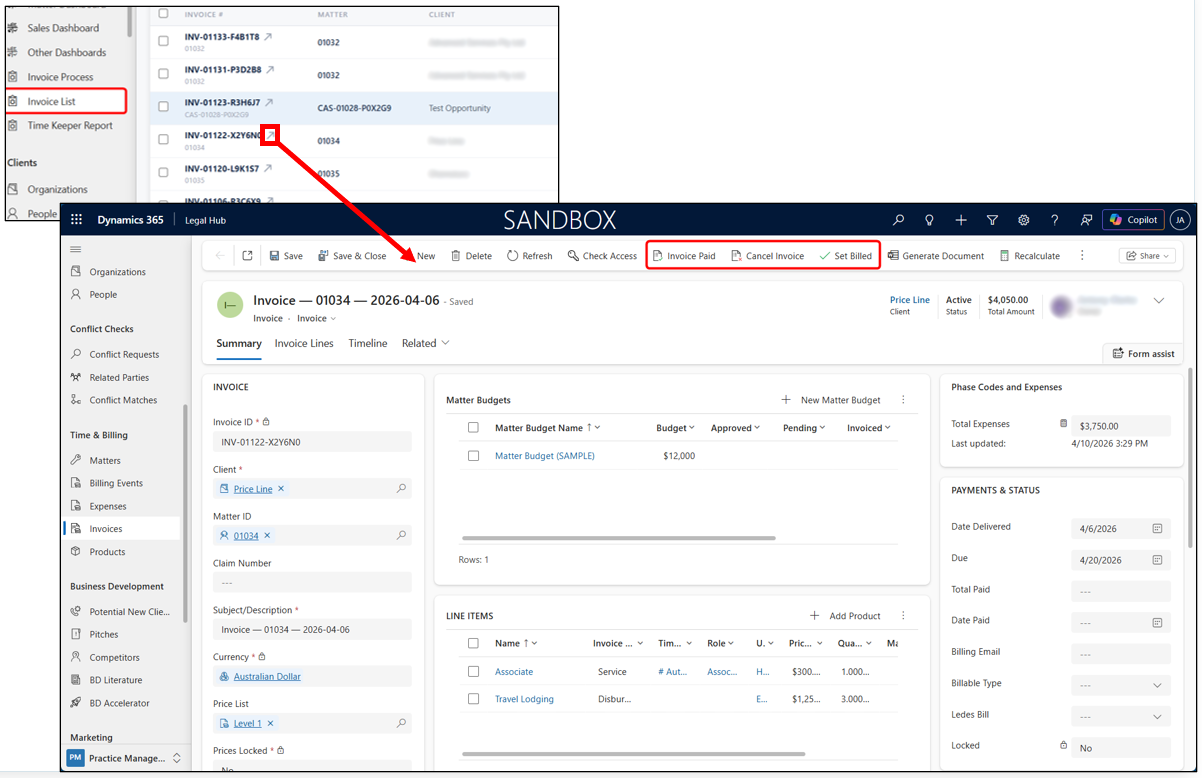
Change Invoice Status from Invoice Form
Invoice status can also be updated directly from the invoice form for more detailed control.
-
Open the invoice from Invoice List by clicking the arrow icon (↗) next to an invoice name.
-
On the invoice form, use the top command bar to update the status:
- Invoice Paid
- Set Billed
- Cancel Invoice
-
The updated status will be reflected in the Invoice List automatically.
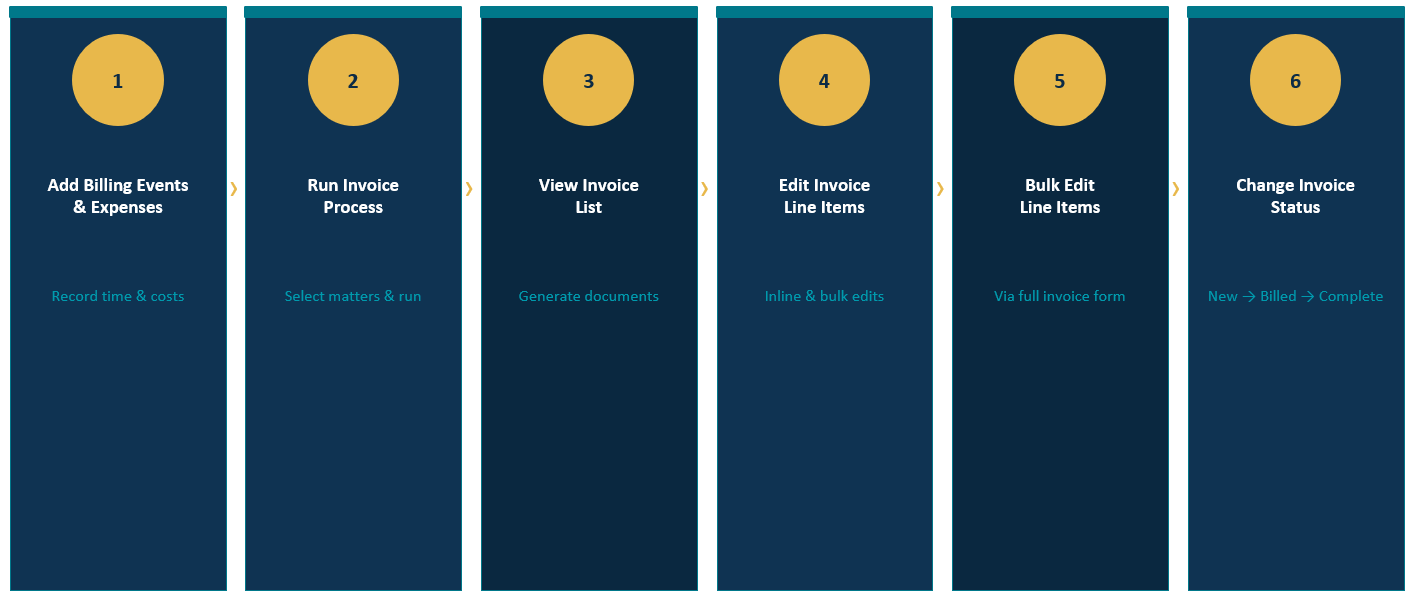
Summary
Here is the process flow from billing events through to finalised invoices.