Dynamics 365 App for Outlook Administration Guide
Introduction
The Dynamics 365 App for Outlook provides a seamless connection between your organization’s email and its CRM data, allowing users to track communications and manage records directly from their inbox. This guide is designed to help administrators navigate the centralized deployment process, ensuring that the integration is stable, secure, and properly configured for the entire team.
Dynamics 365 App for Outlook can be used with Business Central, allowing users to view customer and vendor records, manage business interactions, and create documents directly from Outlook. This integration enhances productivity by streamlining workflows between the two applications.
By the end of this guide, you will have enabled the necessary server-side synchronization and pushed the app to all eligible users from the Power Platform Admin Center. This cloud-based approach eliminates the need for manual local installations and provides your team with a lightweight, high-performance tool that improves data integrity and boosts daily productivity.
This guide provides administrators with the steps required to:
-
Security roles and permissions
-
Configure server-side synchronization
-
Enable user mailboxes
-
Deploy the app to users
-
Validate the setup
The deployment is fully cloud-based and managed centrally via the Power Platform Admin Center, eliminating the need for manual installations.
Security Roles and Permissions
Before configuring or deploying Dynamics 365 App for Outlook, ensure the required security roles and privileges are assigned to both administrators and end users.
Administrator Roles
For full setup and troubleshooting, the administrator should have:
-
System Administrator
Required to configure environment settings, manage mailboxes, run Test & Enable Mailbox, and complete deployment activities. -
Delegated Mailbox Approver (optional, when mailbox approval is delegated)
This role allows mailbox approval without requiring the user to be a Microsoft 365 Global Admin or Exchange Admin. However, Microsoft also requires this user to have the System Administrator role in Dynamics 365.
End User Role
Users who need to access the app in Outlook should be assigned:
- Dynamics 365 App for Outlook User
This is the standard built-in role for App for Outlook access. It provides the base privileges required to use the app. Additional business roles may still be needed depending on what tables or features the user must access.
Important Privilege
If using a custom role instead of the built-in Outlook role, make sure it includes:
- Use Dynamics 365 App for Outlook
This privilege is required for App for Outlook access and is in the security role under:- Business Management > Privacy Related Privileges.
Additional Note
If you assign the Dynamics 365 App for Outlook User role to a team, Microsoft notes that the privilege does not automatically propagate to the users in that team. Assign the role directly to users where needed.
Administration Configuration
The administrator configures integration through the Power Platform Admin Center and the Dynamics 365 Settings area. Because this app relies on cloud-to-cloud communication, the configuration happens entirely within the web browser.
Configure Server-Side Synchronization
This is the most critical prerequisite.
Steps:
-
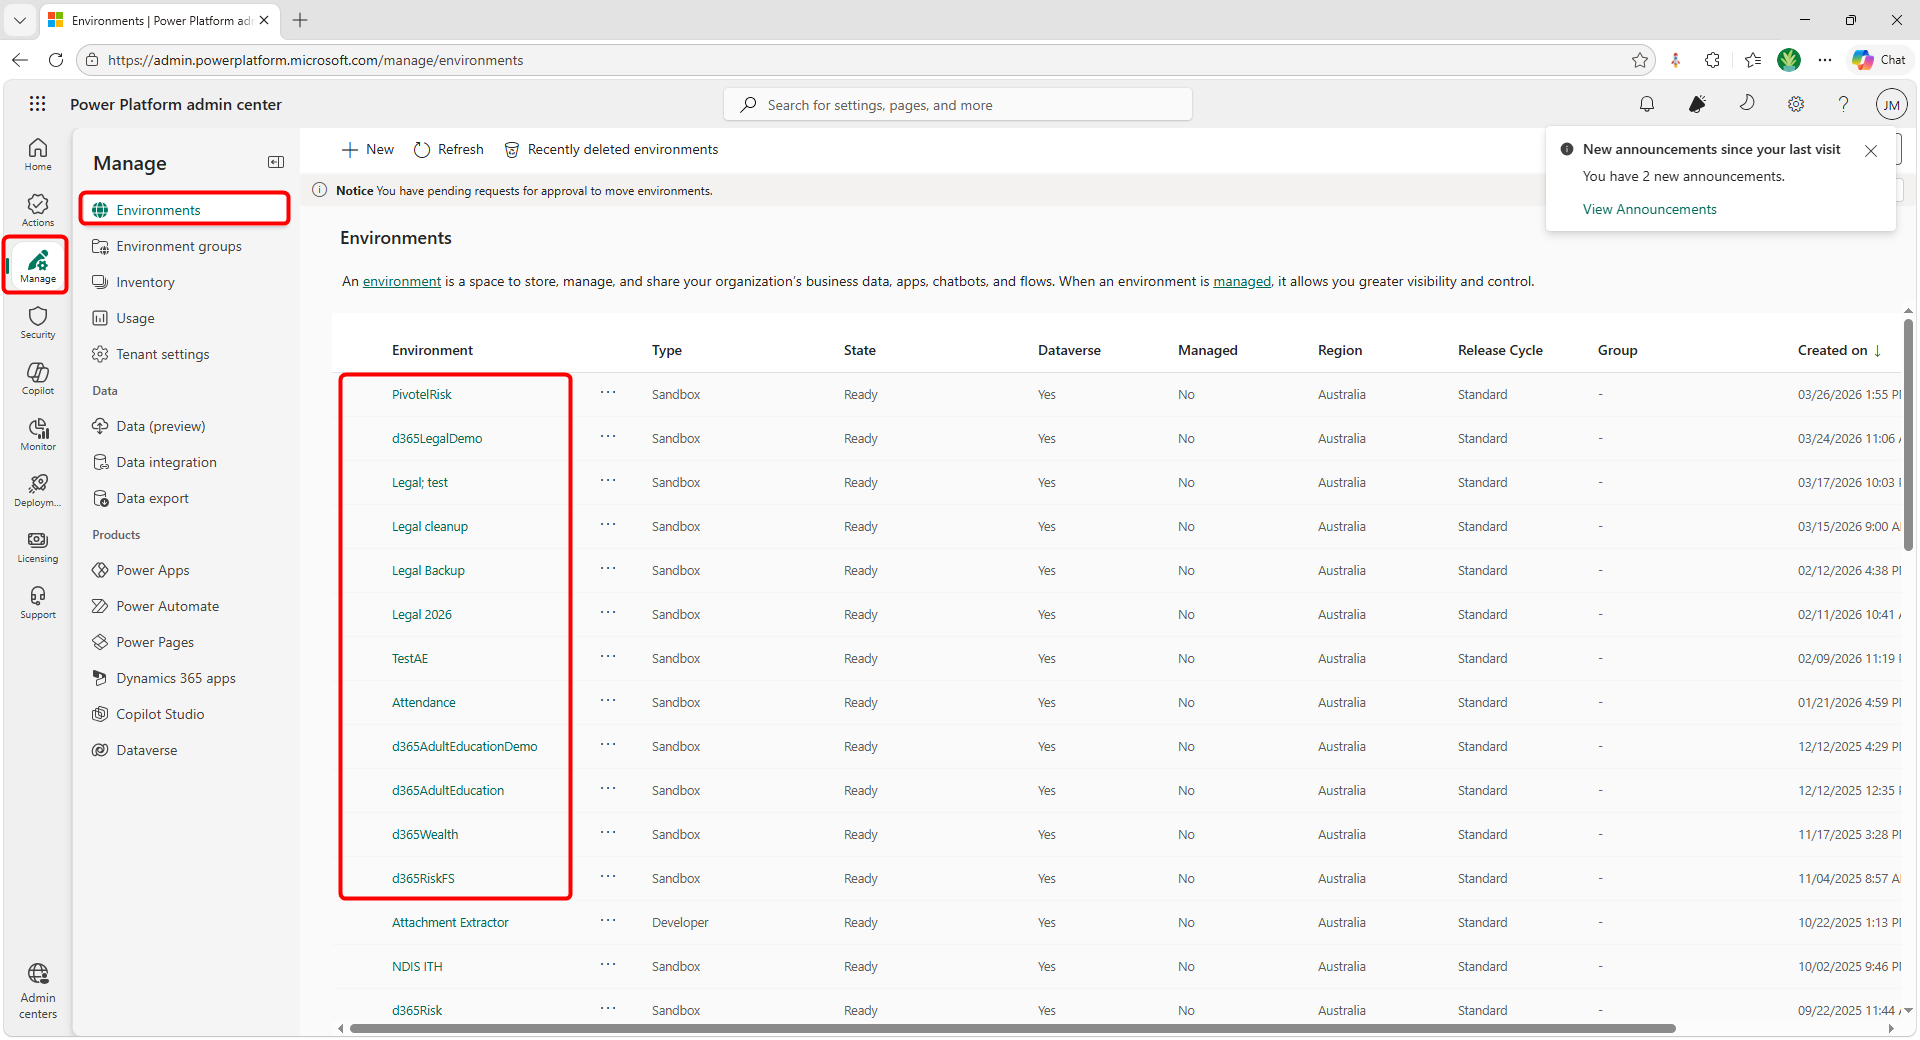
Go to Power Platform Admin Center (https://admin.powerplatform.microsoft.com/ )
-
Navigate to:
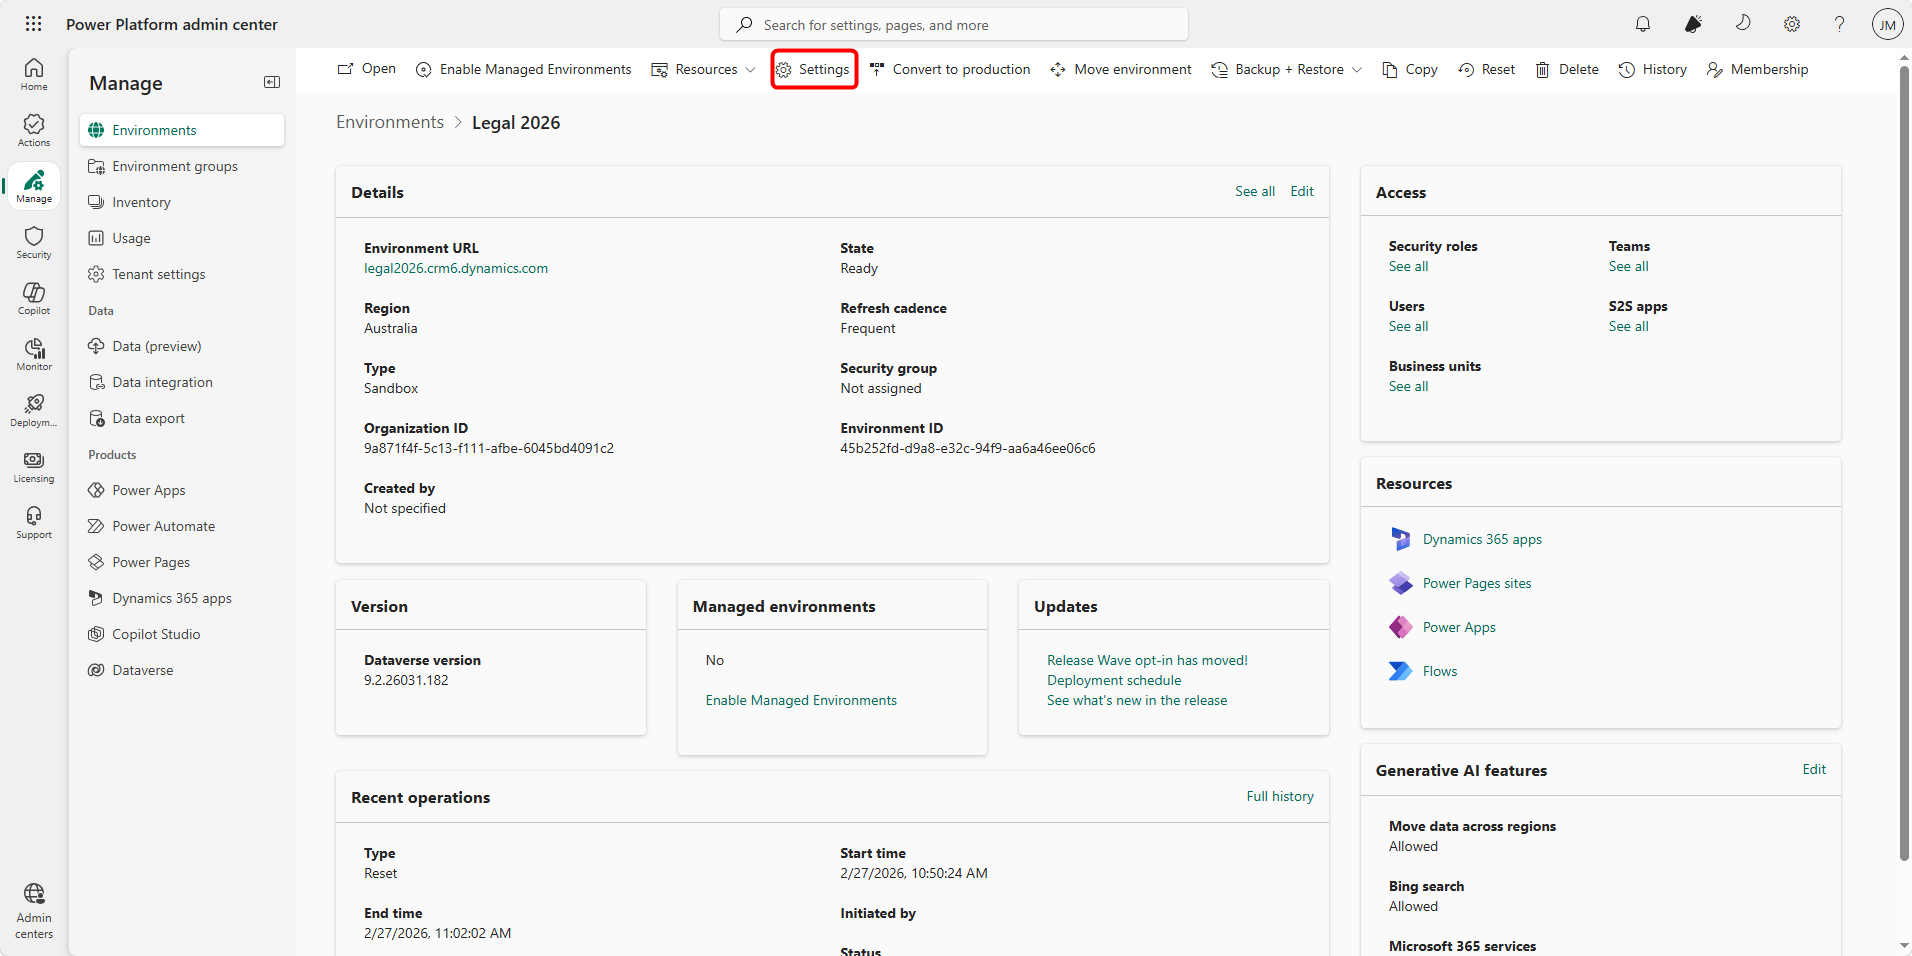
Manage > Environments
Select Environment > Settings
-
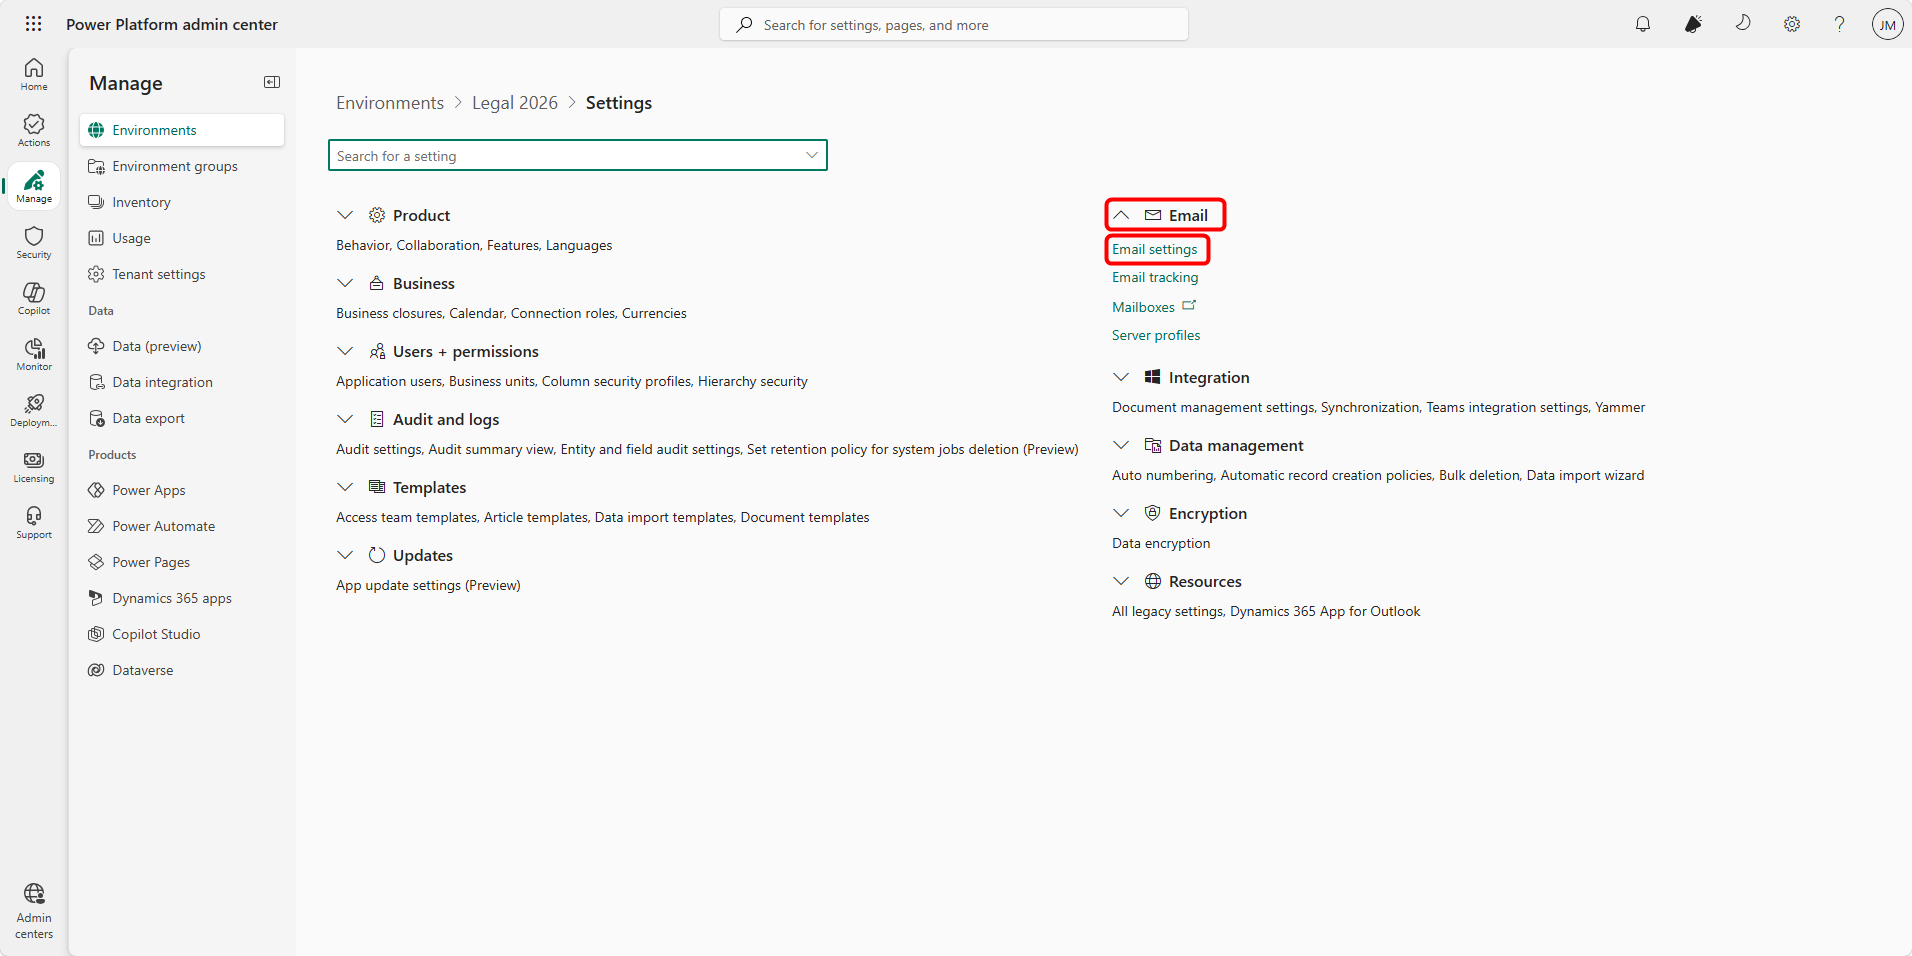
Expand the Email section.
-
Click on Email settings
a. Under Synchronization methods, configure the following:
b. Server Profile:
Select Microsoft Exchange Onlinec. Incoming Email:
Set to Server-Side Synchronizationd. Outgoing Email:
Set to Server-Side Synchronizatione. Appointments, Contacts, and Tasks (optional but recommended):
Set as required (commonly Server-Side Synchronization or None, depending on business needs)
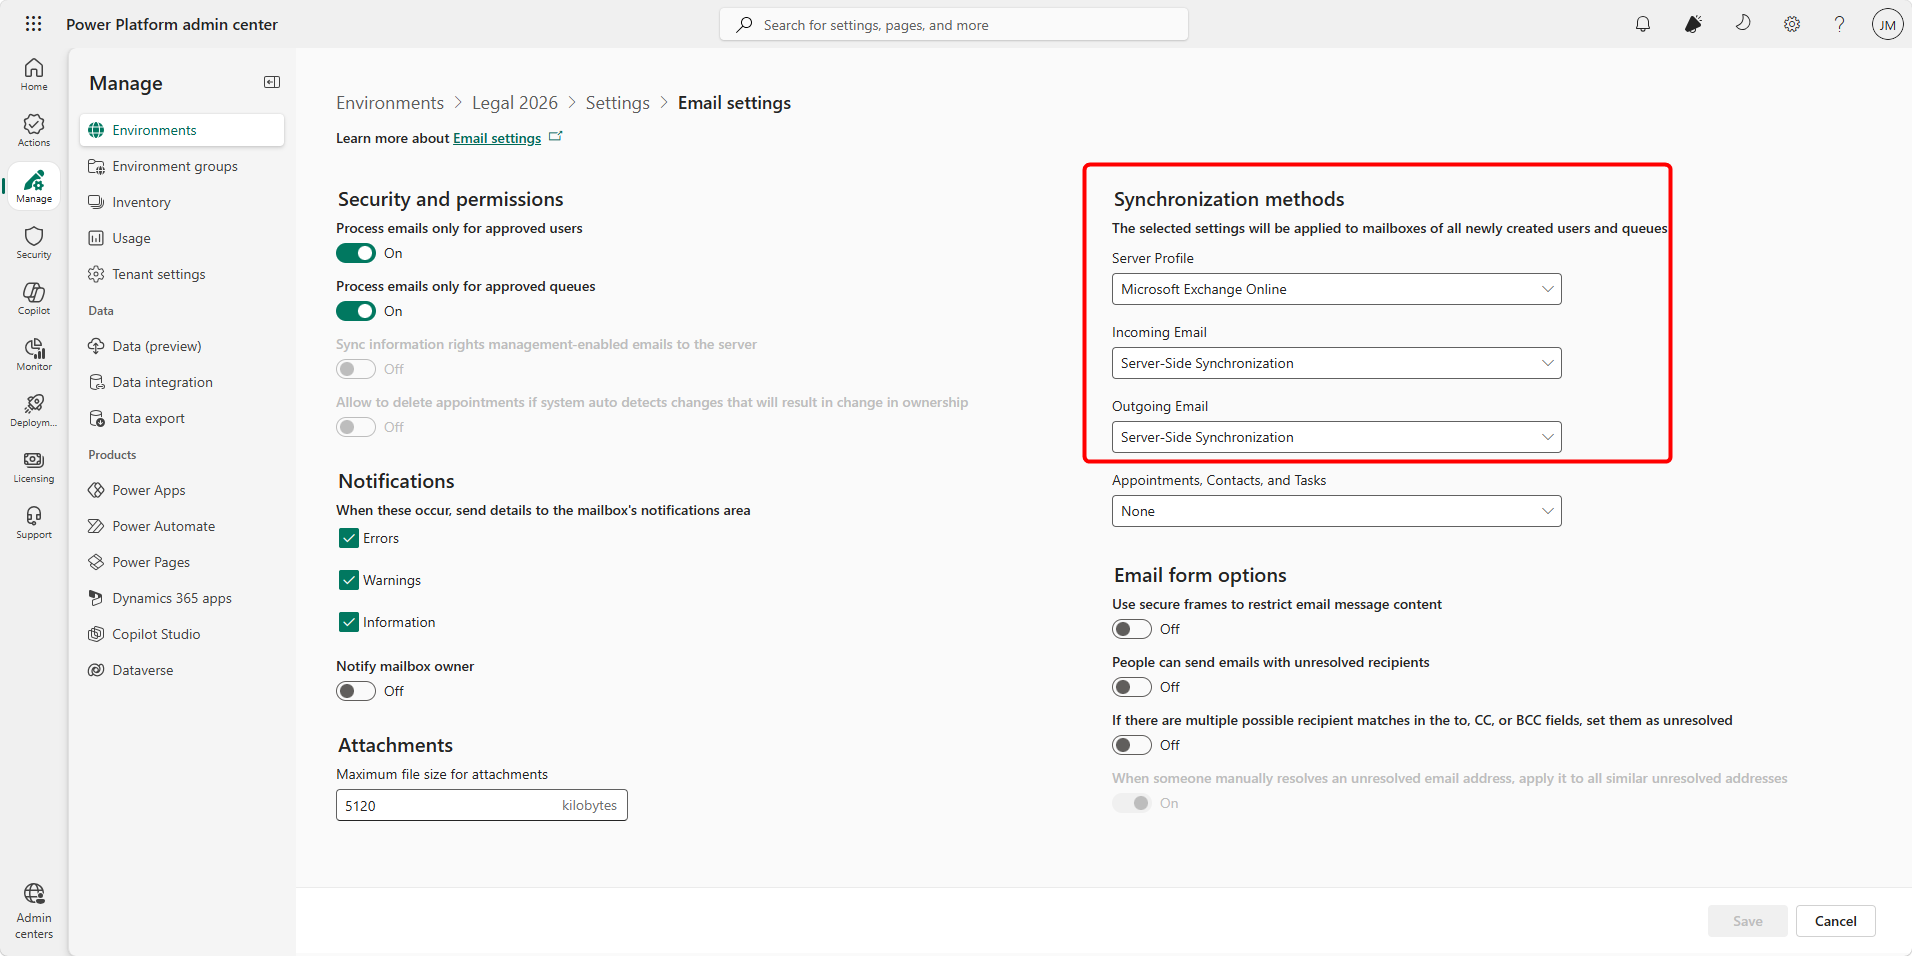
- Click Save.
Enable and Test User Mailboxes
Steps:
-
Go to your Dynamics 365 app (e.g., Sales Hub)
-
Navigate to Settings → Advanced Settings → System → Email Configuration → Mailboxes
a. OR, Power Platform Admin Center → Environment → Settings → Email → Mailboxes
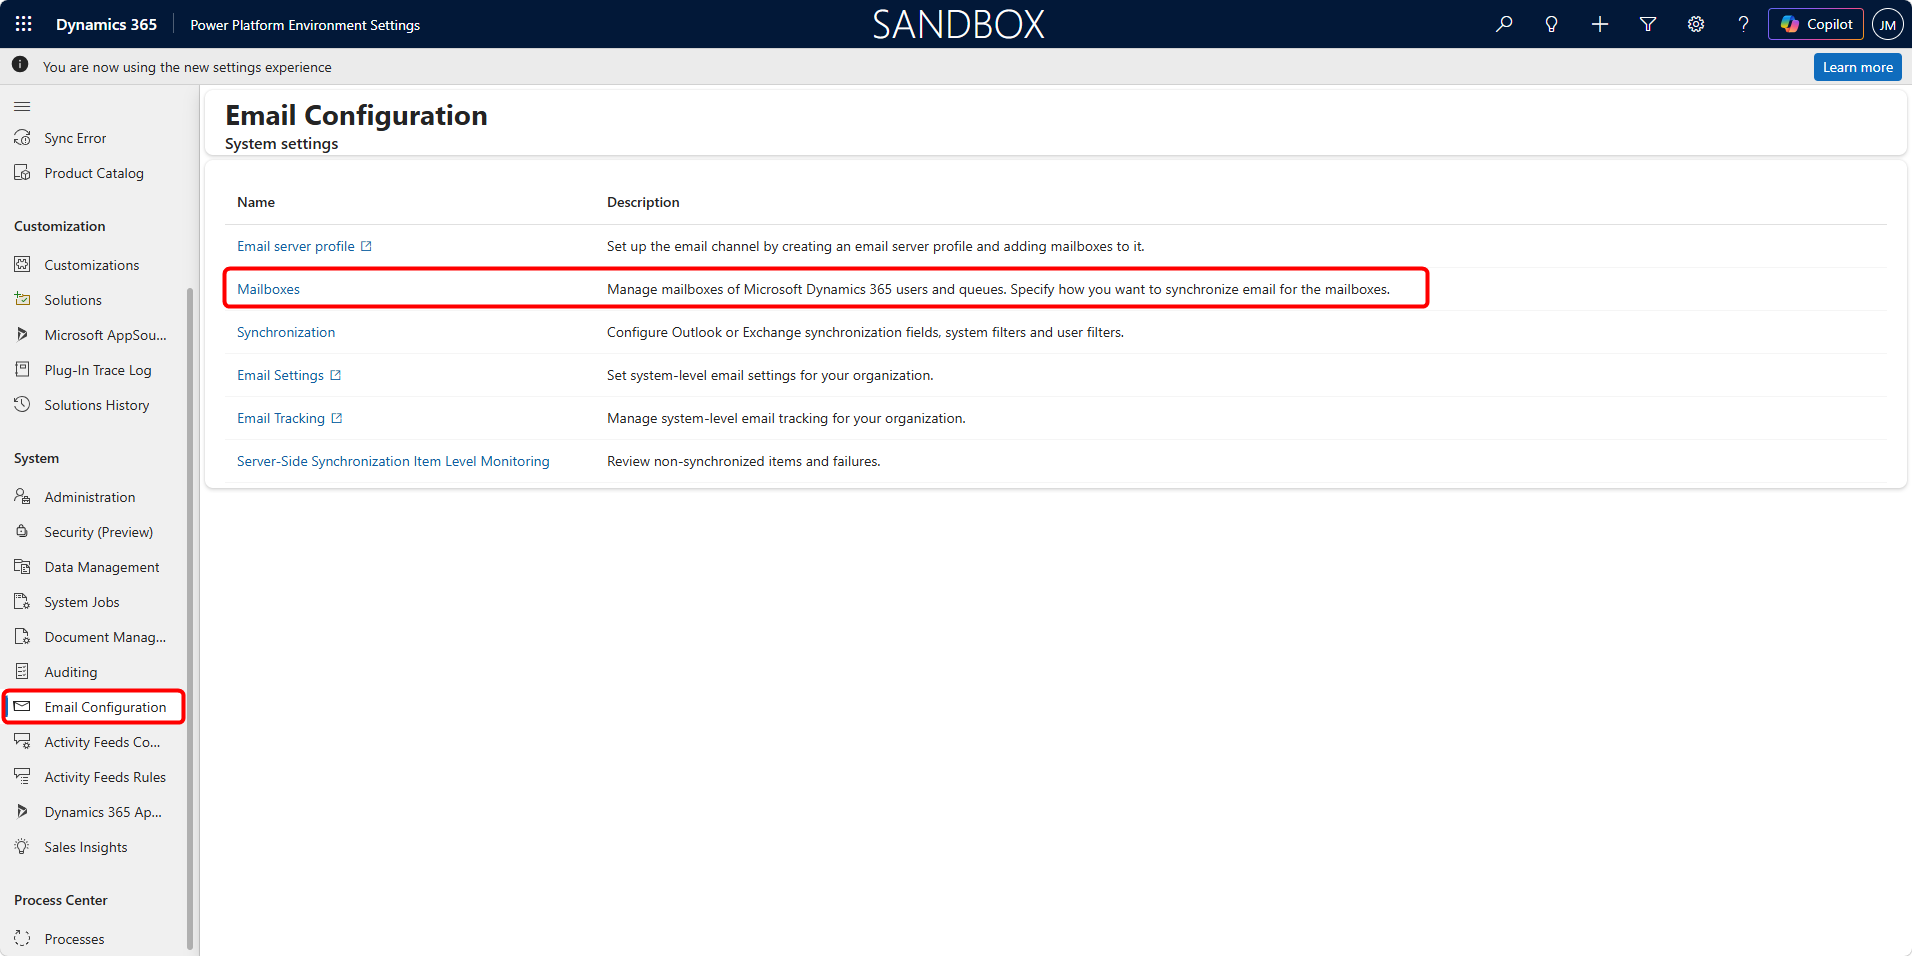
-
Select user mailbox(es).
-
Click:
a. Approve Email
b. Test & Enable Mailbox
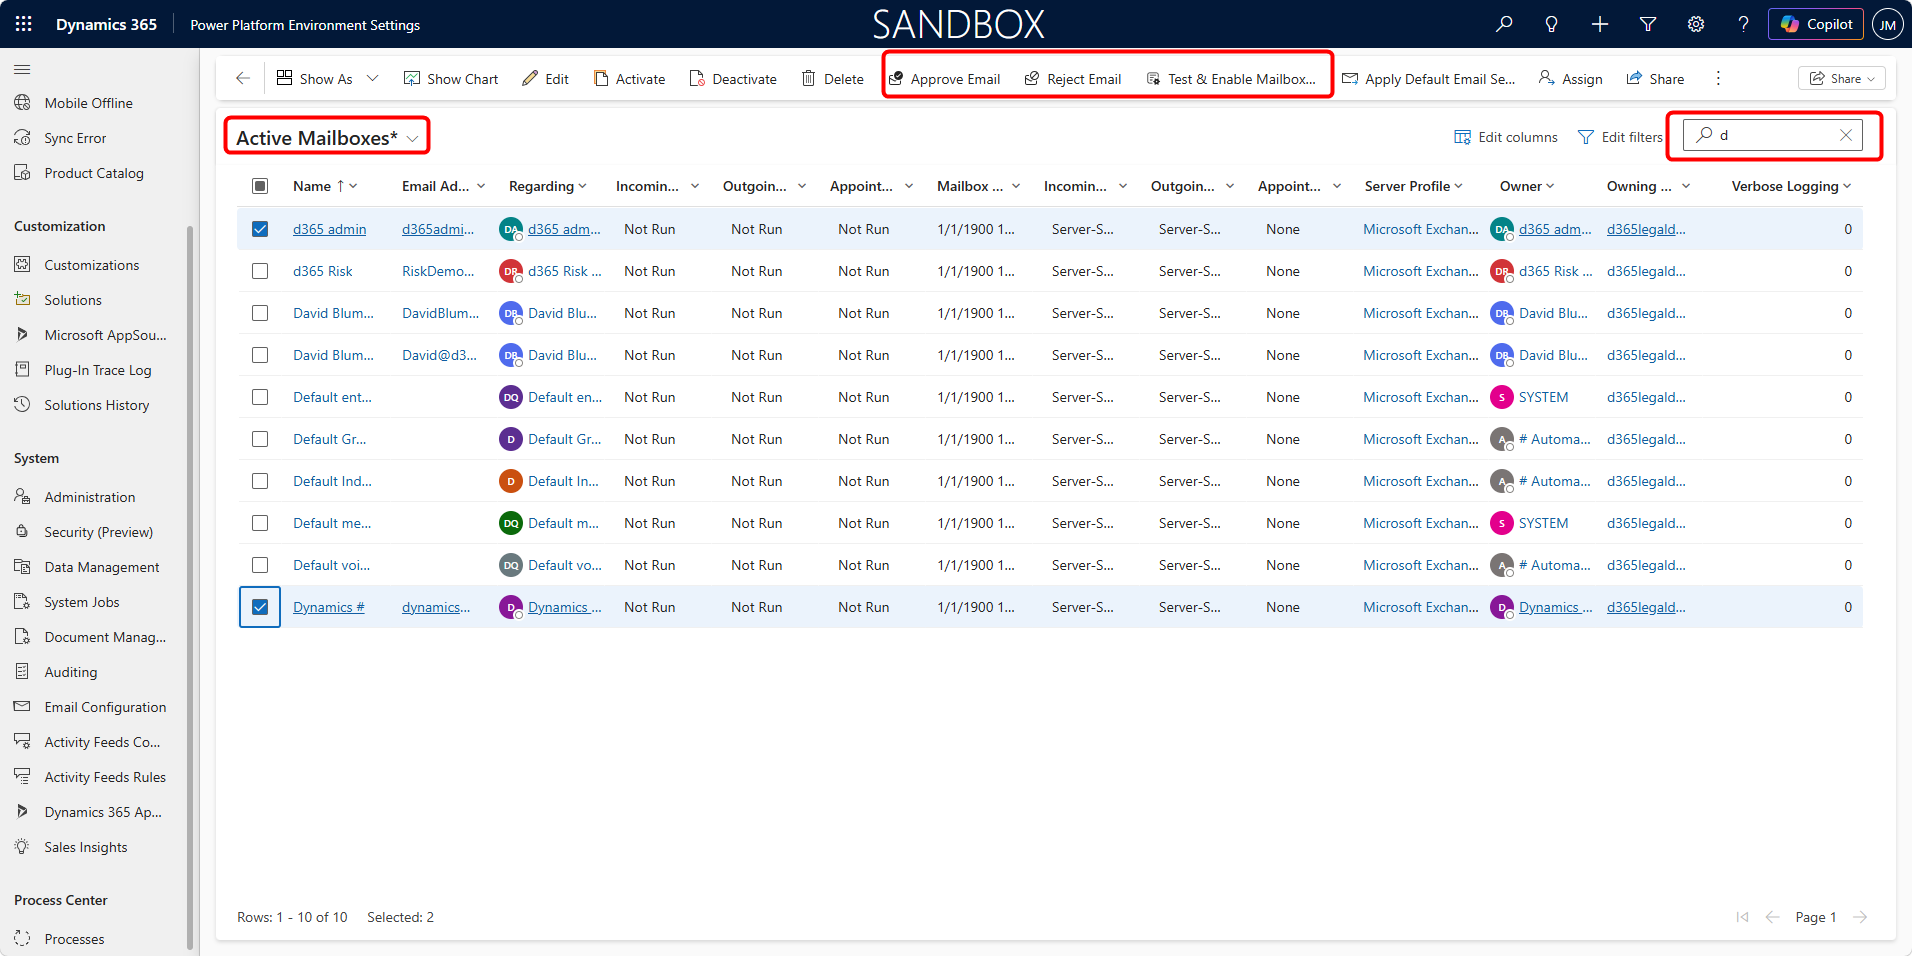
-
Wait for status:
a. Incoming Email → Success
b. Outgoing Email → Success
c. Appointments, Contacts, Tasks → Success
This step is mandatory. Without it, the Outlook app will not work.
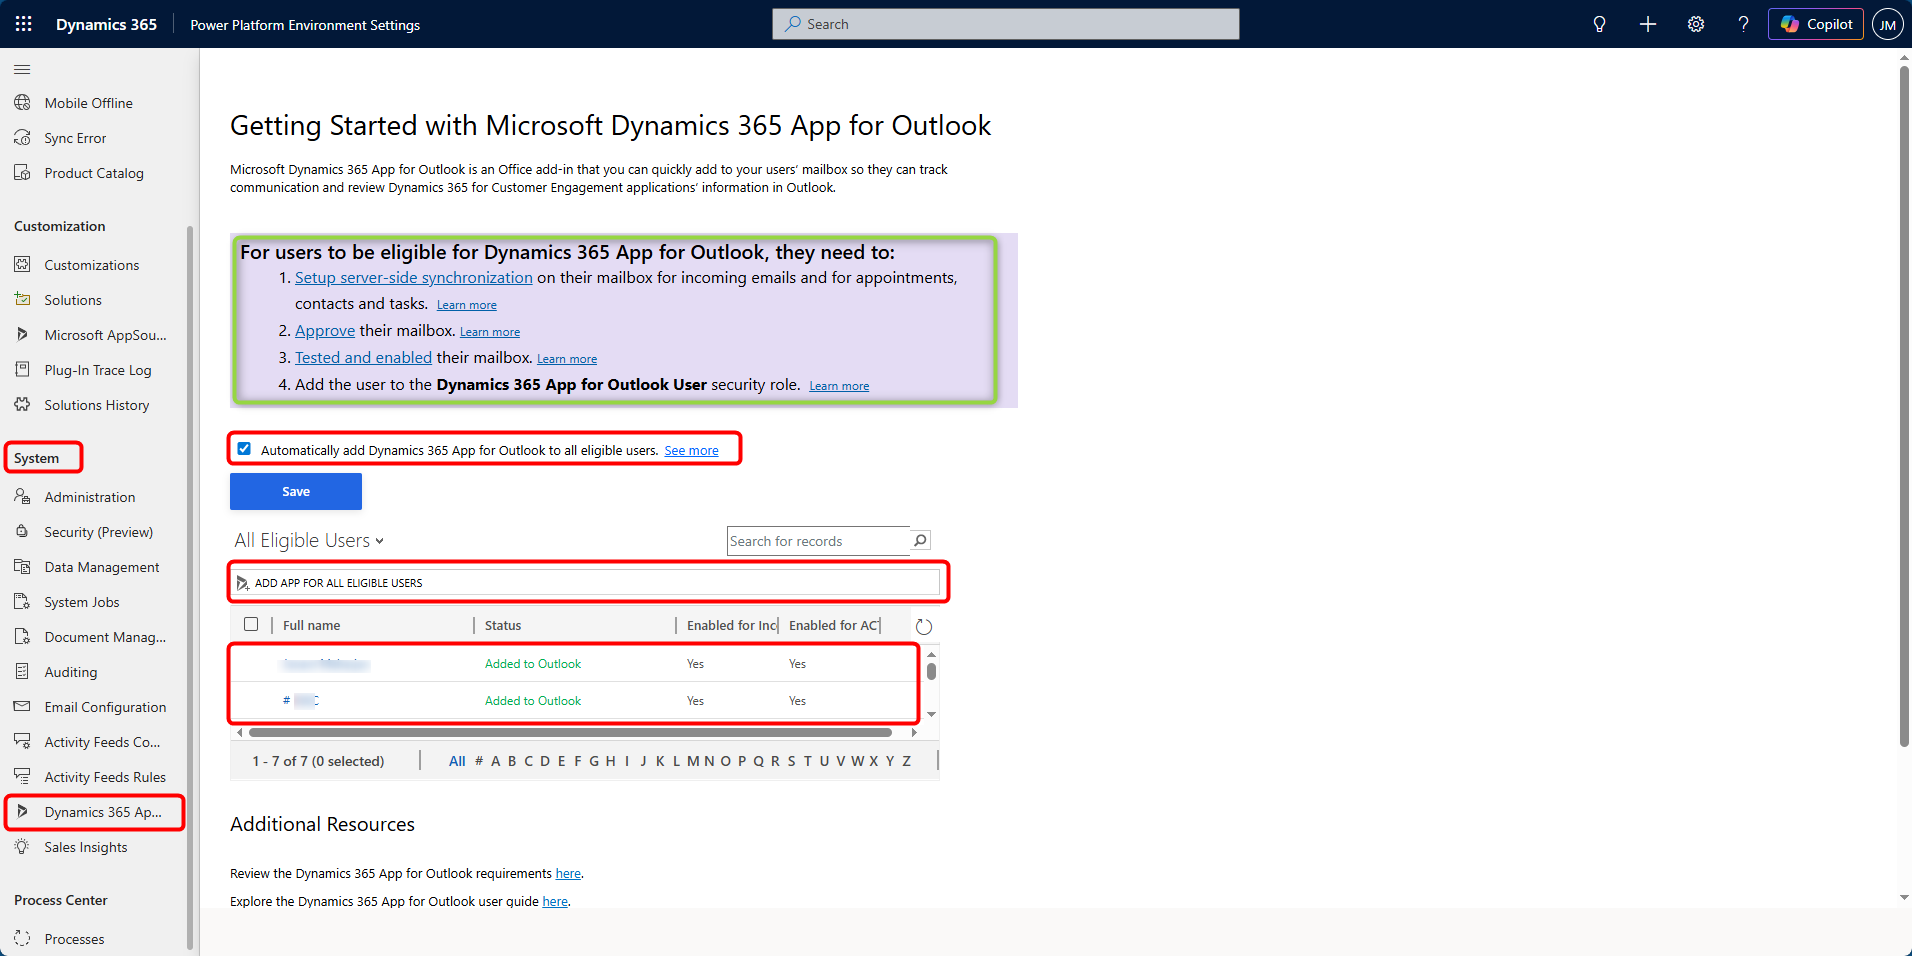
Deploy Dynamics 365 App for Outlook
Steps:
-
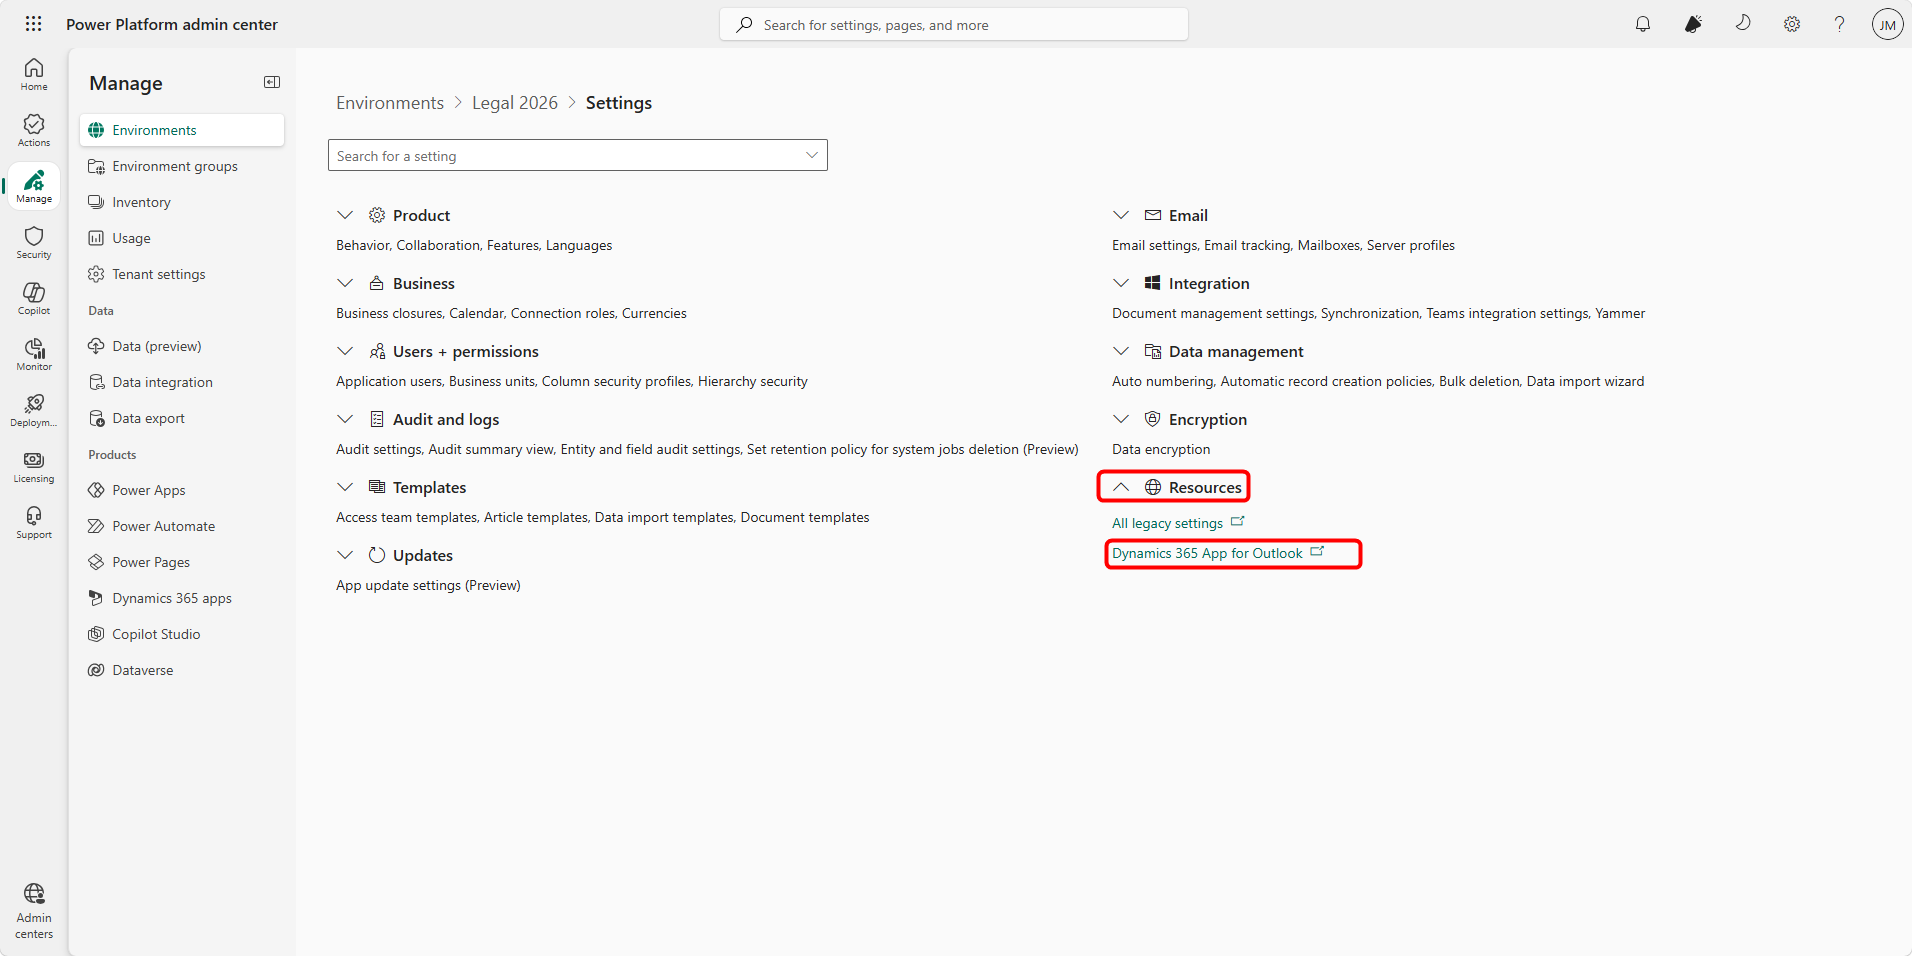
Go to Power Platform Admin Center > Environment > Settings > Dynamics 365 App for Outlook
a. OR Dynamics 365 app > Settings > Advanced Settings > System > Dynamics 365 App for Outlook
-
You will see a list of users:
a. Eligible
b. Not Eligible
-
Select users and choose:
a. Add app to Outlook
-
Recommended:
a. Enable “Automatically add app for eligible users”
-
Alternative:
a. Use “Add app for all eligible users”
-
Status meanings:
a. Pending → Deployment in progress
b. Added to Outlook → Successfully deployed
Important Update (Key Change)
In modern environments:
-
The app is often automatically available once mailbox + sync is configured
-
Manual pushing is becoming less necessary in newer tenants
App User Requirements
Windows Requirements
For the best experience on Windows 10 and Windows 11, the app relies on the Microsoft Edge WebView2 runtime.
-
Recommended Browsers: Microsoft Edge (Chromium-based), Google Chrome, or Mozilla Firefox.
-
Key Detail: Even if you use Chrome as your default browser, Outlook Desktop uses the Edge (WebView2) component to display the Dynamics 365 pane.
-
Legacy Warning: Support for Internet Explorer 11 and “Legacy” Edge (non-Chromium) has been discontinued. If your Windows version is older than 1903 or your Office version is outdated, the app may fail to load.
macOS Requirements
On Mac, the app’s performance is tied directly to the version of Safari installed on the OS.
-
Required Browser: Apple Safari version 16 or higher must be installed.
-
Supported Browsers: Microsoft Edge, Google Chrome, and Mozilla Firefox (latest versions).
-
Note: While you can use Chrome or Edge to access “Outlook on the Web,” the Outlook Desktop for Mac client specifically uses WebKit (Safari’s engine) to render the Dynamics 365 App for Outlook pane.
Mobile Requirements (iOS & Android)
The “App for Outlook” is accessed within the Outlook Mobile App rather than a standalone mobile browser.
-
iOS: Requires the latest three major versions of iOS/iPadOS and the Safari engine.
-
Android: Requires the latest three major versions of Android and the Google Chrome engine.
-
Restriction: The Dynamics 365 App for Outlook is not supported when opening Outlook.com through a mobile web browser (like mobile Safari or mobile Chrome). You must use the official Outlook app from the App Store or Play Store.
User Installation (Self-Service)
In modern Dynamics 365 environments, manual user installation is rarely required.
Once:
-
Mailbox is enabled
-
Server-side sync is working
-
App is deployed by admin
The app automatically appears in Outlook
When is Self-Service Needed?
Only if:
-
Admin has NOT pushed the app
-
Or user is not automatically provisioned
Correct Steps (If Required)
-
Go to️ Settings (top right corner) in Dynamics 365 app (e.g., Sales Hub)
-
Click Advanced Settings (This opens the classic settings area, still required for this step)
-
Navigate to System→ Dynamics 365 App for Outlook
-
Select user record
-
Click Add App to Outlook
Testing the App in Outlook
Once installed, the app will appear in your Outlook interface (provided by your IT or system admin). The quickest way to test the access to Outlook is from the Microsoft 365 suite of applications under Apps. You can access this on your web browser from Microsoft Teams after you sign in to your Dynamics 365 account.
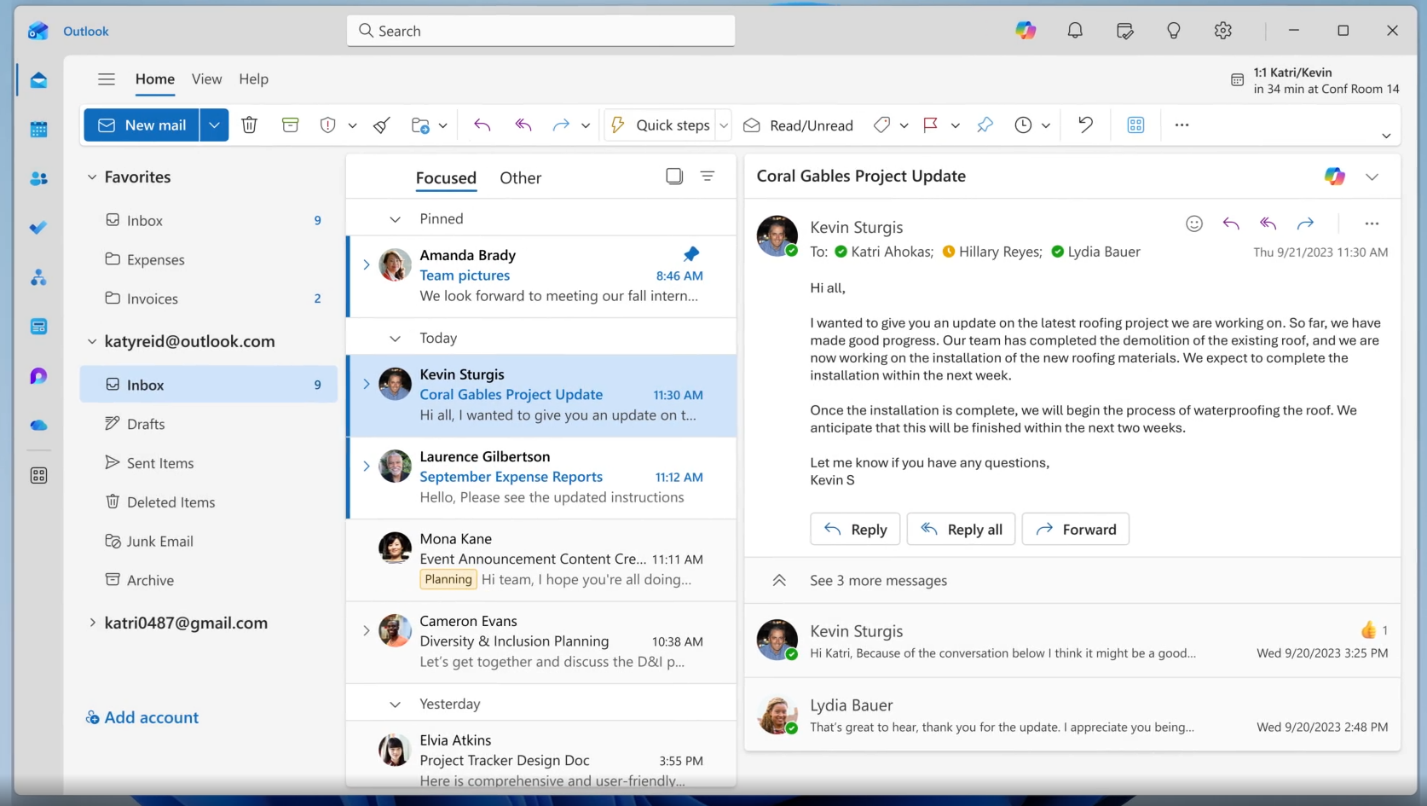
Note that it may take some time (a few minutes) to appear after being added. If it does not appear, request help from your local IT department or system admin.
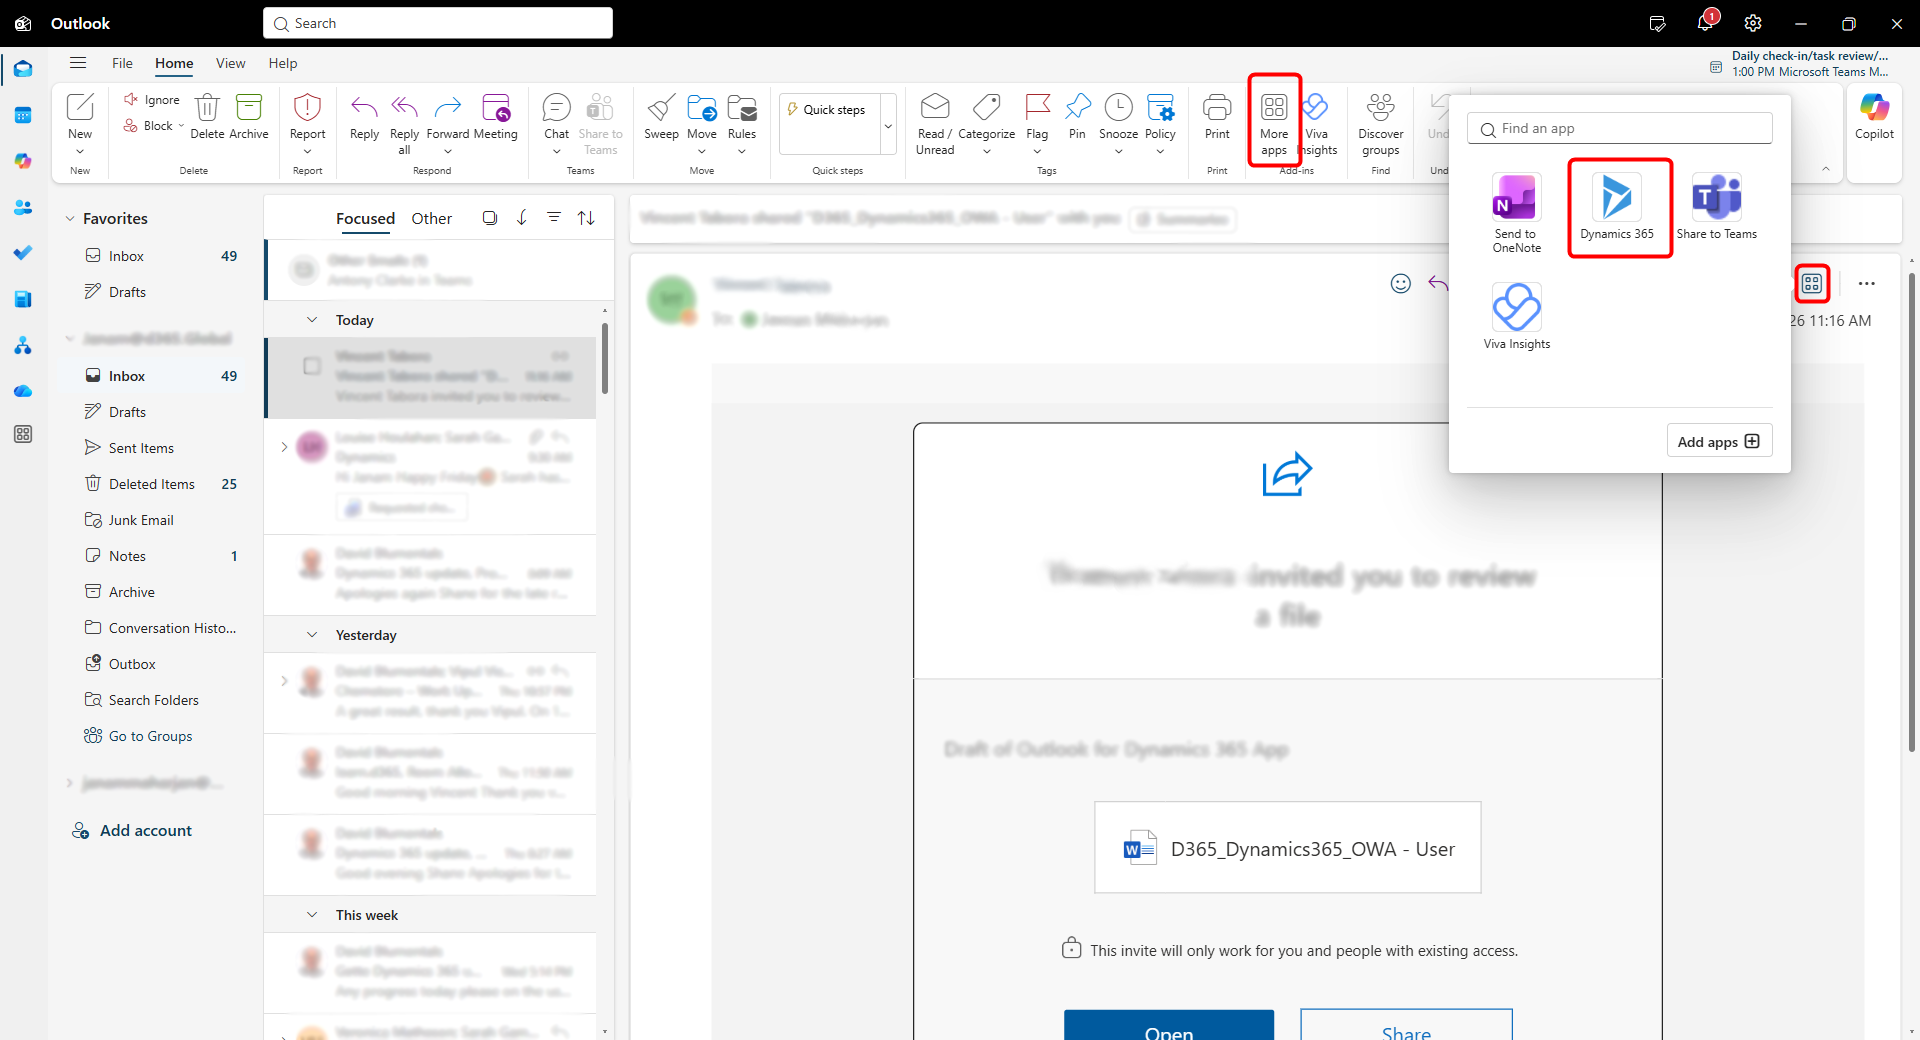
In Outlook Desktop (Windows/Mac)
-
Open an email.
-
Look for the Dynamics 365 icon in the Ribbon (Home tab).
-
If you don’t see it, click the three dots (…) or “More Apps” on the far right of the message header.
In Outlook on the Web (OWA)
-
Open an email.
-
Click the Apps icon or the three dots (…) in the top-right corner of the email message.
-
Select Dynamics 365.
Appendix
For more administration guidance:
Visit Deploy and install Dynamics 365 App for Outlook
For installation, visit the Install Dynamics 365 for Outlook