Pricing for Legal CRM and Case Management for Dynamics 365 Quick Start Guide
Introduction
This guide provides an overview of Pricing in Dynamics 365 for Legal. It covers how to set up and manage pricing for legal services, including creating price lists, defining pricing rules, and applying discounts.
How Pricing Works
Centrally Controlled
- Products (Roles) define who is billable.
- Price Lists define how much each role costs.
- System automatically calculates billing amounts.
Key Principle
Hourly Rate = Role (Product) + Price List (on Matter)s
Important Notes
- Users do NOT need to manually enter rates.
- Rates are automatically applied during Billing Events.
- Ensures consistent and controlled billing.

⚠ Pricing changes apply only to new Billing Events, not existing ones.
Products (Practice Roles)
Before invoicing, lawyers must record all billable time and expenses against a Matter.
- From the left navigation pane under Time & Billing > Select Products.
- Change the view to Practice Roles.
- Review existing roles (e.g., Partner, Associate, Law Clerk).
- Click Add Product to add new Products (Practice Roles).
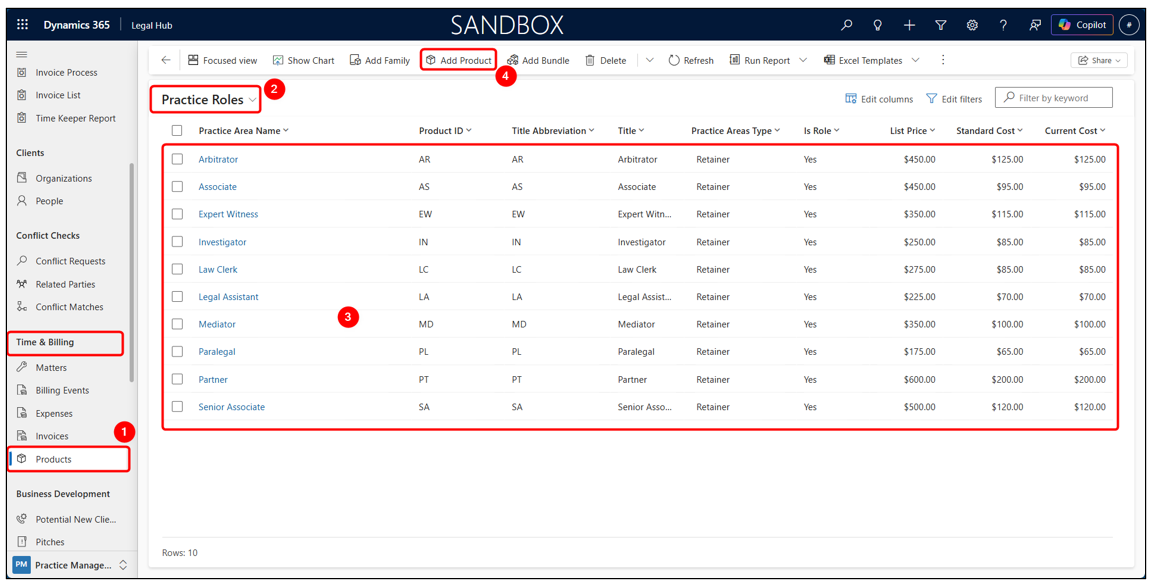
Important Note: Only Products where Is Role = Yes appear in this view.
Create Products
- Click Add Product.
- Enter role details like:
- Name (e.g., Associate)
- Product ID (e.g., AS)
- Set Is Role = Yes
- Set:
- Unit Group = Time
- Default Unit = Hour
- Click Save.
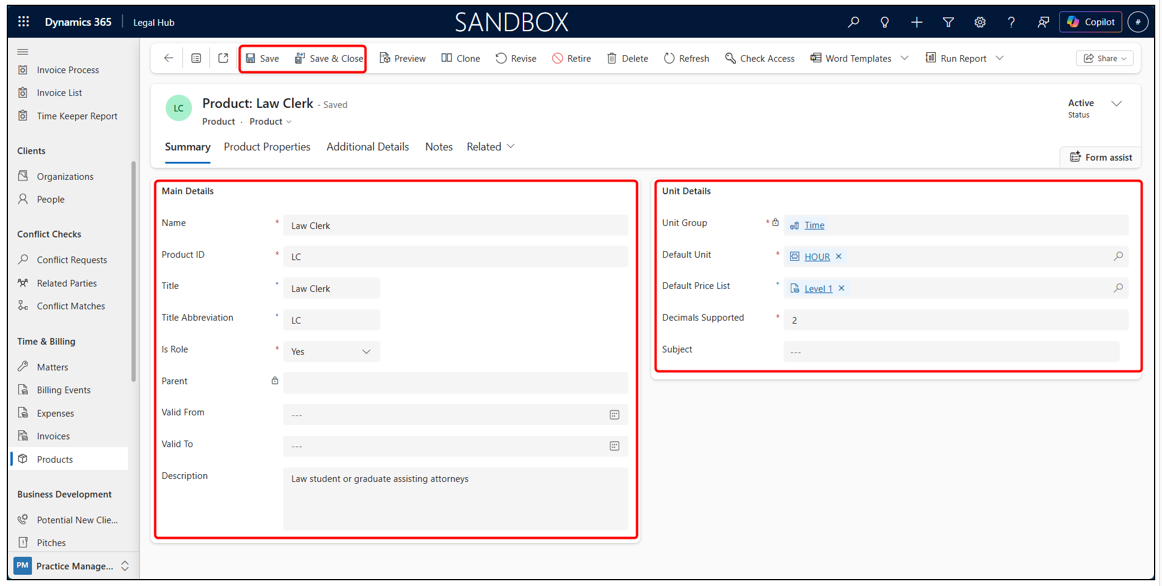
Important Note: If Is Role is not set to Yes, the role will NOT be available for pricing.
Price Lists
Price Lists define the hourly rates for each role and determine how billing is calculated for each Matter.
- Open Admin (bottom left).
- Under Product Catalog → Select Price Lists.
- View existing lists (e.g., Default, Level 1, Level 2).
- Click + New to add new Price List.
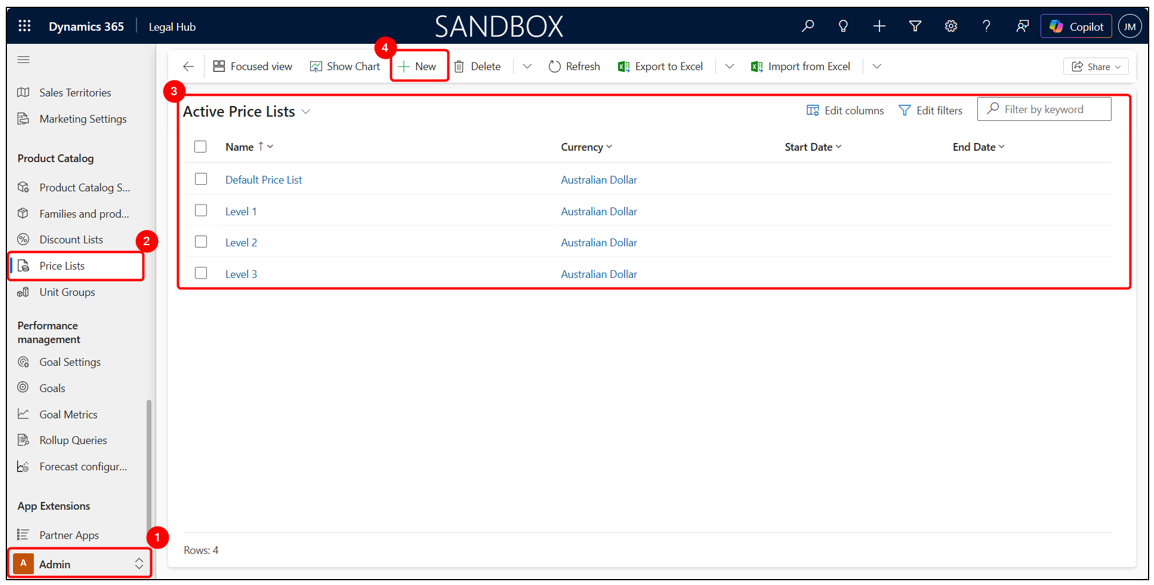
Important Note: Each Matter will use one Price List to determine billing rates.
Create a Price List
Create a Price List to define a new set of billing rates (e.g., for a client or pricing tier).
- Open Price Lists and Click + New.
- Enter:
- Name (e.g., Level 2 or Client Name)
- Currency
- You can add:
- Start Date
- End Date
- Description
- Click Save.
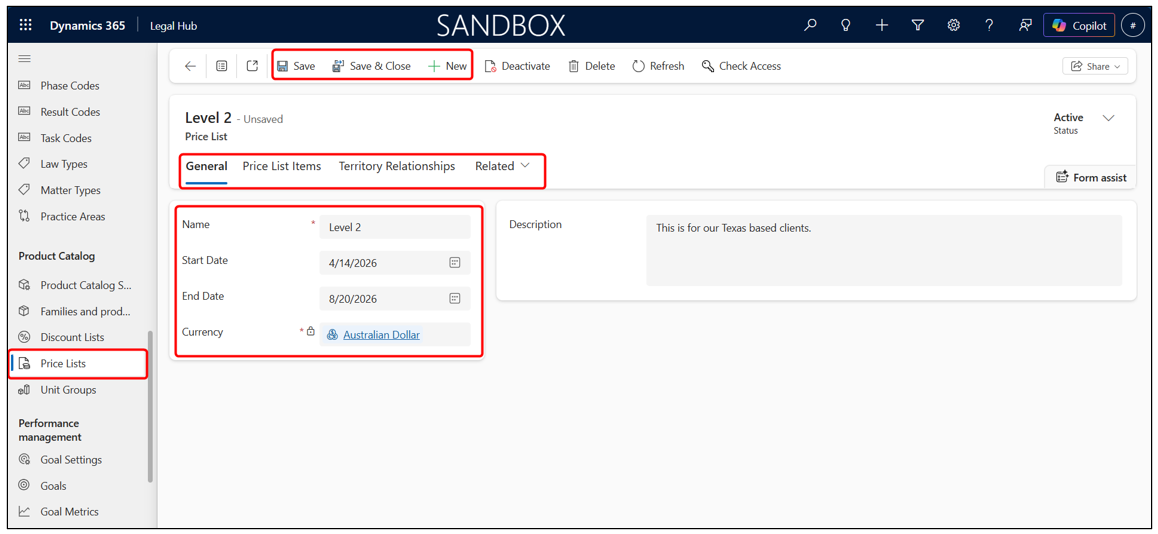
Important Note: The Price List Items tab will appear only after saving.
Add Price List Items
Price List Items define the hourly rate for each role and are used by the system to automatically calculate billing.
- Open a Price List.
- Go to Price List Items tab.
- Click + New Price List Item.
- In General Tab, select:
- Product → Role (e.g., Associate)
- Unit → Hour
- In Pricing Information Tab, select:
- Amount → Hourly rate (e.g., $250)
- Click Save.
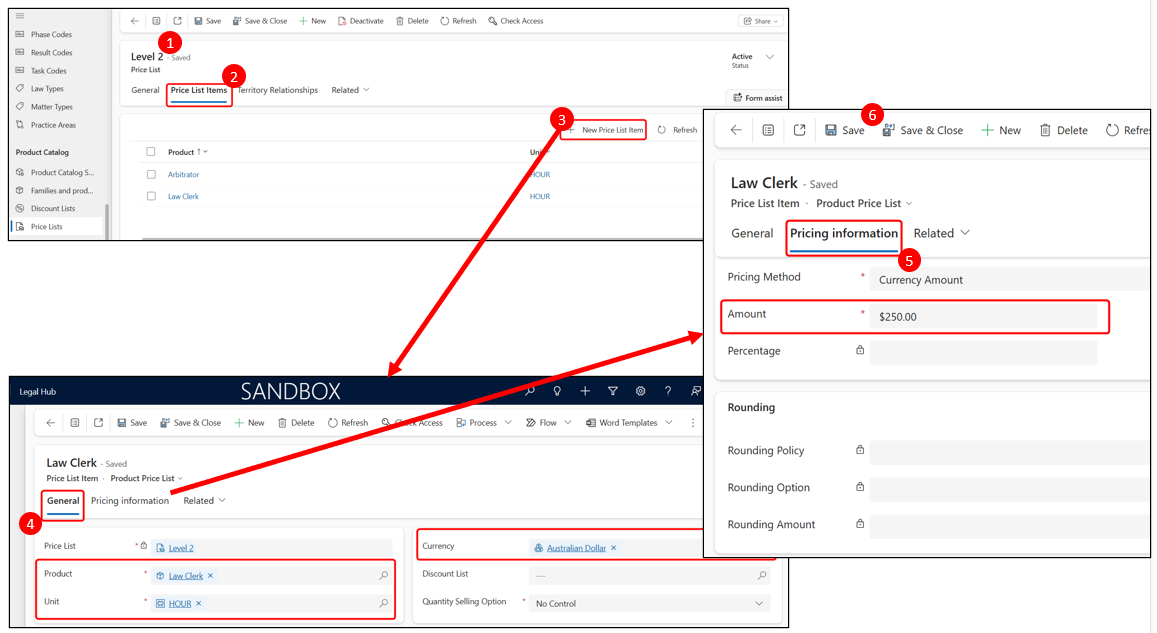
Important Notes: If a Role is NOT added to a Price List → Billing rate will be $0. Multiple Price Lists can be created to support different billing arrangements.
Assign Price List to Matter
The selected Rate List on a Matter determines all billing rates for that engagement.
- Open the Matter.
- Go to the Summary tab.
- Locate the Rate List field.
- Select the appropriate Rate List (Price List).
- Click Save.
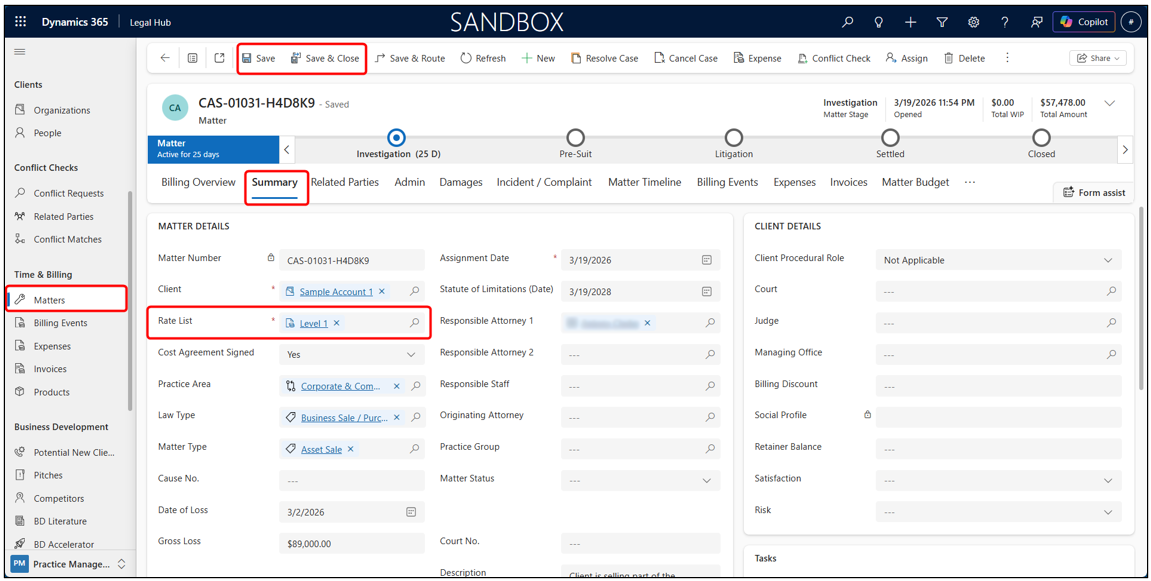
Important Notes: This single field controls ALL billing rates for the Matter. Changing the Rate List later will NOT update existing Billing Events.
Bookable Resources
Bookable Resources represent the people doing the work and determine which role (and rate) is applied during billing.
- Open Admin (bottom left).
- Under Global/Admin Data → Select Bookable Resources.
- View existing Active Bookable Resources.
- Click + New to add a new Bookable Resource.
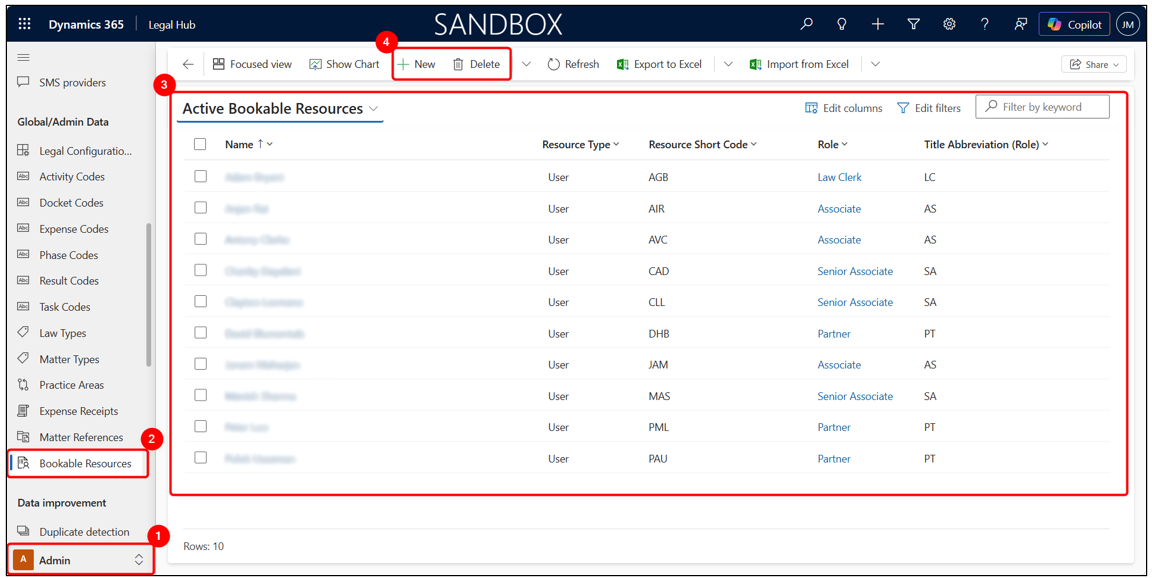
- Each Bookable Resource is assigned a Role.
- This Role links to a Product (Practice Role)
- The system uses this Role + the Matter’s Rate List to determine billing rates.
Important Notes: If a Resource has no Role → Billing rate will be $0. If the Role is not included in the Rate List → Billing rate will be $0.
Create Bookable Resource
Create a Bookable Resource and assign a Role so the system can apply the correct billing rates.
- Go to Bookable Resources (Admin).
- Click + New.
- Enter:
- Resource Type → User
- User → Select user
- Select Role → (e.g., Associate, Partner)
- Set Hourly Rate Cost and click Save.
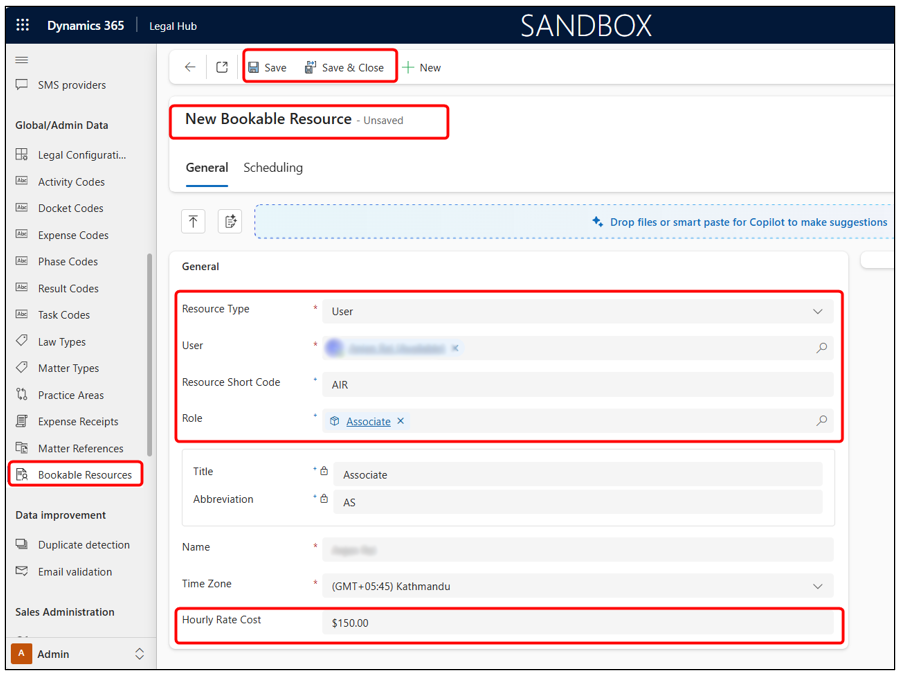
Important Notes: The Role field is critical. This links the User to a Product (Practice Role) and determines billing rates.
Billing Event Pricing
Billing rates are automatically calculated based on the Resource’s Role and the Matter’s Rate List.
When a billing event is created:
- User selects a Bookable Resource.
- System reads the Role (from Resource).
- System reads the Rate List (from Matter).
- System finds the matching Price List Item.
- Hourly Rate and Total Amount are applied automatically.
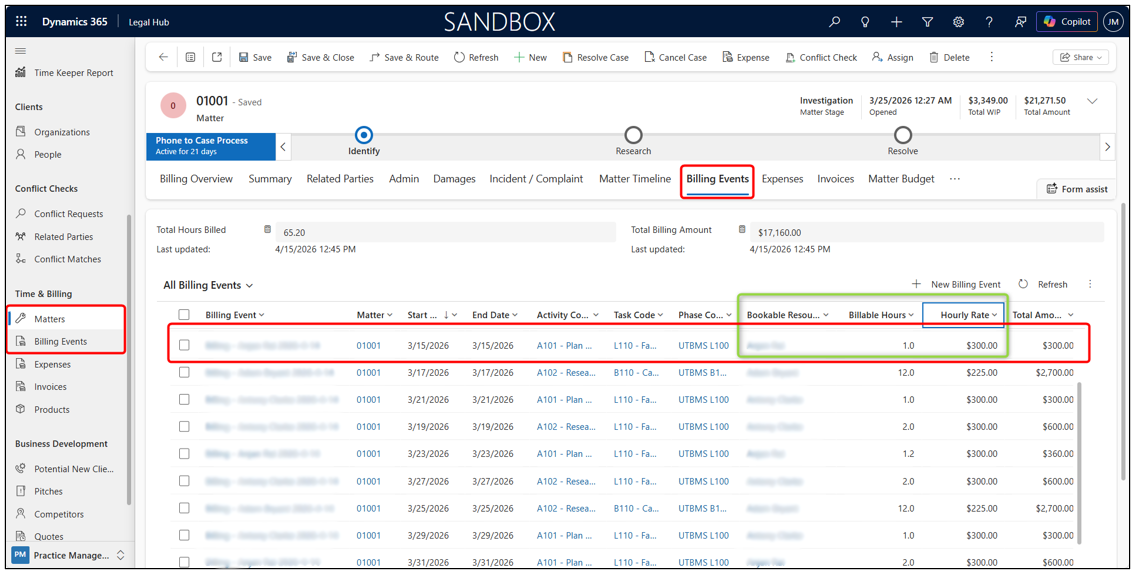
Important Notes: Rates are applied only at the time of creation. Updating Rate List or pricing later will NOT update existing Billing Events.
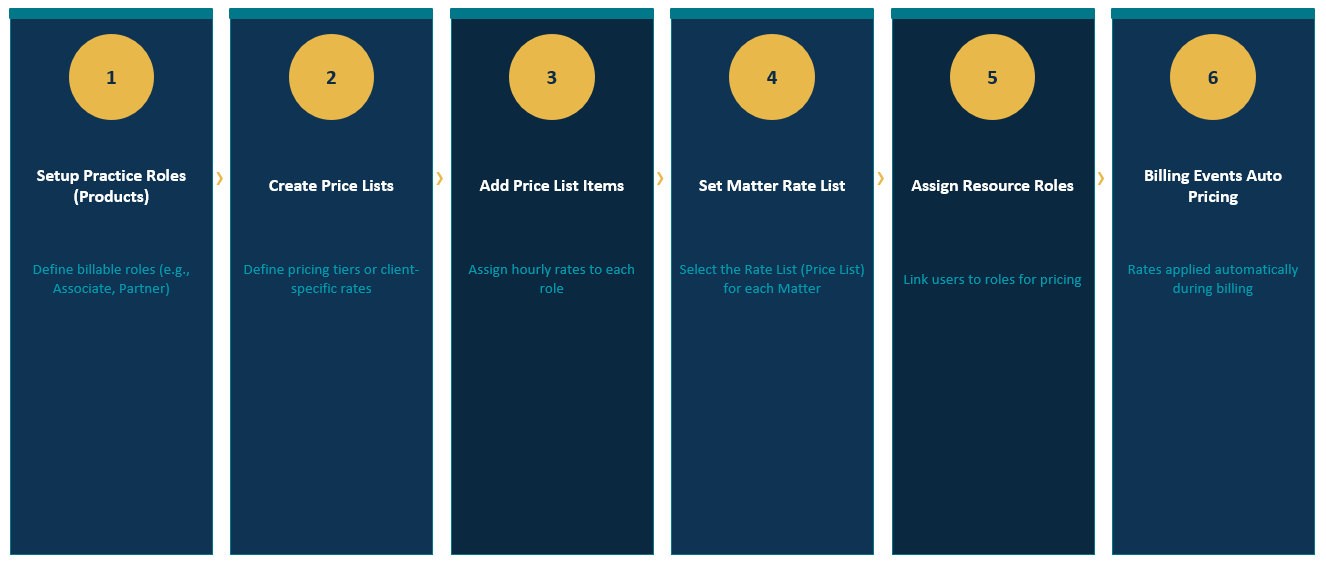
Summary
The following is a diagram that illustrates the Pricing process, from pricing setup to automatic billing.