Legal User Guide for Microsoft Dynamics 365
Staff Portal
The Staff Portal is a secure internal web portal that allows legal staff to access and manage key legal work items without needing to work directly inside Microsoft Dynamics 365 for every task.
The portal provides a simplified staff-facing interface for common operational activities such as viewing matters, recording costs and expenses, creating billing events, managing tasks, tracking deadlines, and reviewing practice activity from a central dashboard.
The Staff Portal is connected to the D365 Legal Solution and uses Dynamics 365/Dataverse as the central system of record. This means records created or updated through the Staff Portal, such as billing events, expenses, tasks, and deadlines, are reflected in the underlying Dynamics 365 environment.
Signing In to the Staff Portal
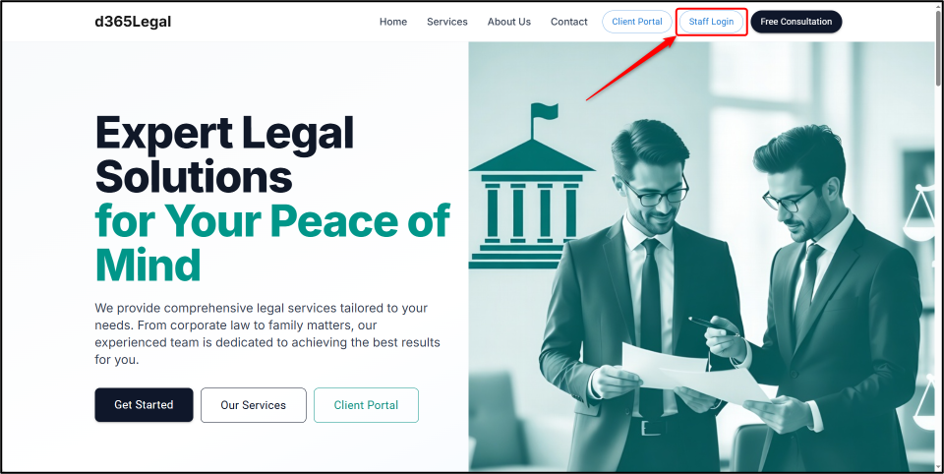
Staff users can access the portal using the portal URL provided by the organisation.
To sign in:
-
Open the Staff Portal URL.
-
Click Sign in with Microsoft.
-
Authenticate using the staff member’s Microsoft work account.
-
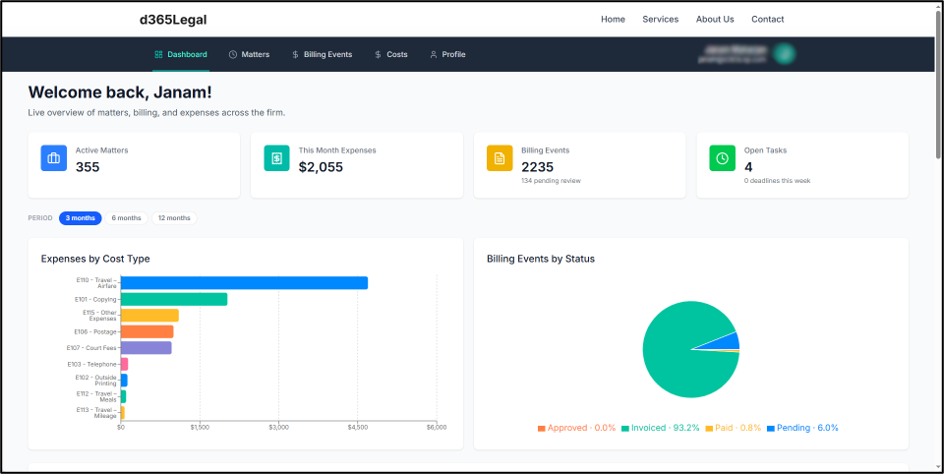
After successful login, the user is directed to the Staff Dashboard.
Staff access is managed by the organisation’s administrator. If a staff member cannot sign in, they should contact the system administrator to confirm that their user account has been provisioned correctly.
Staff Portal Navigation
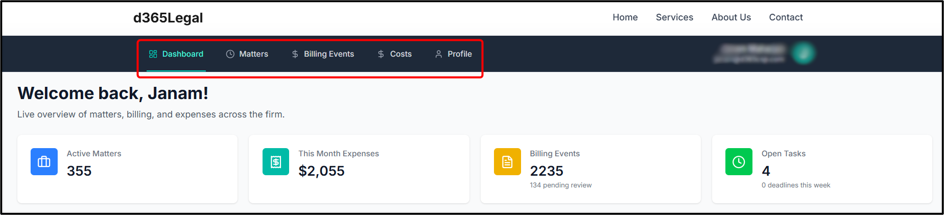
The Staff Portal includes a top navigation bar that provides access to the main portal areas.
The main navigation options are:
| Navigation Item | Description |
|---|---|
| Dashboard | Opens the main dashboard showing KPIs, charts, recent activity, upcoming deadlines, and assigned tasks. |
| Matters | Displays the full list of legal matters available to the staff user. |
| Costs | Opens the expense records area. |
| Billing | Opens the billing events and timekeeping area. |
| Tasks | Opens the action items assigned to users or linked to matters. |
| Profile | Displays the staff member’s profile information. |
The navigation is designed to allow staff users to move quickly between matter management, billing, costs, and task-related activities.
Dashboard
The Dashboard provides a live overview of practice activity and key operational metrics.
It is the first page displayed after signing in and gives staff users a quick summary of current work, including active matters, expenses, billing events, open tasks, deadlines, and recent activity.
KPI Cards
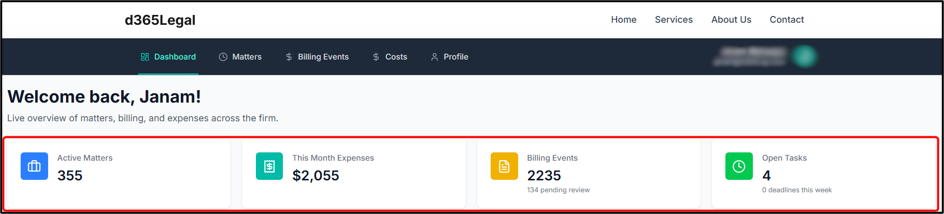
At the top of the dashboard, summary cards display key practice metrics.
| KPI Card | Description |
|---|---|
| Active Matters | Shows the number of matters currently in progress. |
| This Month’s Expenses | Shows the total costs recorded for the current month. |
| Total Billing Events | Shows the number of billing entries, including pending billing items. |
| Open Tasks | Shows tasks that are not yet completed, including items due during the current week. |
These cards provide a quick at-a-glance view of current workload and activity.
Time Period Selector
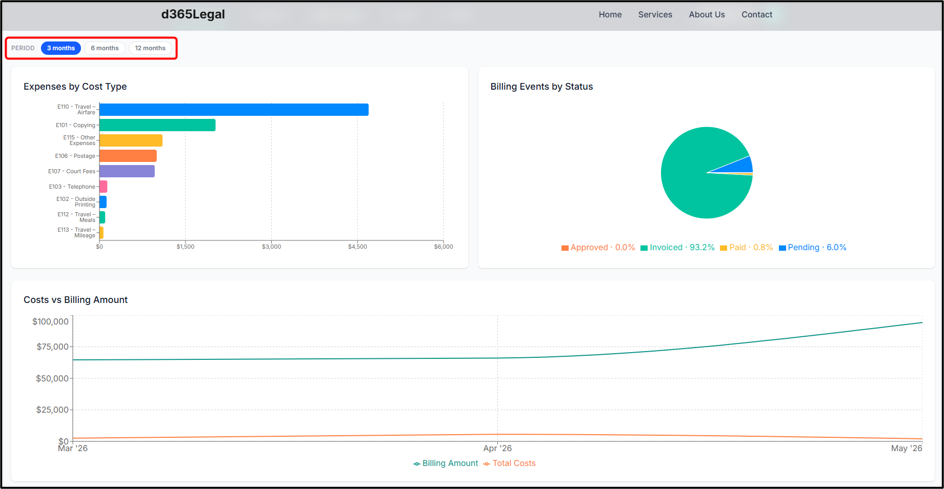
The dashboard includes a Time Period Selector, such as 3m, 6m, and 12m.
This selector changes the data range used in the dashboard charts, allowing staff to review activity over different time periods.
Charts
The dashboard includes visual charts to help staff understand trends and distribution across costs and billing activity.
| Chart | Description |
|---|---|
| Expenses by Cost Type | Shows a breakdown of spending by expense category. |
| Billing Events by Status | Shows the proportion of billing events by status, such as Pending, Approved, Invoiced, Paid, and Credited. |
| Costs vs Billing Amount | Compares monthly expenses against billed amounts over time. |
Recent Activity
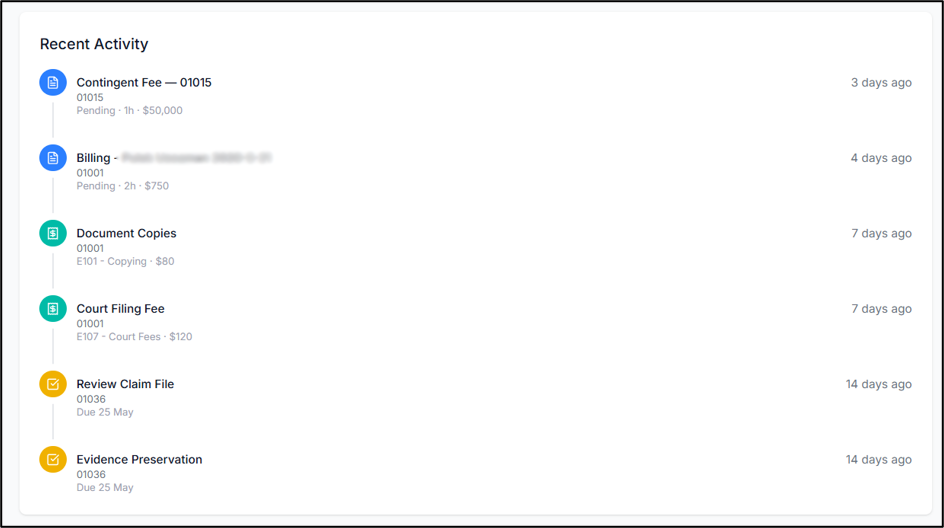
The Recent Activity section displays a chronological feed of recent updates.
This may include:
| Activity Type | Description |
|---|---|
| Billing Events | Recently created or updated billing entries. |
| Expenses | Recently added or updated cost records. |
| Tasks | Task creation, assignment, or completion activity. |
| Deadlines | Deadline creation or update activity. |
Each activity entry shows the activity type, a short description, and a timestamp.
Deadlines and Tasks on the Dashboard
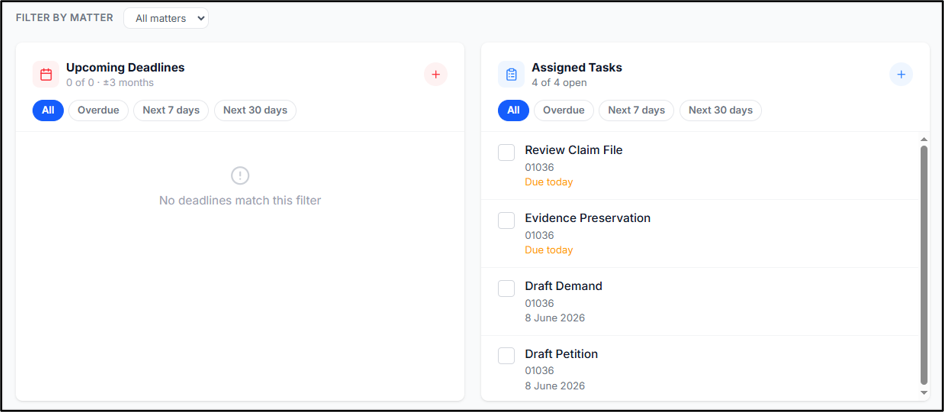
The dashboard also includes panels for Upcoming Deadlines and Assigned Tasks.
These panels allow staff to quickly review important matter-related work without needing to open each matter individually.
Filtering Deadlines and Tasks
Both panels include time filter options.
Available filters may include:
| Filter | Description |
|---|---|
| All | Shows all available items. |
| Overdue | Shows items that are past their due date. |
| Next 7 Days | Shows items due within the next seven days. |
| Next 30 Days | Shows items due within the next thirty days. |
A Filter by Matter dropdown may also be available. This allows staff to filter both deadlines and tasks to a specific matter.
Creating a Deadline from the Dashboard
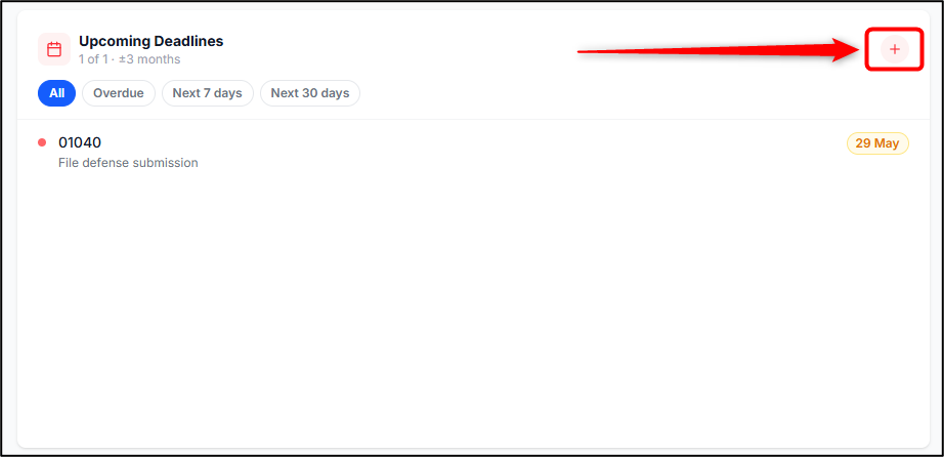
Staff can create a new deadline directly from the dashboard.
To create a deadline:
-
Go to the Upcoming Deadlines panel.
-
Click the + button.
-
Complete the deadline form.
-
Click Create Deadline.
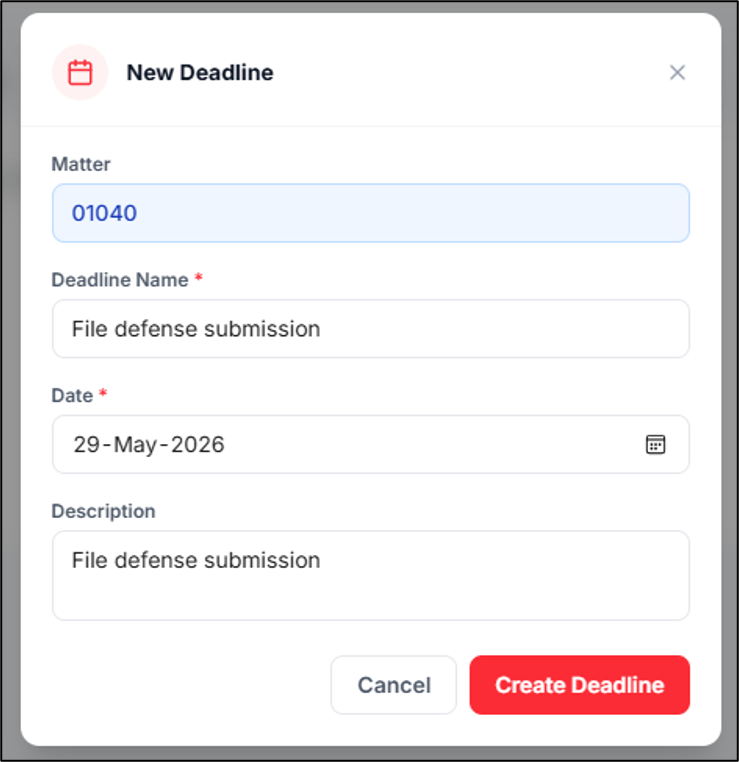
The deadline form includes:
| Field | Required | Description |
|---|---|---|
| Matter | Yes | Select the matter the deadline relates to. |
| Deadline Name | Yes | Enter a descriptive title for the deadline or milestone. |
| Date | Yes | Select the target due date. |
| Description | No | Enter additional notes or context. |
Once saved, the deadline appears in the list.
Creating a Task from the Dashboard
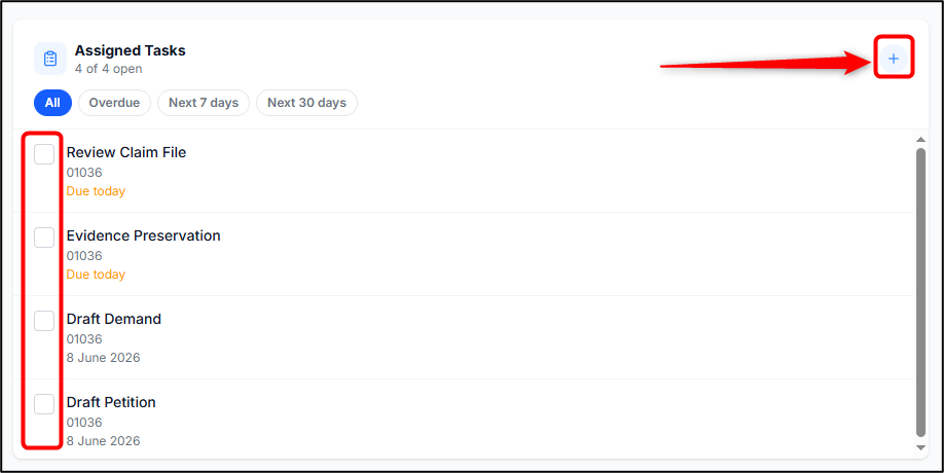
Staff can also create a new task directly from the dashboard.
To create a task:
-
Go to the Assigned Tasks panel.
-
Click the + button.
-
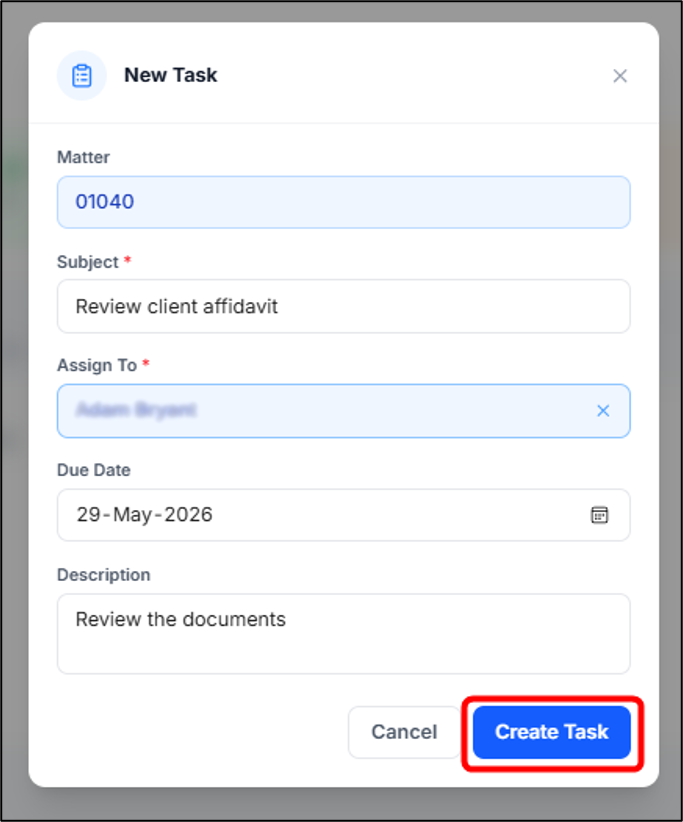
Complete the task form.
-
Click Create Task.
The task form includes:
| Field | Required | Description |
|---|---|---|
| Subject | Yes | Enter the task name. |
| Assign To | Yes | Select the staff member responsible for completing the task. |
| Matter | No | Optionally link the task to a matter. |
| Due Date | No | Select the target completion date. |
| Description | No | Enter additional task details or instructions. |
Tasks can be assigned to any available staff member, not only the current user.
Marking a Task Complete from the Dashboard
To complete a task from the dashboard:
-
Locate the task in the Assigned Tasks panel.
-
Click the checkbox beside the task.
-
Confirm the action in the confirmation dialog.
-
Click Mark Complete.
Once completed, the task is removed from the open task list.
Matters
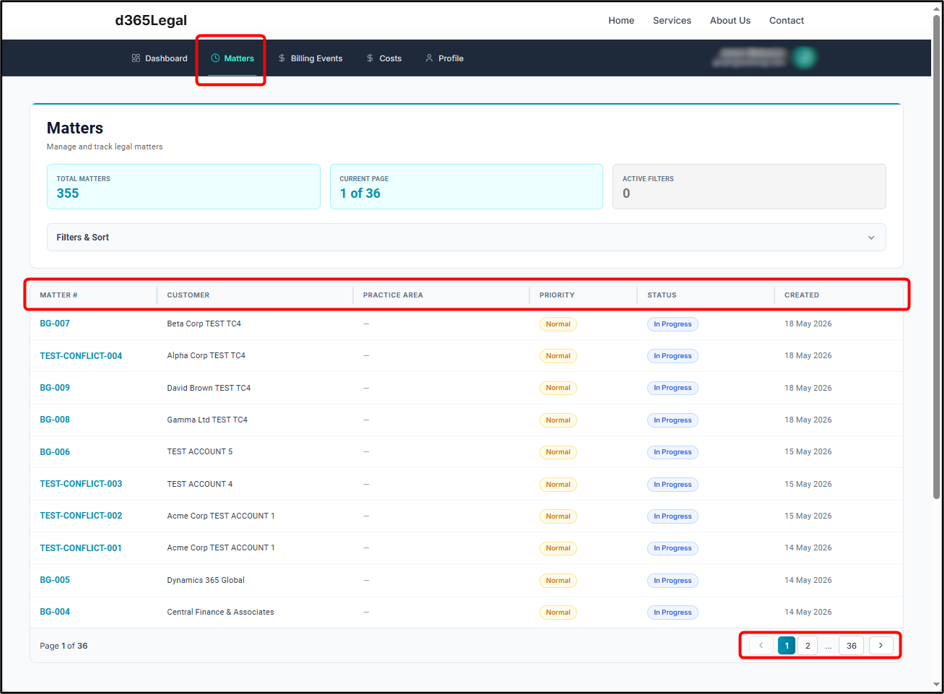
The Matters page displays the list of legal matters available to the staff user. This area allows staff to browse, filter, and open matters for detailed review.
Browsing Matters
Matters are displayed in a table. On smaller screens, the table may switch to a card-based layout.
The matter list includes:
| Column | Description |
|---|---|
| Ticket # | The unique matter reference number. |
| Title | The name or title of the matter. |
| Priority | The priority level, such as High, Normal, or Low. |
| Status | The current matter status. |
| Modified Date | The date and time the matter was last updated. |
| Customer | The associated client or customer. |
Staff can click a row to open the selected matter.
-
Column resizing — Hover over a column border and drag to adjust its width.
-
Pagination — Use the navigation controls at the bottom to move between pages (10 items per page by default).
-
Mobile — On smaller screens the table switches to a card-based layout.
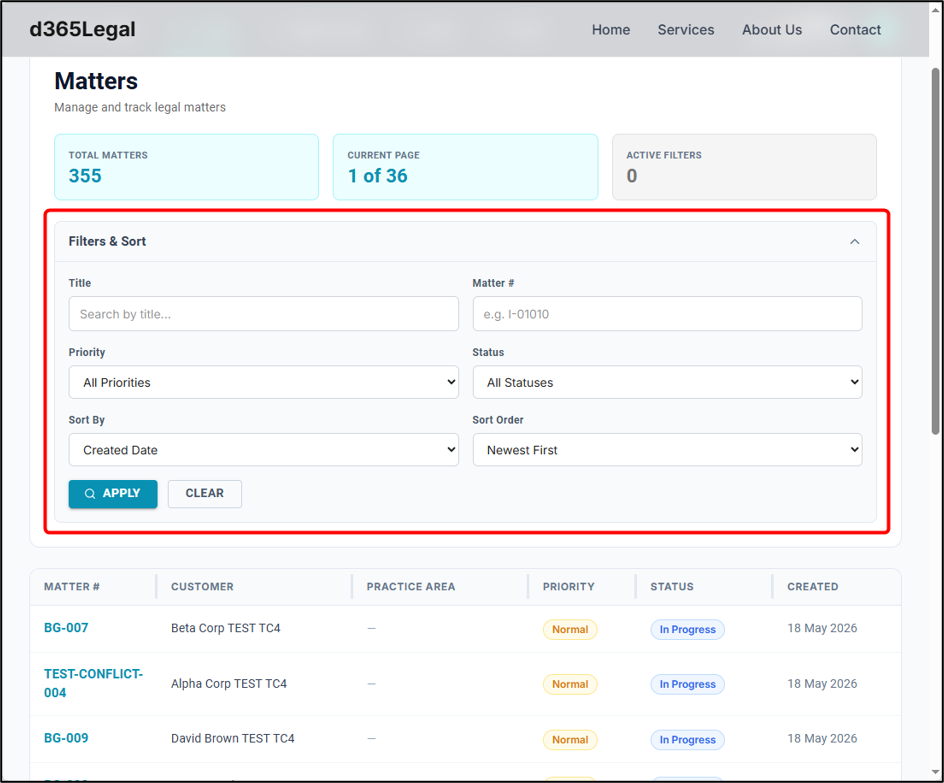
Filtering Matters
The Matters page includes filter controls to help staff find specific records.
Available filters may include:
| Filter | Description |
|---|---|
| Title | Search by matter name or title. |
| Ticket Number | Search by the matter reference number. |
| Priority | Filter by High, Normal, or Low priority. |
| Status | Filter by one or more matter statuses. |
| Sort | Sort by fields such as Created Date, Modified Date, or Title. |
Viewing a Matter
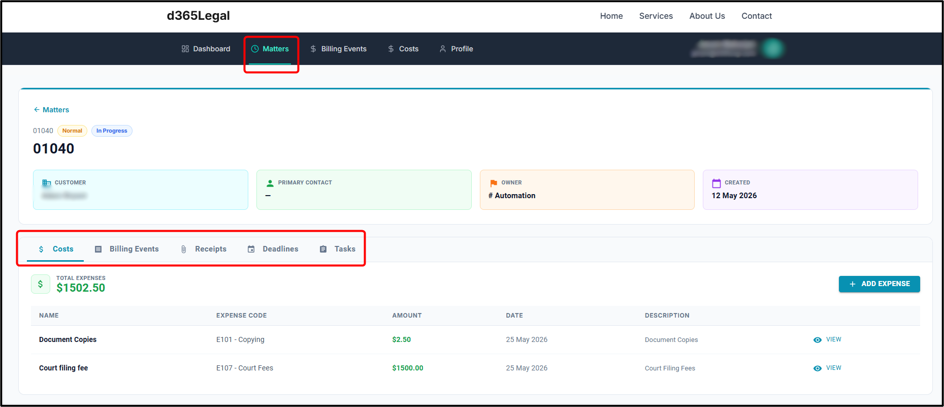
Clicking a matter opens the Matter Detail page. The detail page includes a header showing key matter information, such as:
| Field | Description |
|---|---|
| Matter Title | The title of the matter. |
| Ticket Number | The unique matter reference. |
| Priority | The priority level assigned to the matter. |
| Status | The current status of the matter. |
The page may also display information cards for:
| Information Card | Description |
|---|---|
| Customer | The client or customer linked to the matter. |
| Primary Contact | The primary contact person for the matter. |
| Owner | The staff member responsible for the matter. |
| Created Date | The date the matter was created. |
A matter description section is also displayed, where available.
Matter Detail Tabs
The Matter Detail page includes tabs that allow staff to manage records linked to the selected matter.
| Tab | Description |
|---|---|
| Costs | Shows expense records linked to the matter. |
| Billing Events | Shows billable hours, rates, and amounts for the matter. |
| Receipts | Shows file attachments and uploaded invoices or receipts. |
| Deadlines | Shows matter-specific timeline items and due dates. |
| Tasks | Shows action items associated with the matter. |
The Matter Detail page may also include quick action buttons such as Create Cost and Create Billing Event. When used from a matter, these actions pre-fill the selected matter in the relevant form.
Costs and Expenses
The Costs area allows staff to view, filter, create, and manage expense records.
Expenses are typically linked to matters and may include costs such as disbursements, filing fees, travel, or other matter-related expenses.
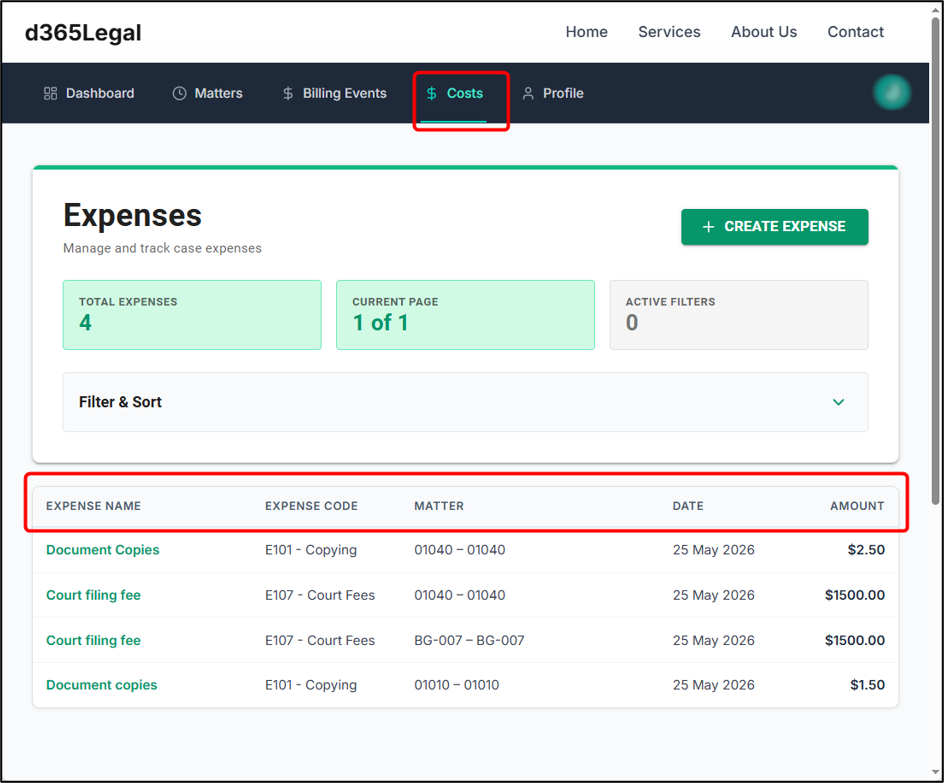
Browsing Costs
The Costs list includes:
| Column | Description |
|---|---|
| Expense Name | Description or name of the expense. |
| Expense Code | Category or expense code. |
| Matter | The matter linked to the expense. |
| Date | The date the expense was incurred. |
| Amount | The expense amount. |
A summary bar may appear at the top of the page showing total expenses, current page position, and the number of active filters.
Filtering and Sorting Costs
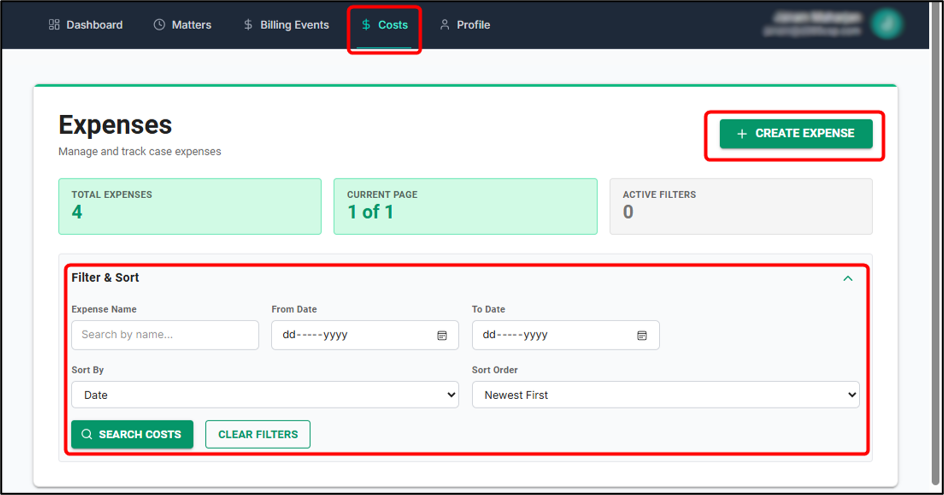
The Costs page includes filter and sort controls.
Available options may include:
| Option | Description |
|---|---|
| Expense Name | Search by expense name or description. |
| Date Range | Filter expenses by From and To dates. |
| Sort By | Sort by Date, Name, Amount, or Created Date. |
| Sort Order | Choose the order, such as Newest First or High to Low. |
| Clear Filters | Reset all active filters. |
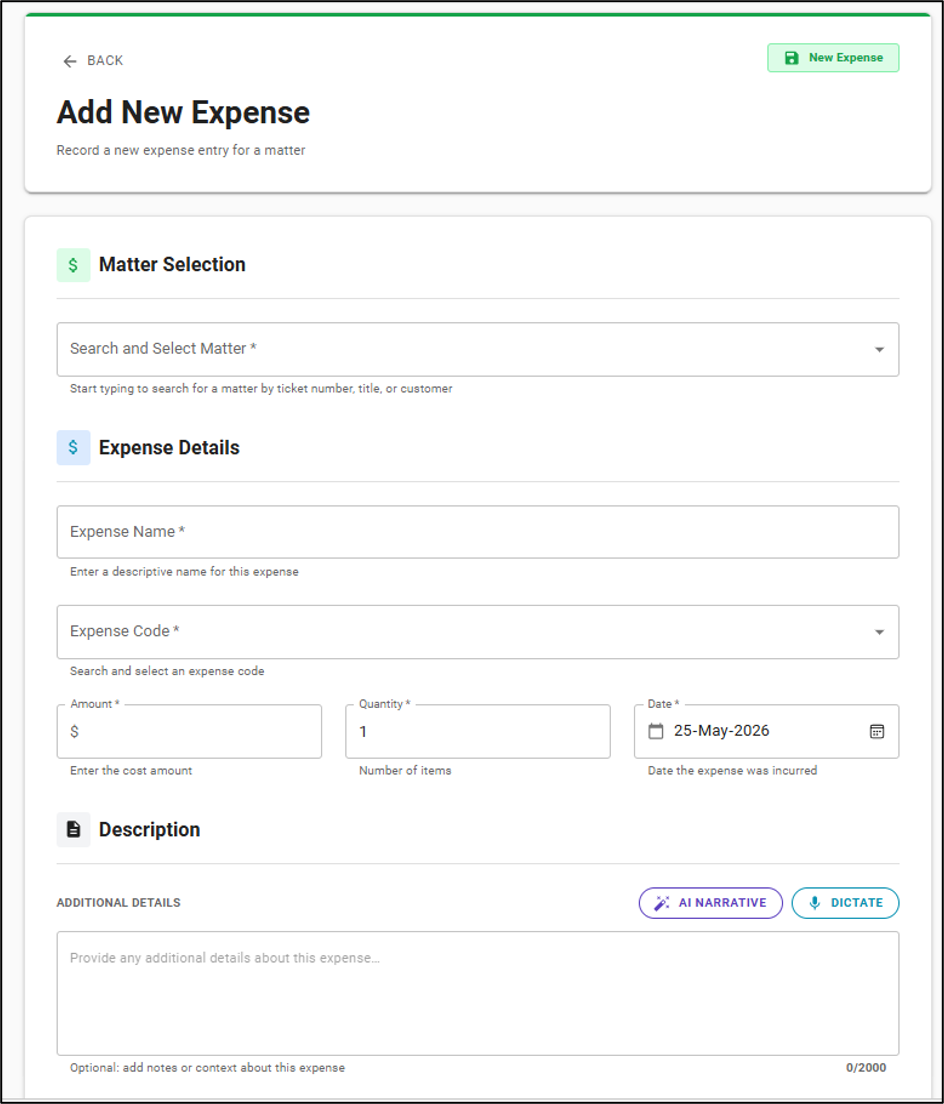
Creating a Cost
To create a cost or expense:
-
Go to Costs, or open a matter and go to the Costs tab.
-
Click Create Expense.
-
Complete the form.
-
Click Save.
The expense form may include:
| Field | Description |
|---|---|
| Matter | The matter linked to the expense. |
| Expense Code | The expense categorisation code. |
| Amount | The amount of the expense. |
| Date | The date the expense was incurred. |
| Description | Details about the expense. |
| Quantity | Quantity associated with the expense, where applicable. |
Required fields are validated when saving. Any validation errors are highlighted on the form.
Viewing a Cost
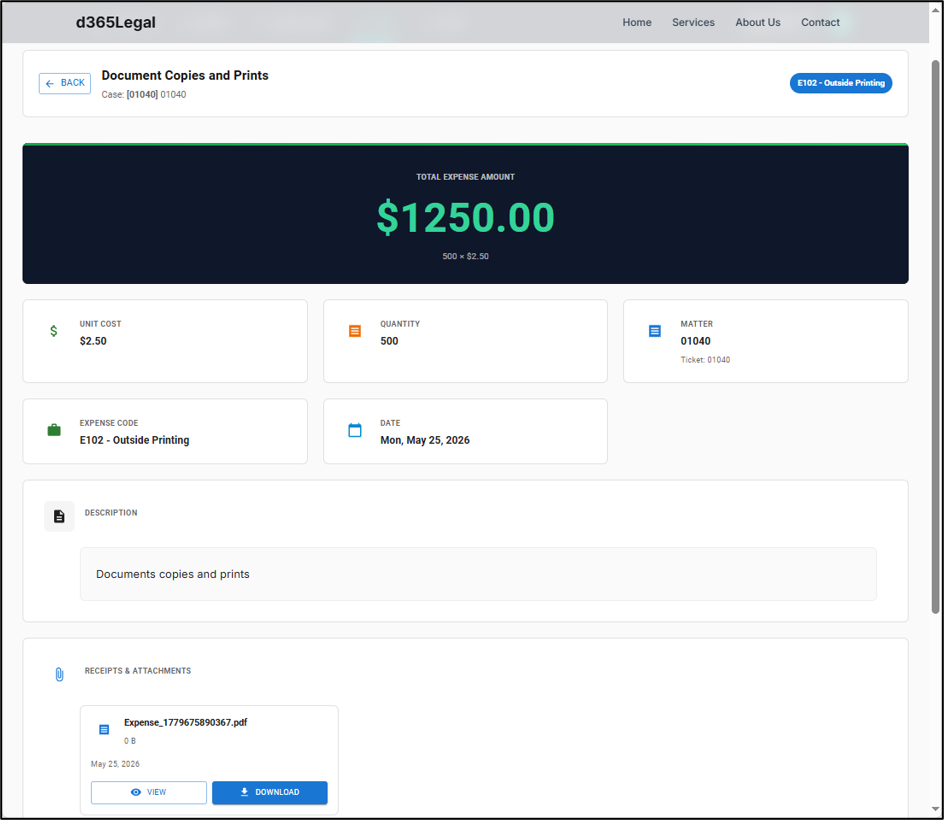
To view a cost, click the relevant row from the Costs list.
The Cost Detail page shows the expense information in read-only format.
Billing Events
The Billing area allows staff to record and manage billable time against matters.
Billing events are used to capture work performed, billable hours, hourly rates, and billing status.
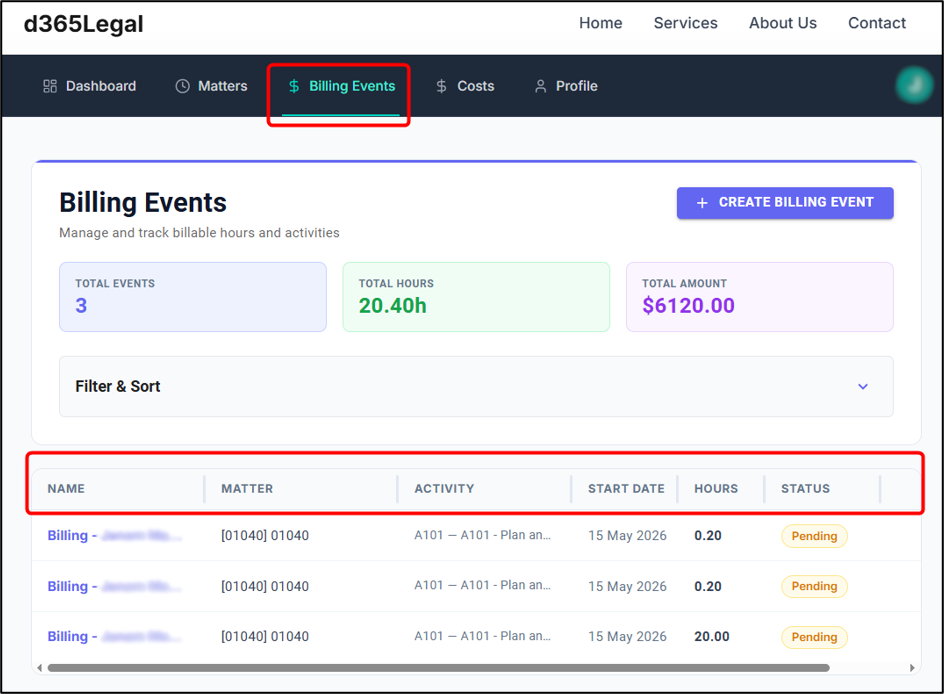
Browsing Billing Events
The Billing Events list includes:
| Column | Description |
|---|---|
| Event Name | Description or name of the billing entry. |
| Matter | The matter linked to the billing event. |
| Hours | The number of billable hours recorded. |
| Rate | The hourly rate applied. |
| Amount | The calculated amount, usually Hours × Rate. |
| Status | The current billing event status. |
| Date | The billing period start date or entry date. |
Billing Event Statuses
Billing event status badges help staff understand the billing lifecycle.
| Status | Colour | Description |
|---|---|---|
| Pending | Orange | The billing event has been created but has not yet been approved. |
| Approved | Green | The billing event has been approved for invoicing or further processing. |
| Invoiced | Blue | The billing event has been included on an invoice. |
| Paid | Purple | The billing event has been paid. |
| Credited | Grey | The billing event has been credited. |
Filtering Billing Events
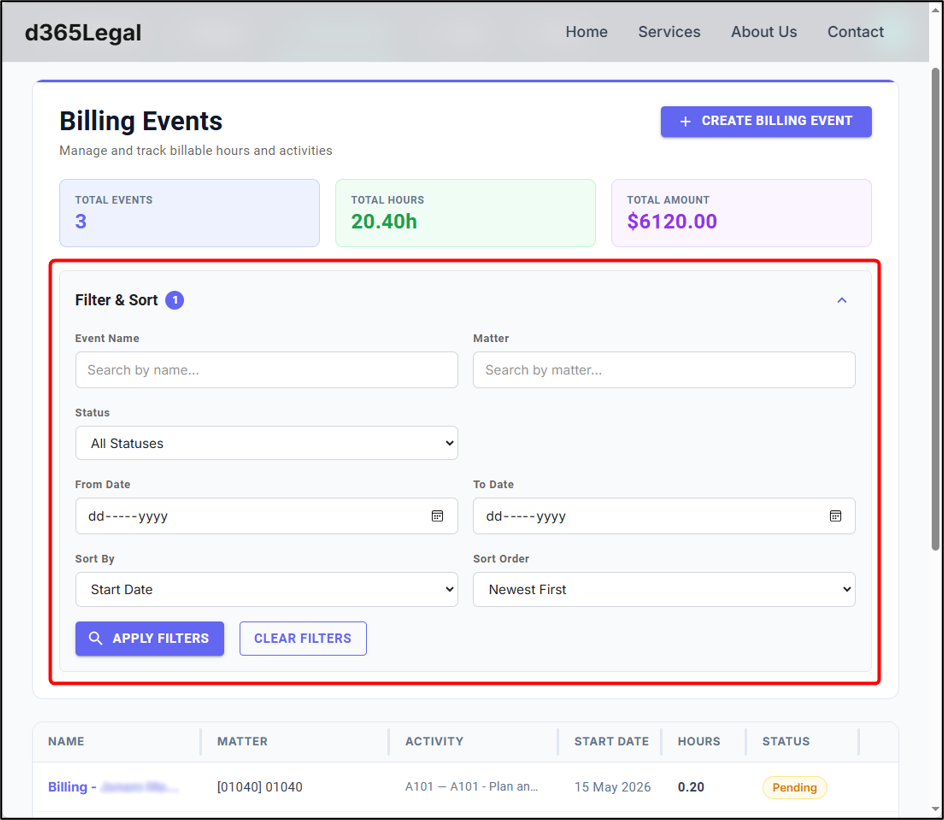
The Billing page includes filter controls to help staff find billing records.
Available filters may include:
| Filter | Description |
|---|---|
| Name | Search by billing event name or description. |
| Matter | Search by linked matter. |
| Status | Filter by billing event status. |
| Date Range | Filter by From and To dates. |
| Sort By | Sort by Name, Hours, Amount, or Start Date. |
Creating a Billing Event
To create a Billing Event:
-
Go to Billing, or open a matter and go to the Billing Events tab.
-
Click Create Billing Event.
-
Complete the form.
-
Click Save.
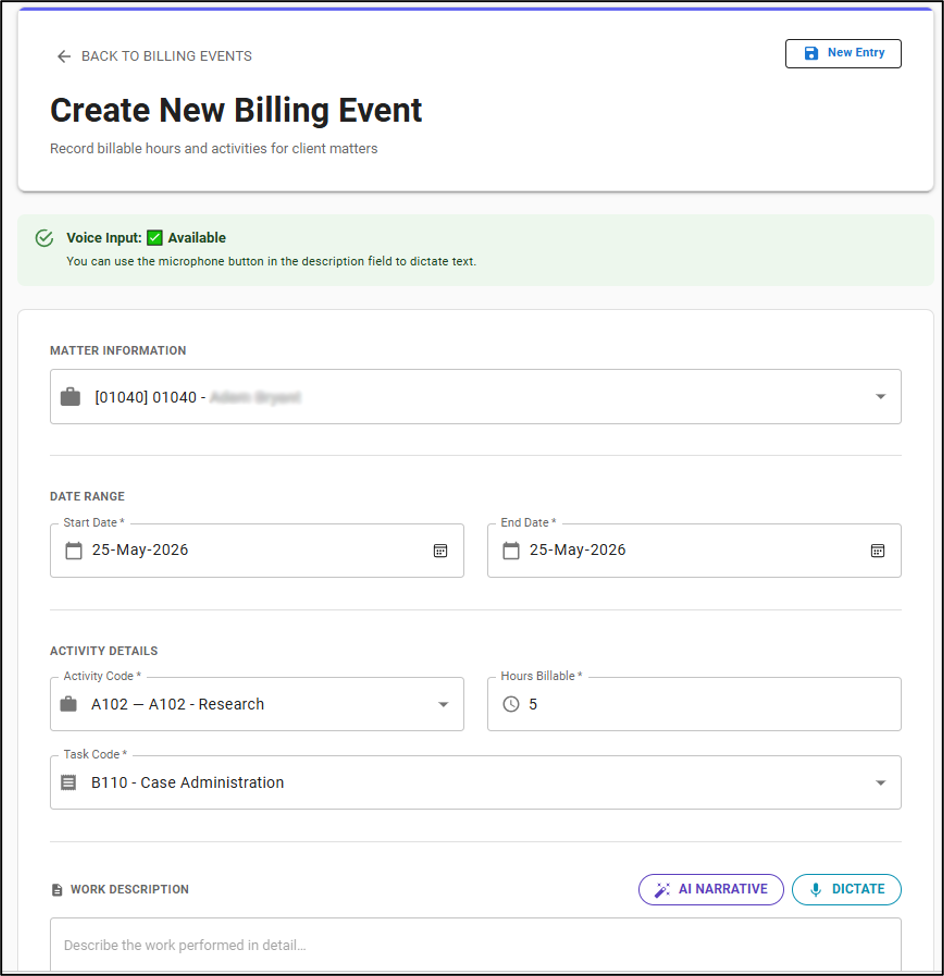
The billing event form may include:
| Field | Description |
|---|---|
| Matter | The matter linked to the billing event. |
| Activity Code | The category of activity performed. |
| Task Code | The type of work or task performed. |
| Billable Hours | The number of hours to be billed. |
| Hourly Rate | The rate applied to the billing event. |
| Start Date / End Date | The billing period or date range. |
| Description / Work Description | Details of the work performed. |
AI Narrative for Billing Events
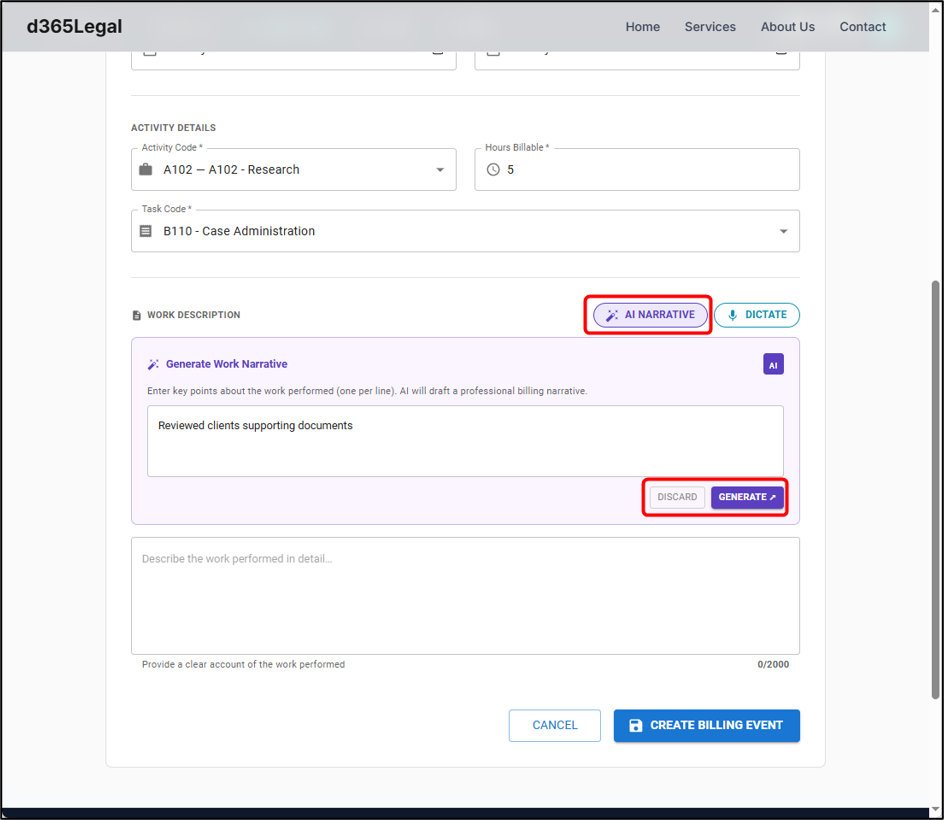
The billing event form includes an AI Narrative tool for the work description field.
This feature helps staff convert brief work notes into a more professional billing narrative.
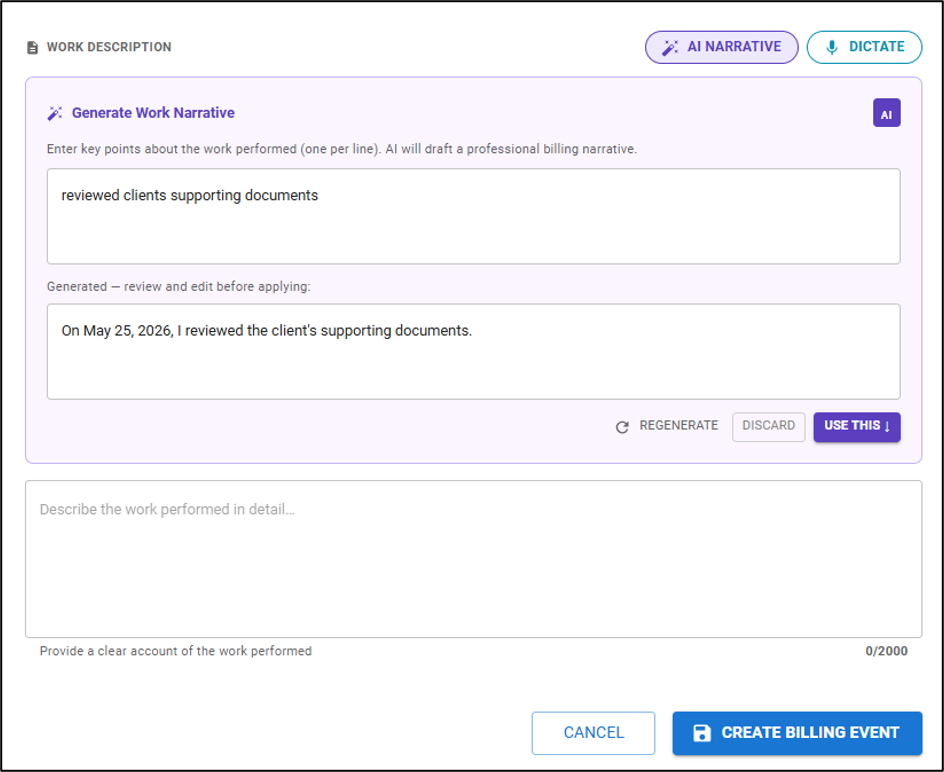
To use AI Narrative:
-
Click AI Narrative above the description field.
-
Enter key points of the work performed, with each point on a separate line.
-
Click Generate.
-
Review the generated narrative.
-
Edit the narrative if required.
-
Click Use this to copy the narrative into the description field.
Staff can also click Regenerate to create a new version or Discard to close the panel without applying the generated text.
The description field may have a character limit, such as 2,000 characters, with a character count shown below the field.
Voice Dictation for Billing Events
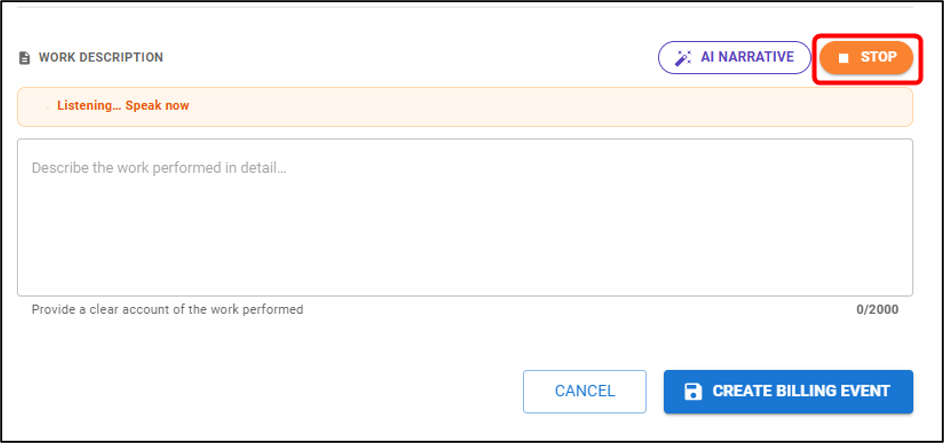
The billing event form may include a Dictate button beside the description field.
This allows staff to speak their work description and have it transcribed into the text field.
To use Voice Dictation:
-
Click Dictate.
-
Speak the billing description clearly.
-
The portal transcribes the text into the description field.
-
Click Stop when finished.
-
Review and edit the text before saving.
Voice dictation is browser-dependent and may only be available in supported browsers, such as Chrome, Edge, or Safari on iOS over HTTPS.
Viewing a Billing Event
To view a billing event, click the relevant billing event row from the Billing list.
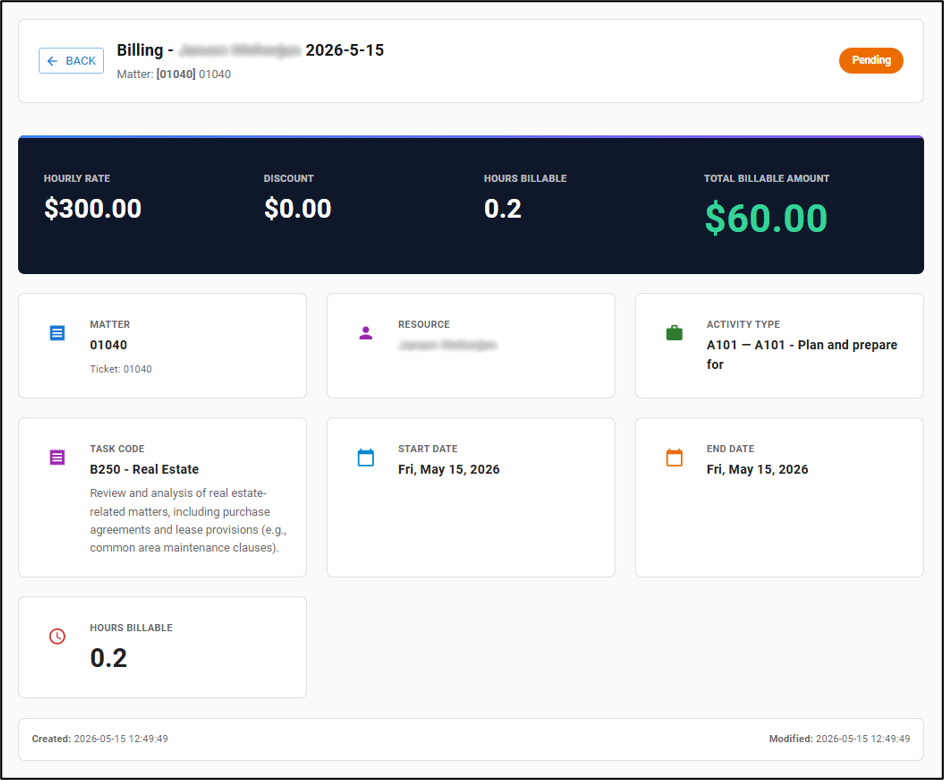
The Billing Event Detail page displays the billing event information, including the linked matter, hours, rate, amount, status, description, and assigned staff member or Bookable Resource where applicable.
Tasks
Tasks are action items that can be assigned to staff members and linked to matters. Tasks help staff manage follow-up activities, responsibilities, and matter-related work.
Viewing Tasks
Tasks can be accessed from the Tasks area, from the dashboard, or from the Tasks tab on a Matter Detail page.
The Task Detail page may include:
| Field | Description |
|---|---|
| Subject / Title | The name of the task. |
| Description | Detailed notes or instructions. |
| Scheduled End Date | The due date for the task. |
| Regarding | The matter linked to the task. |
| Owner | The staff member responsible for the task. |
| Status | The current task status. |
Creating a Task from a Matter
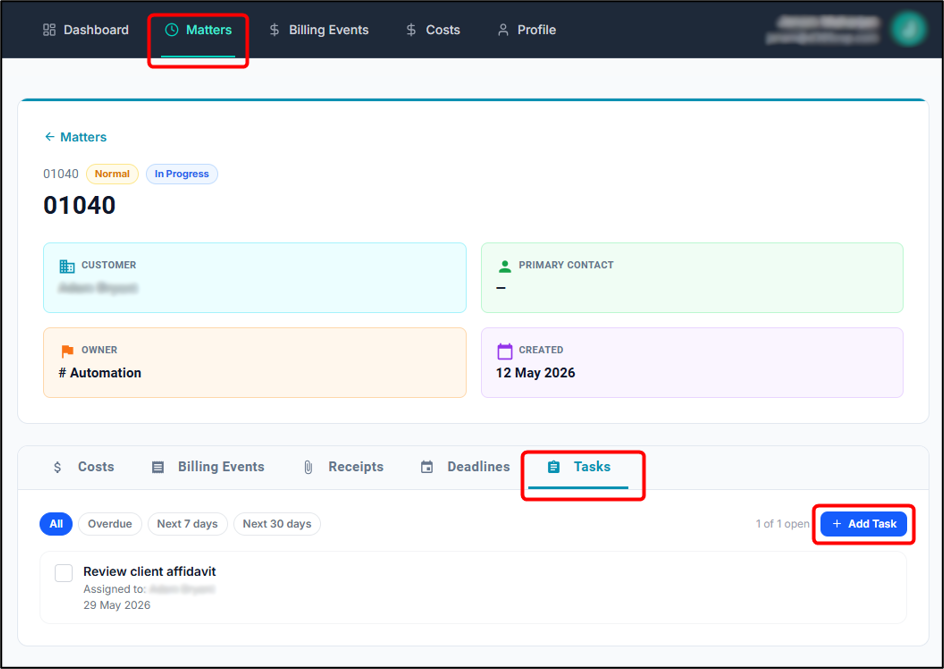
Tasks can be created from within a matter.
To create a task:
-
Open the relevant matter.
-
Go to the Tasks tab.
-
Click Create Task.
-
Complete the task form.
-
Click Create Task.
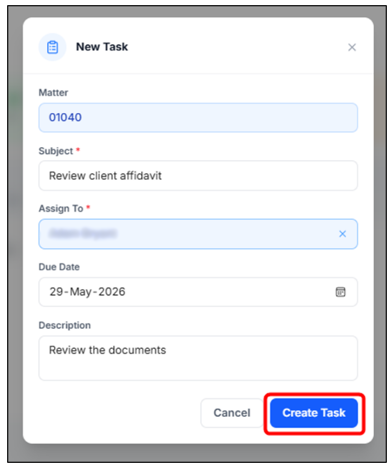
The task form includes:
| Field | Required | Description |
|---|---|---|
| Subject | Yes | The name of the task. |
| Assign To | Yes | The staff member responsible for completing the task. |
| Due Date | No | The target completion date. |
| Description | No | Additional notes or instructions. |
| Matter | Automatically populated | The current matter. |
When a task is created from within a matter, the matter field is pre-filled and locked to the selected matter.
Marking a Task Complete
Tasks can be marked as complete from the task list or from the Task Detail page.
To mark a task complete from the task list:
-
Locate the task.
-
Click the checkbox icon.
-
Confirm the action in the confirmation dialog.
-
Click Mark Complete.
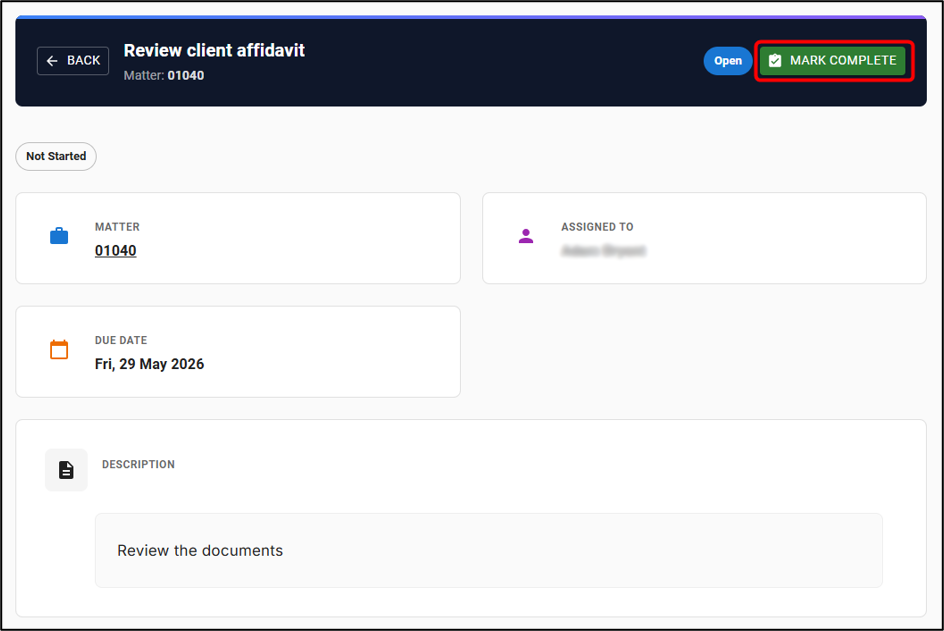
To mark a task complete from the Task Detail page:
-
Open the task.
-
Click Mark Complete.
-
Confirm the action.
If the task is already completed, the Mark Complete button may be disabled.
Deadlines
Deadlines are matter-related timeline items or milestones. They help staff track important dates, due dates, and key events related to a matter.
Viewing Deadlines
Deadlines can be viewed from the dashboard or from the Deadlines tab on a Matter Detail page.
Clicking a deadline in Matter opens the Deadline Detail page.
The Deadline Detail page may include:
| Field | Description |
|---|---|
| Title | The deadline name. |
| Due Date | The target date. |
| Description | Additional notes or context. |
| Linked Matter | The matter associated with the deadline. |
| Owner | The staff member responsible for the deadline. |
| Status | The current deadline status. |
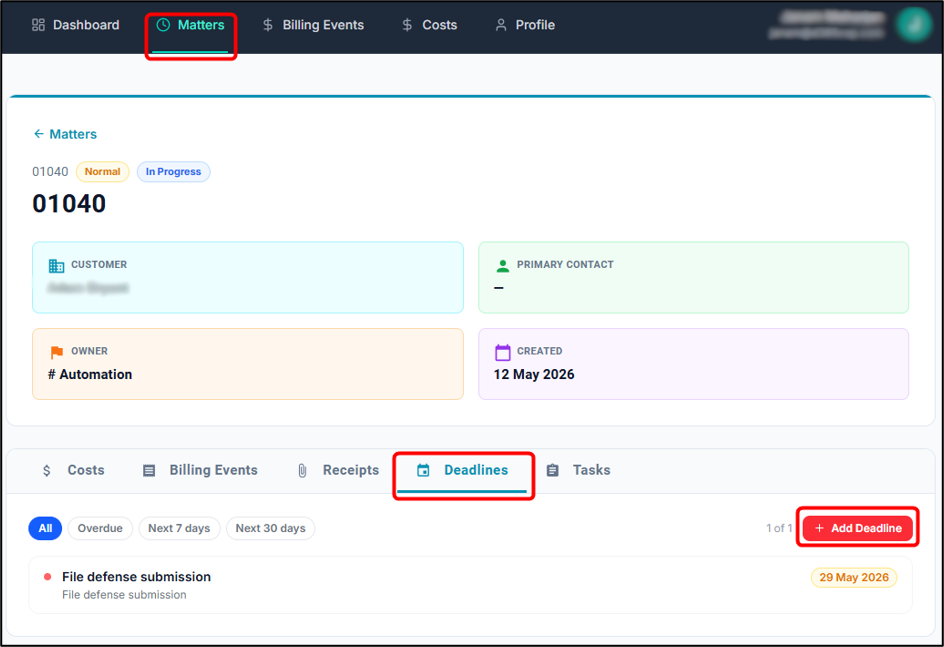
Creating a Deadline from a Matter
Deadlines can be created from within a matter.
To create a deadline:
-
Open the relevant matter.
-
Go to the Deadlines tab.
-
Click Create Deadline.
-
Complete the deadline form.
-
Click Create Deadline.
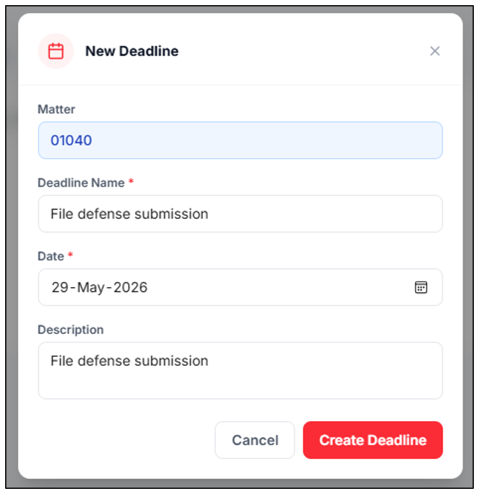
The deadline form includes:
| Field | Required | Description |
|---|---|---|
| Deadline Name | Yes | The title or name of the deadline. |
| Date | Yes | The target due date. |
| Description | No | Additional context or notes. |
| Matter | Automatically populated | The current matter. |
When a deadline is created from within a matter, the matter field is pre-filled and locked to the selected matter.
Documents
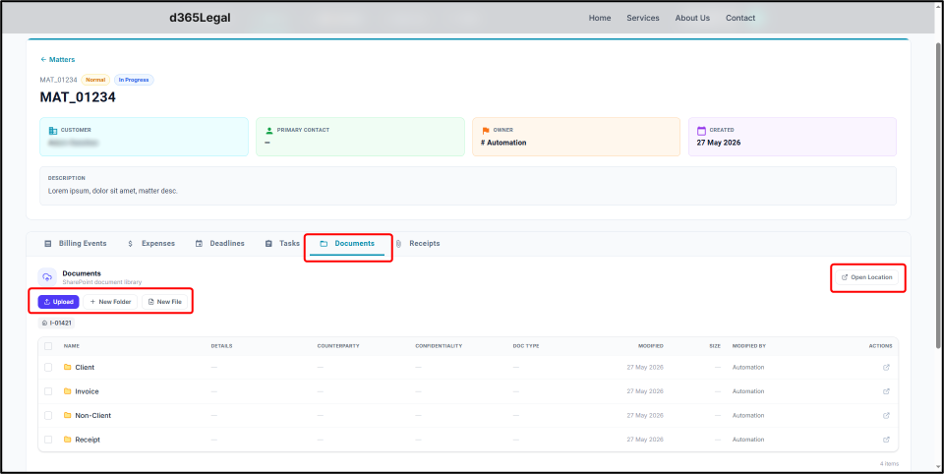
The Documents section allows staff to view and manage all folders and files related to the selected matter. This section is connected to the matter’s SharePoint document library, making it easier for staff to access and manage matter-related documents directly from the portal.
To access documents, open a matter record and select the Documents tab.
From this section, staff can:
| Option | Description |
|---|---|
| View folders and files | Displays all folders and files stored against the selected matter. |
| Upload | Allows staff to upload new documents to the matter folder. Files can be selected or dragged and dropped into the upload area. |
| New Folder | Allows staff to create a new folder within the matter document location. |
| New File | Allows staff to create a new file directly within the matter document location. |
| Open Location | Opens the SharePoint location for the selected matter folder. This allows staff to access the same documents directly in SharePoint. |
Uploading and Tagging Files
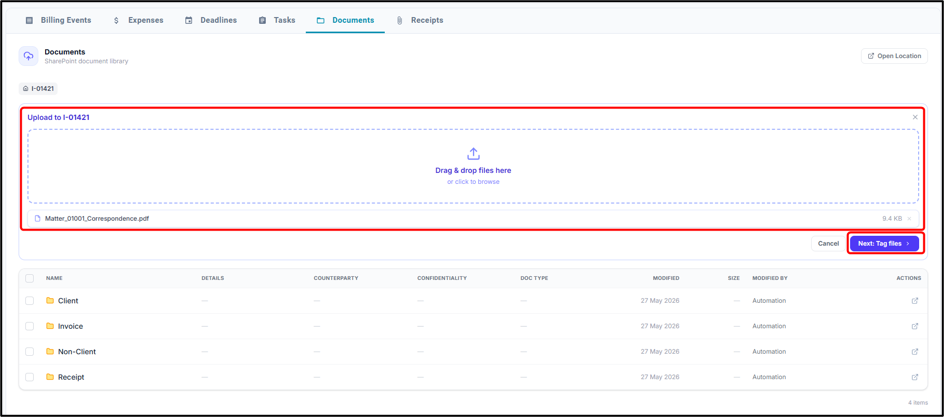
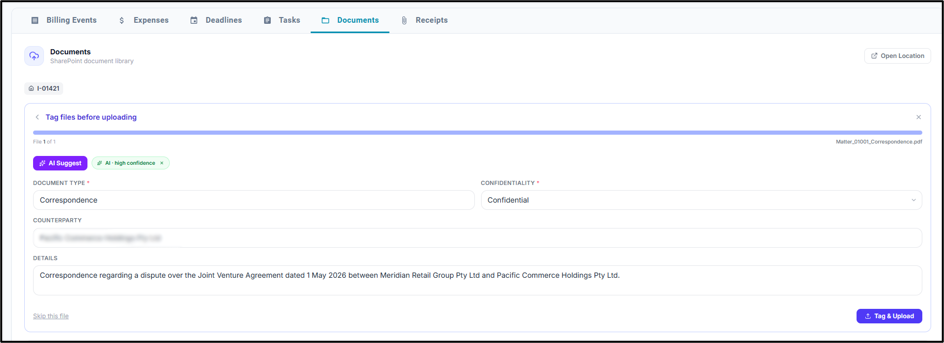
When uploading a file, staff can choose to tag the file before completing the upload. After selecting or dragging a file into the upload area, select Next: Tag files.
The portal includes an AI-assisted tagging feature. This allows the system to read the uploaded file and suggest metadata such as:
-
Document type
-
Confidentiality
-
Counterparty
-
Details or description
Staff can review the AI-suggested tags, update them if required, and then select Tag & Upload to save the file with the selected metadata.
This helps ensure documents are uploaded with useful information, making them easier to identify, search, and manage later.
Receipts
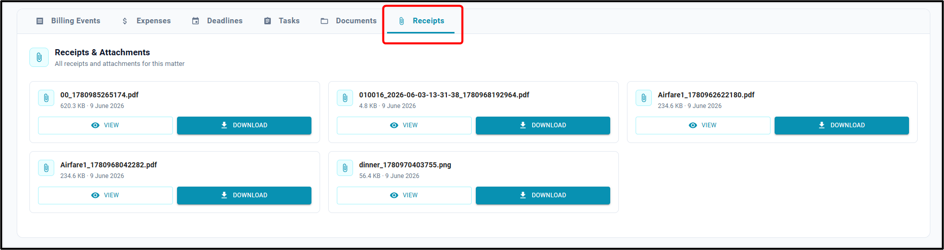
The Receipts section allows staff to view receipts and attachments related to expenses for the selected matter.
To access receipts, open a matter record and select the Receipts tab.
From this section, staff can:
| Option | Description |
|---|---|
| View receipts | Displays all receipt files and attachments linked to the selected matter. |
| View | Opens the selected receipt so staff can review it. |
| Download | Downloads the selected receipt file to the user’s device. |
This section provides a quick way for staff to access supporting documents for expenses without needing to search manually through SharePoint or other document locations.
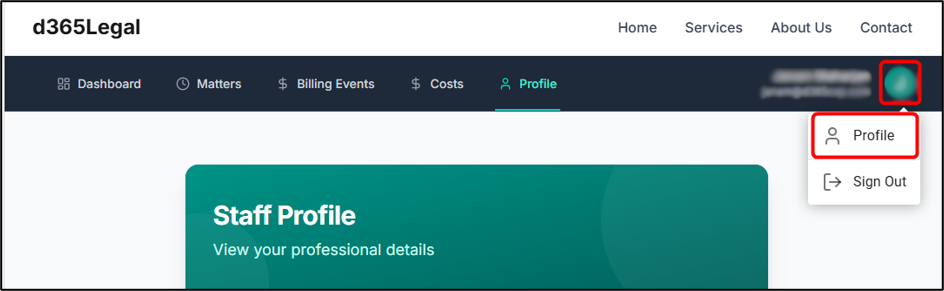
Staff Profile
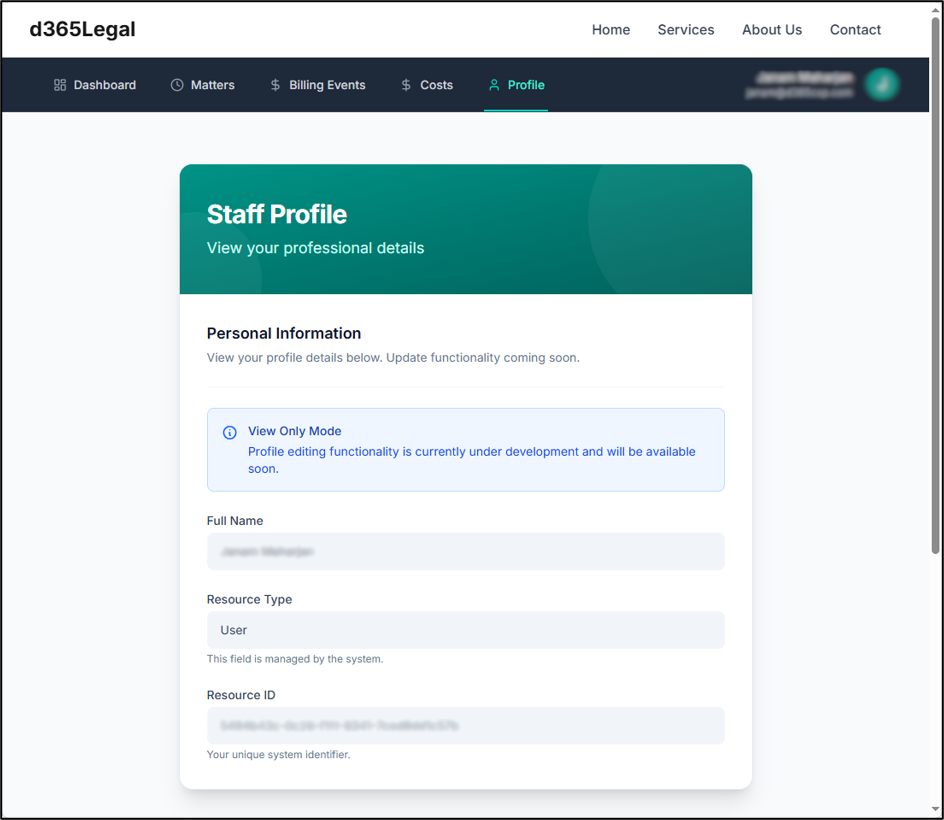
The Profile page displays information from the staff member’s Bookable Resource record in Microsoft Dataverse.
This may include professional or staff-related details used by the Legal Solution.
Profile editing is not currently available through the Staff Portal. If staff details need to be updated, the user should contact the system administrator.
If the Profile page displays an error, the staff user account may not be linked to a Bookable Resource record. In this case, the user should contact the administrator to confirm their setup.
Tips and Portal Behaviour
The Staff Portal includes several usability features to help staff work efficiently.
| Feature | Description |
|---|---|
| Column Resizing | Available on list views by dragging the column edge. |
| Row Selection | Clicking a row opens the related detail page. |
| Back Navigation | Users can use the Back button or breadcrumbs to return to the previous list. |
| Mobile Layout | List views switch to a card layout on smaller screens. |
| Matter Pre-fill | When creating costs, billing events, tasks, or deadlines from a matter, the current matter is automatically pre-filled where applicable. |