Managing Multiple Companies in Dynamics 365 Business Central
Introduction
Business Central provides an environment where several business entities can exist, with each entity having its independent financial records for audit and tax purposes. Each company can have its own Chart of Accounts and home currency, and cross-company transactions are automatically generated when these companies are defined as Intercompany Partners and accounts are mapped.
This guide covers the basic configuration for using several companies within a Business Central environment (Production or Sandbox) in a single tenant. Cross-tenant intercompany configuration requires additional steps.
Inter-Company Configuration
In setting up the Inter-Company Configuration, each company/entity must treat the other companies as Partners. The setup in each company is reciprocally completed in the “partner” companies.

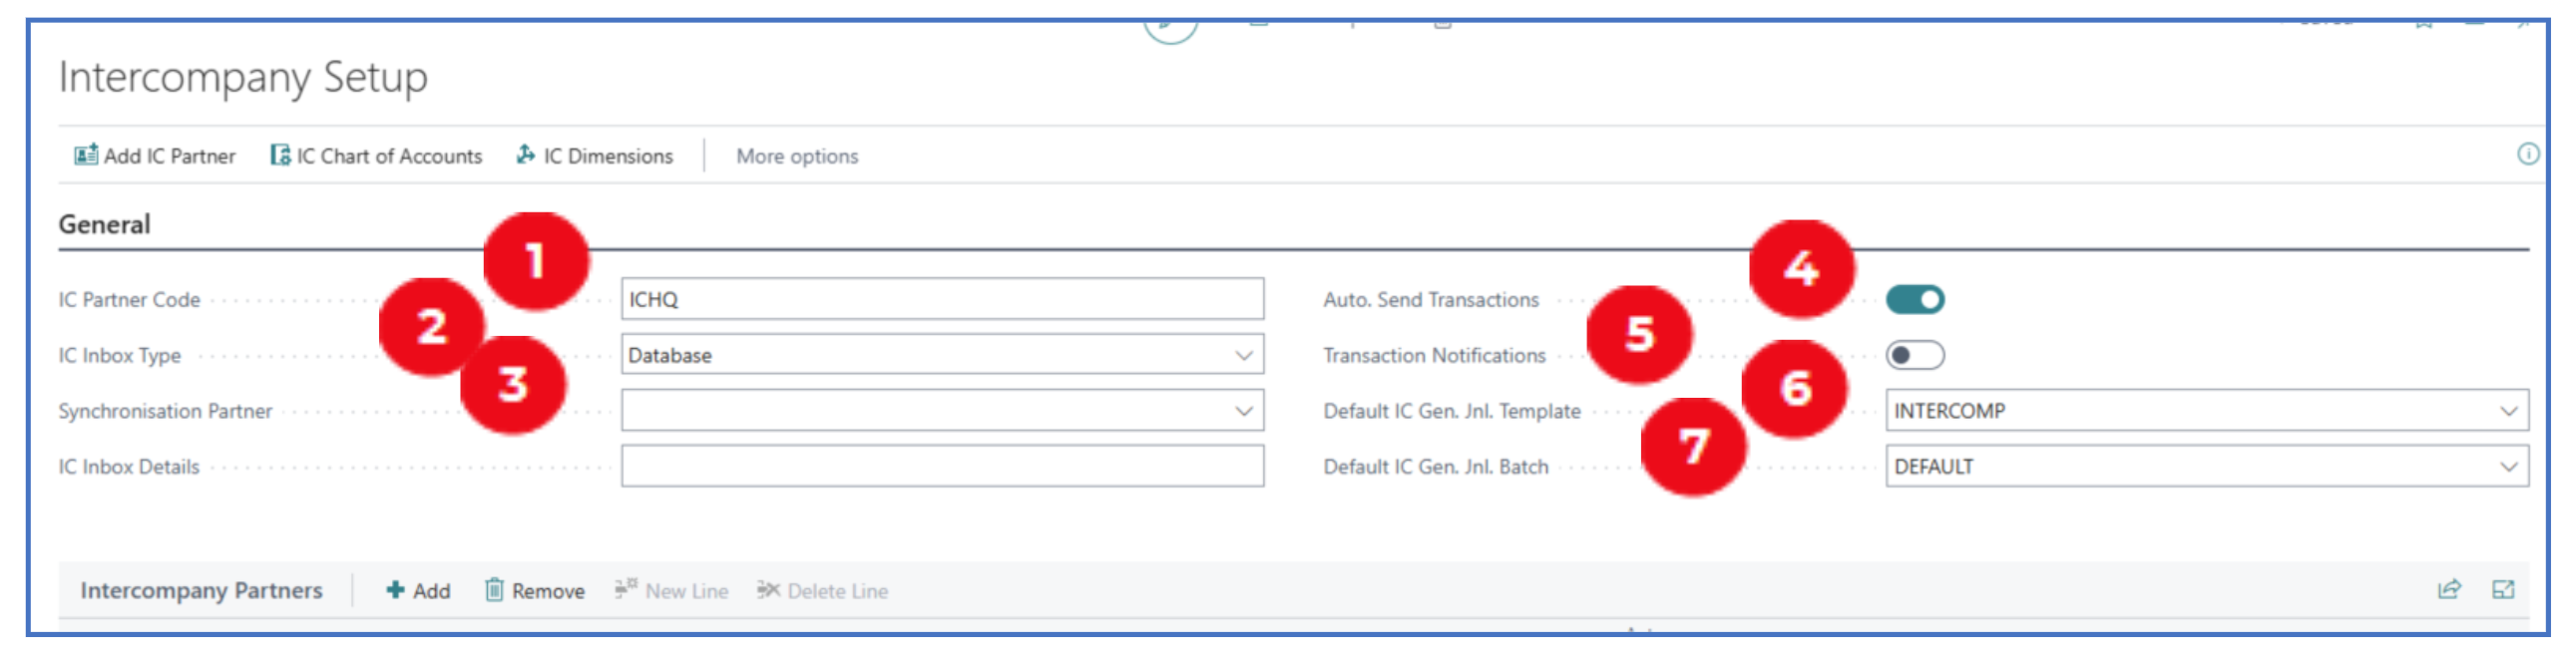
Setup
This setup defines the partner code of the “main” company and list/add the intercompany codes of partner companies.
-
IC Partner Code: Define a code (20 char max) to represent this company in the intercompany configuration. This will be the company code referenced in other partner companies.
-
IC Inbox Type: Select “Database” as the default since transactions are managed within the same tenant environment.
-
Synchronisation Partner (optional): Select the default company partner (if more than 1) by which this company’s Chart of Accounts will be synchronised with.
NB: Important to note that there should be one main company whose Chart of Accounts will be used to synchronise with the Chart of Accounts of other partner companies to allow for consistent consolidation mapping.
-
Auto Send Transactions (optional): Enable this to allow intercompany transactions from this company to auto-generate transactions in the partner company.
-
Transaction Notifications (optional): Enable this if you require notification whenever an intercompany transaction is posted.
-
Default IC Gen. Jnl. Template: Select the default INTERCOMP template created for cross-company transactions.
-
Default IC Gen. Jnl Batch: Select DEFAULT for the default intercompany batch name.
Inter-Company Partner
One or more companies can be setup as “trading partner” companies with the “main” company in this configuration.
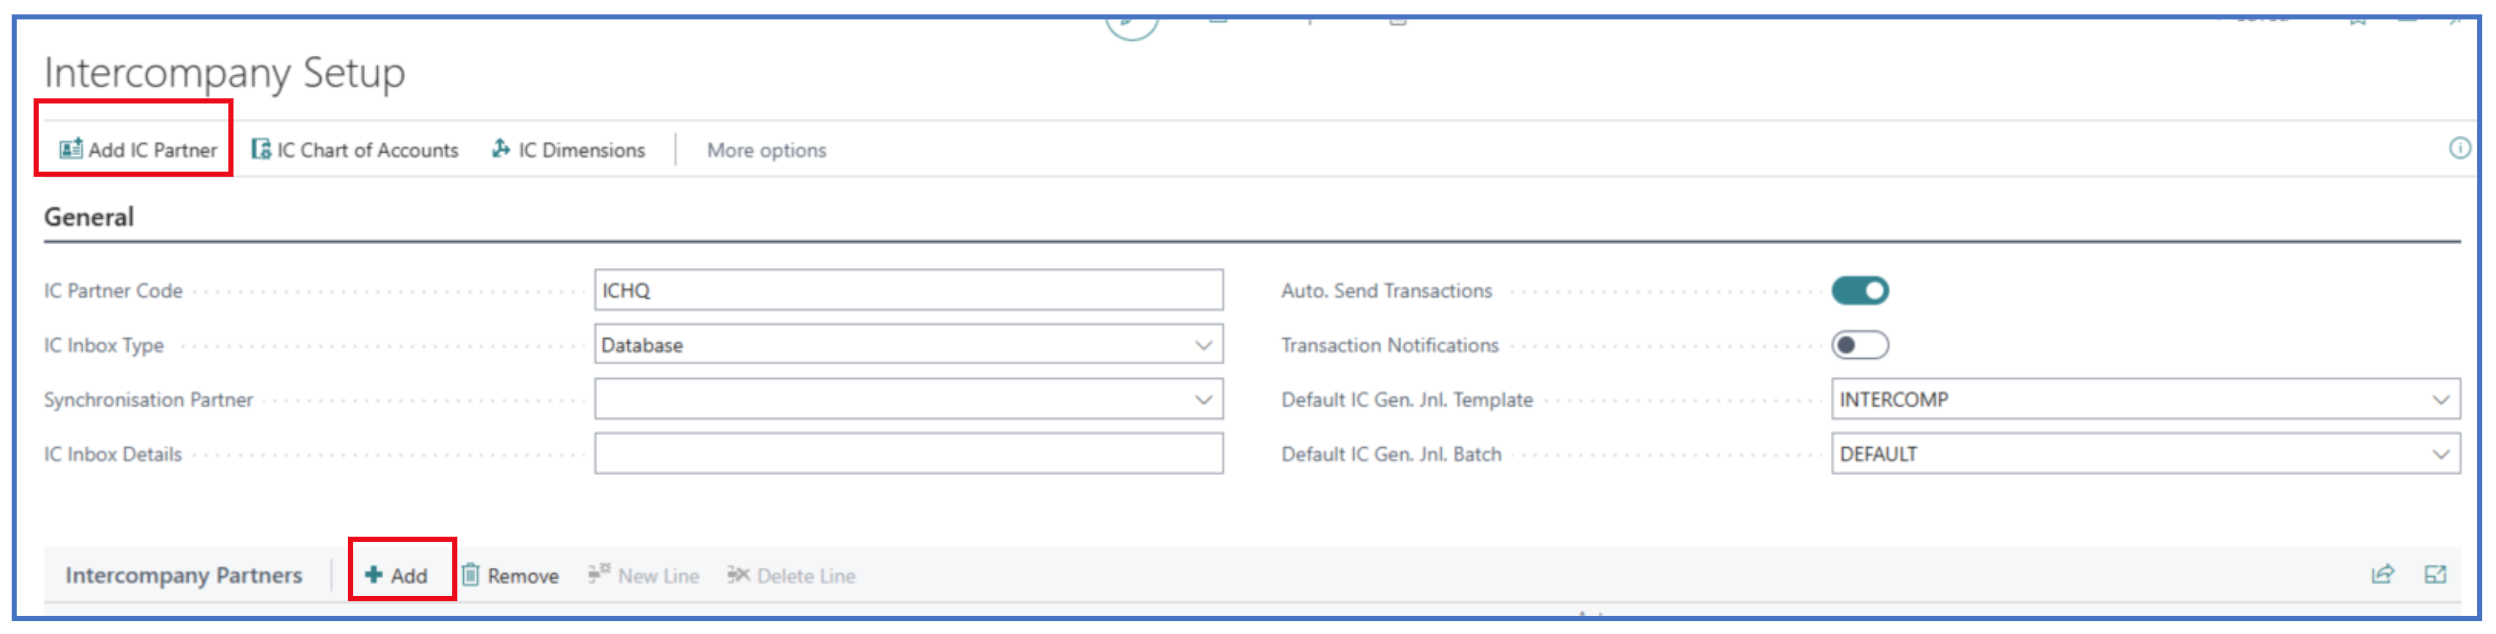
Click on Add IC Partner or Add to open the Inter-company partner definition page:
Dimensions, Bank Accounts (optional) If the intercompany transactions require updating of the destination company’s dimension or bank account, these have to be separately setup.
Connect Externally Setup (optional) Used when the inter-company configuration requires a separate environment or tenant.
General Tab
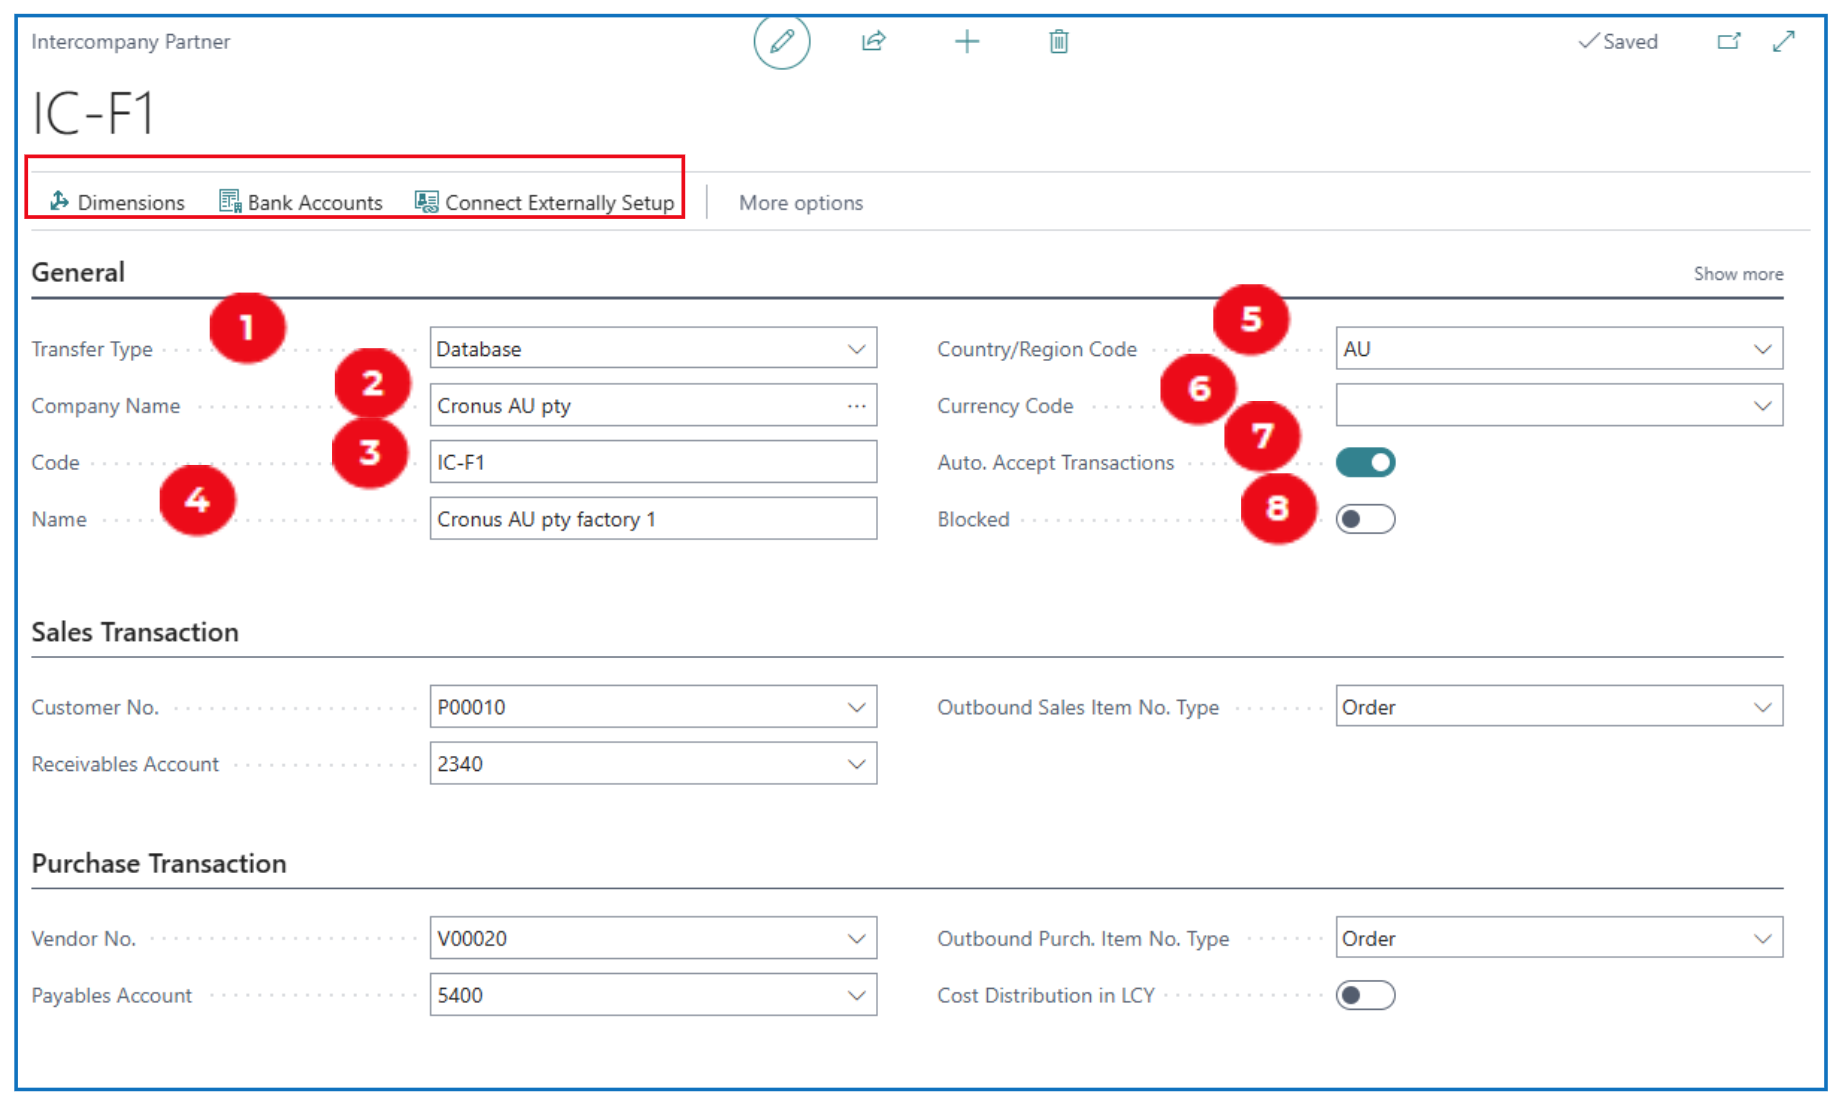
-
Transfer Type: Accept the “Database” default since the companies to include are in the same database environment (i.e. not external environment).
-
Company Name: Select the partner company name from the list of companies created in the same environment.
-
Code: Enter a partner code (20 char max) for the selected company.
-
Name: The name of the selected company defaults here.
-
Country/Region Code: Select the region/country code of the partner company.
-
Currency Code: Select the currency code of the partner company (if it differs from the base currency code of the current company).
-
Accept Auto Transfer: Enable this to allow the partner company to receive and auto-generate the Intercompany Journal for transactions initiated from the current company.
-
Blocked: Enable to block further inter-company transactions.
Sales Transaction Tab
The partner company needs to be setup as a Customer with an Inter-Company Receivables account — these are defined and defaulted here. It enables the current company to recharge expenses or invoice the partner company.

Purchase Transaction Tab
If the partner company is also recharging to the main company, it needs to also be setup as a Vendor with an Inter-Company Payables account — these are defined and defaulted here. It enables the current company to auto-receive journal lines for expenses or invoices that the partner company recharges.

Chart of Accounts Mapping
Once the intercompany partner is setup, the IC Chart of Accounts need to be mapped. The main company and partner company can have different COA codes for mapping to the Intercompany COA (but it helps to have the same COA codes).
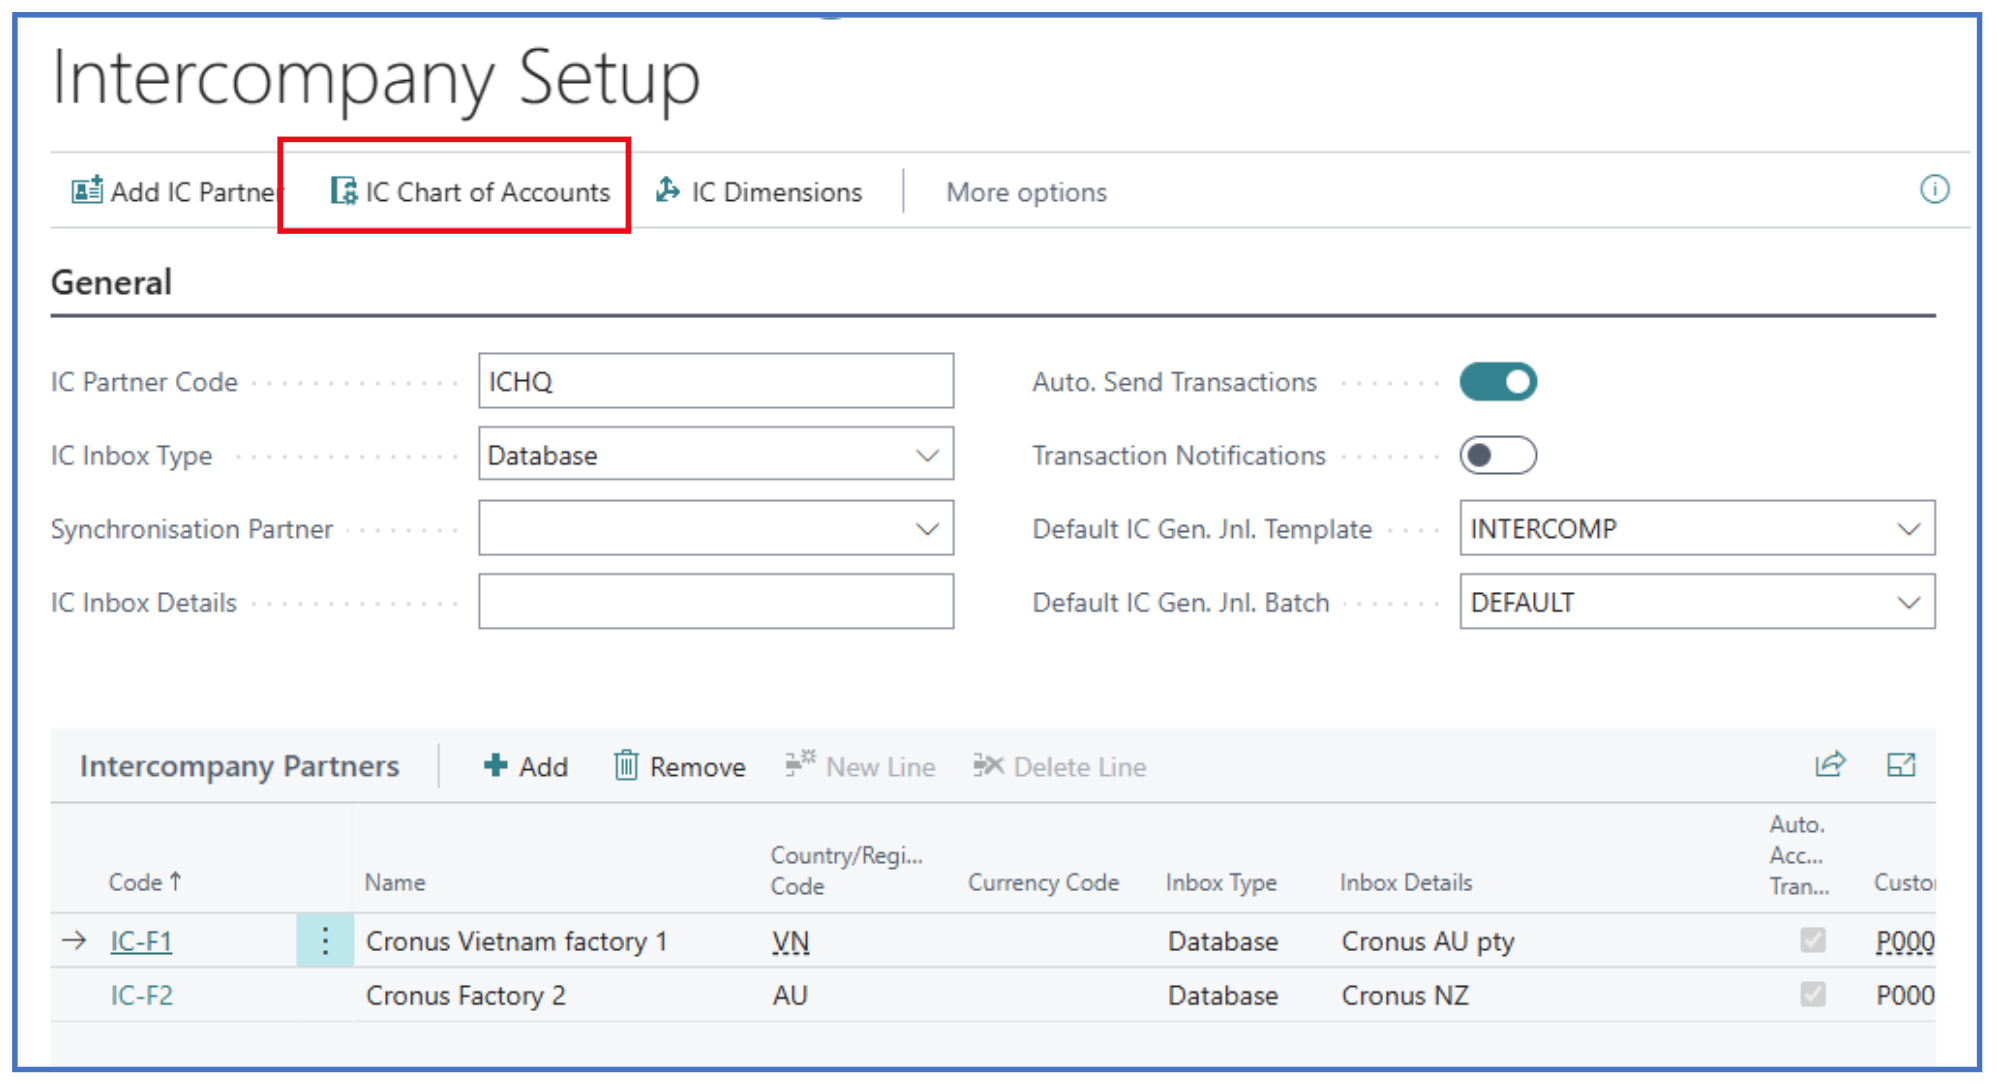
Select IC Chart of Accounts from the list of IC setup pages to open the page:
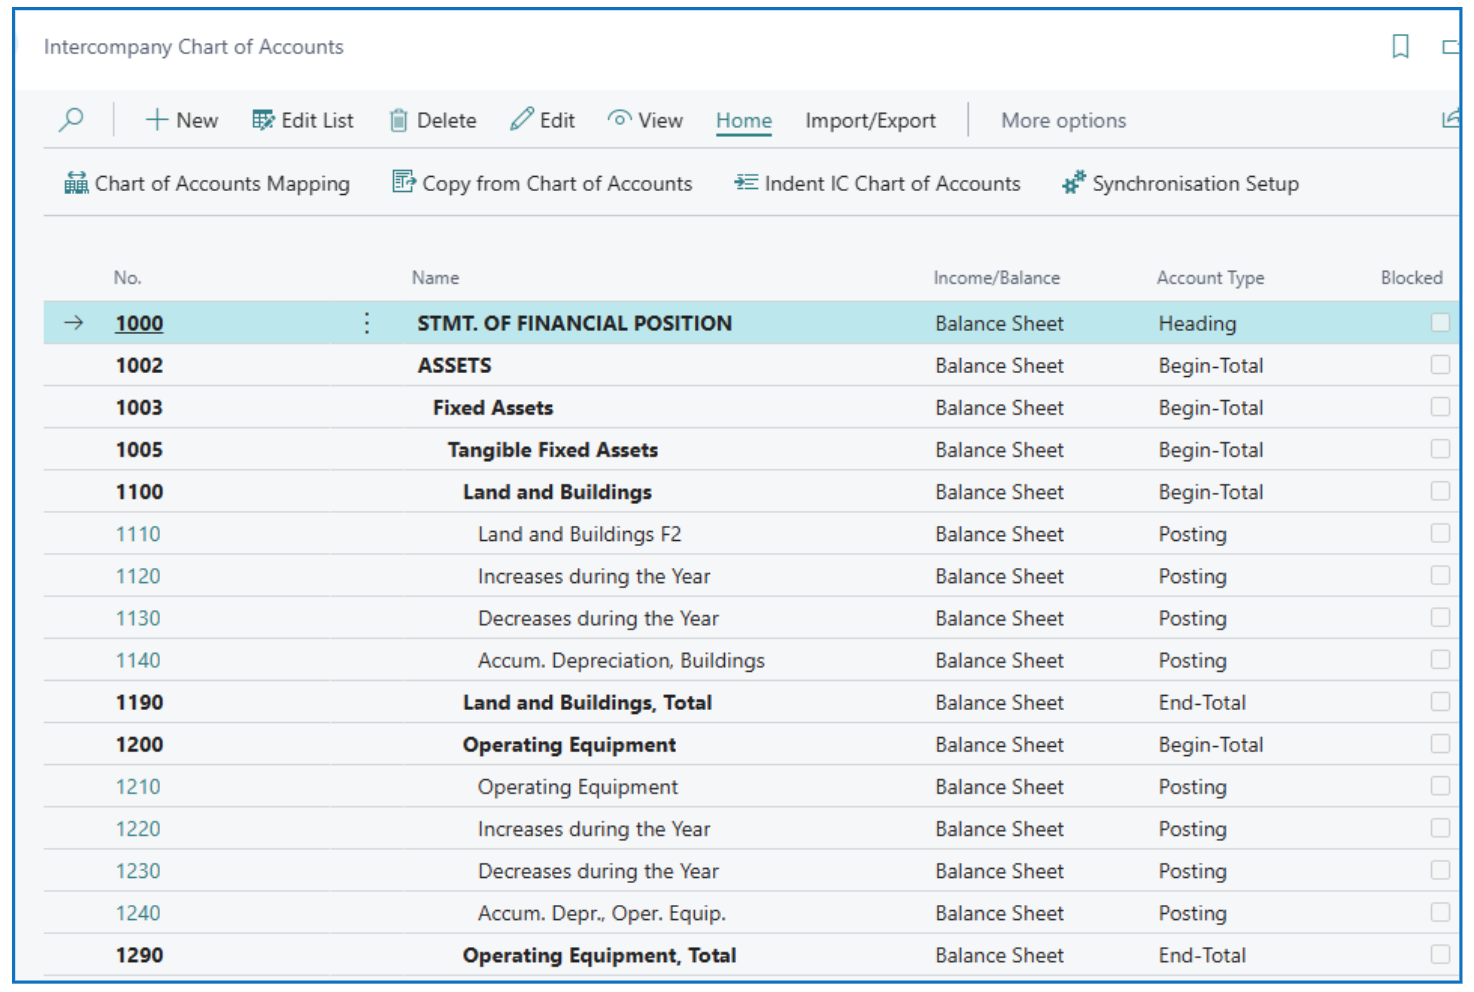
You can define an individual set of account codes for intercompany or select Copy from Chart of Accounts to replicate the same COA.
Once replicated or defined, select Chart of Accounts Mapping to display the COA from the current company for mapping.
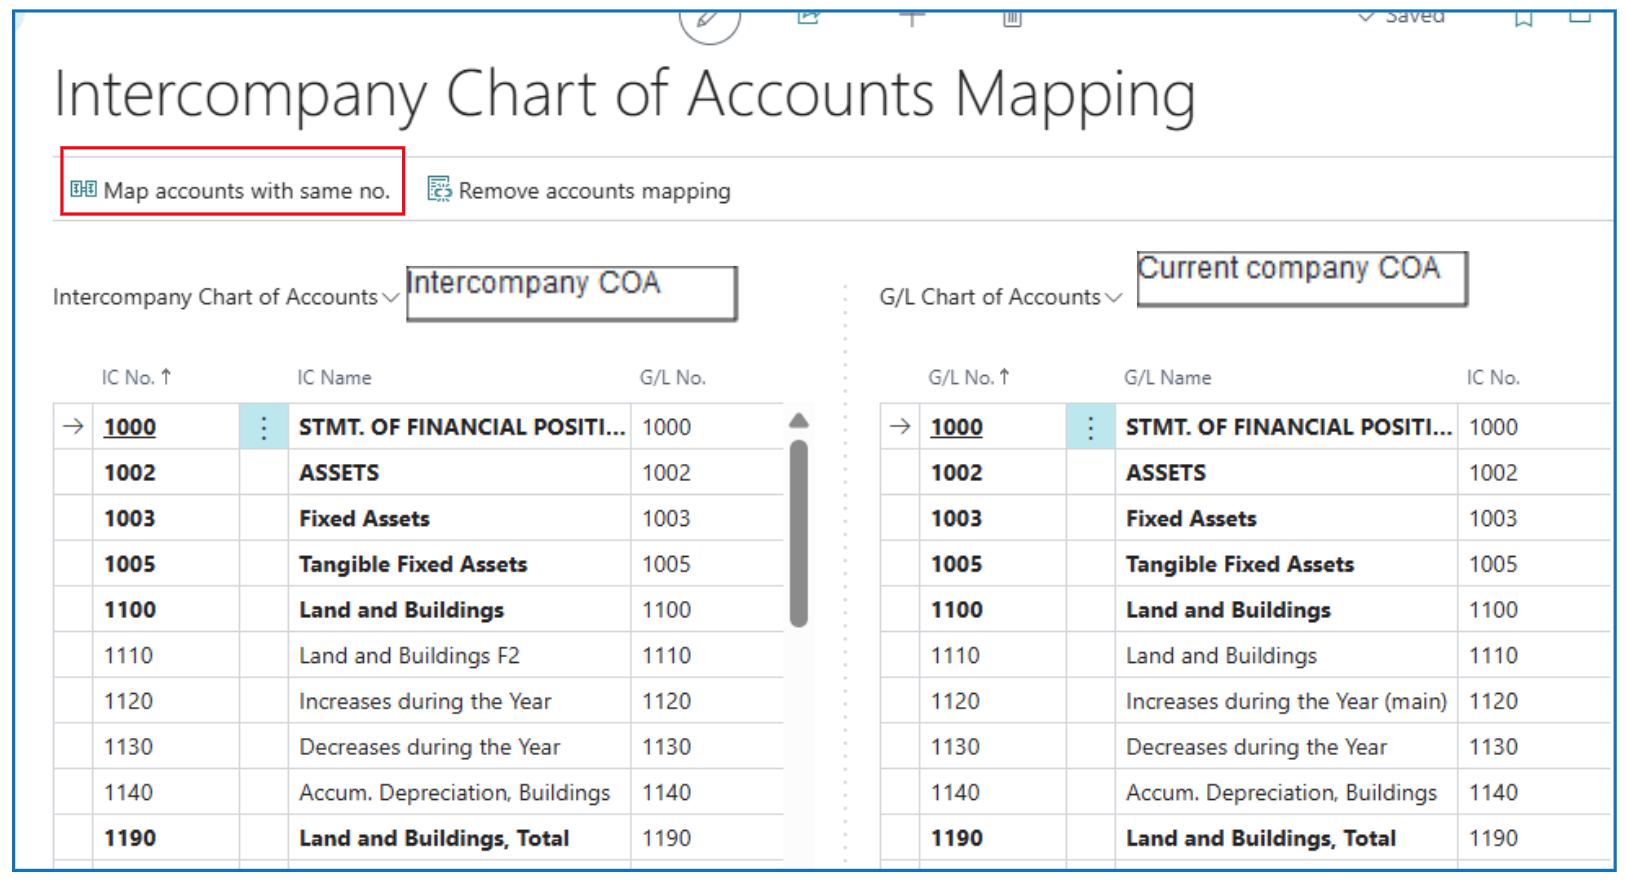
Select Map accounts with same no. for the system to map the COA on the left (Intercompany) with COA on the right (current company).
Once the Intercompany accounts are mapped, inter-company transactions will pickup the correct GL accounts used in journals.
Consolidating Across Companies
Each company’s transactions are posted into a single balancing GL chart of accounts to produce financial reports. When consolidation is required, each company is defined as a Business Uni and the Consolidating company “pulls” a set of month-end values from each business unit to combine.
Create Consolidation Company
Create a company for consolidating month-end balances from every subsidiary business unit. No other transactions exist in the Consolidation Company except for consolidating journals from all business units.
Define Business Units
The setup of consolidation requires defining subsidiary companies as Business Units in the Consolidation company.
Select menu option Business Units and click on +New.

-
Code and Name: Define a business unit code and name for the company.
-
Currency Code and Exchange Rate Table: If the subsidiary company has a different base/home currency, specify the currency code; otherwise, leave blank. The Currency Exchange Rates for consolidating transactions can either be Local (using the consolidating company’s exchange rates) or Business Unit (using the exchange rates from the business unit).
-
Consolidate: Enable this flag to include the defined business unit in the consolidation.
-
Consolidation %: Define the % of consolidation for the current entity (based on ownership %)
-
Start Date and End Date: Enter the Start and End dates of this business unit if the fiscal year dates are different from the Consolidation company
-
Data Source: Define the business unit data currency — either base/home currency or reporting currency
-
Default Data Import Method and Company Name: These fields are used to associate the defined Business Unit with a Company code.
-
G/L Accounts: Define the various GL accounts for posting of exchange differences when consolidating transactions from this Business Unit (assuming it has a different base currency).
Run Consolidation
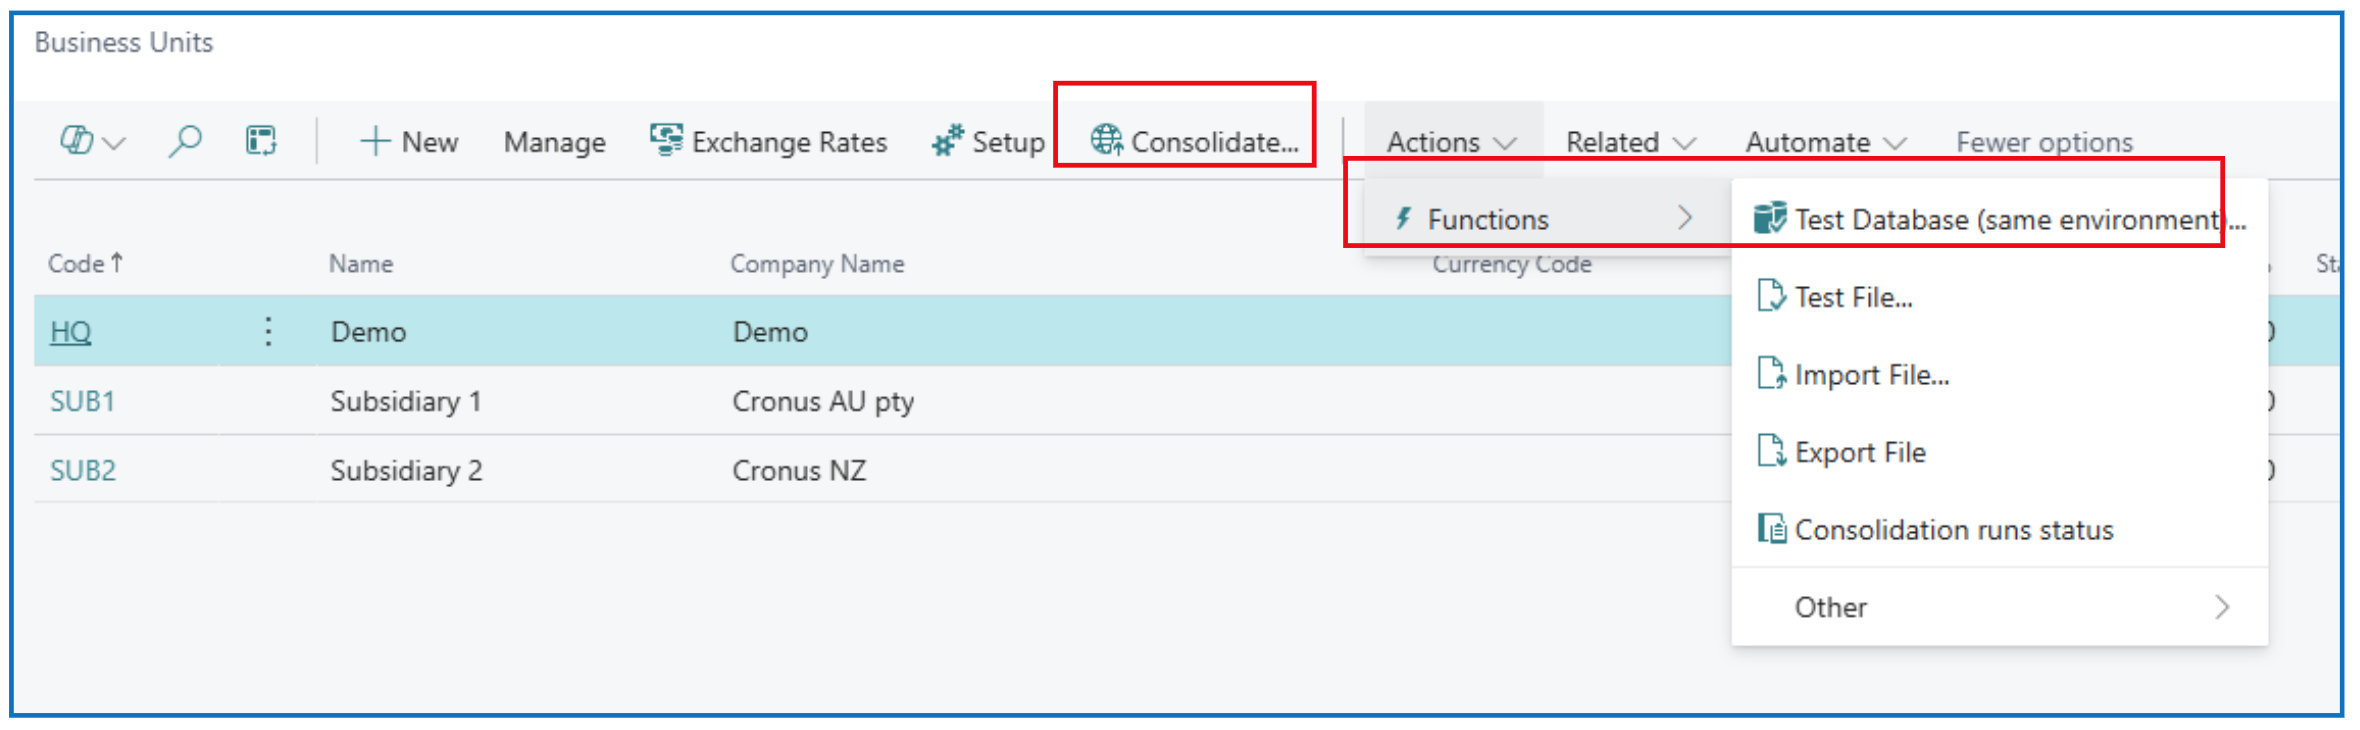
After all companies are defined as Business Units in the Consolidation Company, select Actions > Functions > Test Database (same relationship) to run a test report that validates the GL account mappings.
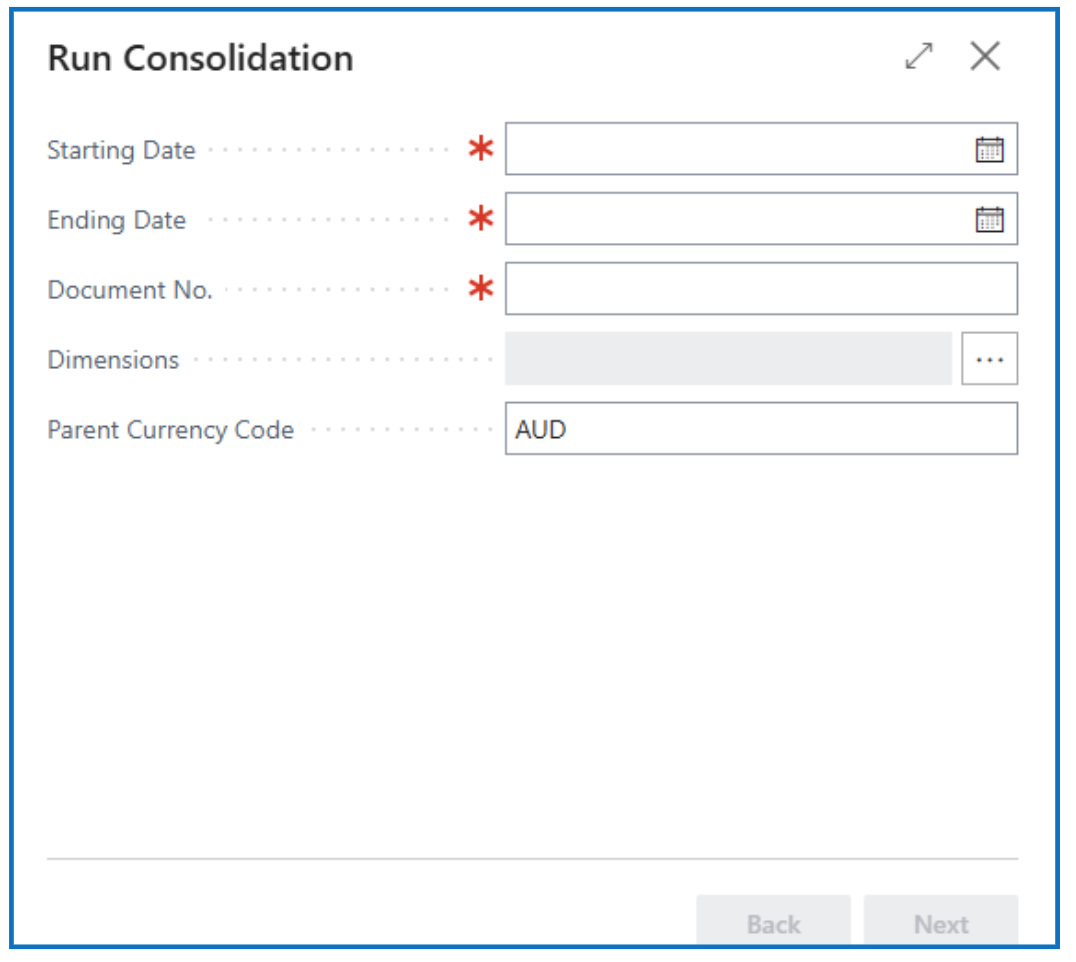
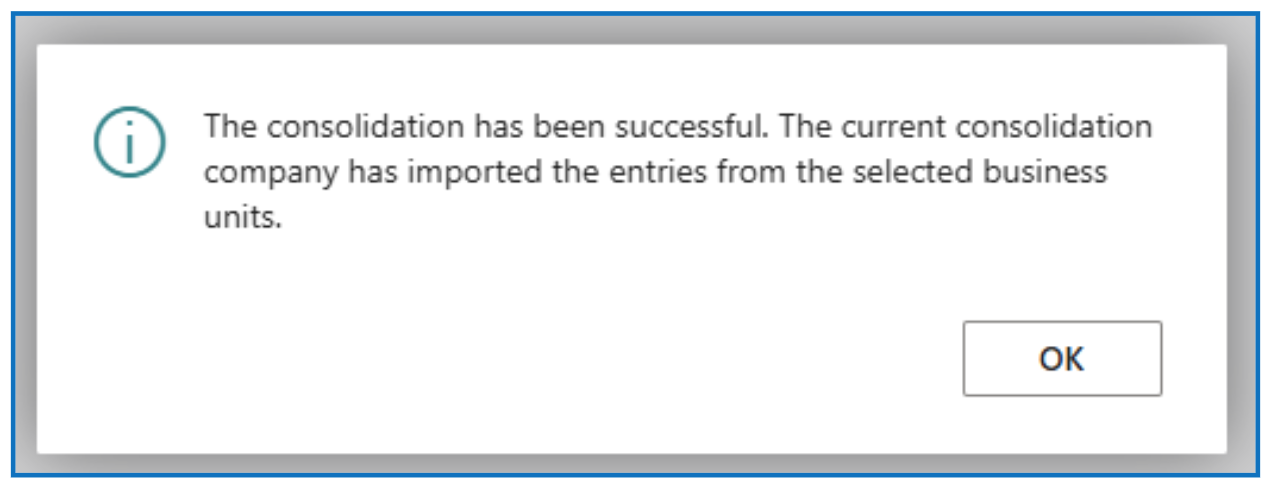
Once validated, select Consolidate to run the consolidation of business units. In the prompt, select the date range for consolidating transactions and the currency to use. Specify a document number for the consolidating transactions from business units.
This opens the list of consolidating Business Units defined:
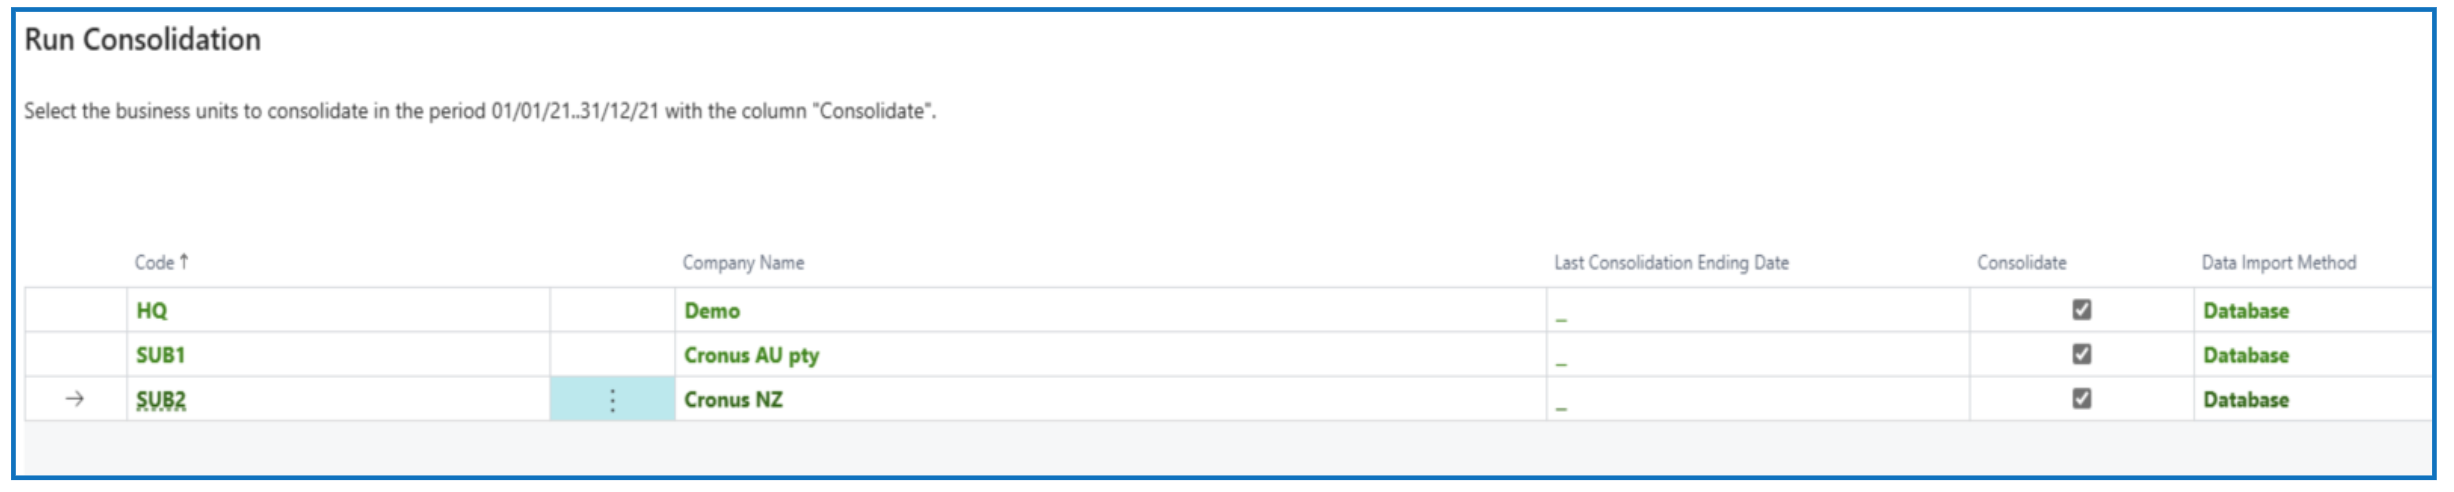
The Consolidate flag is enabled by default. (Disable the flag is you do not wish to include the subsidiary).
Otherwise, click NEXT to continue with the consolidation process until the end.
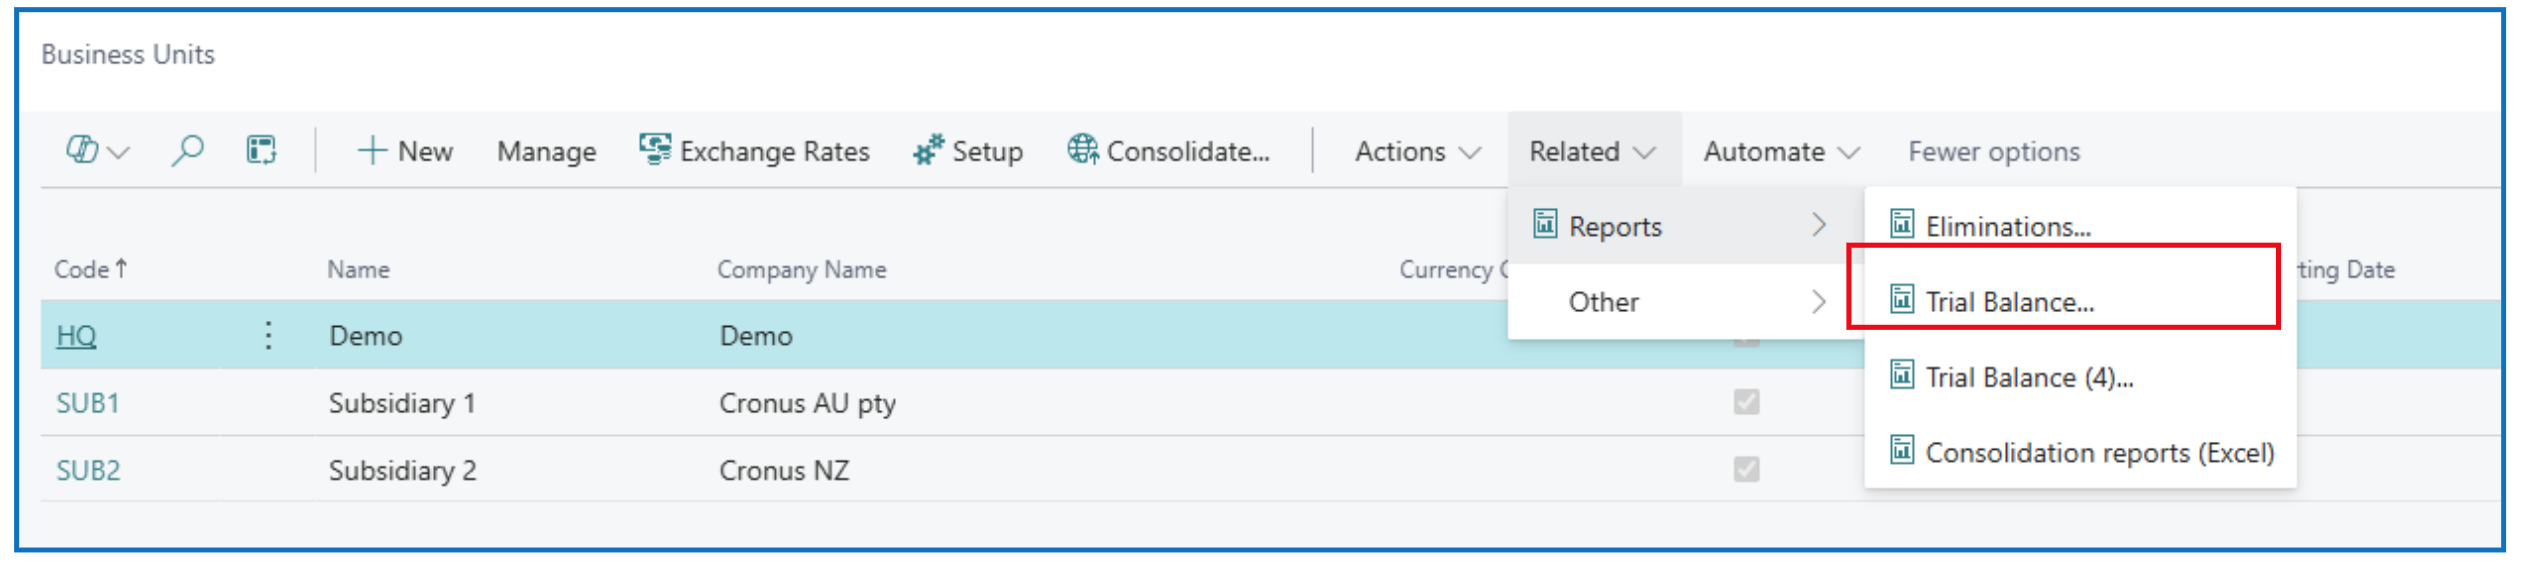
Run Consolidation Trial Balance and Post Elimination Journal
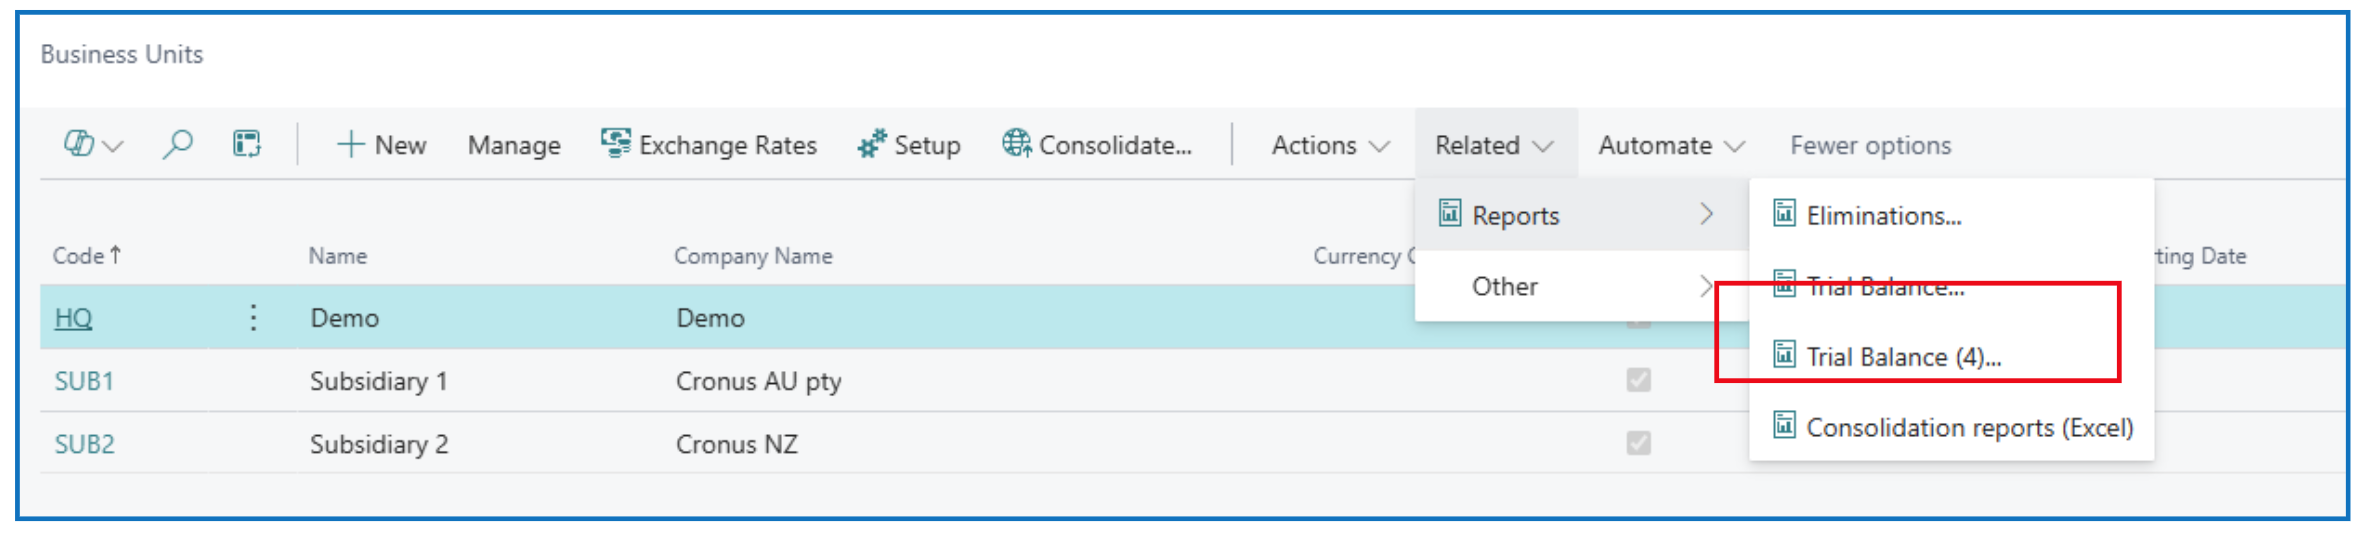
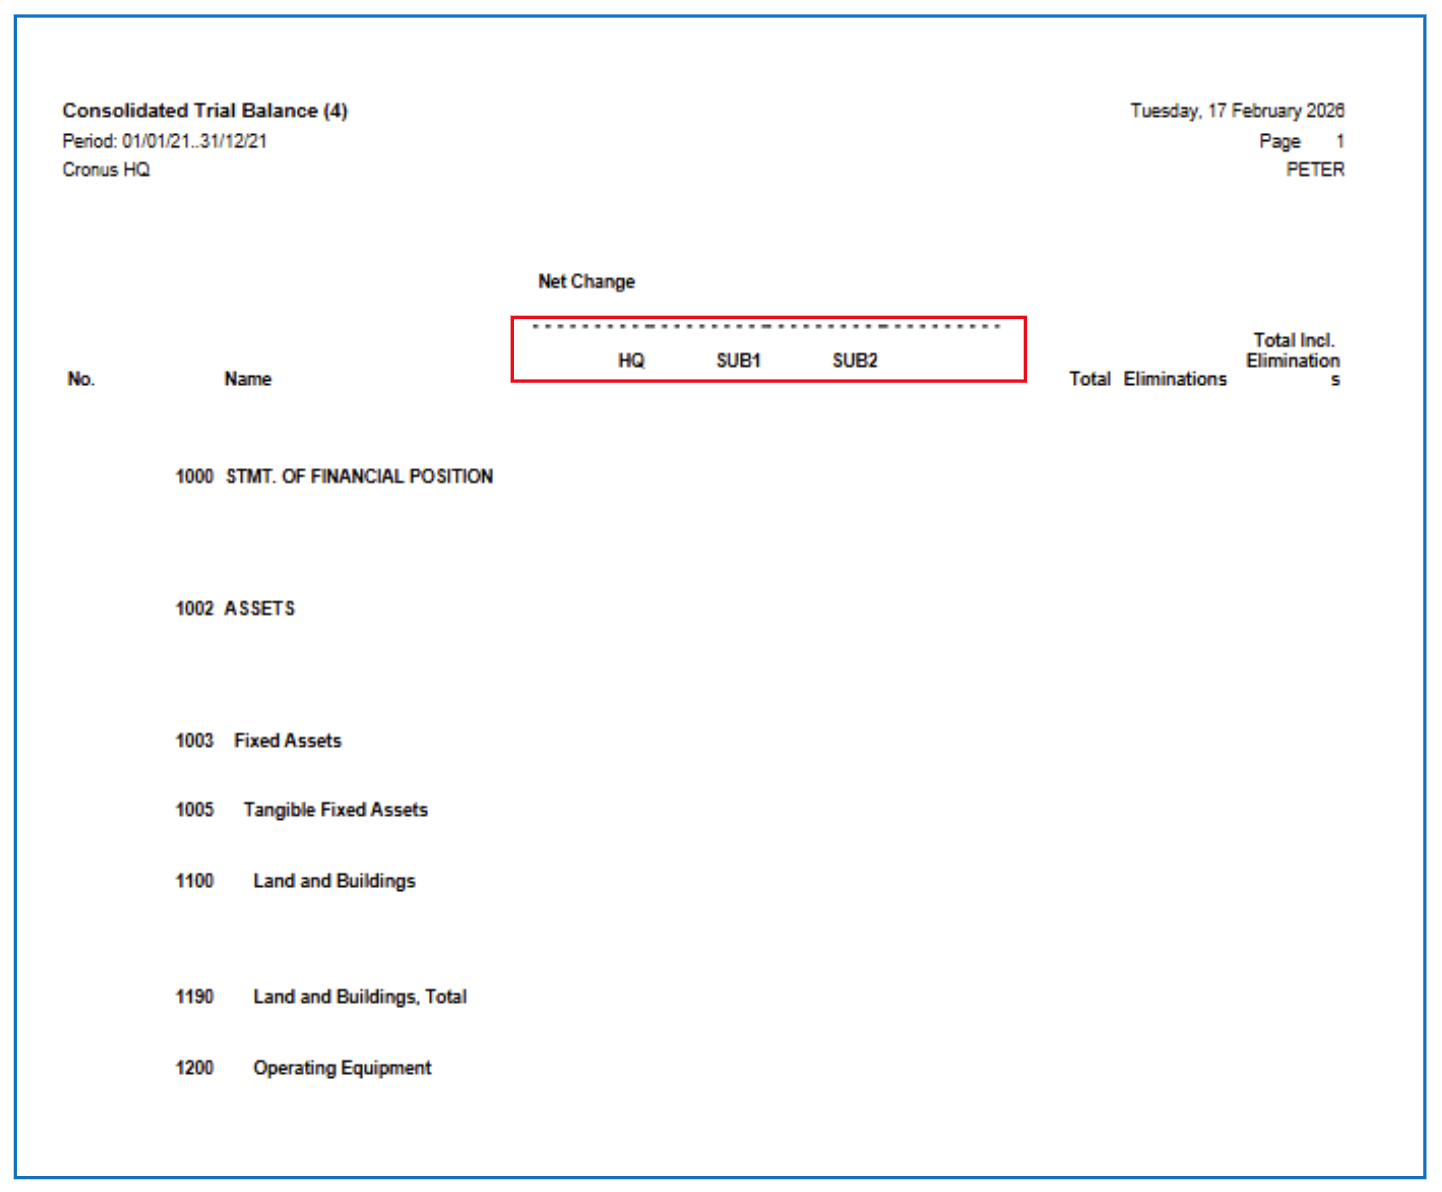
After consolidating from all Business Units, run the Trial Balance by selecting Related > Reports > Trial Balance (4) to view the trial balance columns for the business units.
Example structure:
Create a journal batch to record elimination entries in the Consolidation Company — these are used to offset balances in intercompany accounts, example, Intercompany receivables and intercompany payables.
After posting the intercompany journals, run the Consolidation Trial Balance showing the elimination entries. Select Related > Reports > Trial Balance.
You can also run other Consolidation reports that are Excel-based.
Global View of Companies
When there’s a consolidation company, it is also possible to create a “global” view of certain balances from each subsidiary, using Company Hub. This Company Hub “global view” could exist in the Consolidation Company or the Main Company, and comprises of all the companies defined in the environment.
Company Hub
Select Company Hub list page.
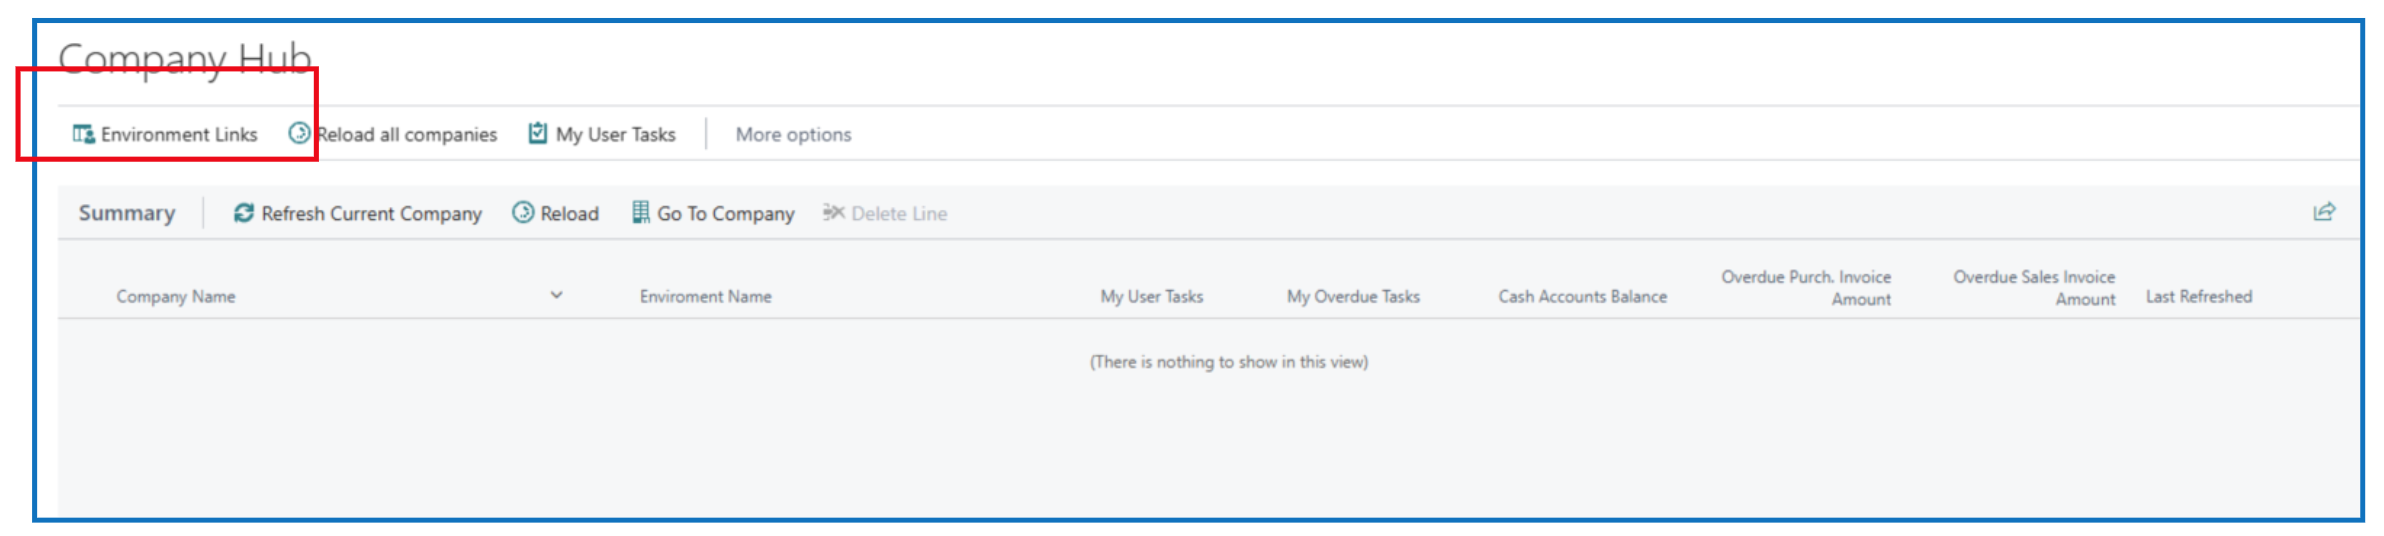
Select Environment Links to associate a company to the hub (use +New to create a new link).
-
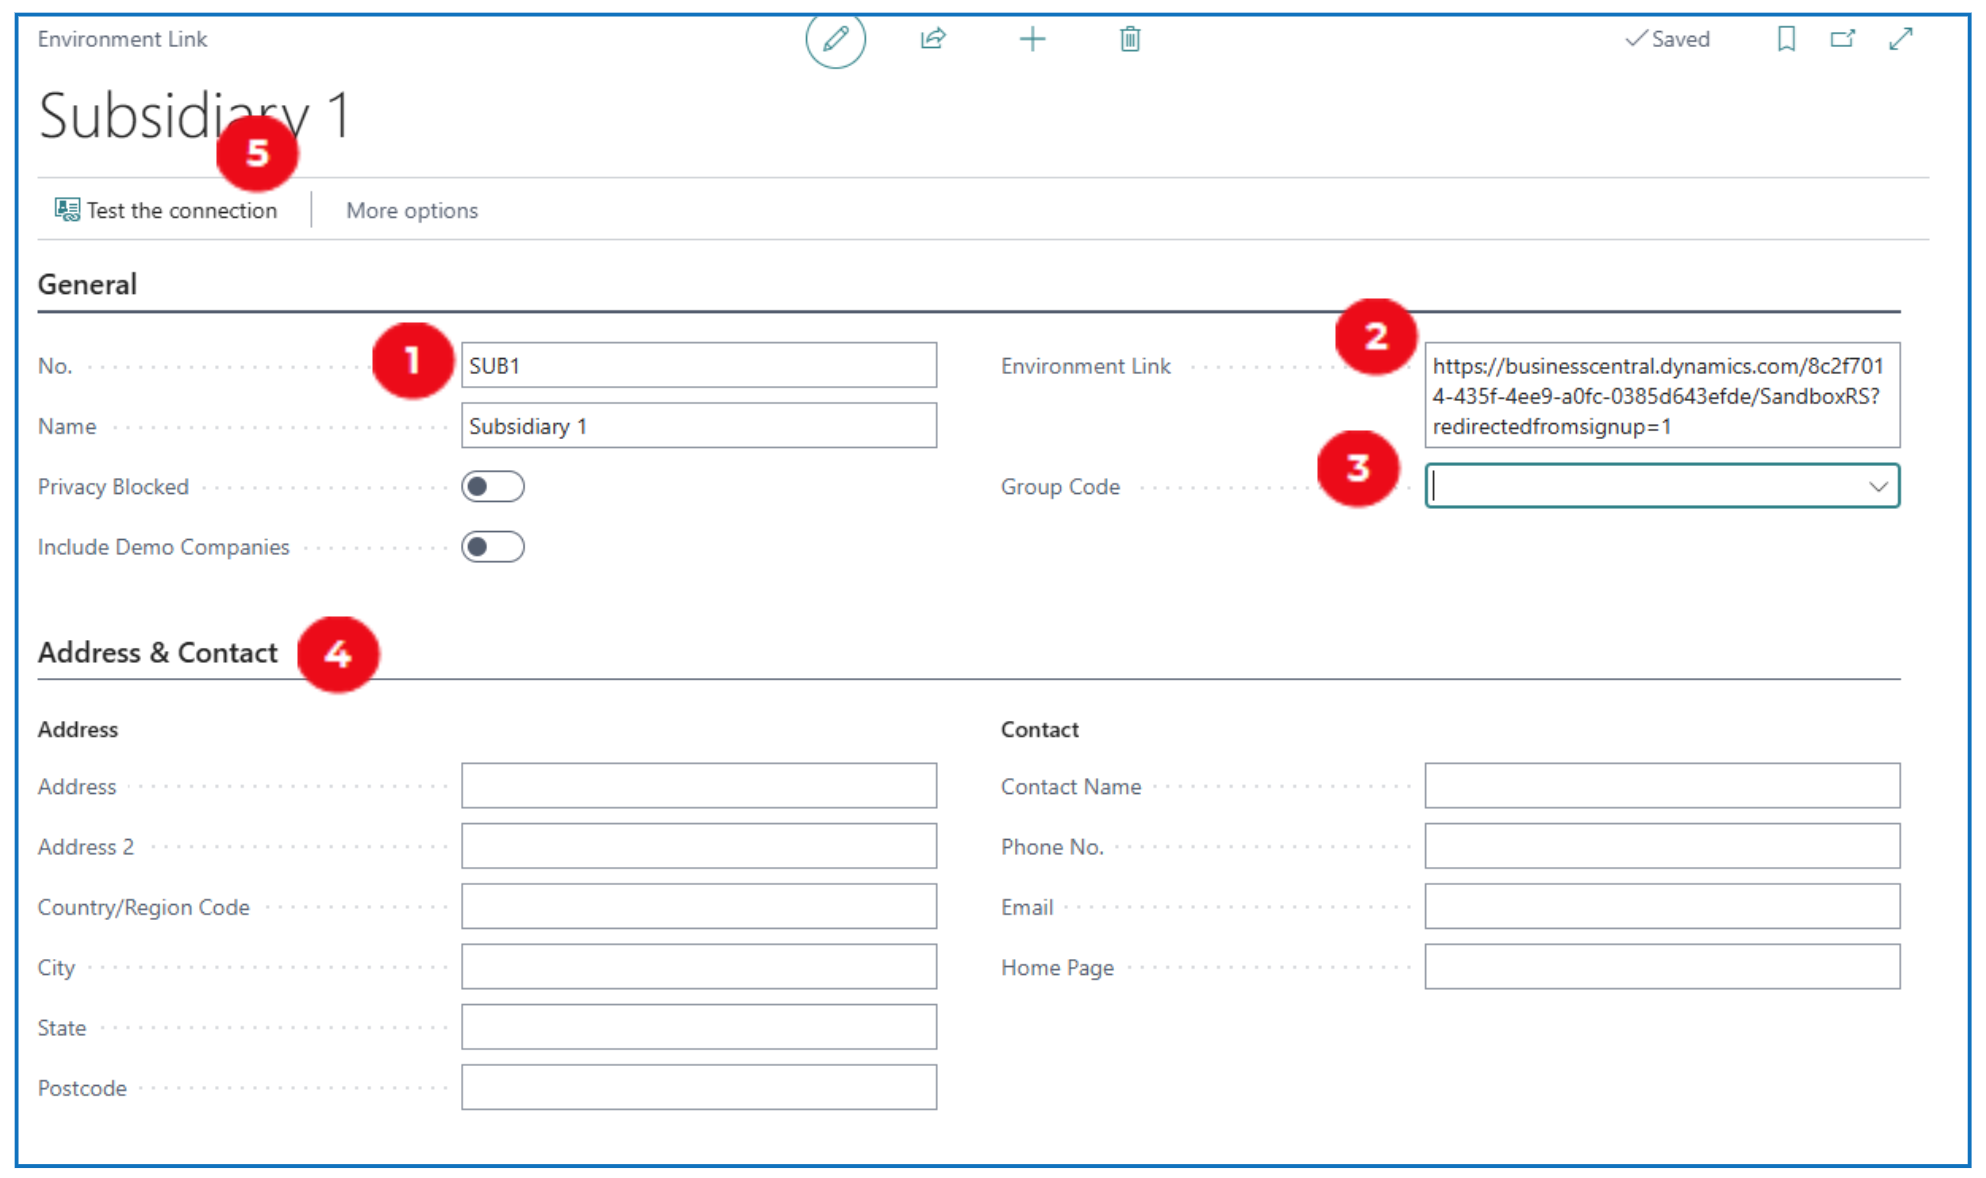
No. and Name: Define a code and name for the company to be linked in the Hub.
-
Environment Link: Copy the URL for the environment (from Admin Centre) and paste it in this box to establish the link.
-
Group Code (optional): Define group codes to group companies for display on the Hub.
-
Address & Contact (optional): Complete the information for the company.
-
Select Test the Connection to verify the link to the company.
Once the environment link is established, click on Reload to display all the companies in the environment.
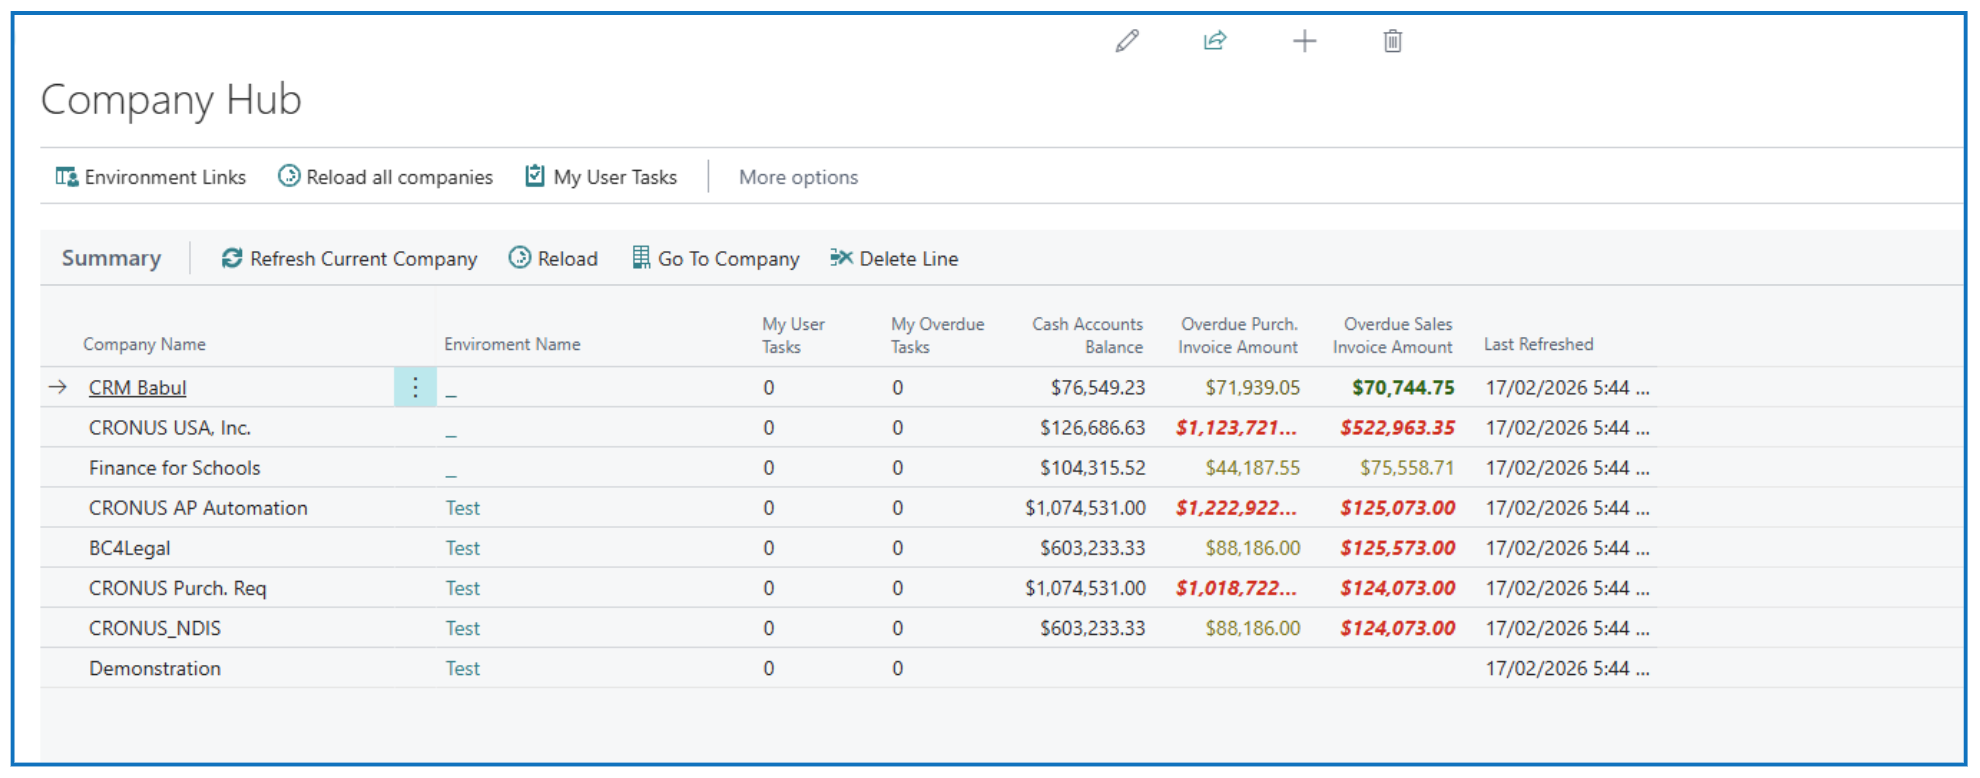
The information displayed in the columns across all companies can be Personalised.
To access the company in a new browser window, highlight the company name and select Go To Company menu option.
Written By:
Peter Loo
Team Leader, Business Central
Connect on LinkedIn