Quality Control Management in Dynamics 365 Business Central User Guide
Introduction
This Quality Control Management app is an extension to standard Business Central addressing the need for a Quality Control module to record QC measures in Business Central. The app complements current Purchasing/Warehouse Receipting processes, allowing users to nominate industry-standard quality specifications and measures for recording quality inspection outcomes.
Visit Microsoft Marketplace to get the app: Quality Control Mgmt for D365 Business Central
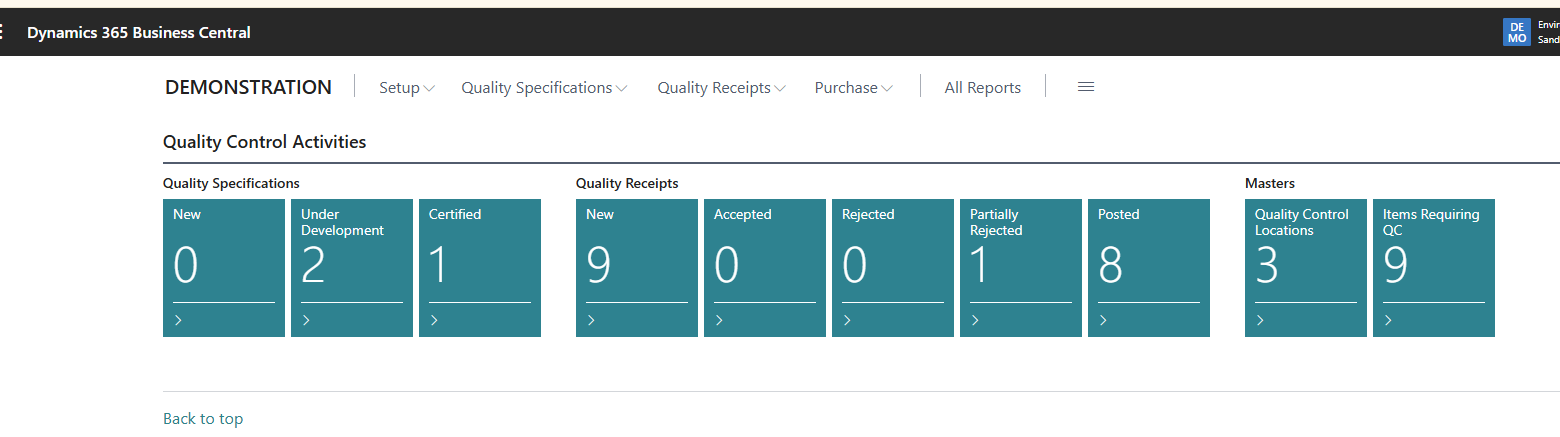
Role Centre for QC
Select the QC Role Centre to view QC related tiles. This Role Centre provides a dashboard of QC related activities.
Configuring Quality Management Building Blocks
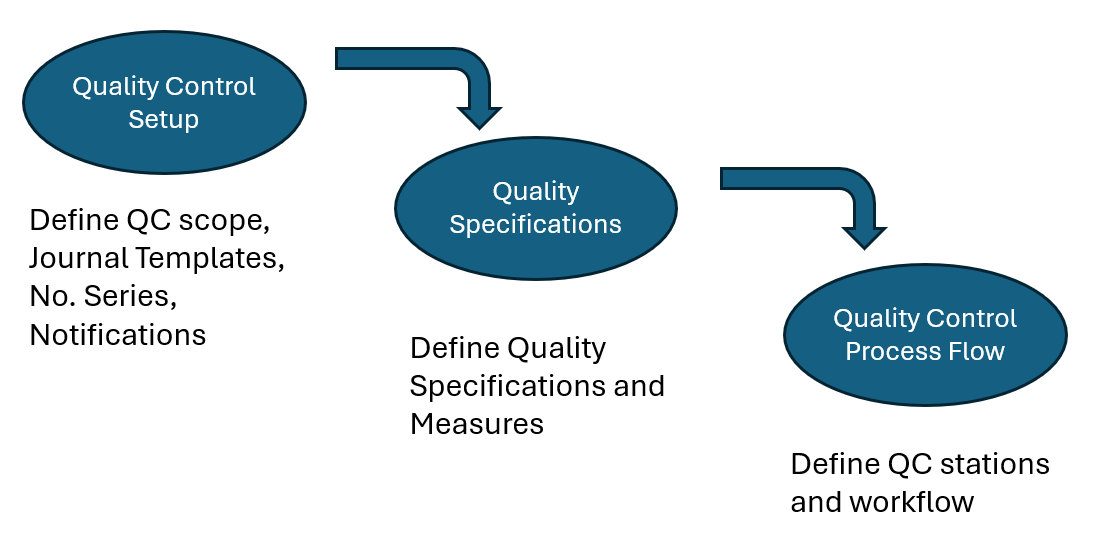
Quality Control Setup
Navigate to menu option Quality Control Setup to define the following:
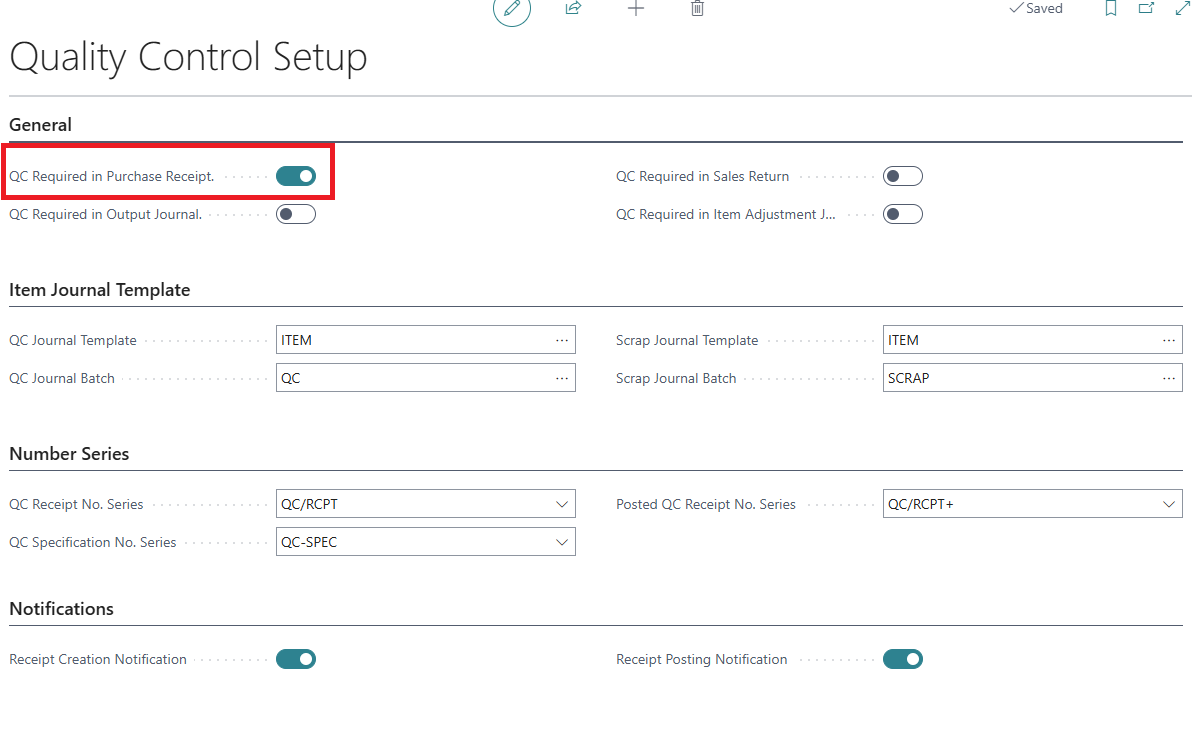
General
This section determines the quality management scope:
-
QC Required in Purchase Receipt: enable this to use the QC module in recording quality checks for purchases (current release).
-
QC Required in Output Journal: enable this to use the QC module in Production output (future release and only for Premium license).
-
QC Required in Sales Return: enable this if quality checks are conducted for customer sales returns (future release).
-
QC Required in Item Adjustment Journal: enable this if quality checks are conducted for stock-take and other inventory quantity adjustments (future release).
Item Journal Template
Define the following journal templates — these are default journals used to record item quantities that have been processed through QC.
-
QC Journal Template and Journal Batch: This is used to record items that passed QC inspections according to the Quality Specifications.
-
Scrap Journal Template and Journal Batch: This is used to record items that failed QC inspections.
Number Series
Define the no. series used for QC transactions:
-
QC Receipt: The transaction is used to acknowledge the receipt of items into the QC process and the QC outcome for the items.
-
QC Specification No. Series: These are used to register the user-defined QC specifications based on internal policies or industry-standards.
-
Posted QC Receipt: This is used to record the posted item journal after recording the QC outcome.
Notifications
Enable the desired notification settings:
-
Receipt Creation Notification: When an item is assigned to the QC location, a QC receipt is created and a notification sent.
-
Receipt Posting Notification: When the QC process is completed and the QC receipt is posted; a notification is sent.
Quality Specification and Measures
Quality Specifications can be obtained from the relevant material ISO standards or from industry practices, each with its own quantitative (numeric) or qualitative (text) quality measures and UOMs. These quality measures are defined and grouped into Quality Specifications and Specification cards.
Quality Measures
Navigate to QC Control Measures to view the list of defined quality measures, for example:
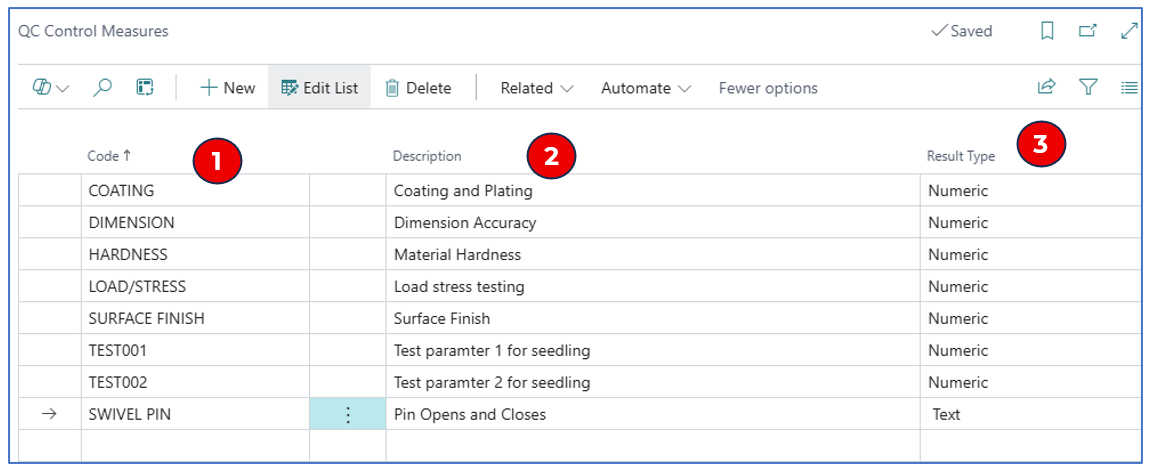
Click +New to add a new measure.
-
Code: Enter a code to represent the quality measure.
-
Description: Enter an appropriate description for the quality measure.
-
Result Type: Select “Numeric” for quantitative measure or “Text” for qualitative measure.
Quality Specifications
Navigate to the Quality Specifications list page to view the quality specifications defined, examples:

-
Status: This determines if the Quality Specification is ready for use (“Certified”) or is “New”, “Under Development” or “Closed”.
-
Click on +New to open a blank Quality Specification card to define the QC measurements.
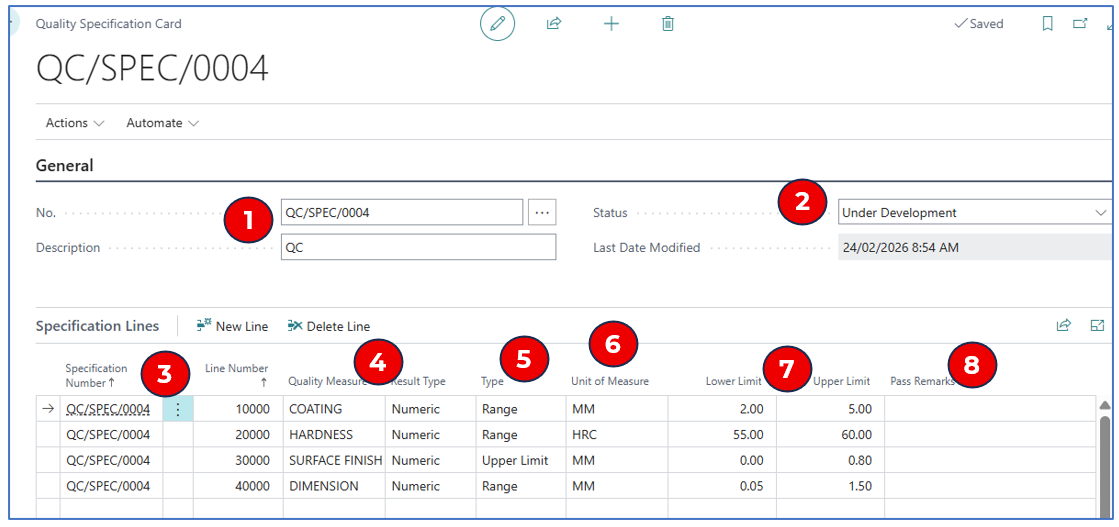
Quality Specification Card
Define the quality measurements required in the Quality Specification card, for example:
General
-
No. and Description: Enter a code and description for this set of quality measures.
-
Status:
a. New: When a new Quality Specification card is created.
b. Certified: When the measurements are confirmed and ready to be used in Quality Control checks.
c. Under Development: This status indicates that an existing list of quality check measures is being reviewed.
d. Closed: This status is used to “close” the specification card so that it can’t be used. NB: Items with a closed Quality Specification card will not undergo QC.
Specification Lines
-
Specification Number: This auto-populates from the No. entered in the header.
-
Quality Measure and Result Type: Select the defined “Quality Measure” (or create a new measure under QC Control Measures”.)
-
Type: This defines the measure type:
a. Lower Limit: This indicates that the measure is used to validate the lower numeric limit.
b. Upper Limit: This indicates that the measure is used to validate the upper numeric limit.
c. Range: This indicates that the measure is used to validate between a lower and an upper numeric limit.
d. Text: This is a qualitative measure.
-
Unit of Measure: Select the UOM for the quality measure.
-
Lower Limit and Upper Limit: These numeric fields define the limits for validation.
-
Pass Remarks: (optional) This field displays a comment regarding the Passing grade for the quality measure.
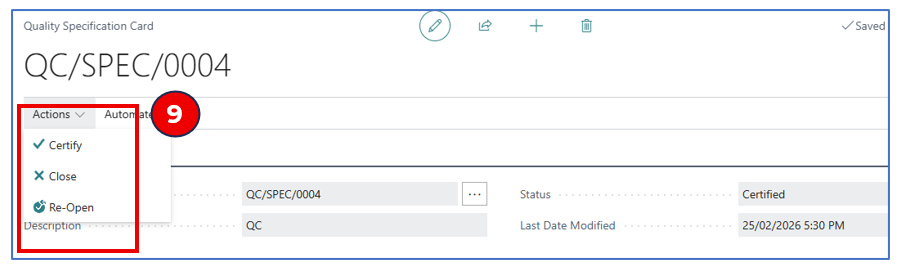
- Once the Quality Specification Card is completed, release it with a Certified status. This is done with menu option Actions > Certify.
NB: When a specification is certified, it is non-editable and is ready to be selected on the Item Card. To re-open the Specification for modifications, use menu option Actions > Re-open.
Quality Control Process Flow
When an item is defined as QC Required, movement transactions for the item tracks the QC process. This is done by defining Locations within the QC route, e.g. warehouse receiving into a QC location for quality checks before accepting the items.
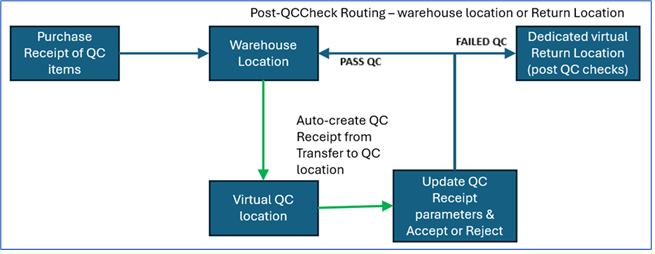
QC Locations
Navigate to Locations to view the list of locations with additional definitions for QC handling, for example:
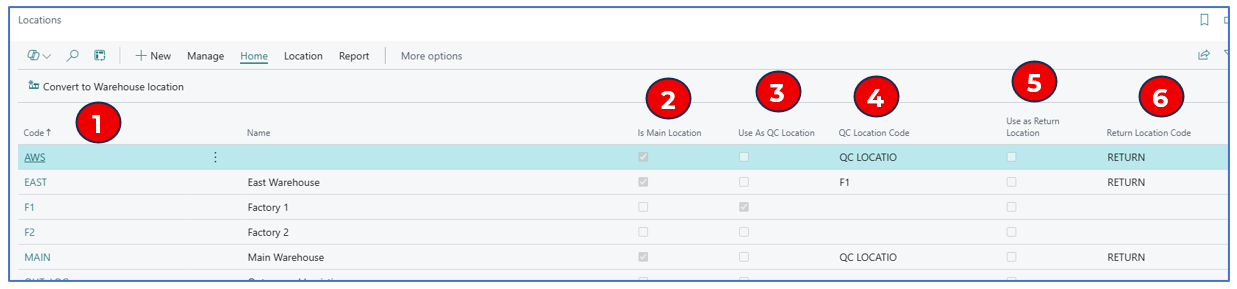
-
Code and Name: This displays the location code and name.
-
Is Main Location: This flag indicates that the location code is a main warehouse location.
-
Use As QC Location: This flag indicates that the ‘location code’ represents a designated QC check location (virtual or physical).
-
QC Location Code: This is the location code selected as the QC location auto-routed from the main warehouse location.
-
Use As Return Location: This flag indicates that the location is set aside in the QC process routing for items failing QC to be returned to the vendor.
-
Return Location Code: This is the location code where items that failed the QC will be returned to the vendor.
Click on +New to open a Location card to create a new location code, example:
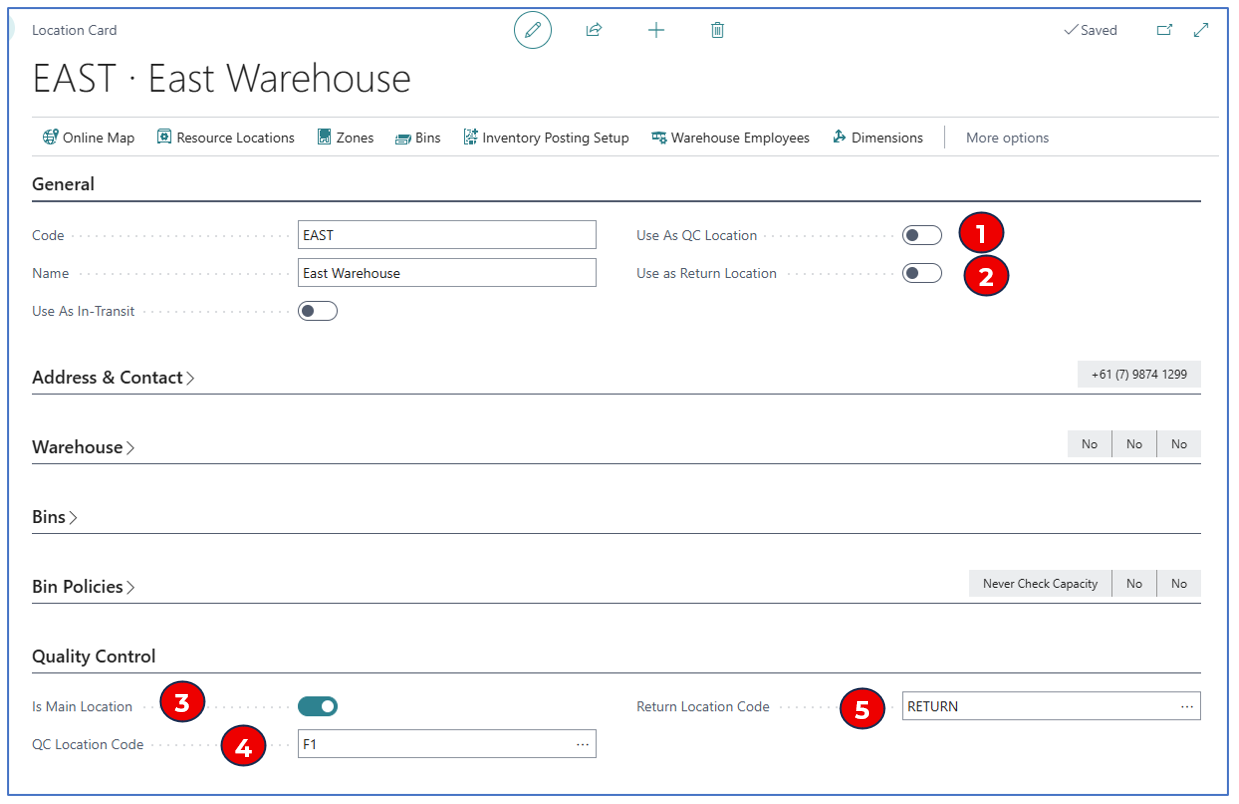
QC Setup
Related fields in Location card:
General
-
Use As QC Location: Enable this flag if the location code is used as a QC station.
-
Use As Return Location: Enable this flag if the location code is used as a Return station after the QC process (for items to be returned to the vendor).
Quality Control
This new Fasttab section defines the QC routing process with a main warehouse location, a QC station location, and a Return location
-
Is Main Location: Enable this flag if the location code is the main warehouse location.
-
QC Location Code: Select the location designated as the QC station associated with the Main Location.
-
Return Location Code: Select the location designated as the ‘goods-to-return-to-vendor” after failing Quality Control checks.
Inventory and Quality Control
The triggering factor for ensuring that quality control checks are applied to an item is configured in the Item Master.
Item with Quality Control Checks
The QC requirement is defined in the Quality Control fasttab on the item master.
For example:
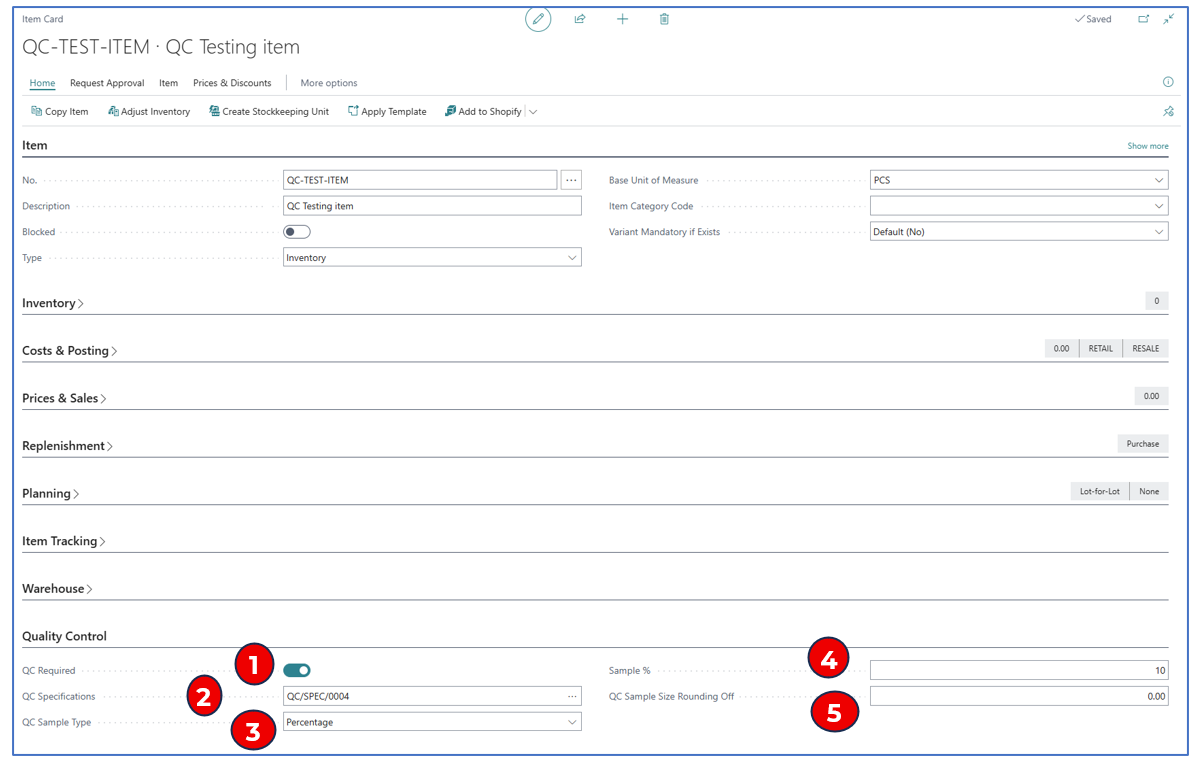
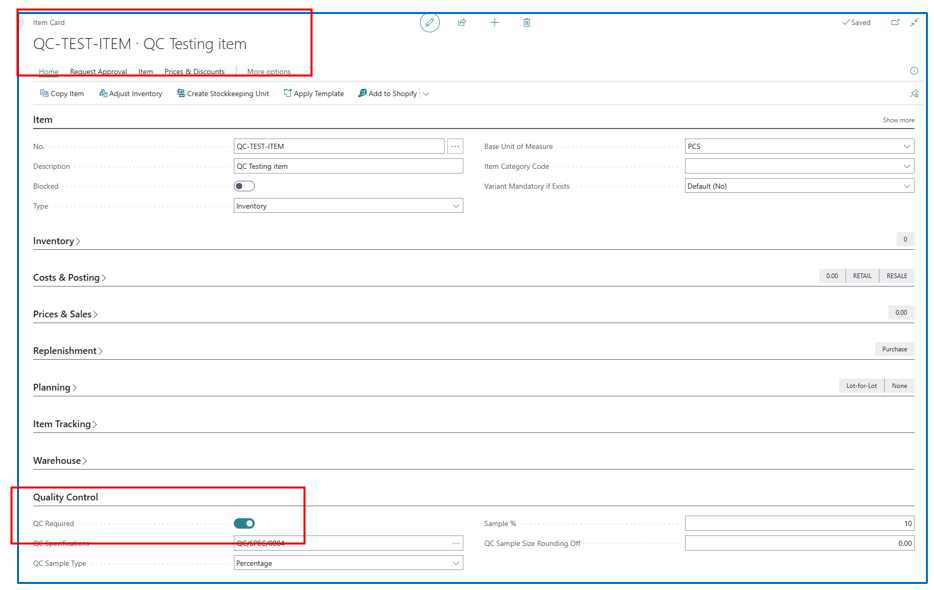
A new Fasttab Quality Control is added to the item card. Select values for the following fields:
-
QC Required: Enable this field if the item is to be included in the QC process.
-
QC Specifications: Select the pre-defined QC specifications.
-
QC Sample Type: This value determines the QC testing sampling method (by % or fixed quantity).
-
Sample %: Use this field to enter the numeric sample size (by % or quantity unit).
-
QC Sample Size Rounding: Specify the rounding factor for calculating % sampling size.
Item Tracking — Lot or Serial
Items that are tracked by Lot and/or Serial numbering can have the entire lot or specific serial number QC-certified by the QC process route. Lot control and serial number control is standard functionality optionally defined for the item, and Lot/Serial number control is managed in Purchase/Warehouse Receipt.
Before Receive posting of the Purchase Order, the QC Required item must have the Lot/Serial number defined in the PO line.
Quality Control On Purchases
In creating a Purchase Order, the PO header should indicate the main receiving warehouse location. If the item is QC enabled, the PO line location will automatically adopt the QC location associated with the main warehouse location.
Purchasing QC vs non-QC Items
Navigate to Purchasing > Purchase Order to create a PO for items requiring QC.
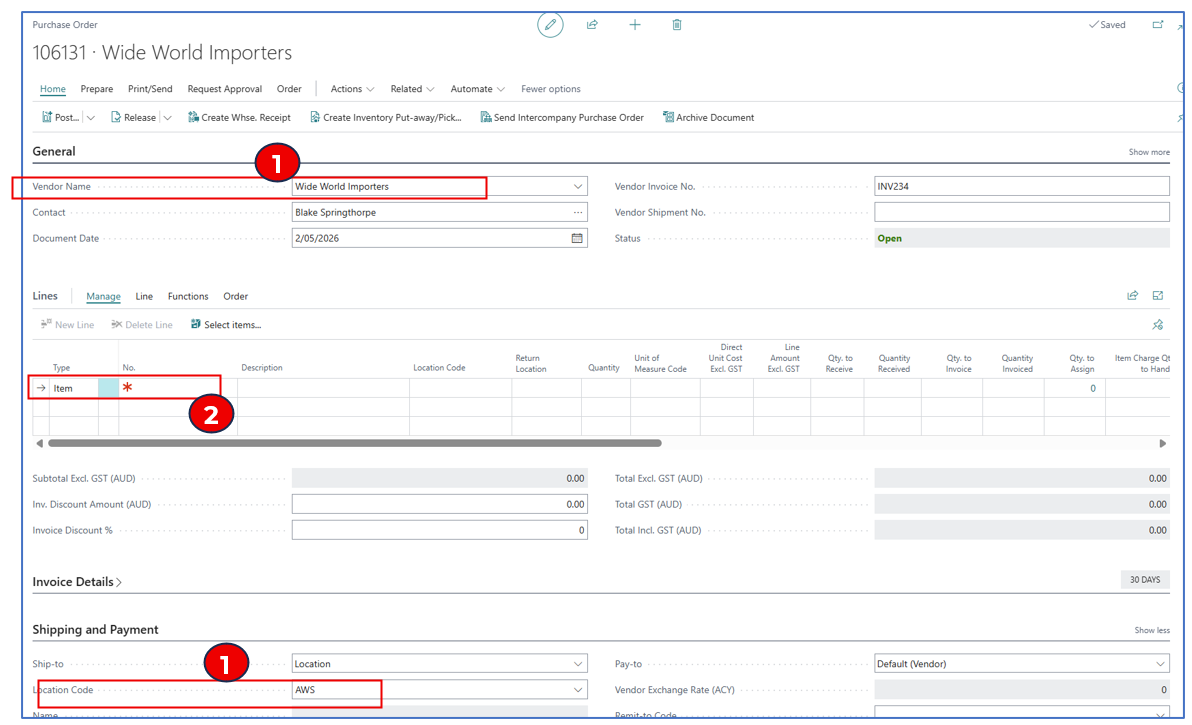
- Ensure that the PO header has a location marked as “Main Location” in the QC setup. This header location can be defaulted from the selected vendor or selected manually.
Example location: AWS

- Select an item that has QC Required configured.

-
When the selected item has QC Required, the Location code is automatically updated to the QC Location, and the Return Location is defaulted for quantities to be returned to the vendor (i.e. failed QC).
-
Items that do not have QC Required will have the same Location as the PO Header.
-
PO lines can be added for various QC Required items and can also be mixed with items withoutQC Required.
Quality Controlled Items and QC Receipt
Items that are configured with QC Required will automatically be routed to the QC Location.
In the following example,
- When the PO entry is complete, post the Purchase Receipt by selecting Receive.
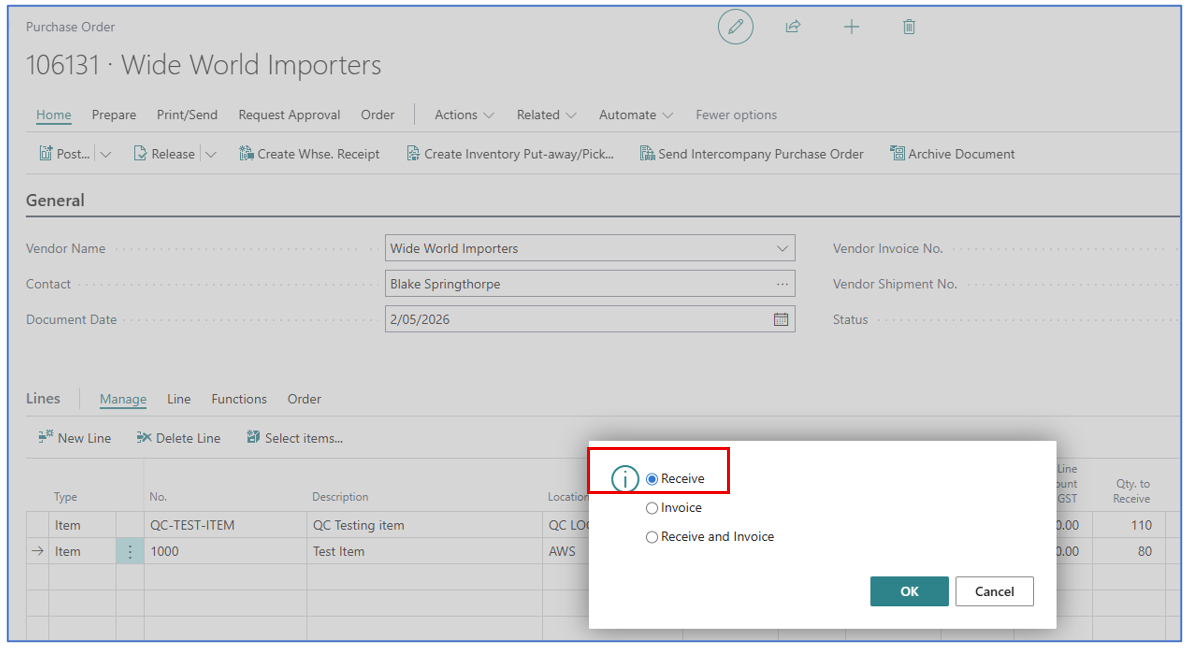
-
The posting creates 2 transactions:
a. Posted Purchase Receipt (standard)
b. QC Receipt (unposted)
-
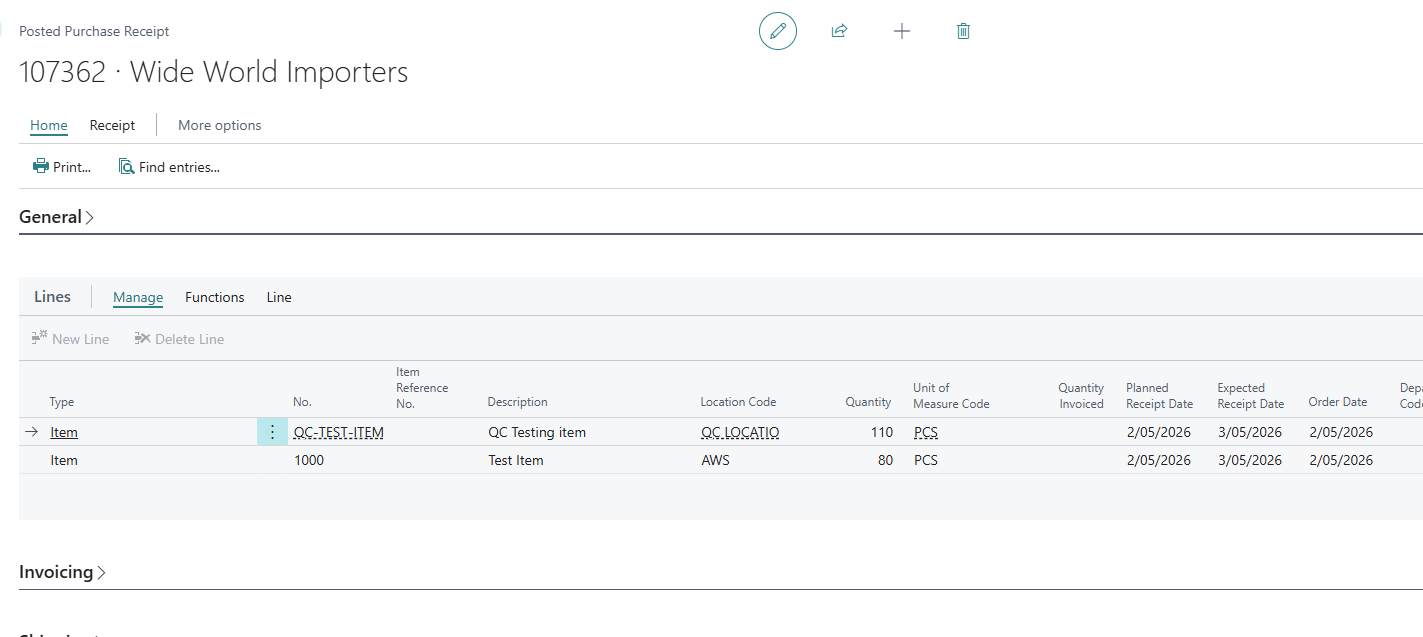
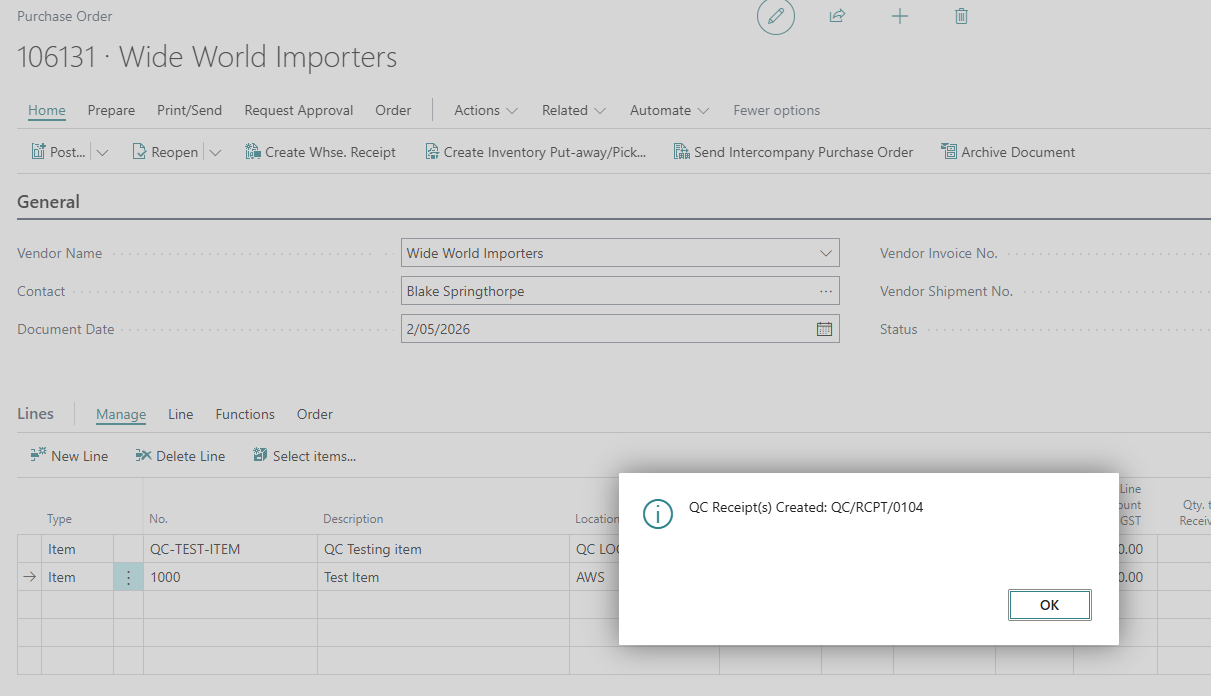
The new QC Receipt is the page for entry of Quality Control checks to confirm the QC measures defined by the assigned Quality Specification. Navigate to QC Receipt List to view the list of QC receipts. A QC receipt is created for each PO line that has a QC Required item.

-
Select and open the QC Receipt card.
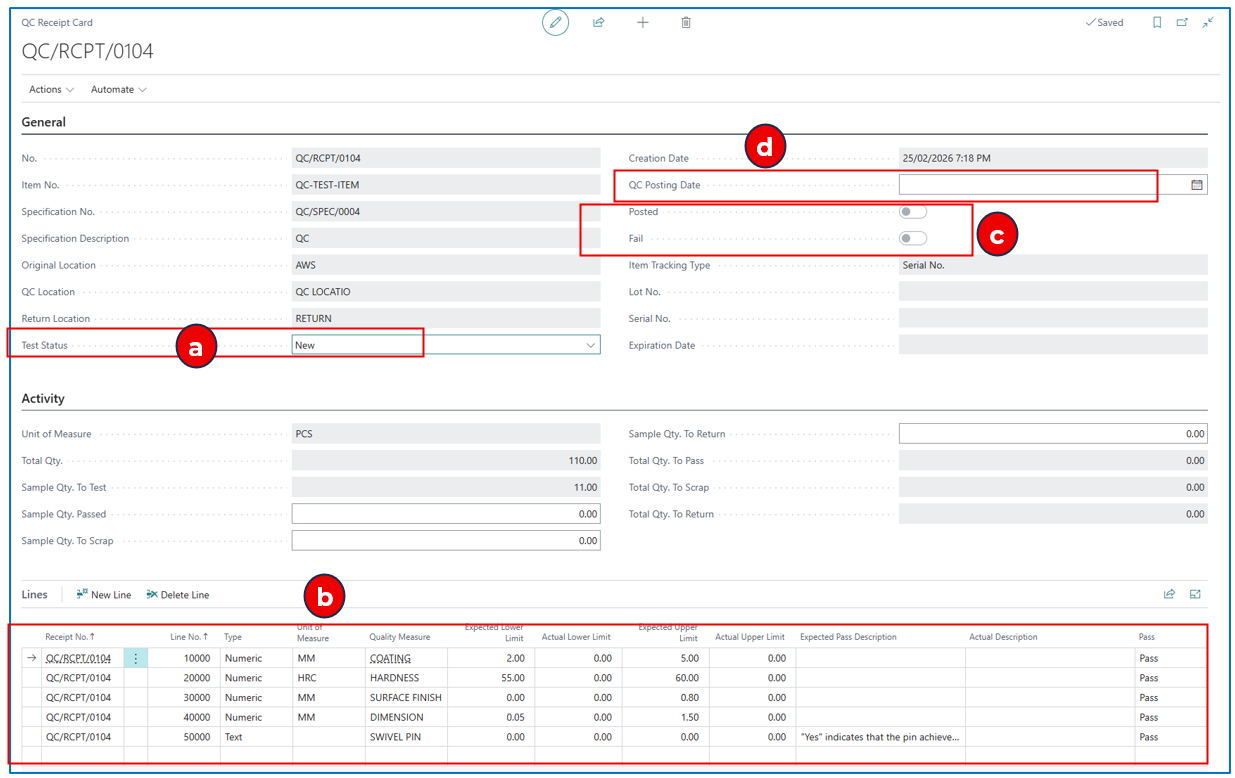
a) Test Status: This default as New.
b) Lines: These are the testing measures defined for the selected QC Specification code on the item card.
c) Posted and Fail: These are enabled according to the next step in processing the QC Receipt.
d) QC Posting Date: This posting date must be selected to post the QC Receipt.
QC Accept or Reject
The QC Receipt is an intermediate receiving step after the posting of PO ‘Receive’ — the “QC Required” items are then validated against quality measures defined.
In the QC Receipt card Activity section,
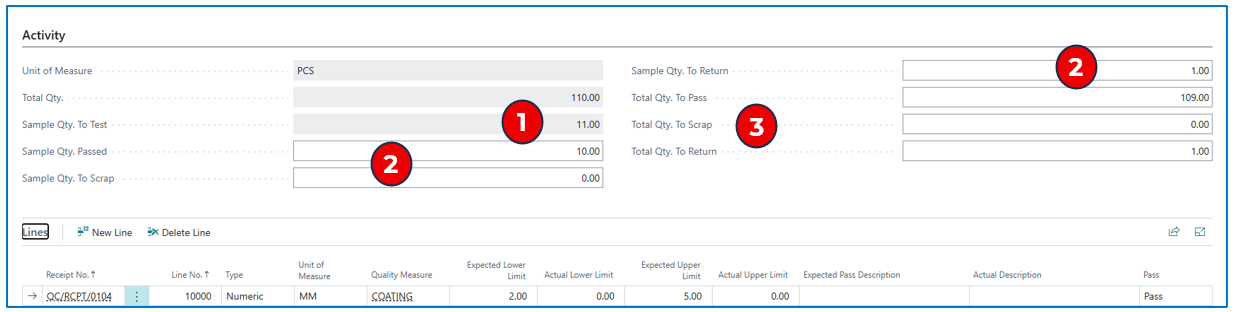
-
As defined in the item QC section, the item testing sample quantity is calculated and displayed.
-
After checking through the testing result, enter the Sample Quantity that passed, or scraped, or to be returned (to vendor).
a. Sample Qty Passed: The quantity transfers from QC Location to the main warehouse location indicated on the PO
b. Sample Qty to Scrap: The quantity transfers as a “Negative Adjustment” from the QC Location
c. Sample Qty to Return: The quantity transfers from QC location to the Return location
-
The Total quantities of Passed, Scrap, and Return will be displayed (includes the original ordered quantity).
The quality measures from the item’s QC Specification No. are displayed in the QC Receipt line section:

-
Numeric QC measures may have Expected Lower and Upper Limits according to acceptable quality definitions.
-
From the QC testing outcome, the limits can be entered in these columns for reference and comparison to expected standards.
-
If the QC measure is text, the testing result can be entered in the Actual Description.
-
Finally, for each measure, indicate if the test outcome is Pass or Fail. Setting the outcome to Pass or Fail is subjective.
Example: a sample batch of 10 could have 9 passing all measures and 1 passing only 2 measures — will it be acceptable to “Pass” the measures for 9 and have one scrapped or returned? Does the “Pass” rating for each measure require that all sample units pass these measures?
NB: If any measure is marked as “Fail”, the entire sample will need to be “Rejected”.
QC check — Sample Test Accepted
When the measures are rated and the Pass sample quantities are updated, select to accept, reject, or partially accept the testing result. Navigate to Actions > Status > Accept, Reject, Partial.
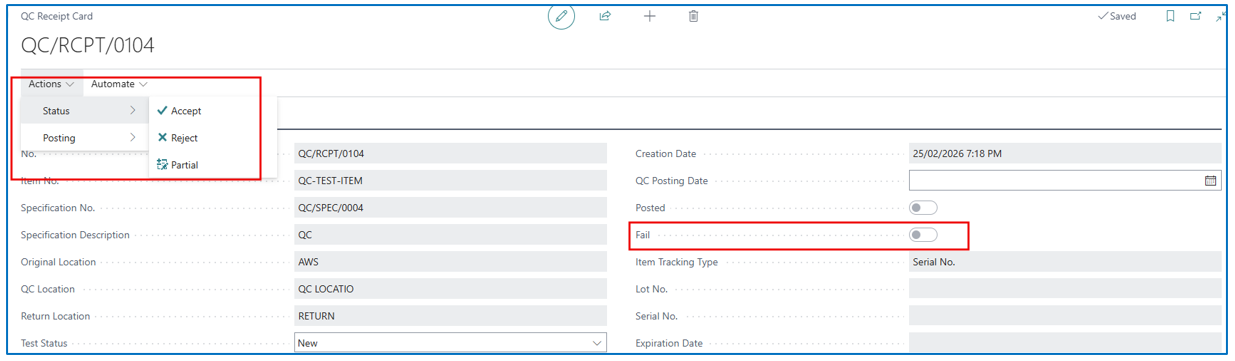
This closes the sample QC Receipt for posting.
NB: if any of the measures is marked as Fail, the Fail flag will be enabled and the sample batch status cannot be updated to Accept.
If Sample Qty to Test <> Sample Qty Passed, the QC Receipt status must be updated to Partial.
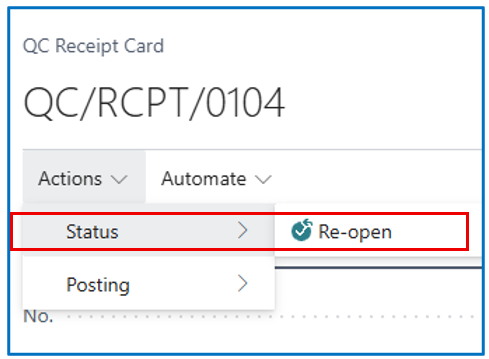
After closing the sample QC Receipt, it can be re-opened for changes (if needed).
When the sample testing QC Receipt is closed with a status, the next step is to post the QC Receipt.
This creates Posted Transfers that adjust the inventory with the Pass quantities and moves the Scrap and Return quantities to the Return Location (for further handling).
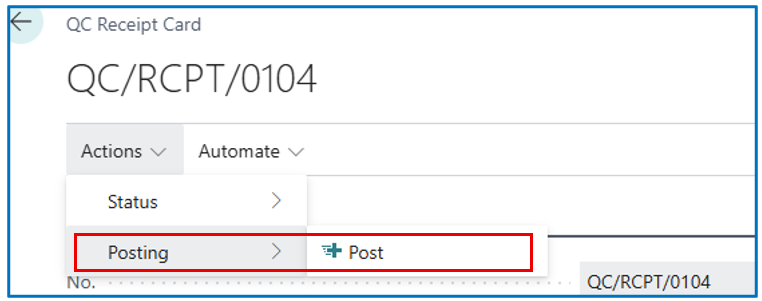
NB: The QC Receipt posting date must be selected.

Stock Movement After QC Receipt Posting
To review the stock movement in the Purchase Receipt and QC process, we can view the Item Ledger Entries.
Example:
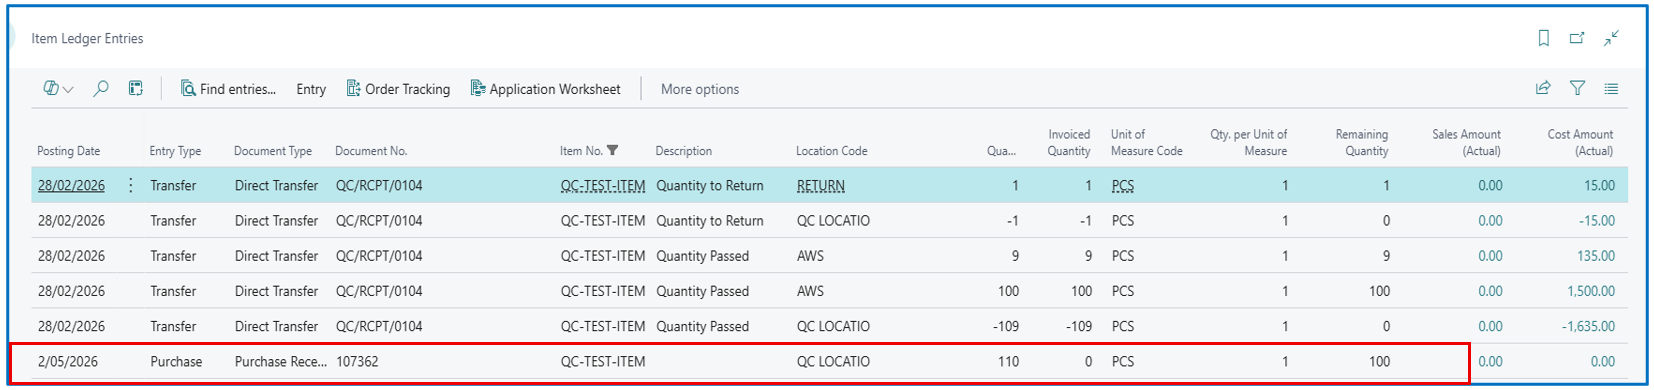
The main location for this purchase was AWS and QC Location was “QC LOCATION”.
In this example, the purchase order was for 110 units. From this quantity, the test sample was 10 — 9 were Accepted and 1 was returned.
Movement Recorded from QC Process
-
For QC Required item, the Purchase was received into QC Location.
-
From the posted QC Receipt, the sample quantities are transferred out to AWS (9) and RETURN (1).
-
On posting of the QC Receipt, the balance of 100 units (held in QC Location during the QC Testing) are transferred to AWS.
Another example of the inventory movement for a QC Required item that is LOT Tracked.
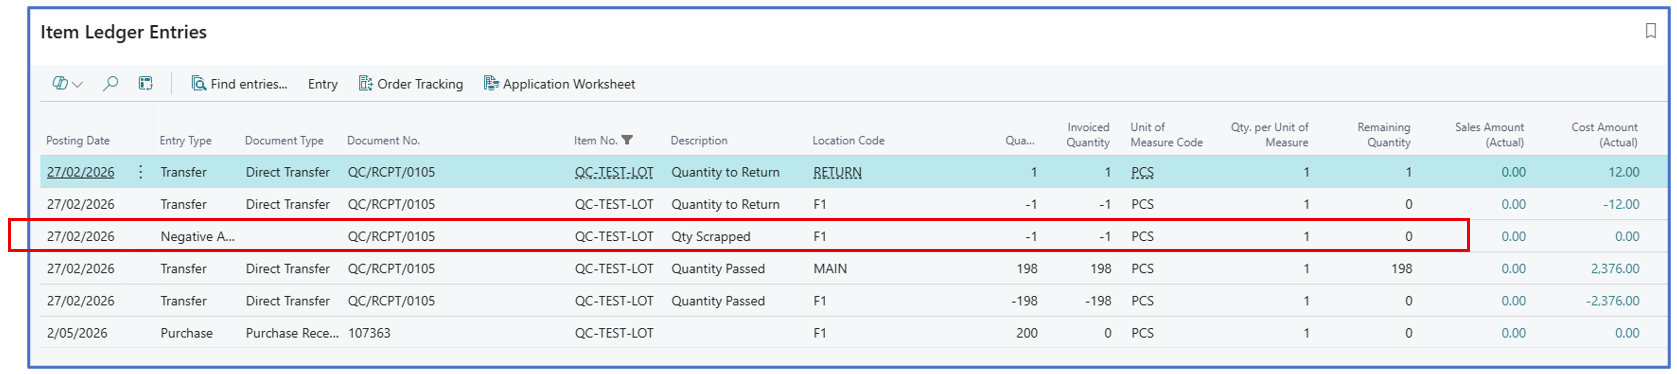
Purchased quantity = 200
Sample quantity = 10
Passed QC quantity = 198
Return to vendor quantity = 1
Scrap quantity = 1 (negative adjustment)