Room Allocation System for Education in Dynamics 365 User Guide
Introduction
The Room Allocation System (RAS) app is a central module within Microsoft Dynamics 365 that manages all programme rooms, meeting rooms, and event venues across an organization. It ensures that allocations are accurate, conflict-free, and fully traceable. This is ideal for schools and universities to ensure proper scheduling of rooms for meetings, events, and conferences.
Purpose
RAS was designed for efficient scheduling of rooms.
- It is a single integrated system for room scheduling.
- It reduces administrative effort and double allocations.
- Automates matching of requirements with available rooms.
- Support Reception, Sales, Academic teams, and Event Managers.
- Improve visibility through schedule board views.
Navigating the RAS App in Dynamics 365
Accessing the RAS App
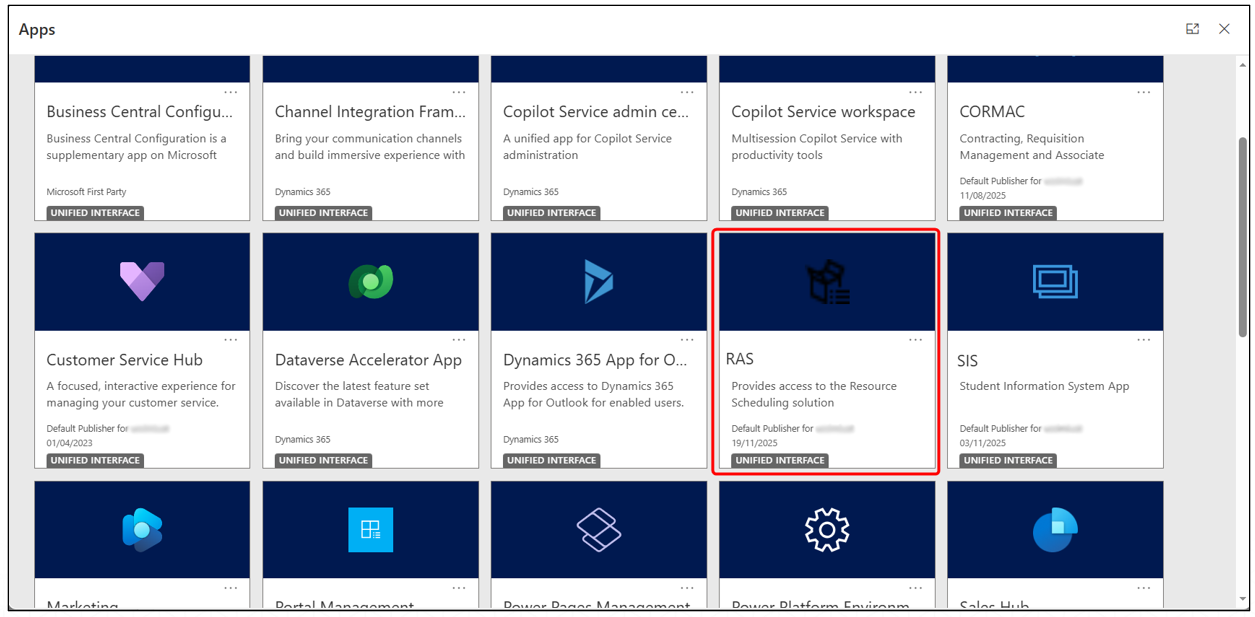
Follow these steps to access the RAS app.
- From the Dynamics 365 home screen, go to Apps.
- Select the RAS app from the list of available applications.
RAS App Layout
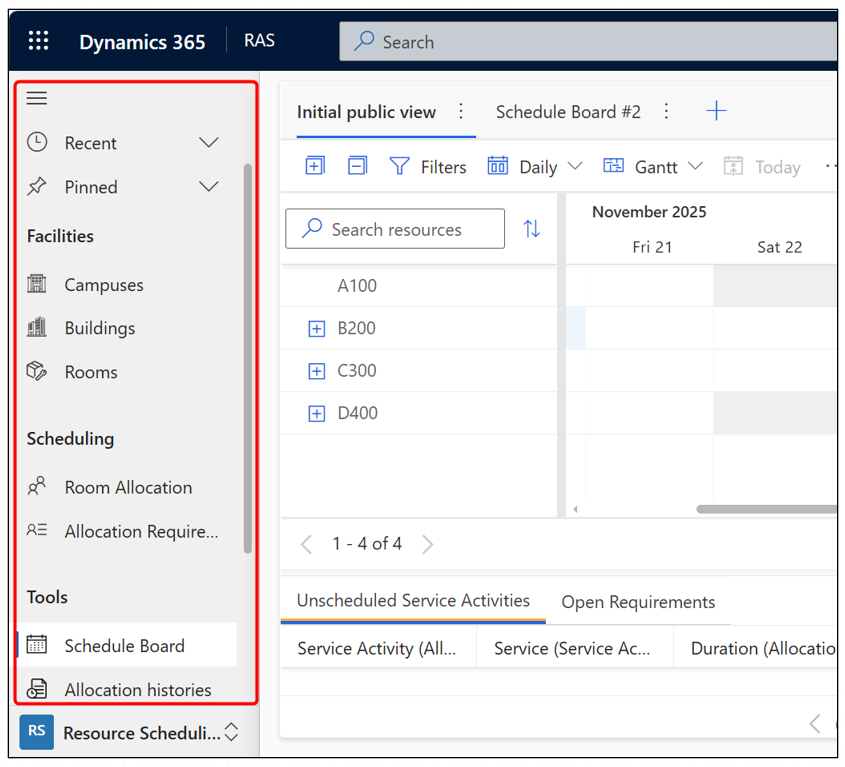
Once inside the app, the left navigation panel is divided into three main sections:
- Facilities: Contains all structural elements of your organization’s physical i.e. Campuses, Buildings and Rooms available for allocation.
- Scheduling: Used for managing allocations and requests i.e. Allocation Requirements and Room Allocations
- Tools: Provides advanced management and audit capabilities with Schedule Board and Allocation Histories.
Campuses, Buildings & Rooms
Campuses
A campus represents the top-level physical site for an organization or customer that contains multiple buildings or locations.
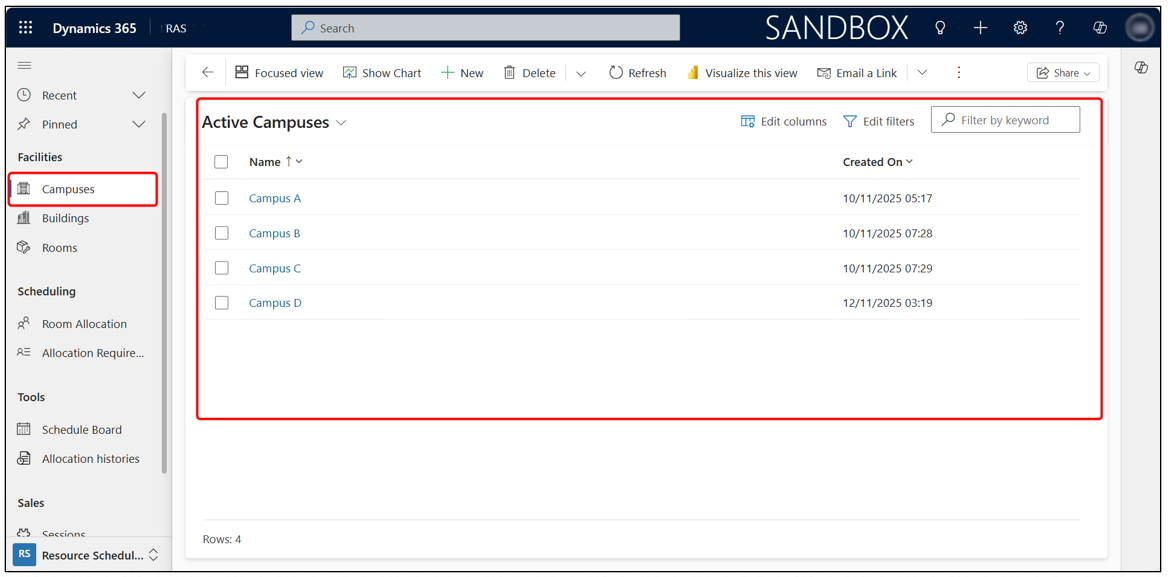
Viewing Campuses
- Click Facilities > Campuses from the left navigation pane.
- This opens the list of all available campuses.
- Select any campus to view its details, address, and associated buildings.
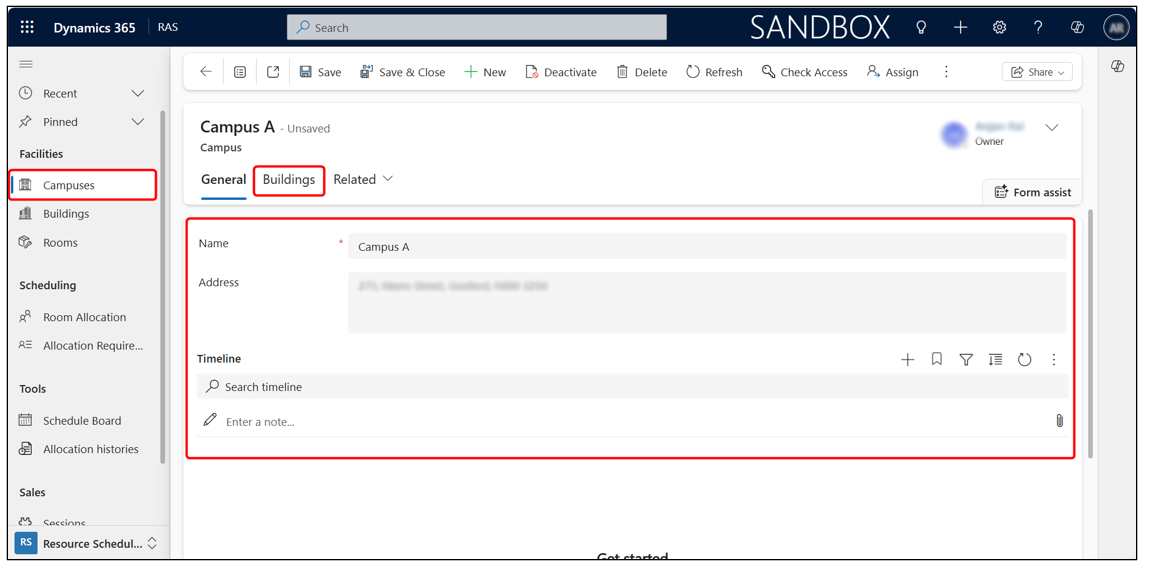
Campus Details
Inside a campus record, you will see:
- General tab -> Campus name and address
- Buildings tab -> All buildings linked to that campus
Click on the Buildings tab to view the list of buildings.
Creating a New Campus
- Select + New from the top command bar.
- Enter the Campus Name and Address.
- Click Save to create the new campus.
Buildings
A building is a child location under a campus, representing a physical structure where assets, rooms, floors, and serviceable equipment are located.
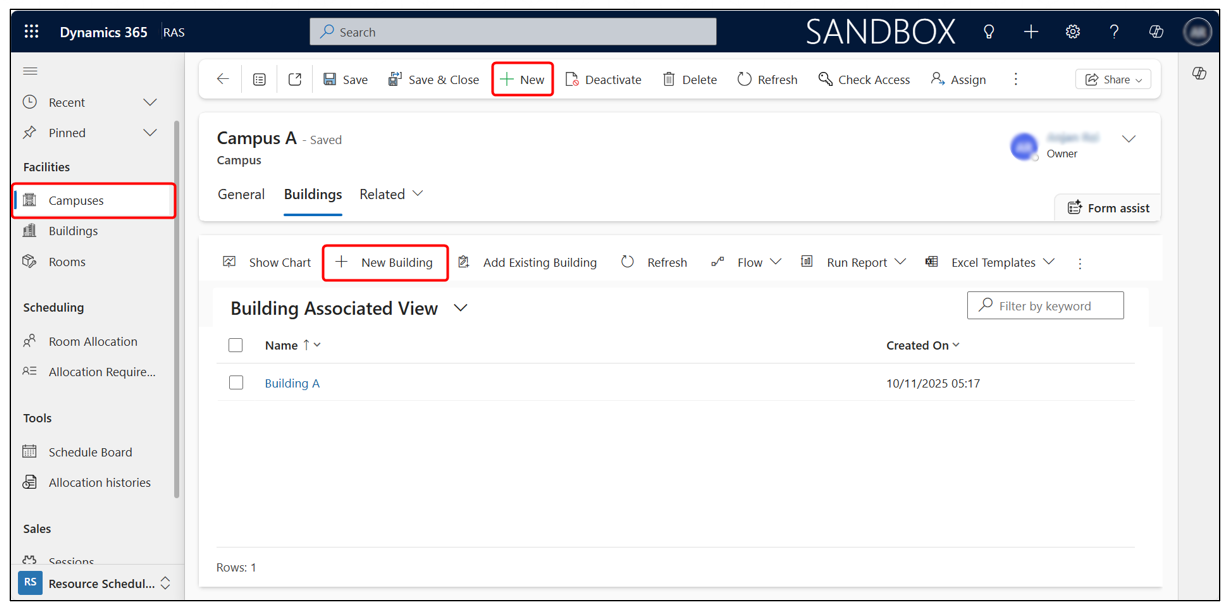
Adding a New Building to a Campus
- Open the specific campus record.
- Go to the Buildings tab.
- Click + New Building from the command bar.
- Enter Building Name and Address, then click Save.
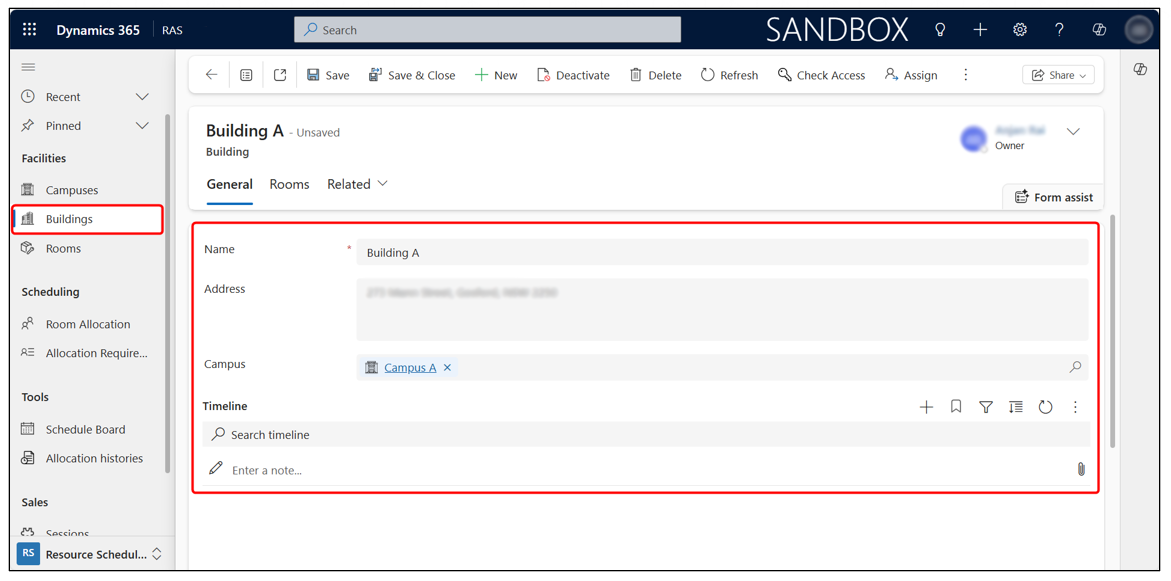
Viewing Building Record
- Click Facilities > Buildings from the left navigation pane.
- This opens the list of all buildings across IMI campuses.
- Select a building to view its details
- Inside a building record following details are shown,
- Name
- Address
- Associated Campus
Use the Rooms tab to view and manage rooms inside the building.
Creating a New Building
- Click + New from the top command bar to create a new building.
- Enter Building Name, Address, and select the Campus.
- Click Save to store the building details.
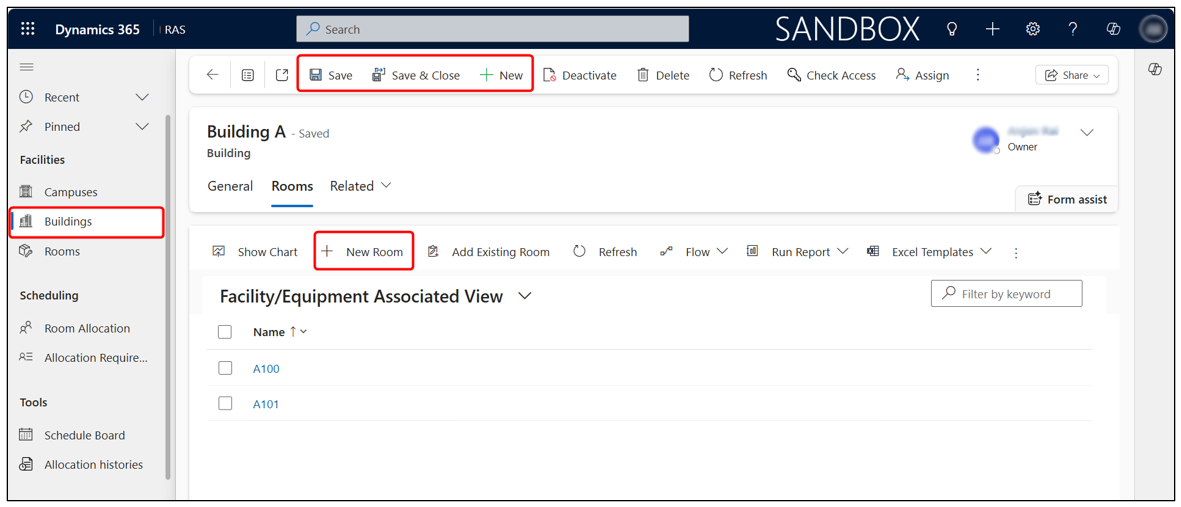
Adding Rooms Under a Building
- Open a building record.
- Navigate to the Rooms tab.
- Click + New Room from the command bar.
- Enter the Room Name, Capacity, and any other required details.
- Click Save to add the room to the building.
Rooms
Rooms are the core component of the Room Allocation System. All allocation requests (Sessions, Events, Opportunities, Direct Allocations) will ultimately match against this room database.
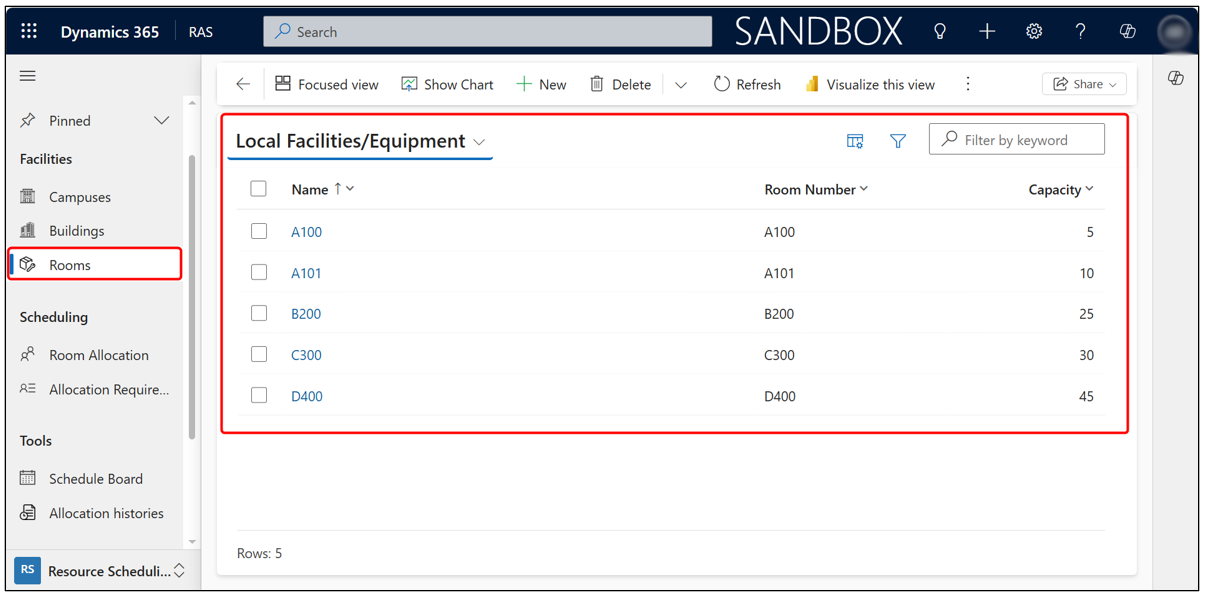
Viewing Rooms
- Click Facilities > Rooms from the left navigation pane.
- This opens the full list of all rooms (Facilities/Equipment records) across all campuses and buildings.
- You can sort or filter rooms by Name, Room Number, or Capacity.
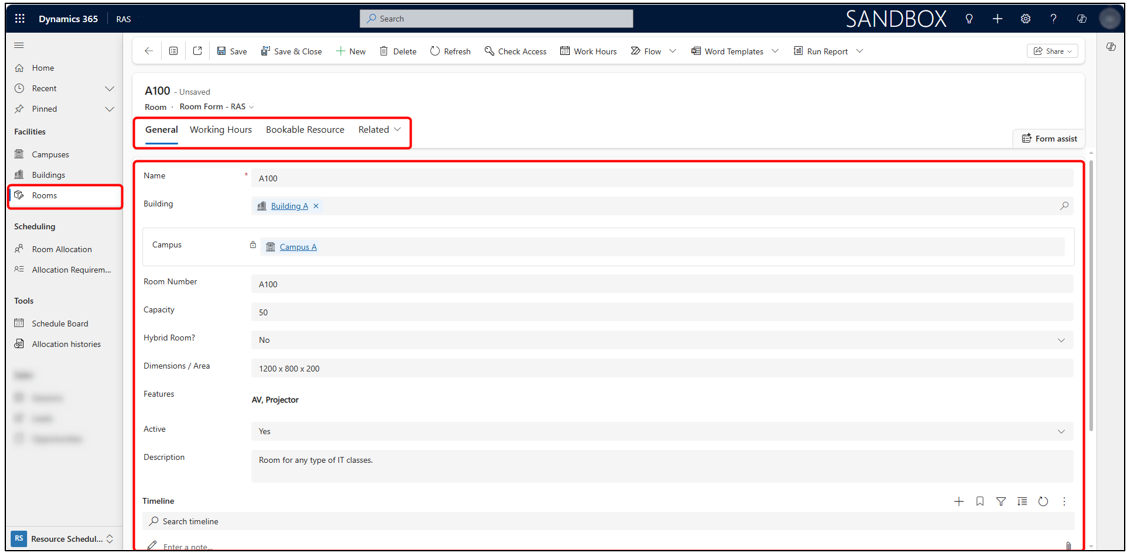
Room Details
Selecting a room displays its full details under several tabs:
- General Tab: Contains the primary information used during allocation: Room Name, Building Campus, Room Number, Capacity, Hybrid Room (Yes/No), Dimensions / Area, Features, Notes etc.
- Working Hours Tab: Each room can have custom working hours to control availability.
Bookable Resource
- When a room is created, the system automatically generates a corresponding Bookable Resource.
- This allows the room to participate in Universal Resource Scheduling (URS).
Creating Room Allocation
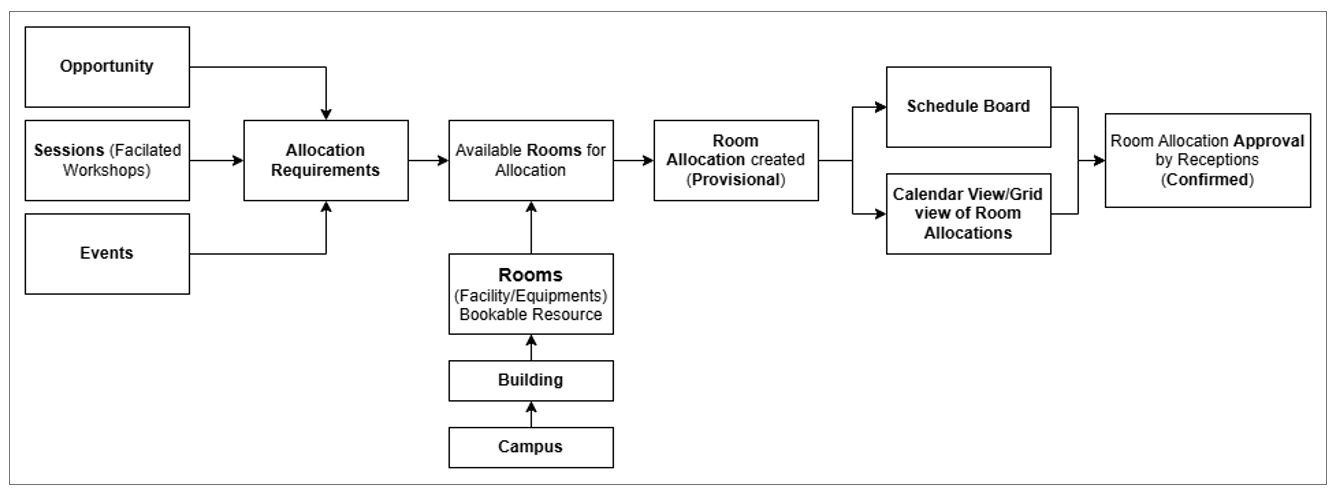
Room allocations in RAS can originate from multiple sources:
- Programme Sessions
- Events
- Opportunities (Room Sales)
- Direct/Admin Allocations
Each of these sources automatically creates an Allocation Requirement which is then used to match and book an appropriate room.
Best Way to Create a Room Allocation
The recommended and most consistent method is to create a room allocation via an Allocation Requirement.
This ensures:
- Correct matching of capacity & time
- Time validation
- Conflict prevention
- Linking to the correct source (session/event/opportunity/admin)
Creating an Allocation Requirement
- Navigate to Scheduling > Allocation Requirements.
- Click + New from the command bar.
- Fill in the required information on the form: Name, Capacity, From & To Date/Time, Duration, Type, Lookup Field( Session/Event/Opportunity/None), etc. Additional fields: AV Notes, Catering Notes, Layout / Facility Notes.
- Once all details are entered, click Save.
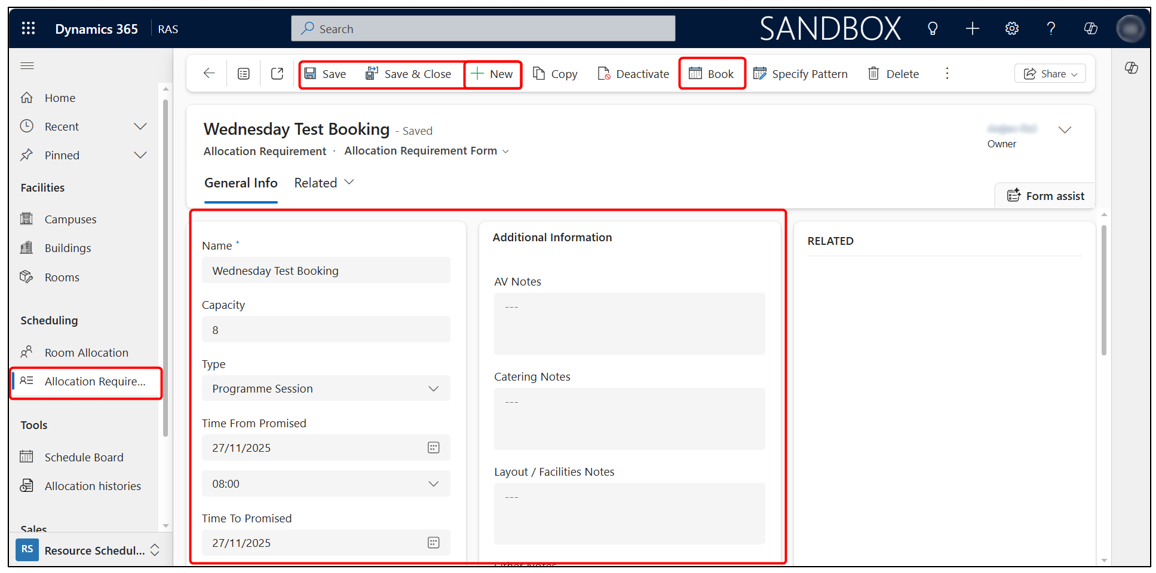
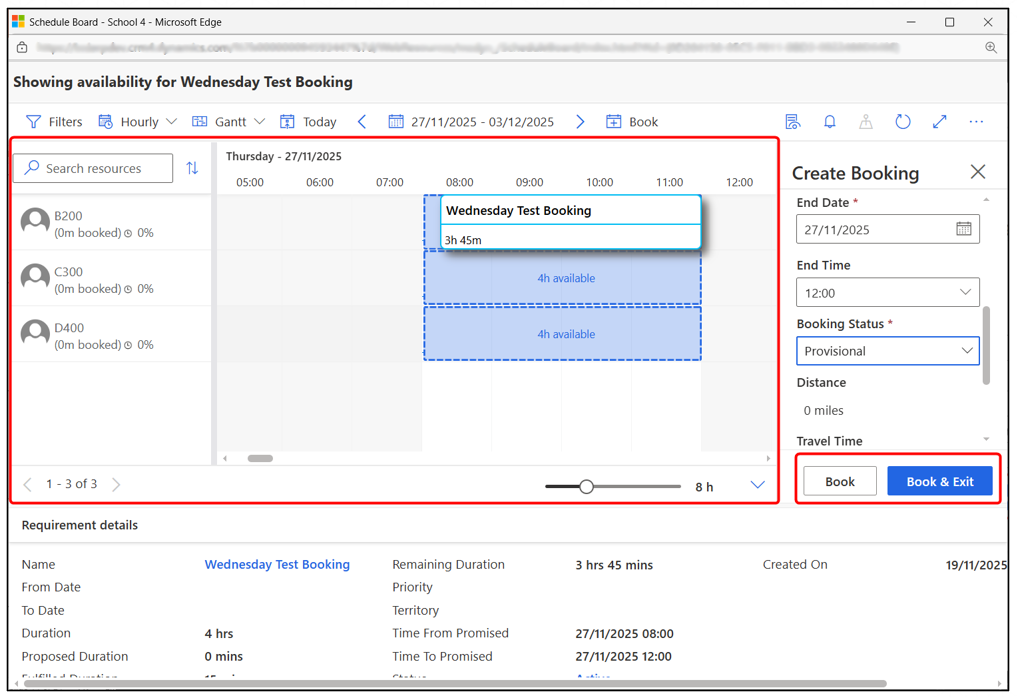
Booking a Room from Allocation Requirement
After saving, the Book button will appear on the top command bar. Click Book to open the Schedule Board, filtered automatically to show only rooms that:
- Meet the required time range
- Satisfy capacity
- Are available (not double-booked)
Completing the Booking
On the Schedule Board:
- Select an available room slot.
- Click Book or Book & Exit.
A provisional Room Allocation record will be created and linked back to the Allocation Requirement, which can be viewed under Scheduling > Room Allocation.
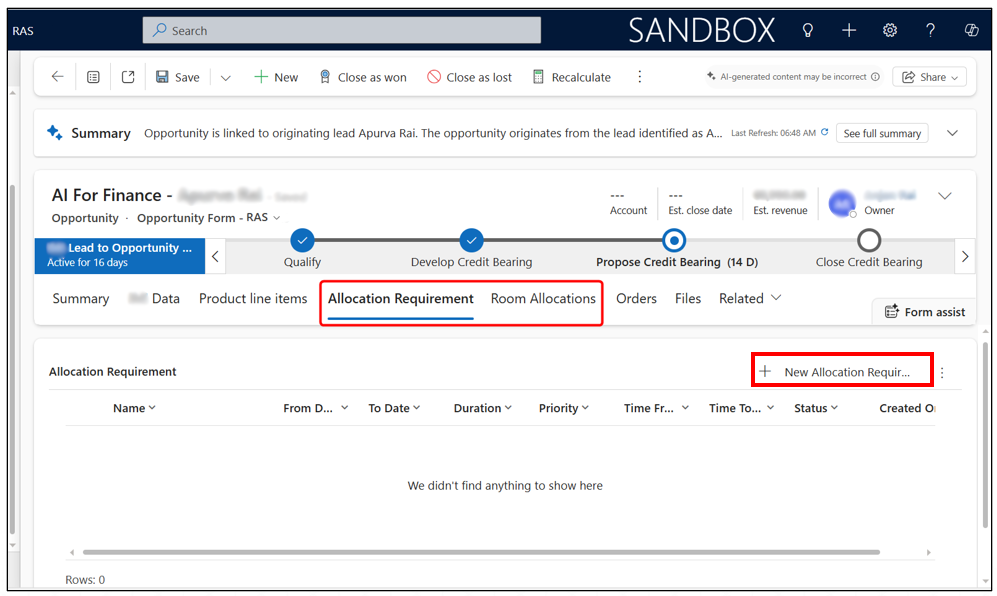
Allocation via Opportunity
When room allocation is required for a sales-related activity (Room Sales), it can be managed directly from the Opportunity record. To access Allocation options, open an Opportunity where the AOI (Area of Interest) is set to Campus. Two RAS-related tabs will be available:
- Allocation Requirement
- Room Allocations
Creating Allocation Requirement
- Go to the Allocation Requirement tab.
- Click + New for Allocation Requirement.
A new requirement form will open, already associated with this Opportunity.
- Fill in the required details and click Save.
This requirement will now be used to match and book a suitable room.
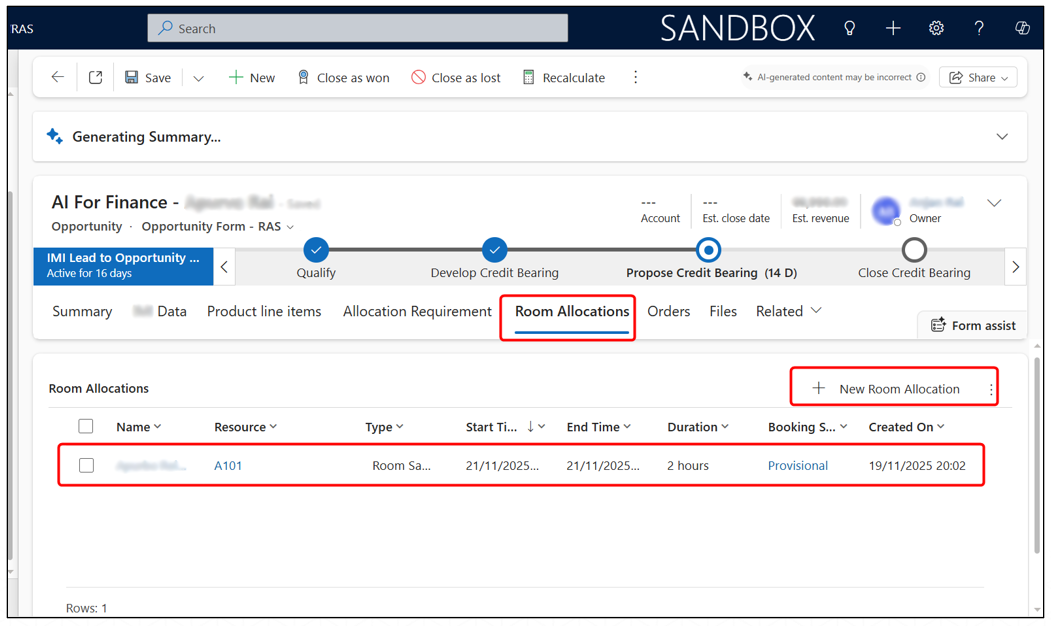
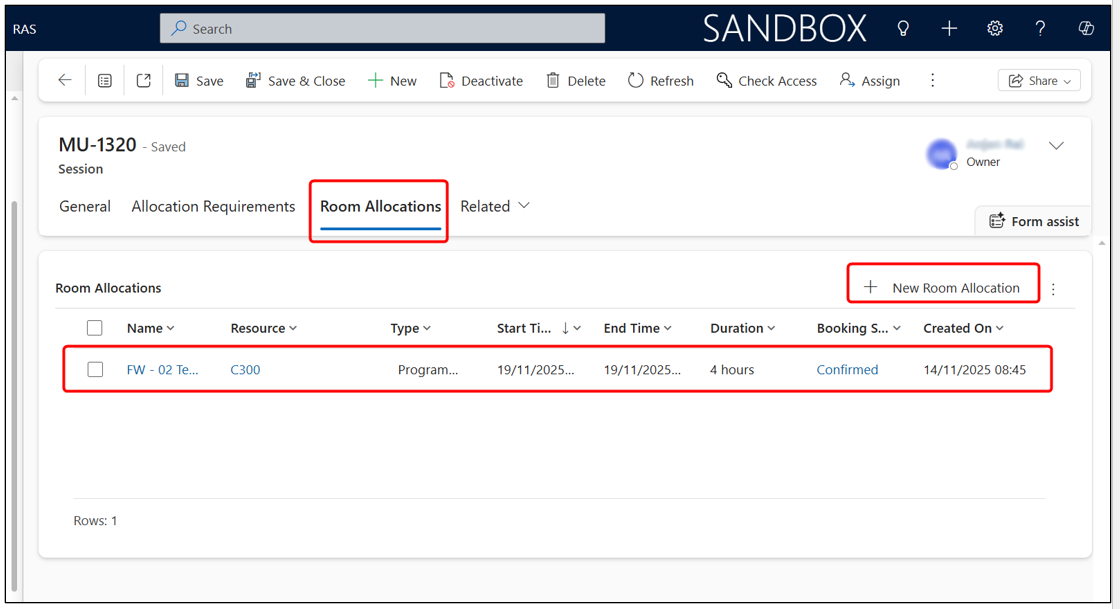
Create Room Allocation
- Select the Room Allocations tab.
- Click + New Room Allocation.
- Fill in the mandatory fields.
- Select the Allocation Requirement that was created or leave it empty to create direct room allocation.
- Save the allocation. This creates a direct allocation.
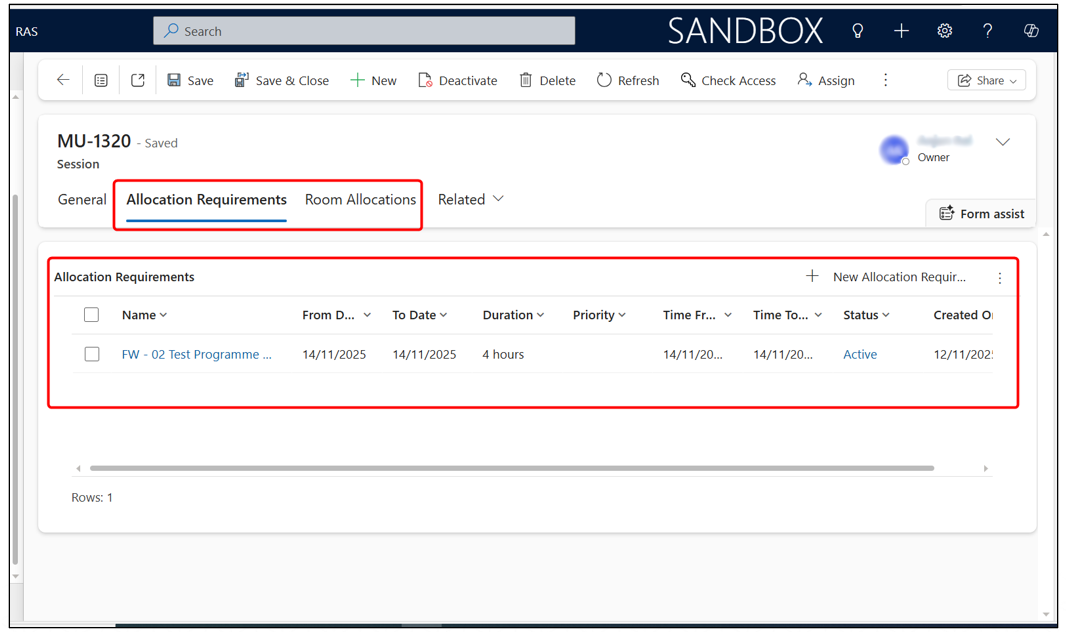
Allocation via Sessions
When a Session is created for Facilitated Workshops, the system automatically generates an Allocation Requirement based on the session’s date, time, and capacity details.
Viewing Allocation Requirements for a Session
- Open the Session record.
- Navigate to the Allocation Requirements tab.
You will see the automatically generated requirement linked to this session.
If any adjustments are needed, such as adding AV notes, catering notes, or updating timing, click on the allocation requirement record to edit the details.
Creating Room Allocation for a Session
You can book a room for the session directly from the session record.
- Go to the Room Allocations tab on the Session.
- Click + New Room Allocation.
- A new allocation record will open, already linked to the session’s allocation requirement.
- Select the room.
- Save the record to complete the provisional allocation.
Allocation via Event
Room allocations for Events are managed directly through the Event record. When an event is created, based on the event details (date, time, capacity), the system automatically generates an Allocation Requirement for room matching and scheduling.
Viewing Allocation Requirements for an Event
- Open the Event record.
- Navigate to the Allocation Requirements tab.
The allocation requirement automatically created from the event’s information will appear.
You may edit this requirement if you need to modify timing, capacity, or add notes such as AV, catering, or layout instructions.
Creating Room Allocation for Event
- Go to the Room Allocations tab.
- Click + New Room Allocation.
A new allocation form will open, already linked to the event’s Allocation Requirement. Choose the appropriate room.
- Click Save to generate the provisional room allocation.
Room Allocation
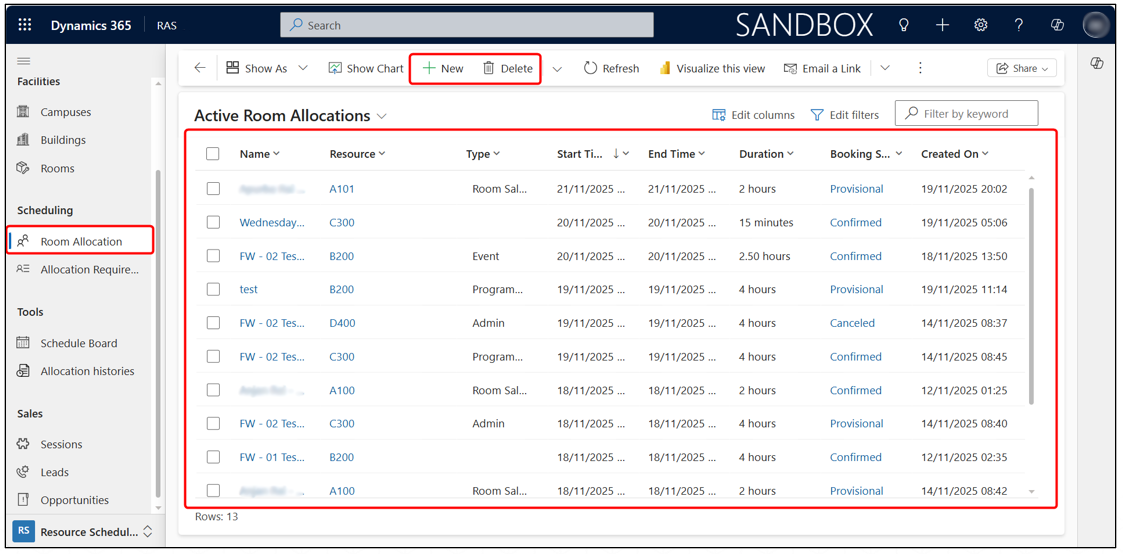
All room allocation records from Opportunities, Sessions, Events, or Admin are stored in one central location. To access them:
Go to Scheduling > Room Allocation in the left navigation pane. This page displays a list of all active, provisional, confirmed, and cancelled room allocations.
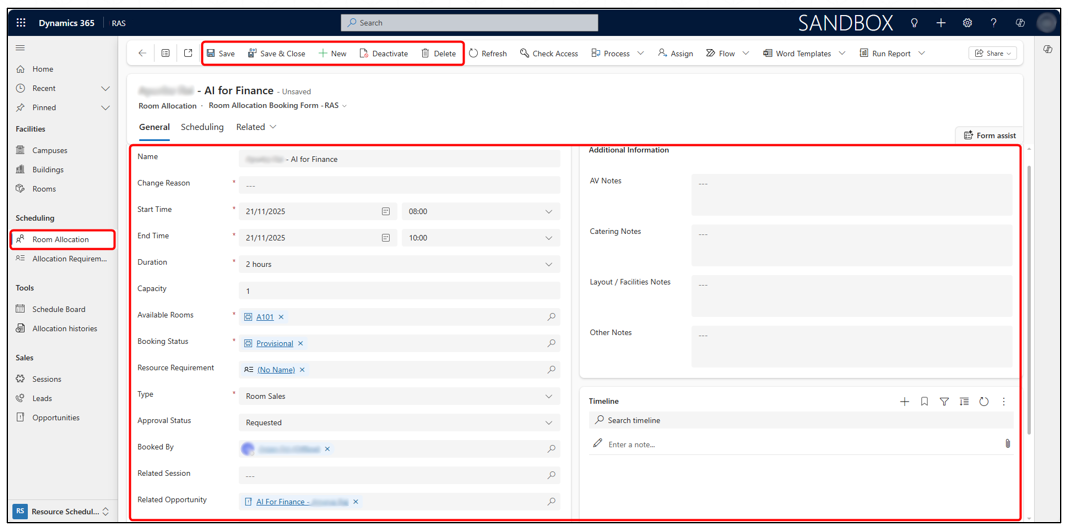
Creating, Editing, and Managing Direct Room Allocations
Admins can create room allocations directly from the Room Allocation screen.
To create a new allocation:
- Click + New on the command bar and enter the required details for room allocation. You may associate an existing Allocation Requirement to create a new one or leave it empty (RAS will automatically create and link an Allocation Requirement based on the entered information).
Managing Existing Allocations
Click any Room Allocation record to open and Edit its details. Use Delete to remove when needed.
Schedule Board
The Schedule Board is the central planning interface used to manage all room allocations. It provides a real-time, visual timeline of room availability, allocations, and open allocation requirements. Users can filter rooms, view schedules in different formats, drag-and-drop bookings, and manage unallocated requirements—all from one screen.
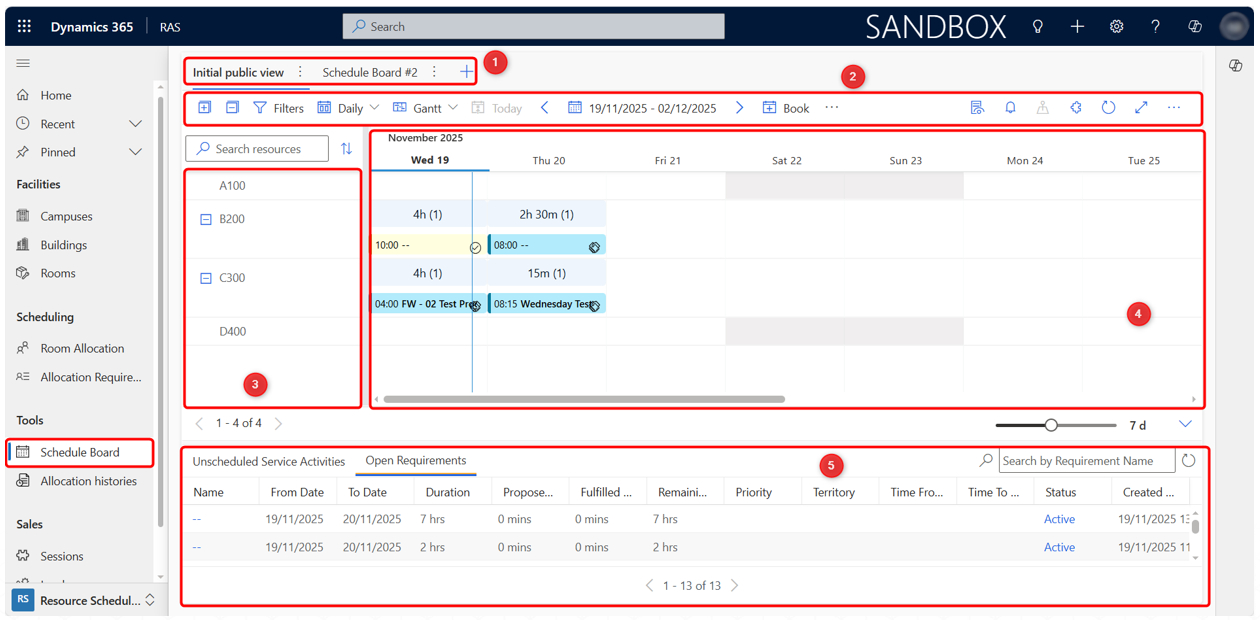
- Board Tabs
- Command Bar
- Resource List
- Main Scheduling Grid
- Open Requirements & Unscheduled Activities
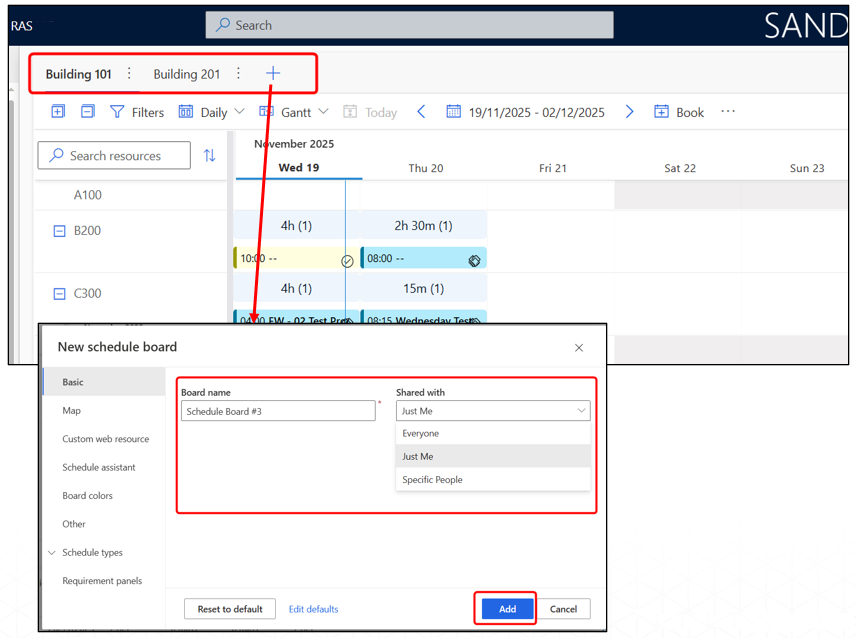
Board Tabs (Top Section of Schedule Board)
The Board Tabs allow users to create and switch between multiple schedule board views. Each board can have its own filters, layouts, and room groups, making it easier to manage different campuses/buildings, or types of rooms.
- Each tab represents a separate schedule board configuration.
- You can add new boards by clicking the “+” tab.
Boards can be customized to show:
- Only specific buildings
- Specific types of rooms (e.g., computer labs, workshop rooms)
- Special filtered views for admin/sales/sessions
- Switching between tabs lets user quickly navigate between different areas
Command Bar
The Command Bar provides quick access to all scheduling actions and display controls available on the Schedule Board.
Key Functions
- Filters: Apply filters to show only specific rooms/resources (e.g., by capacity, campus, building, etc).
- View Modes: Switch between Hourly, Daily, Weekly, Monthly or Gantt views.
- Date Navigation: Move forward/backward through the calendar or jump to today.
- Book Button: Allows booking directly from the schedule board based on selected requirements.
- Additional Actions (⋯): Access other tools such as settings, refresh, or resource configuration.
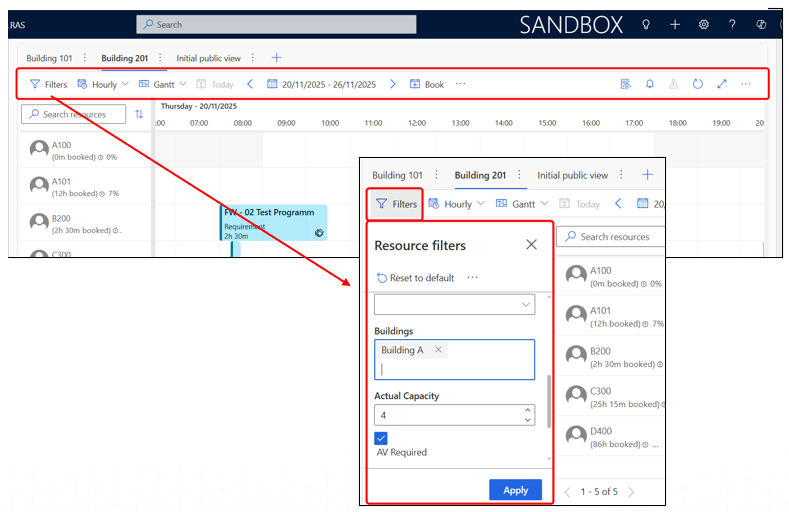
Resource List
The Resource List displays all rooms that are available for scheduling based on the selected filters and board configuration.
Key Points
- Shows all rooms (resources) that match the current filters.
- Rooms appear with their names (e.g., A100, B200, C300).
- The list dynamically updates when filters change.
- Clicking a room highlights its availability on the schedule timeline.
- Only rooms that are active and configured as bookable resources will appear here.

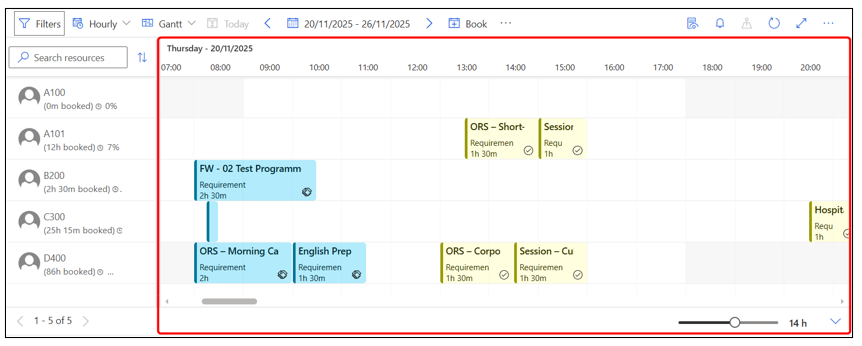
Main Schedule Board
The Main Schedule Board (Calendar View) is the main visual area where all room allocations appear. It shows which room is allocated, for what time, for which activity, and in what status.
Key Points
- Each colored bar represents a Room Allocation (Blue = Confirmed, Yellow = Provisional)
- Interactive Scheduling Features:
- Drag & Drop allocations to another room/time.
- Extend or reduce duration by stretching the edges.
- Displays room allocations across the selected date range, and you can change how many hours/days are visible by adjusting the zoom bar at the bottom-right corner of the board.
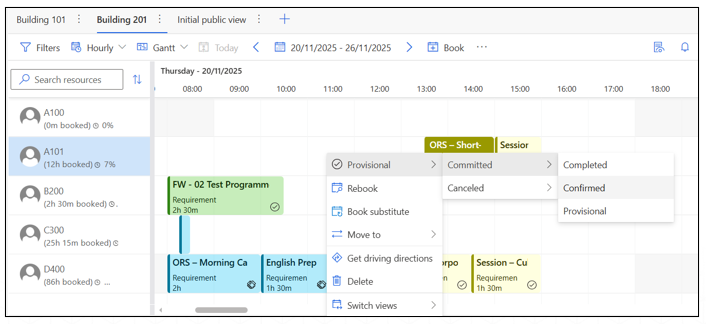
- Booking Interaction:
- Hovering over a booking displays key details of the Room Allocation (name, type, status).

- Right-click on a booking to change the allocation status (e.g., update from Provisional → Confirmed).
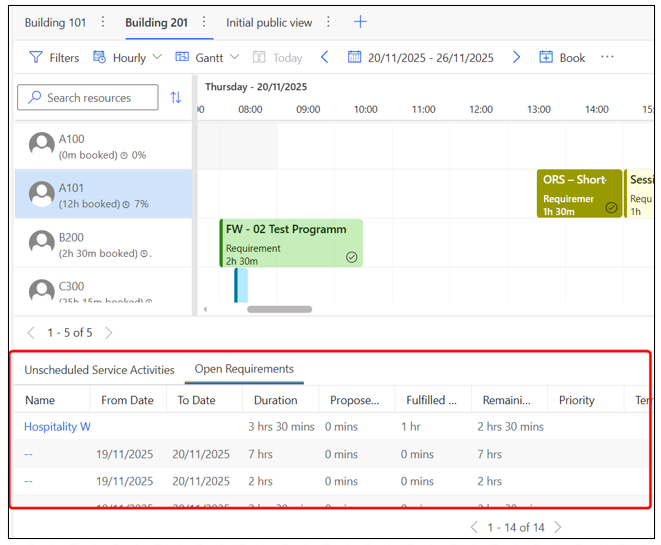
Open Requirements & Unscheduled Activities
The Open Requirements / Unscheduled Activities panel displays all allocation requirements that still need room assignments.
Key Points
- Shows all pending Allocation Requirements that are not yet allocated into a room (Sessions, Events, Opportunities, Admin).
- Clicking a requirement highlights matching availability on the board.
- You can drag and drop a requirement onto a room timeline to instantly create a Room Allocation.
- Once scheduled, the requirement is removed from this list.
Allocation History
Allocation History provides a full audit log of every change made to a Room Allocation record. It helps track what changed, who changed it, when it was changed, and why the change was necessary.
Recording Changes
- Whenever a user updates key on a Room Allocation, they must fill in the Change Reason field before saving the change.
- When the record is saved, the system automatically logs:
- The change reason
- Before/after values
- Date and time of the change
- The user who made the change
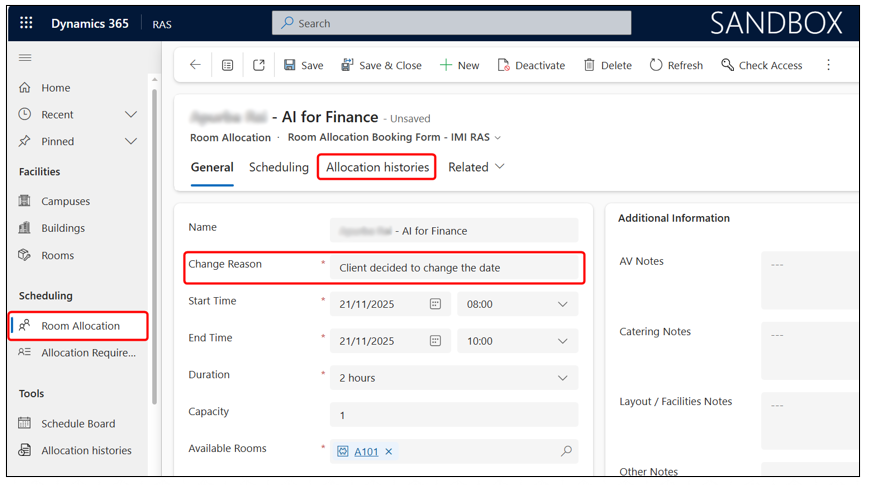
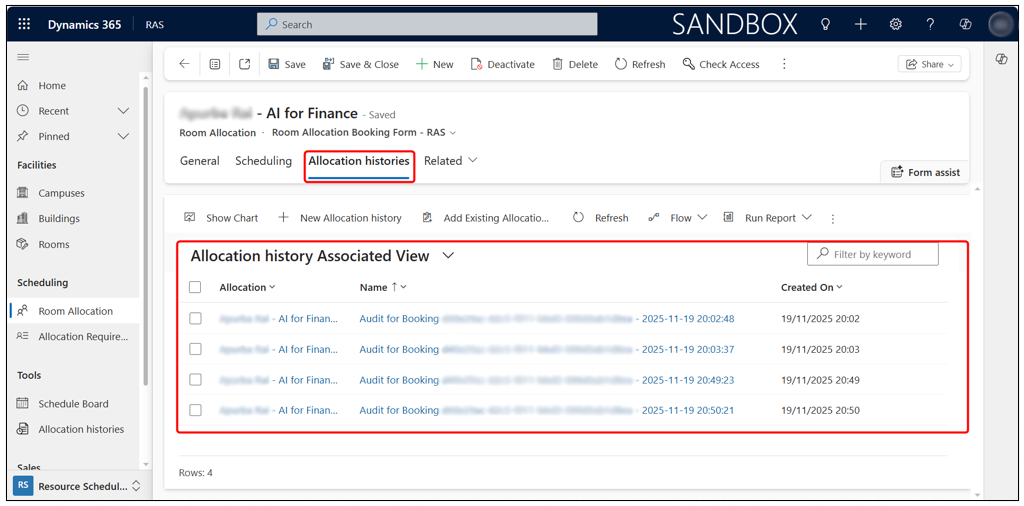
Viewing the Audit Log
Open the Room Allocation record and go to the Allocation histories tab. Here you will see a list of all history entries recorded for that booking. Each entry provides detailed information about the update.