Sales & Receivables User Guide in Dynamics 365 Business Central
Accounts Receivables
When Sales Invoices and Credit Memos are posted into the customer account (Accounts Receivables), the customer ledger entries will be available for Receipt entries.
There are 2 main methods of posting receipts within customer ledger:
-
Using a Cash Receipt Journal
-
Using Register Customer Payments
Note: Under Cash Management processes, Deposit is another document to enter receipts from customers if the payment is deposited in the bank.
Cash Receipt Journal
The Cash Receipt Journal is used to record customer (incoming) payments (on account or to offset invoices). Refunds from vendors can also be recorded in a cash receipt journal line.
-
Navigate to Cash Receipt Journal to open the Cash Receipt Journals entry page.
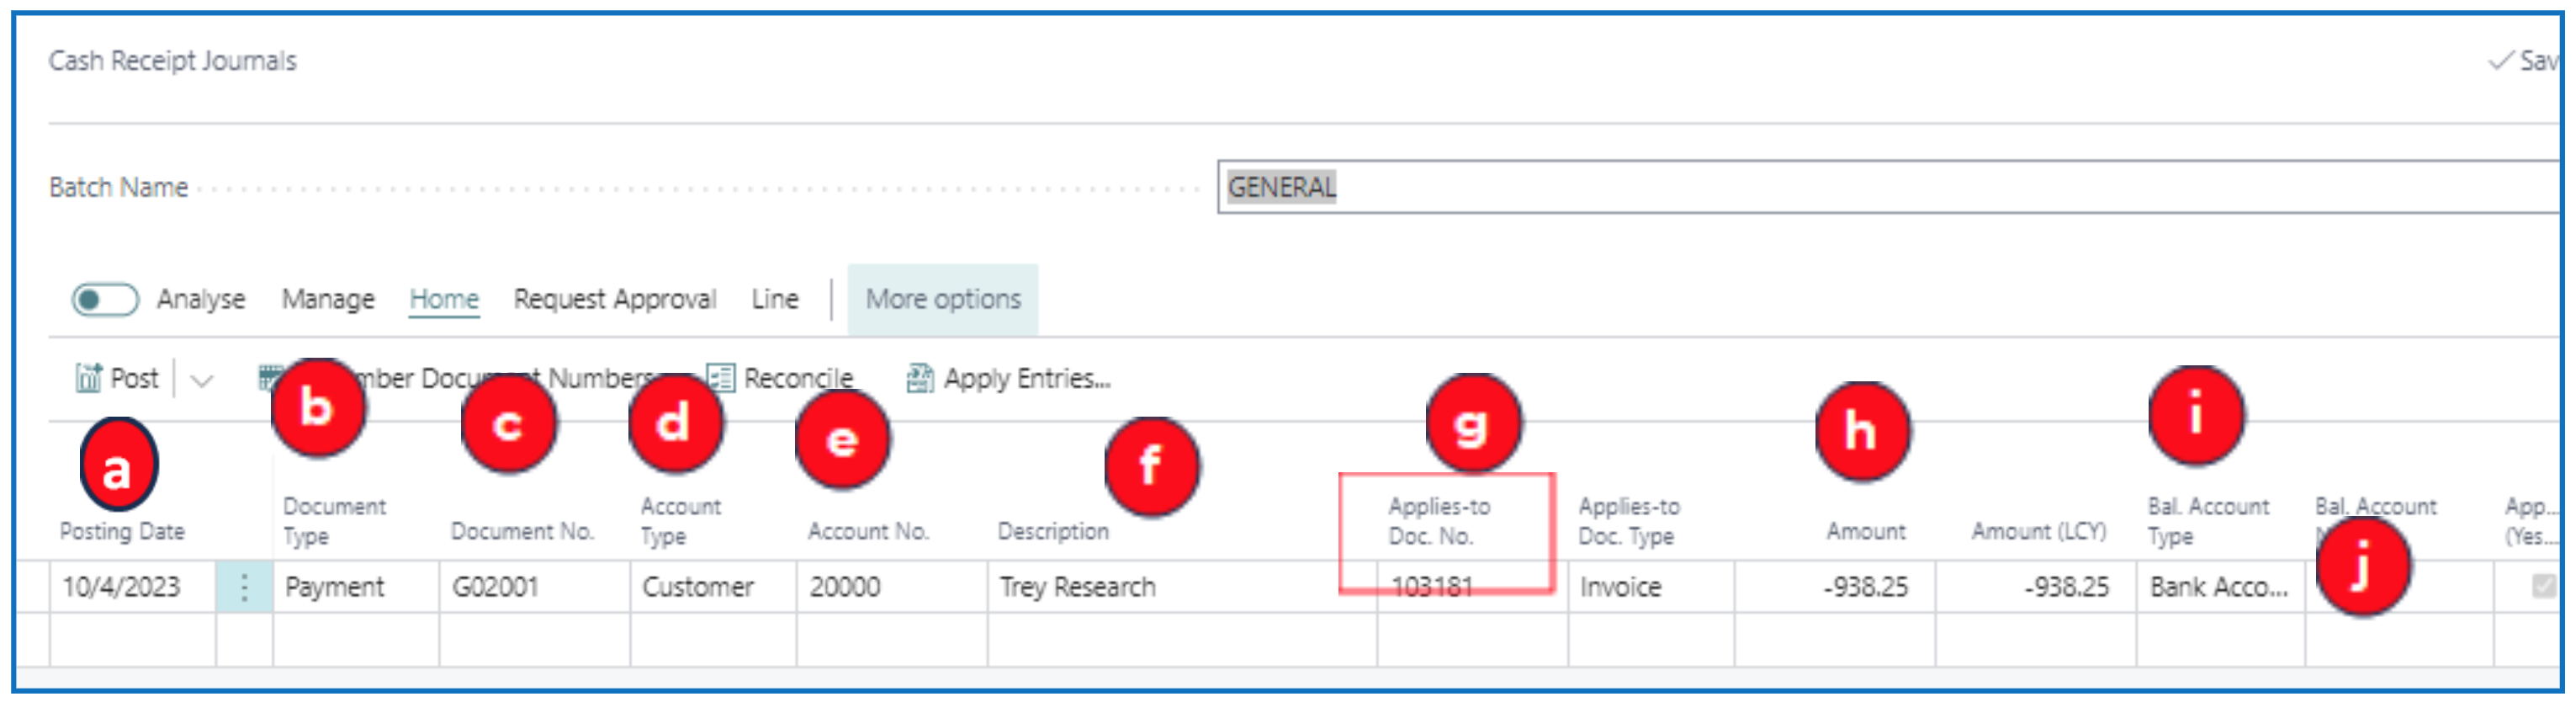
One journal line represents one receipt (amount) that can be applied to one or more (unsettled) invoices based on the invoice Remaining Amount.
Select the Batch Name (if specific batches are created for different payment methods or bank accounts).
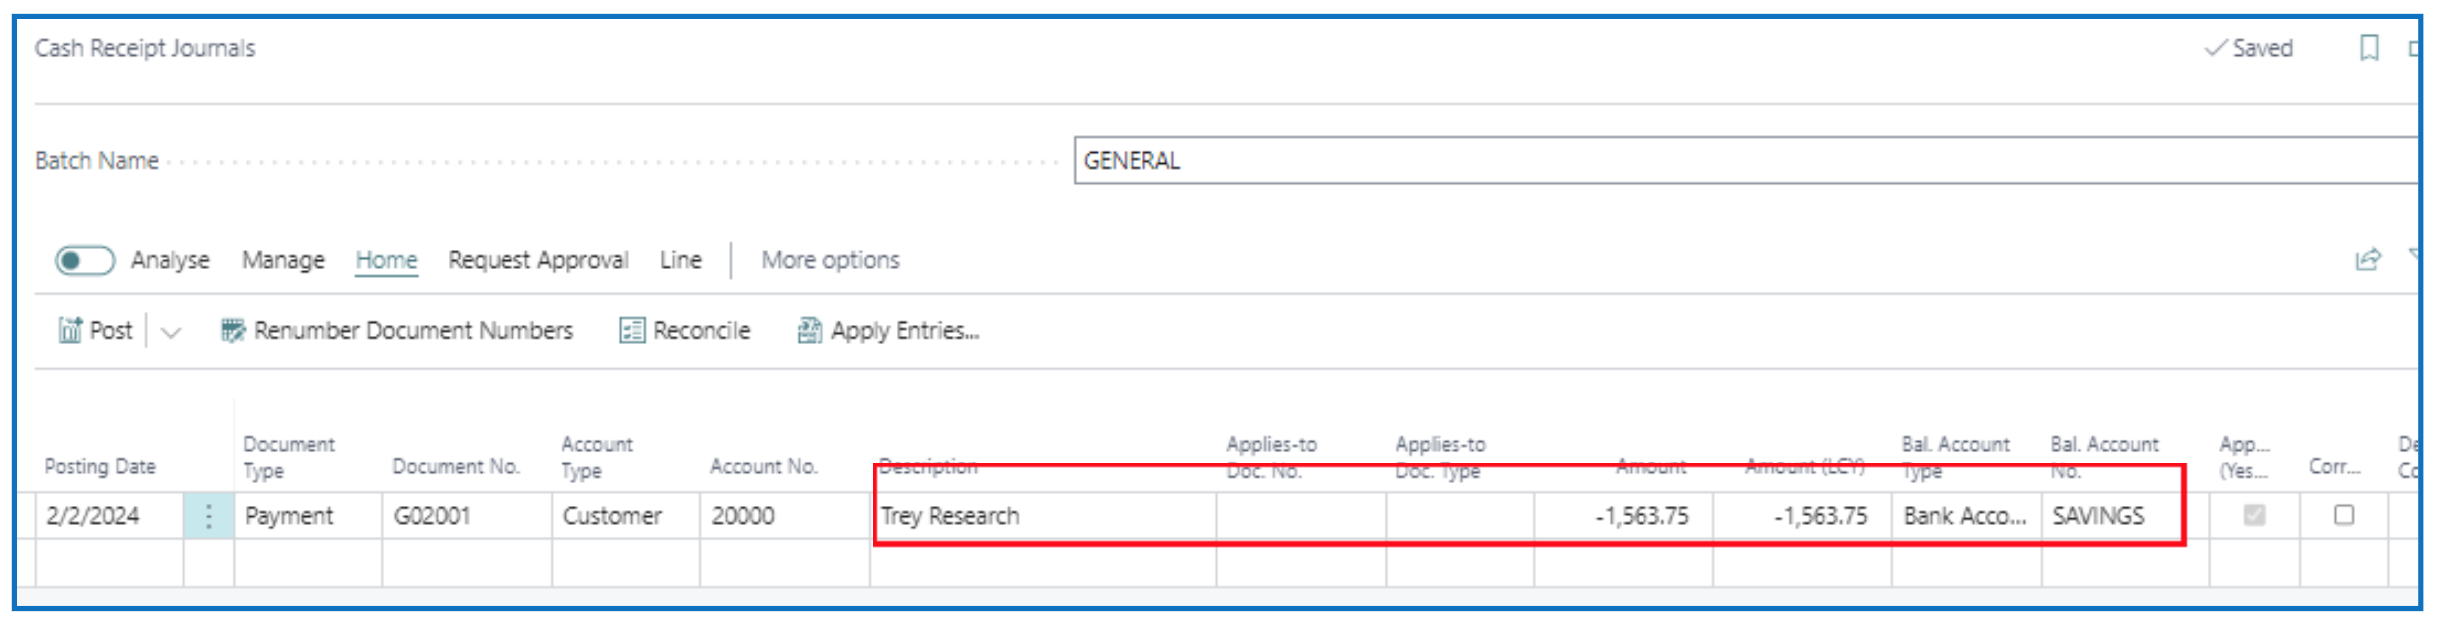
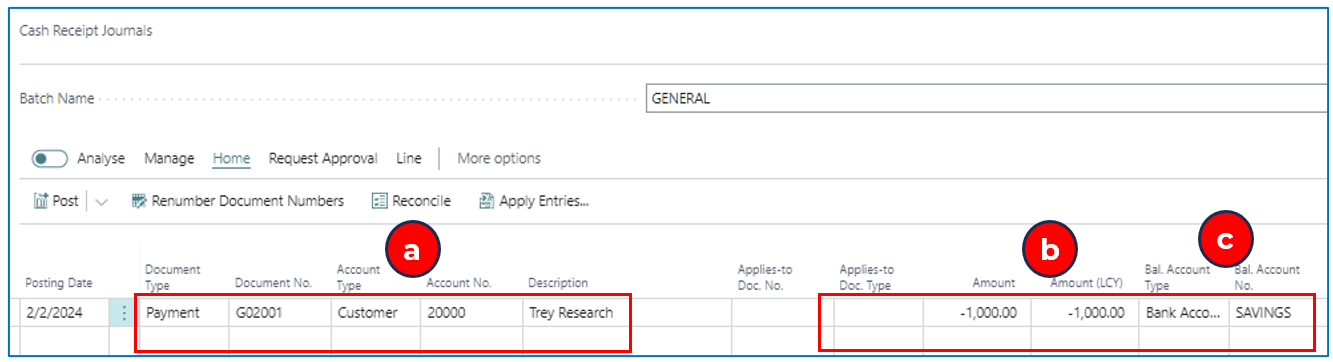
a) Posting Date — Enter the date to post this receipt (line).
b) Document Type — Select Payment since this is a customer payment.
c) Document No. — Enter a document number reference or use the default numbering sequence.
d) Account Type — Select Customer.
e) Account No. — Select the customer account number.
f) Description — This defaults to the customer’s name (enter any text if needed).
g) Applies-to Doc. No — Click on the field to open the Apply Customer Entries list page to select the invoice to apply this payment.
h) Amount — This value defaults from the invoices selected in step (g) (Applied-to Doc).
i) Bal. Account Type — Select Bank as the payment is to be posted to a G/L bank account.
j) Bal. Account No. — Select the Bank account defined.
Apply Customer Entries:
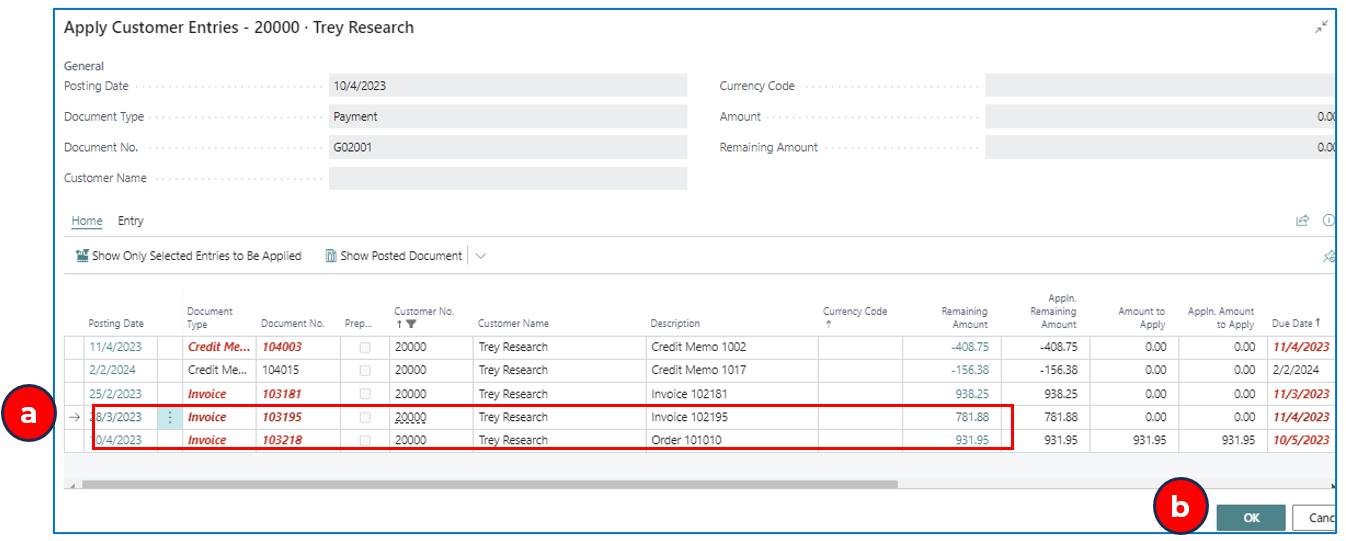
NB: The red highlighted invoices indicate that these are past payment due date.
Applying a Single Invoice to the Payment Received
a) Select the invoice record to apply this payment (above example).
b) Click OK and the value of the invoice will appear in the Cash Receipt Journal line (with an opposite sign ‘-ve’).
c) This indicates that the payment amount will be applied to the single selected invoice on posting the Cash Receipt Journal.
d) Repeat above steps for every invoice payment from different Customer code selected — this will create a journal line for each receipt applied against each customer invoice.
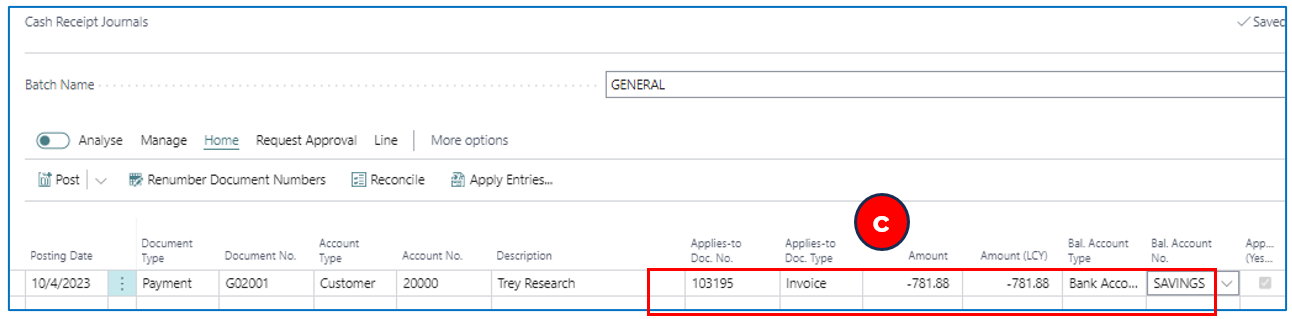
Applying Multiple Invoices to the Payment Received (As a Lumpsum)
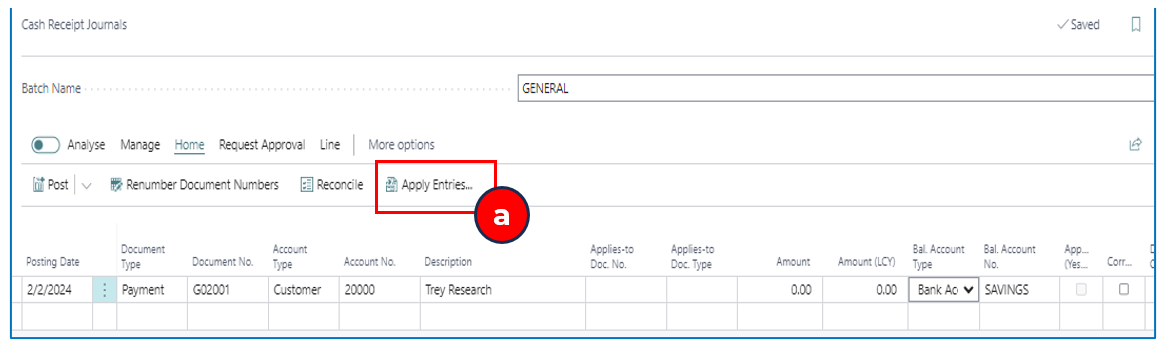
a) The customer payment is a lumpsum for several invoices. Click on Apply Entries in the Cash Receipt Journal to open the Apply Customer Entries list page.
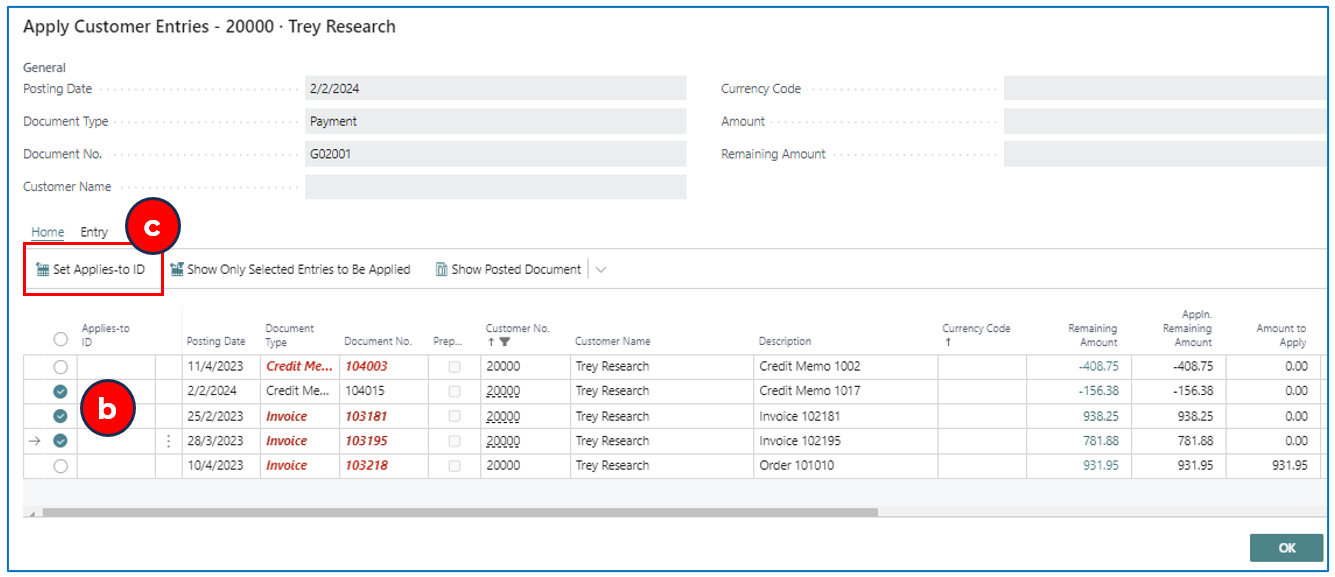
b) Select multiple invoice (and credit memo) lines to apply such that the net total is the value of the receipt.
c) Click on Set Applied-to ID to assign the selected documents a common applies-to reference that combines the totals. Click OK to confirm the receipt total. The total net amount will appear in the Cash Receipt Journal line.
Apply On-Account Payment
At the time of receipt, if you do not select any invoice to apply, the receipt amount will be posted in the customer account as On-Account. Similarly for credit memos that are not applied to any invoices, these will be “on-account” (credits).
a) Enter the Cash Receipt Journal line with Account Type of Customer and customer account code.
b) Amount — It is important to enter a ‘-ve’ amount for payment received (indicating the amount reduces the customer ledger balance).
c) Bal. Account Type — If the payment is received in the bank, this should be the Bank Account type (for reconciliation). If cash is received, this should be G/L Account (Bal. Account Type) and Bal. Account No. is the G/L cash account.
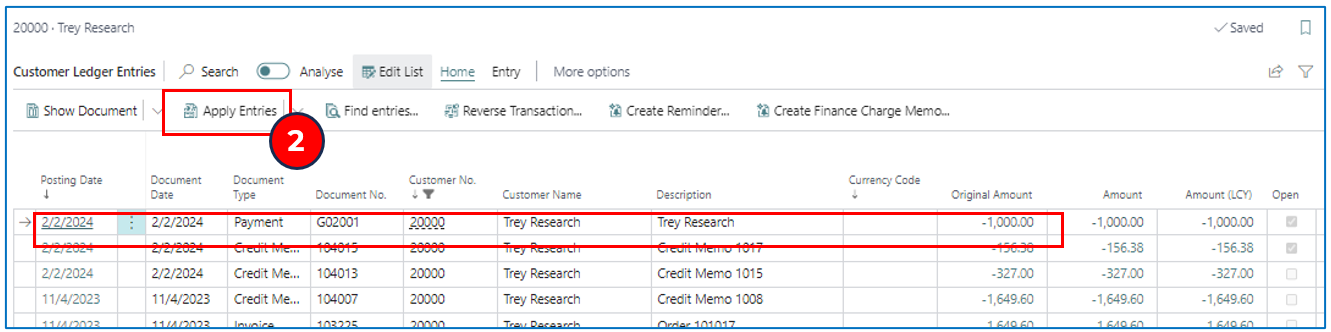
Applying On-Account Credit in the Customer Ledger
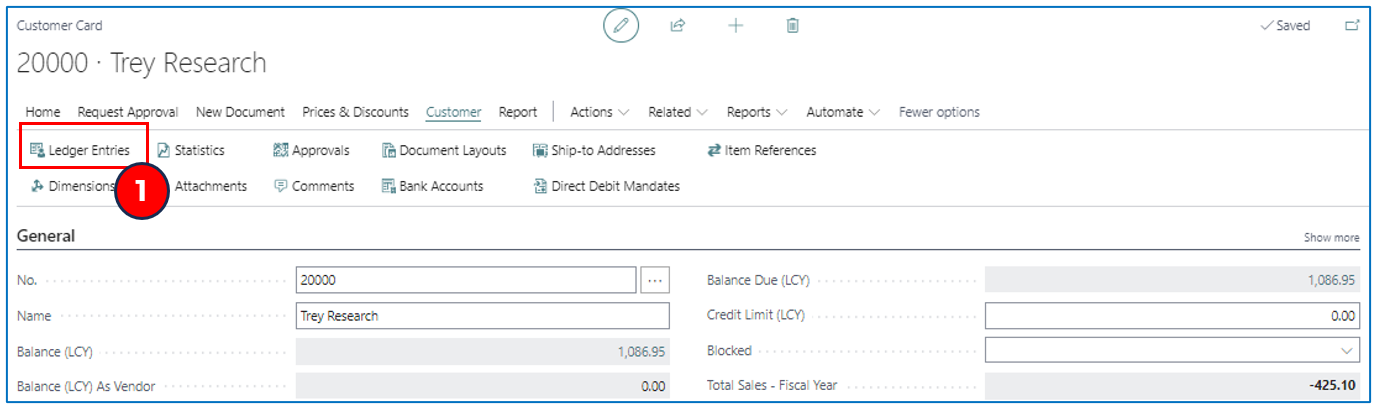
The Customer Ledger entries can be viewed from within a customer card page. Navigate to the customer list page and select a customer.
-
Select menu option Customer > Ledger Entries to open the Customer Ledger Entries list page.
Example:
NB: Documents highlighted in red indicate that these are past due date.
-
The posted on-account cash payment is reflected as a ‘-ve’ amount with Document Type Payment. Select this on-account payment and click on menu option Apply Entries to open the Apply Customer Entries list page.
Example:
-
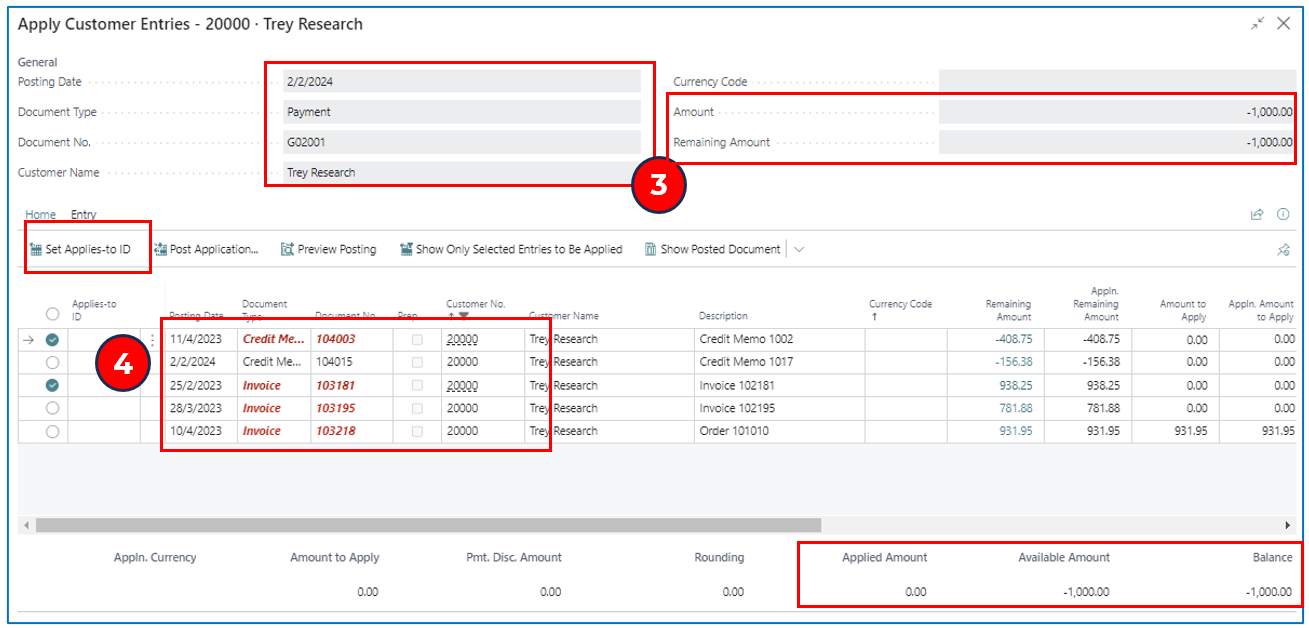
The Apply Customer Entries page displays the on-account payment and the list of available Open documents that can be selected to offset against this payment.
NB: the bottom summary provides the balance to offset (e.g. -$1,000)
-
Multi-select the documents to apply the on-account payment offset and click on **Set Applies-to ID** to confirm the selection for offset.
This will default the user id to the Applies-to ID field as an audit record of which user performed this payment offset.
The bottom summary also provides the value for Applied Amount and Balance. Continue to apply the Balance amount to other documents so that the balance is close to $0.
If there is a -ve balance, it means that there is a balance to be used in future invoice offset.
If there is a +ve balance, it means that there is a balance due (from one of the invoices).
-
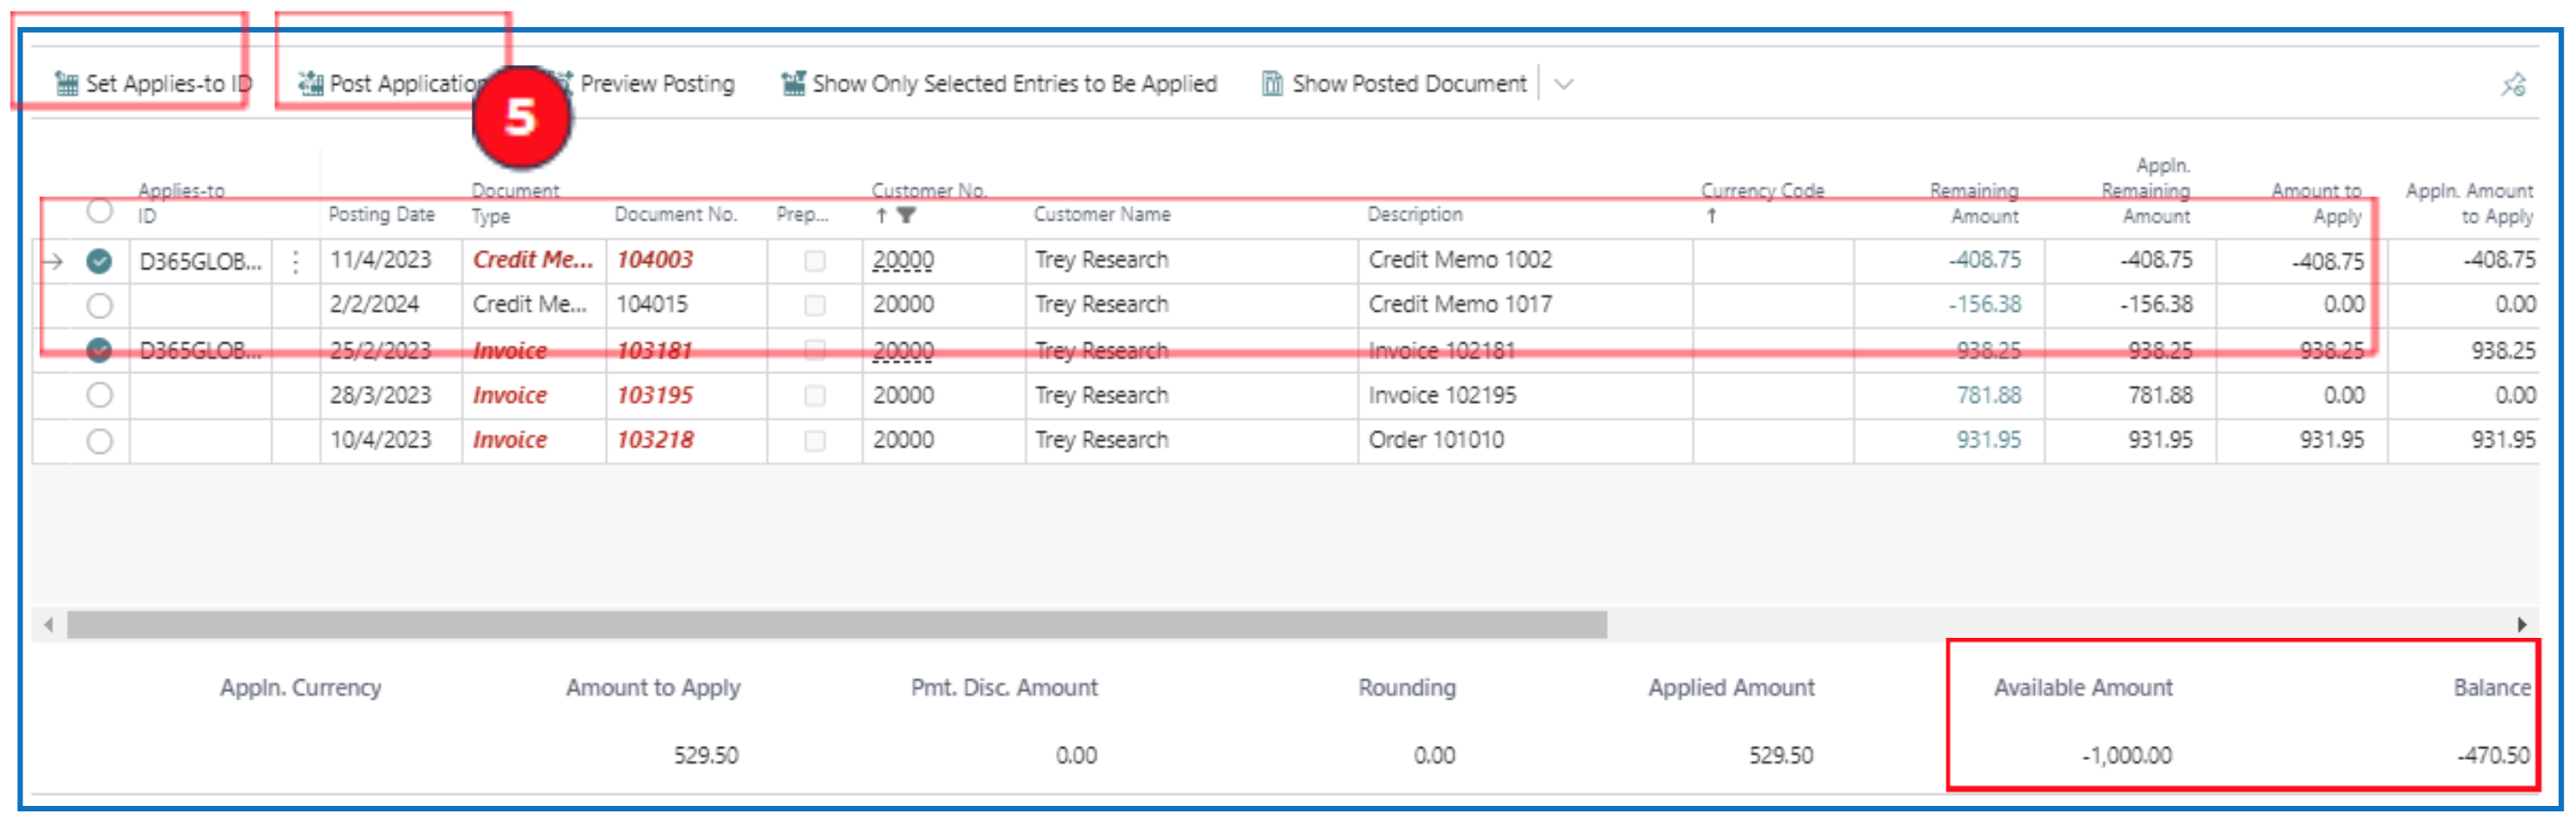
Finish the process by posting — click on Post Application to post the offset transactions and confirm the posting date.
Tip: Use preview posting to check the value adjusted in the customer account upon posting.
-
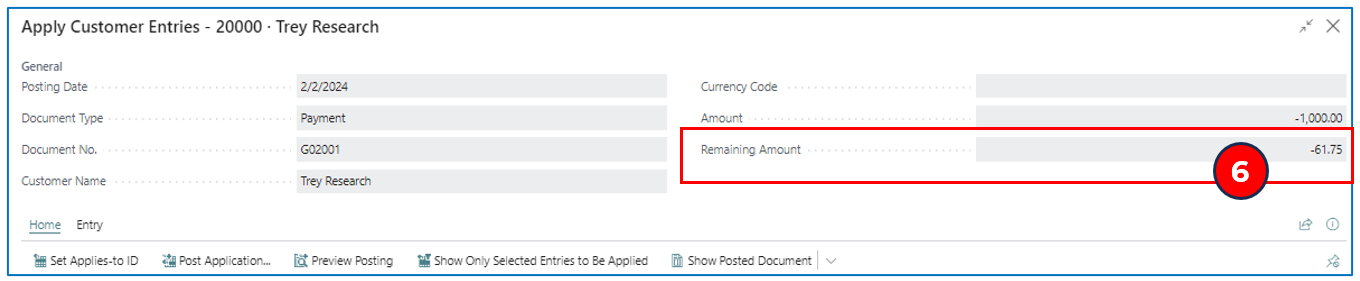
The above process can be repeated and if the on-account payment was not fully applied the first time, the balance will be available for future application (shown as Remaining Amount).
Un-applying Offset Amounts in Customer Ledger
There are times when the offset application of a payment or credit memo against an invoice was incorrect and must be corrected/reversed. This is the Unapply Entries process.
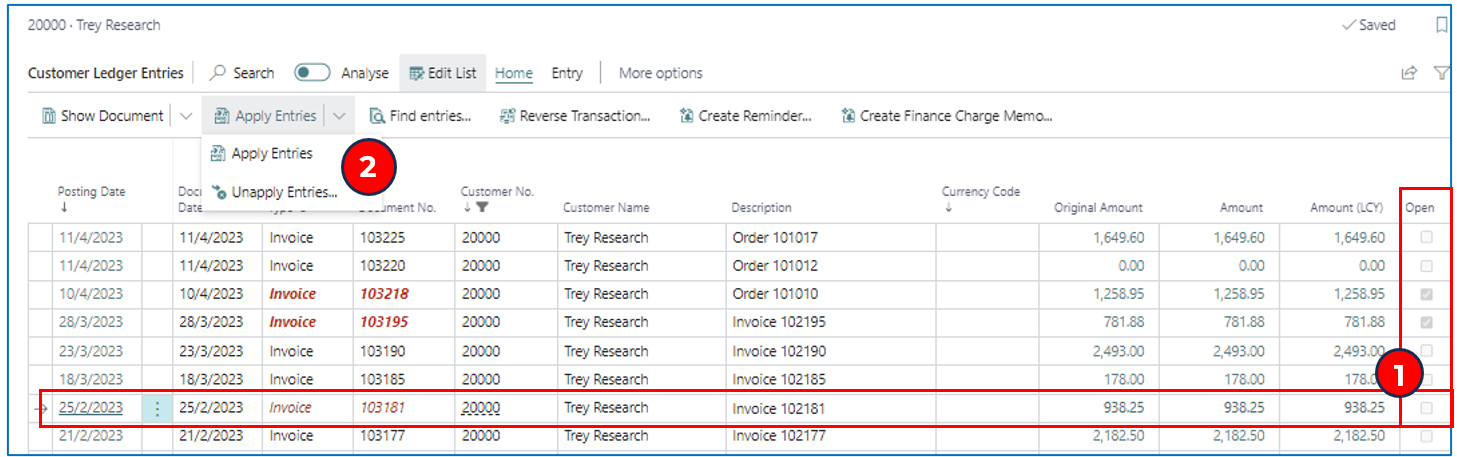
Navigate to the Customer Ledger Entries list page for the customer:
-
Select the record with the incorrect offset application.
NB: The status should not be Open (unticked).
-
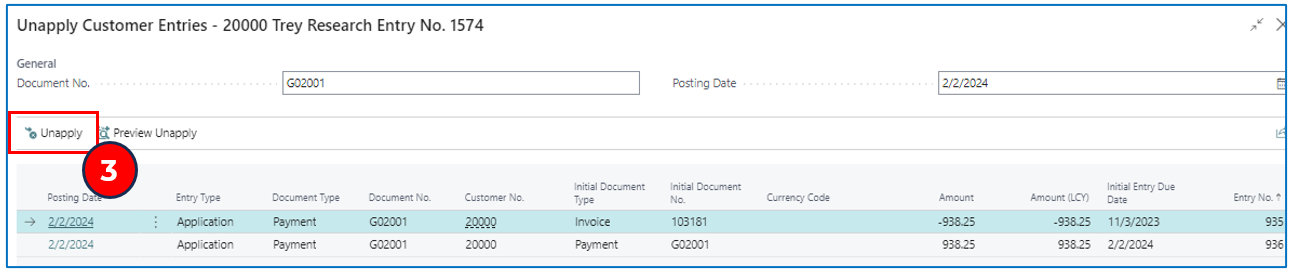
Click on menu option Apply Entries > Unapply Entries to open the Unapply Customer Entries list page.
-
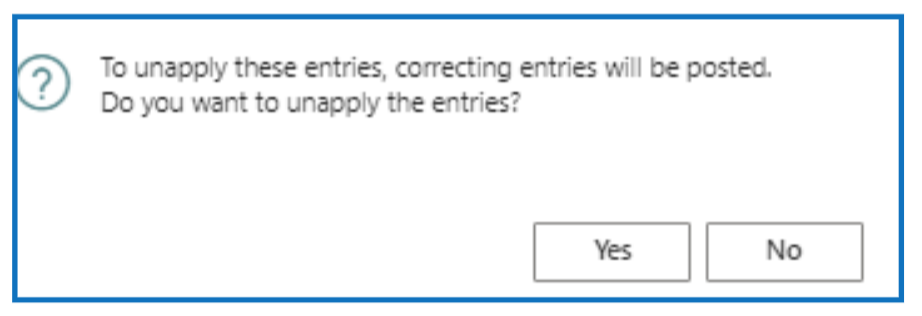
Highlight the payment to unapply (i.e. reversing the offset to make the invoice unpaid) and click on Unapply. Accept the confirmation.
-
By “unapplying” the transaction, invoices will be re-opened (as unpaid) and on-account payments will be reinstated (with full Remaining Amount to be used).
Register Customer Payments
Register Customer Payments is the other quick method of recording customer invoices included in the payment received.
Navigate to Customer card page and select menu option Actions > Register Customer Payments. This method will display all open invoices for a specific customer in the Register Customer Payments list page.
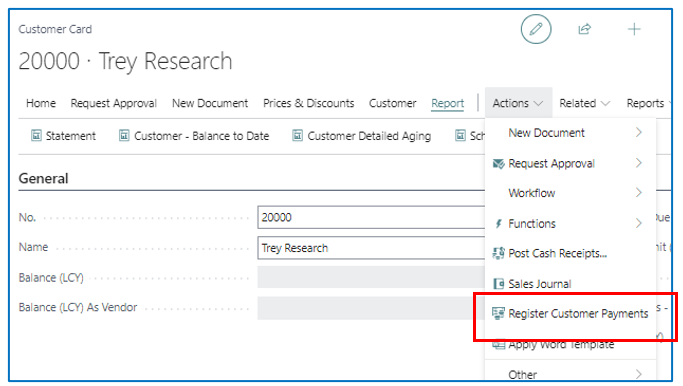
Using the Register Customer Payments shortcut will open the same page but displays open invoices for all customers.
Depending on your preference to process customer payments received, either way of navigating to the Register Customer Payments list page is acceptable.
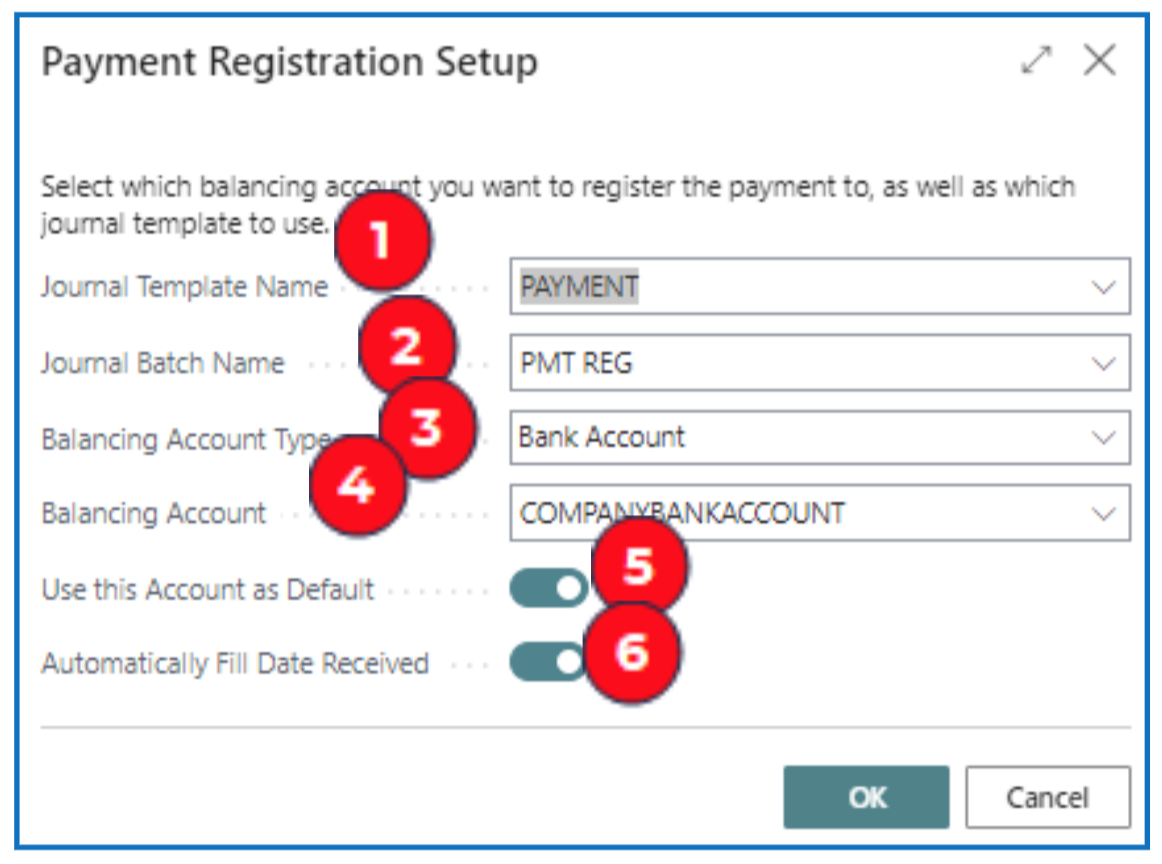
NB: When you first open the Register Customer Payments list page, the setup prompt appears for you to confirm parameters for posting.
Example:
-
Journal Template Name — Select the pre-defined cash receipt journal for processing customer payments.
-
Journal Batch Name — Select the assigned journal batch name.
-
Balancing Account Type — Select Bank Account for payments received in the bank.
-
Balancing Account — Select the bank account to post receipts. This will default the total balance available to be used in payment offset.
-
Use this Account as Default — Enable only if you are always using the same bank for the process.
-
Automatically fill Date Received — Enable to post cash receipts with the current posting date.
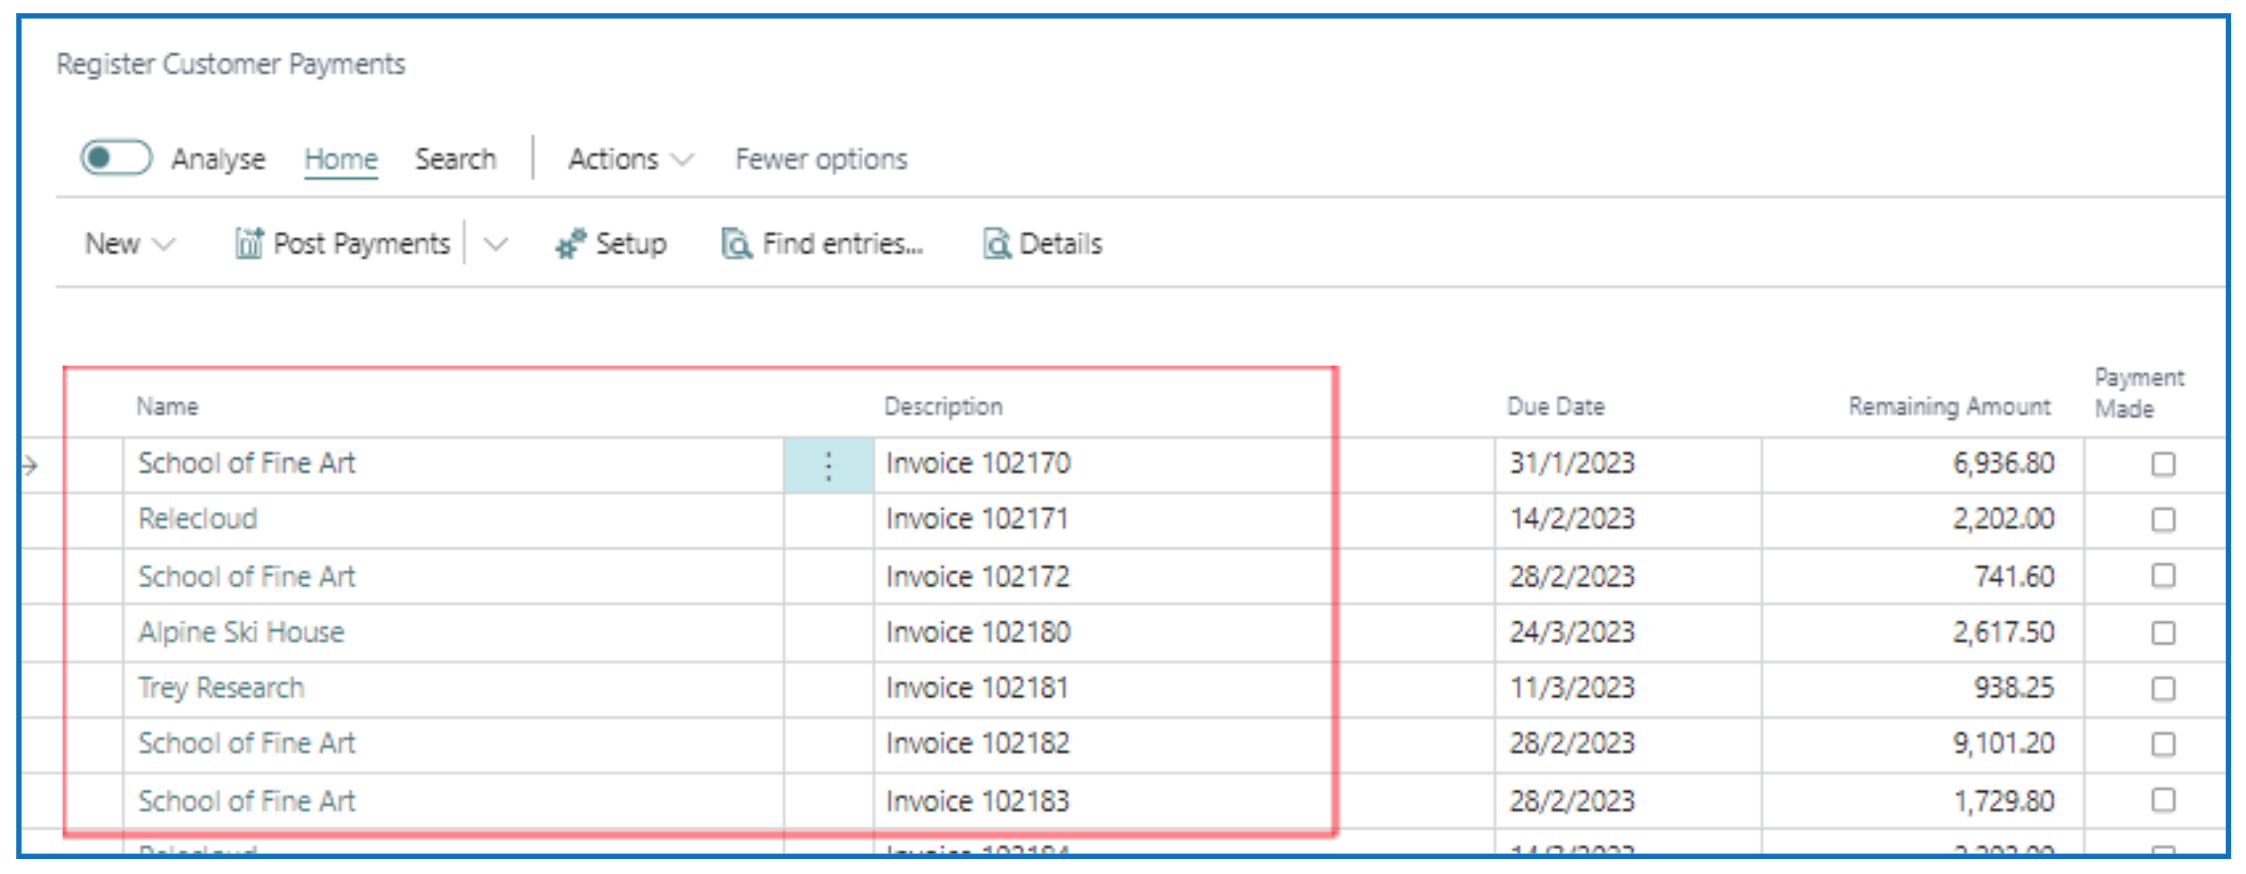
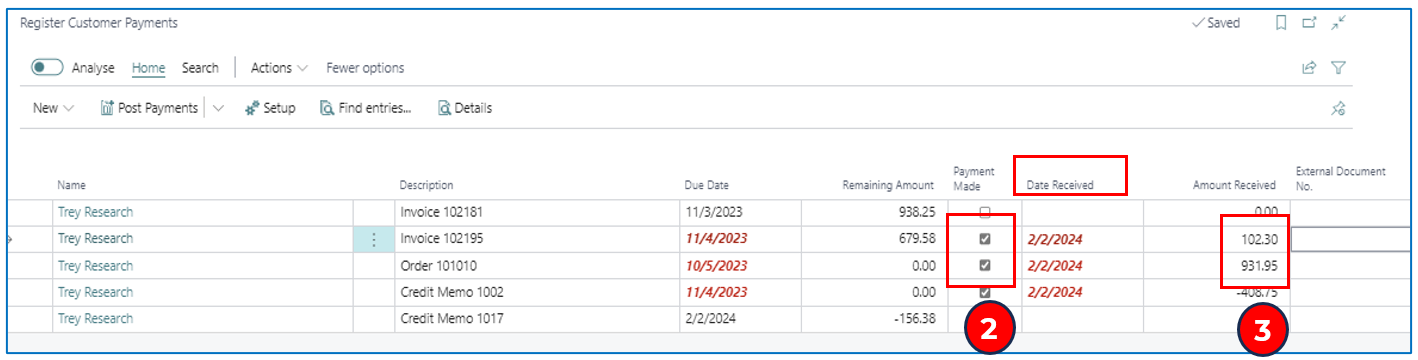
Register Customer Payments list page:
-
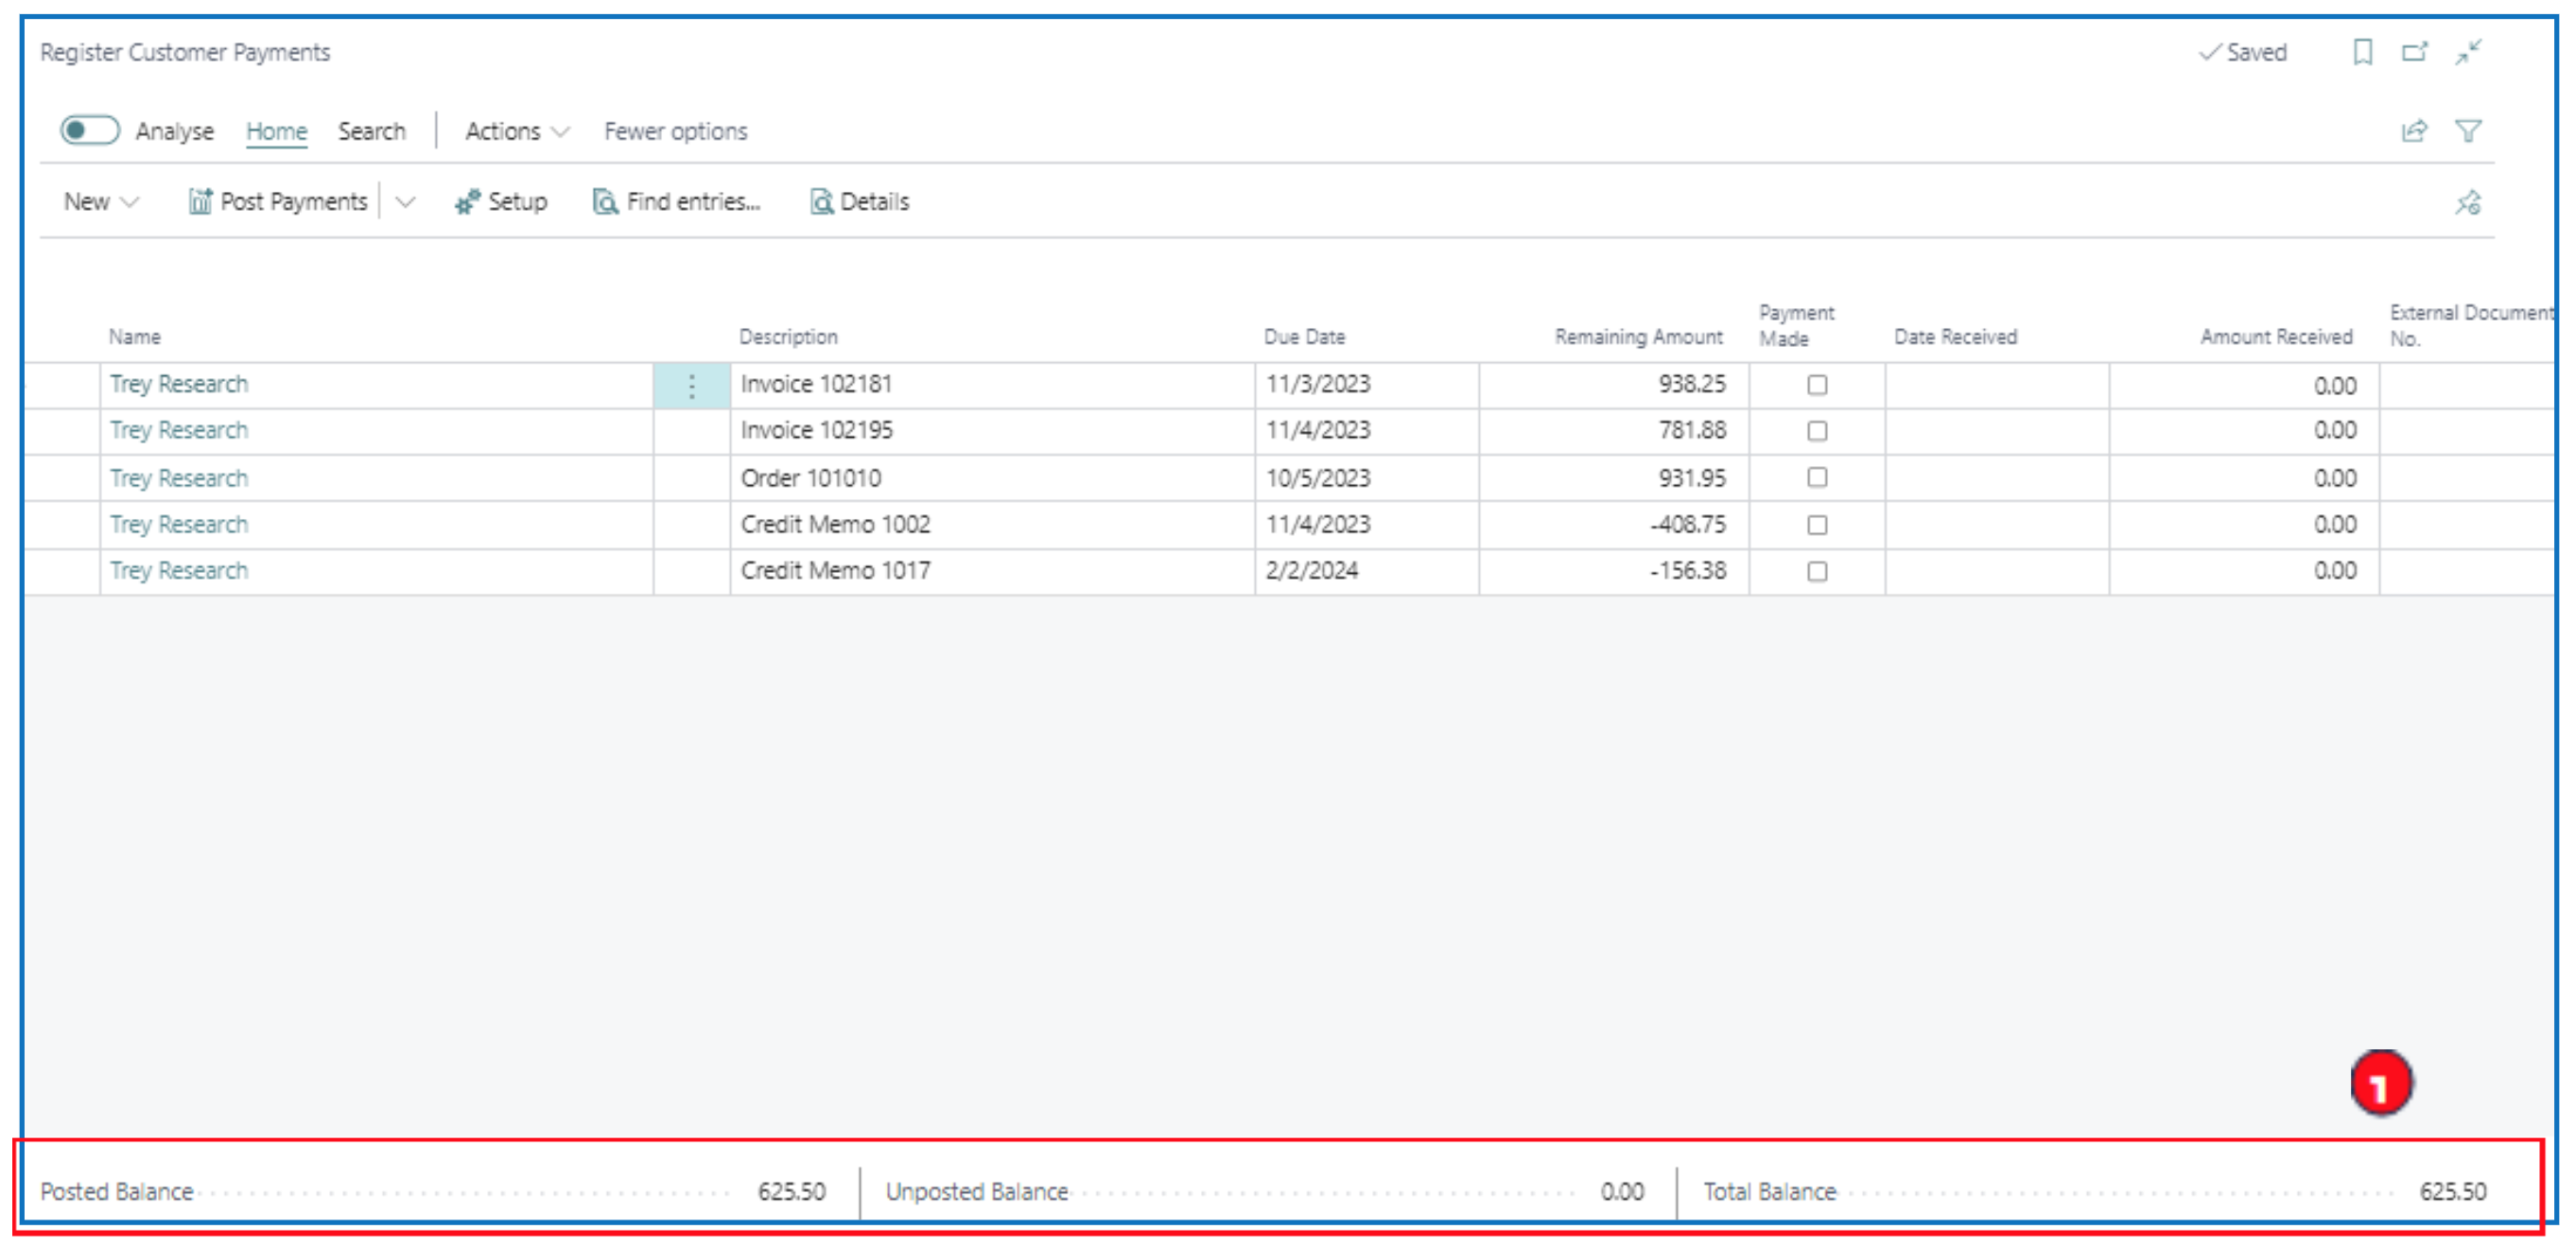
Based on the Balancing (Bank) Account selected in the setup prompt; the bank balance is displayed (for information) at the bottom of the page. This total comprises both posted and unposted receipts to the bank account (Balancing Account).
-
Next step is to tick the Payment Made for the invoices of which payments were received. The Date Received automatically completes with current date ONLY if the setup enables Automatically Fill Date Received.
-
Accept the Amount Received (offset value) as the full invoice amount or enter a lesser amount to offset for the invoice.
-
When Amount Received for invoices are all ticked as paid, post the payment either as a lumpsum in the bank (G/L) account or as separate payment amounts.
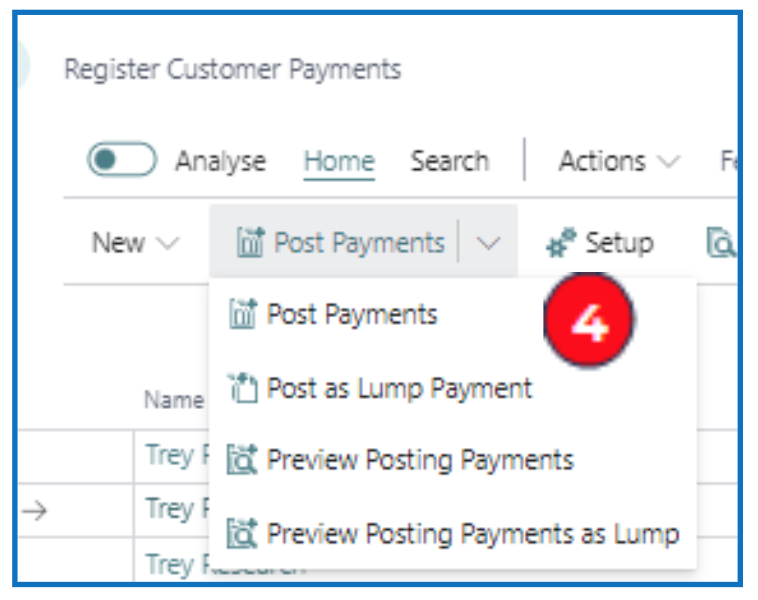
User Preview posting to check the G/L posting to the bank account and confirm the payment amount(s) received.
The posting will help with later bank reconciliation of posted transactions to the bank statement. This posting of receipts will increase the G/L bank balance.
Statements and Reminders
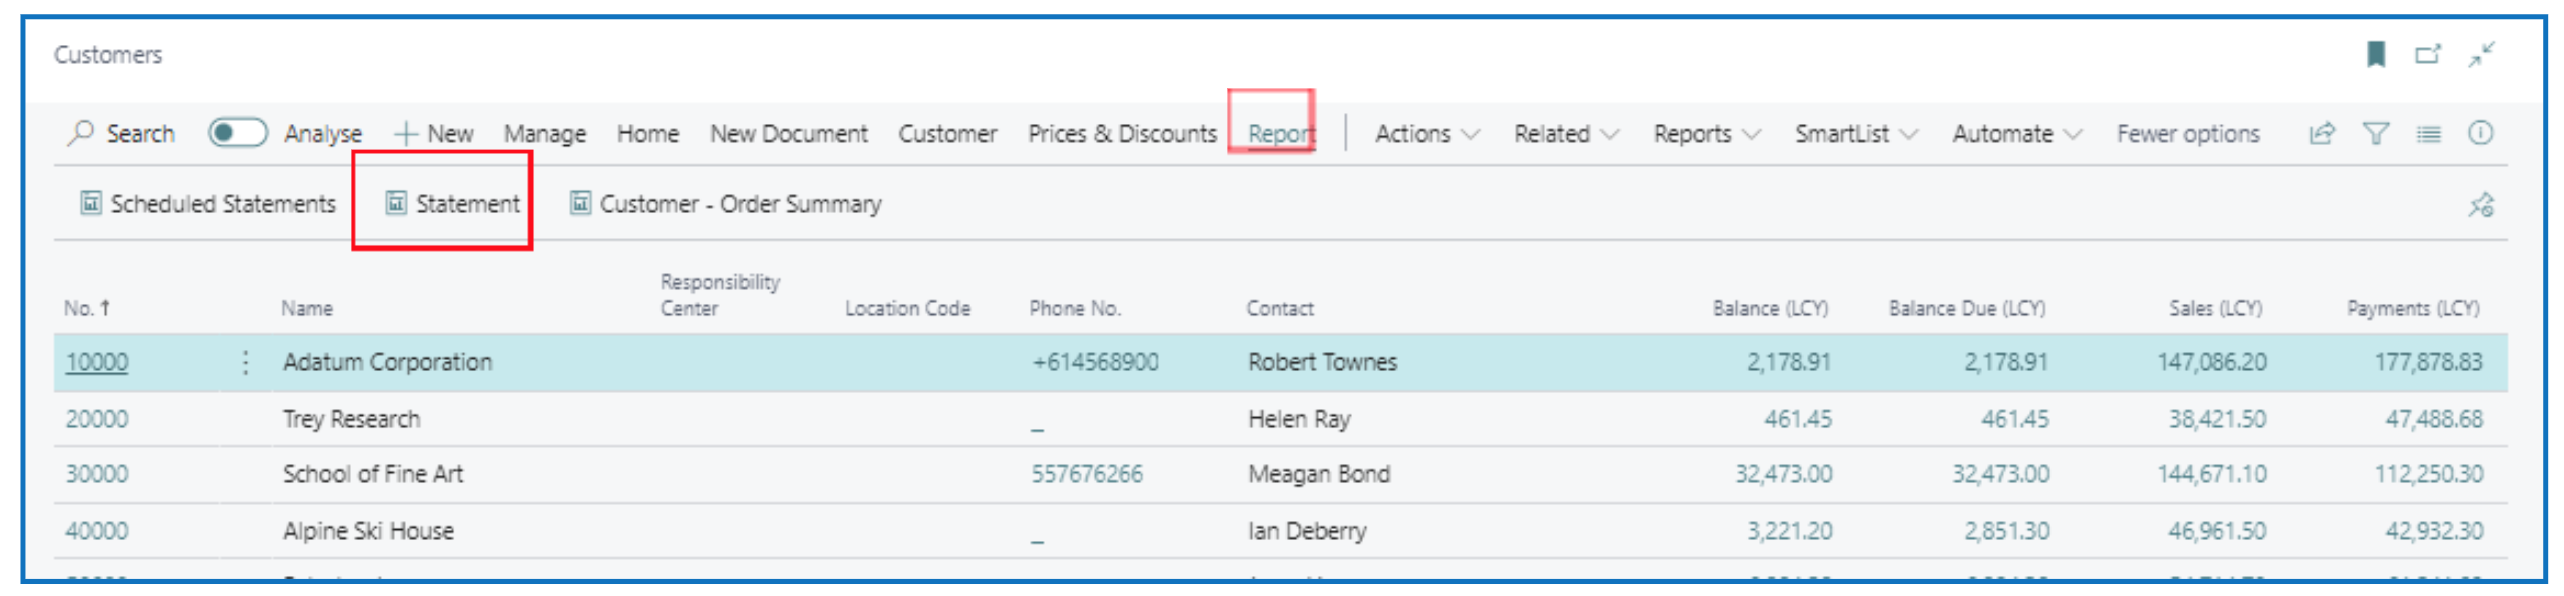
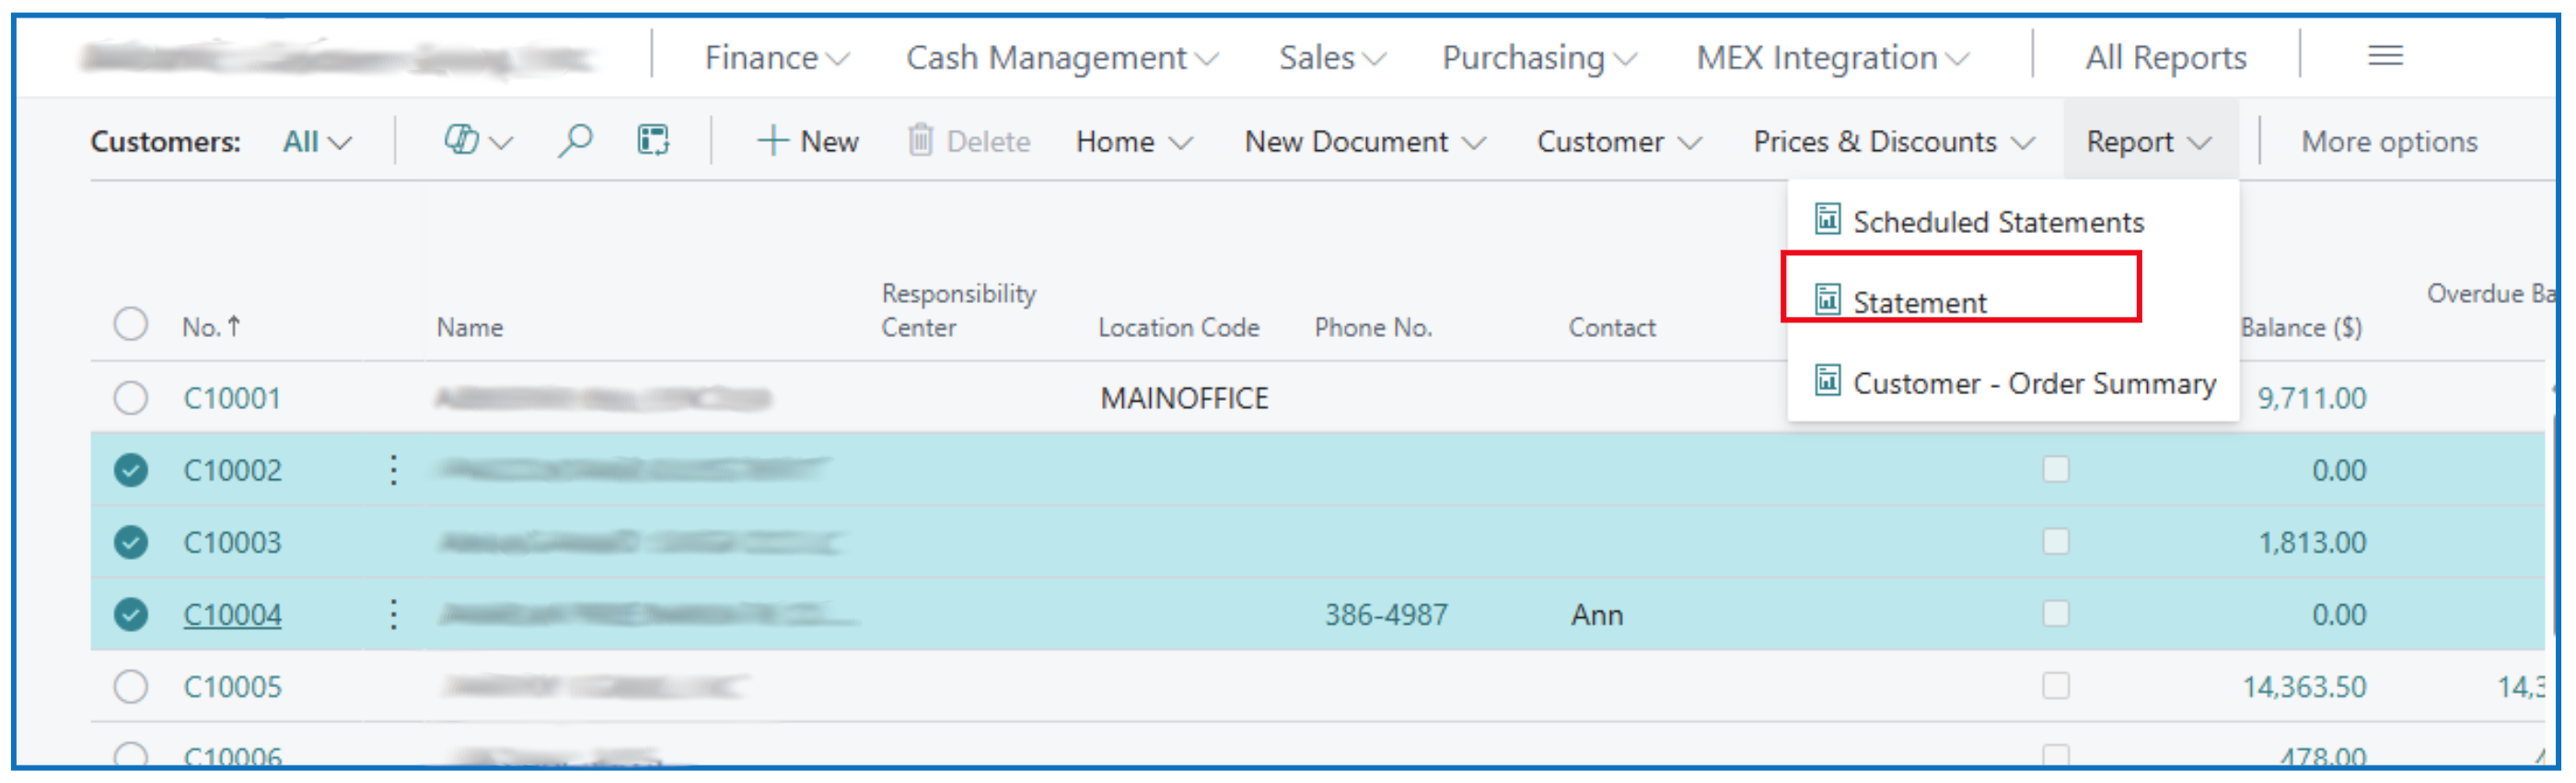
Standard Statement print formats are available from the Customers list page or from the Customer Card page.
Customer list page menu option Report > Statement.
NB: Scheduled Statements is an option to create a Job Schedule that prints statements and runs automatically to email/send statements to recipients.
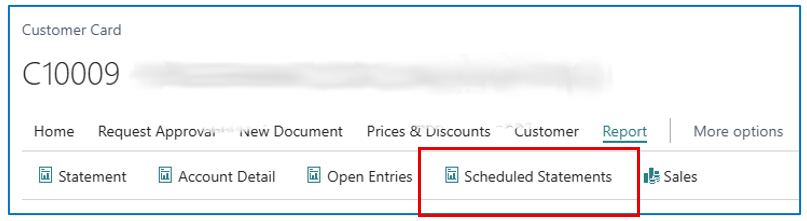
Customer Card page menu option Report > Statement.

Reports
Standard customer and sales reports available in Business Central can be found from the menu option All Reports.

Under the Reports option, select reports from the Sales and Marketing section.

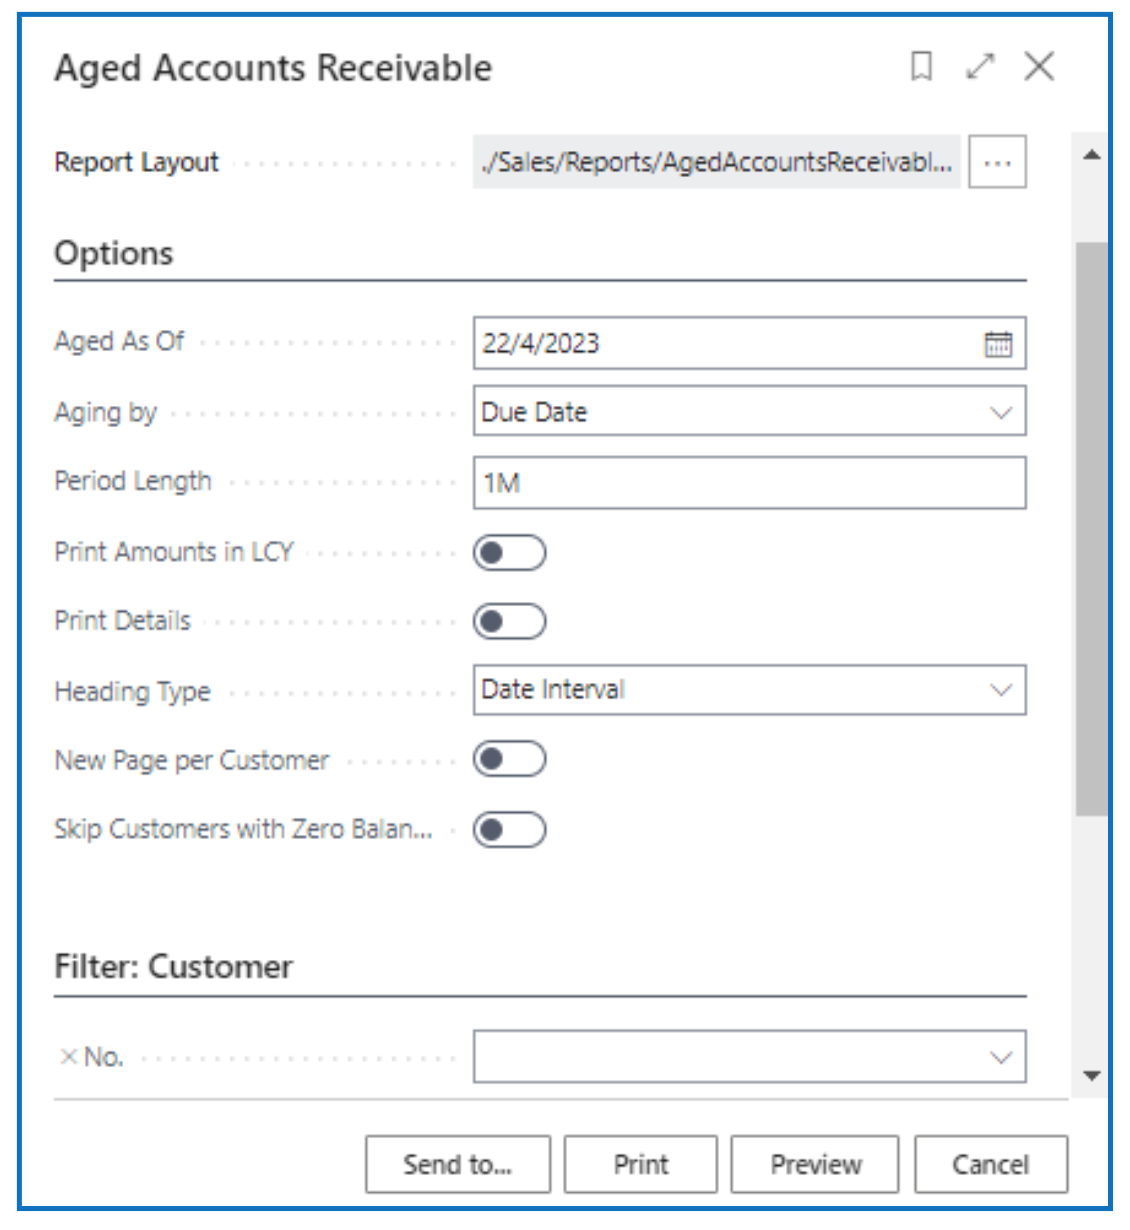
Aged Accounts Receivable
This is a common report to use. Navigate to the report through All Reports menu option:
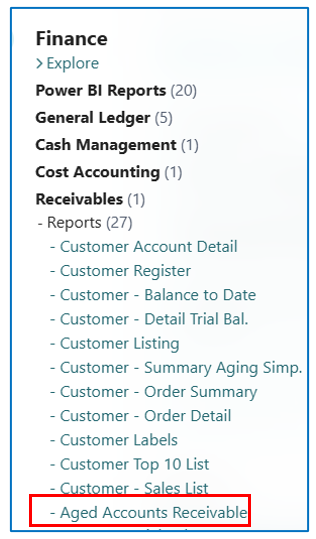
When this report is run, the prompt allows for options to define the aging as of date, the aging brackets (date and duration) and other parameters.
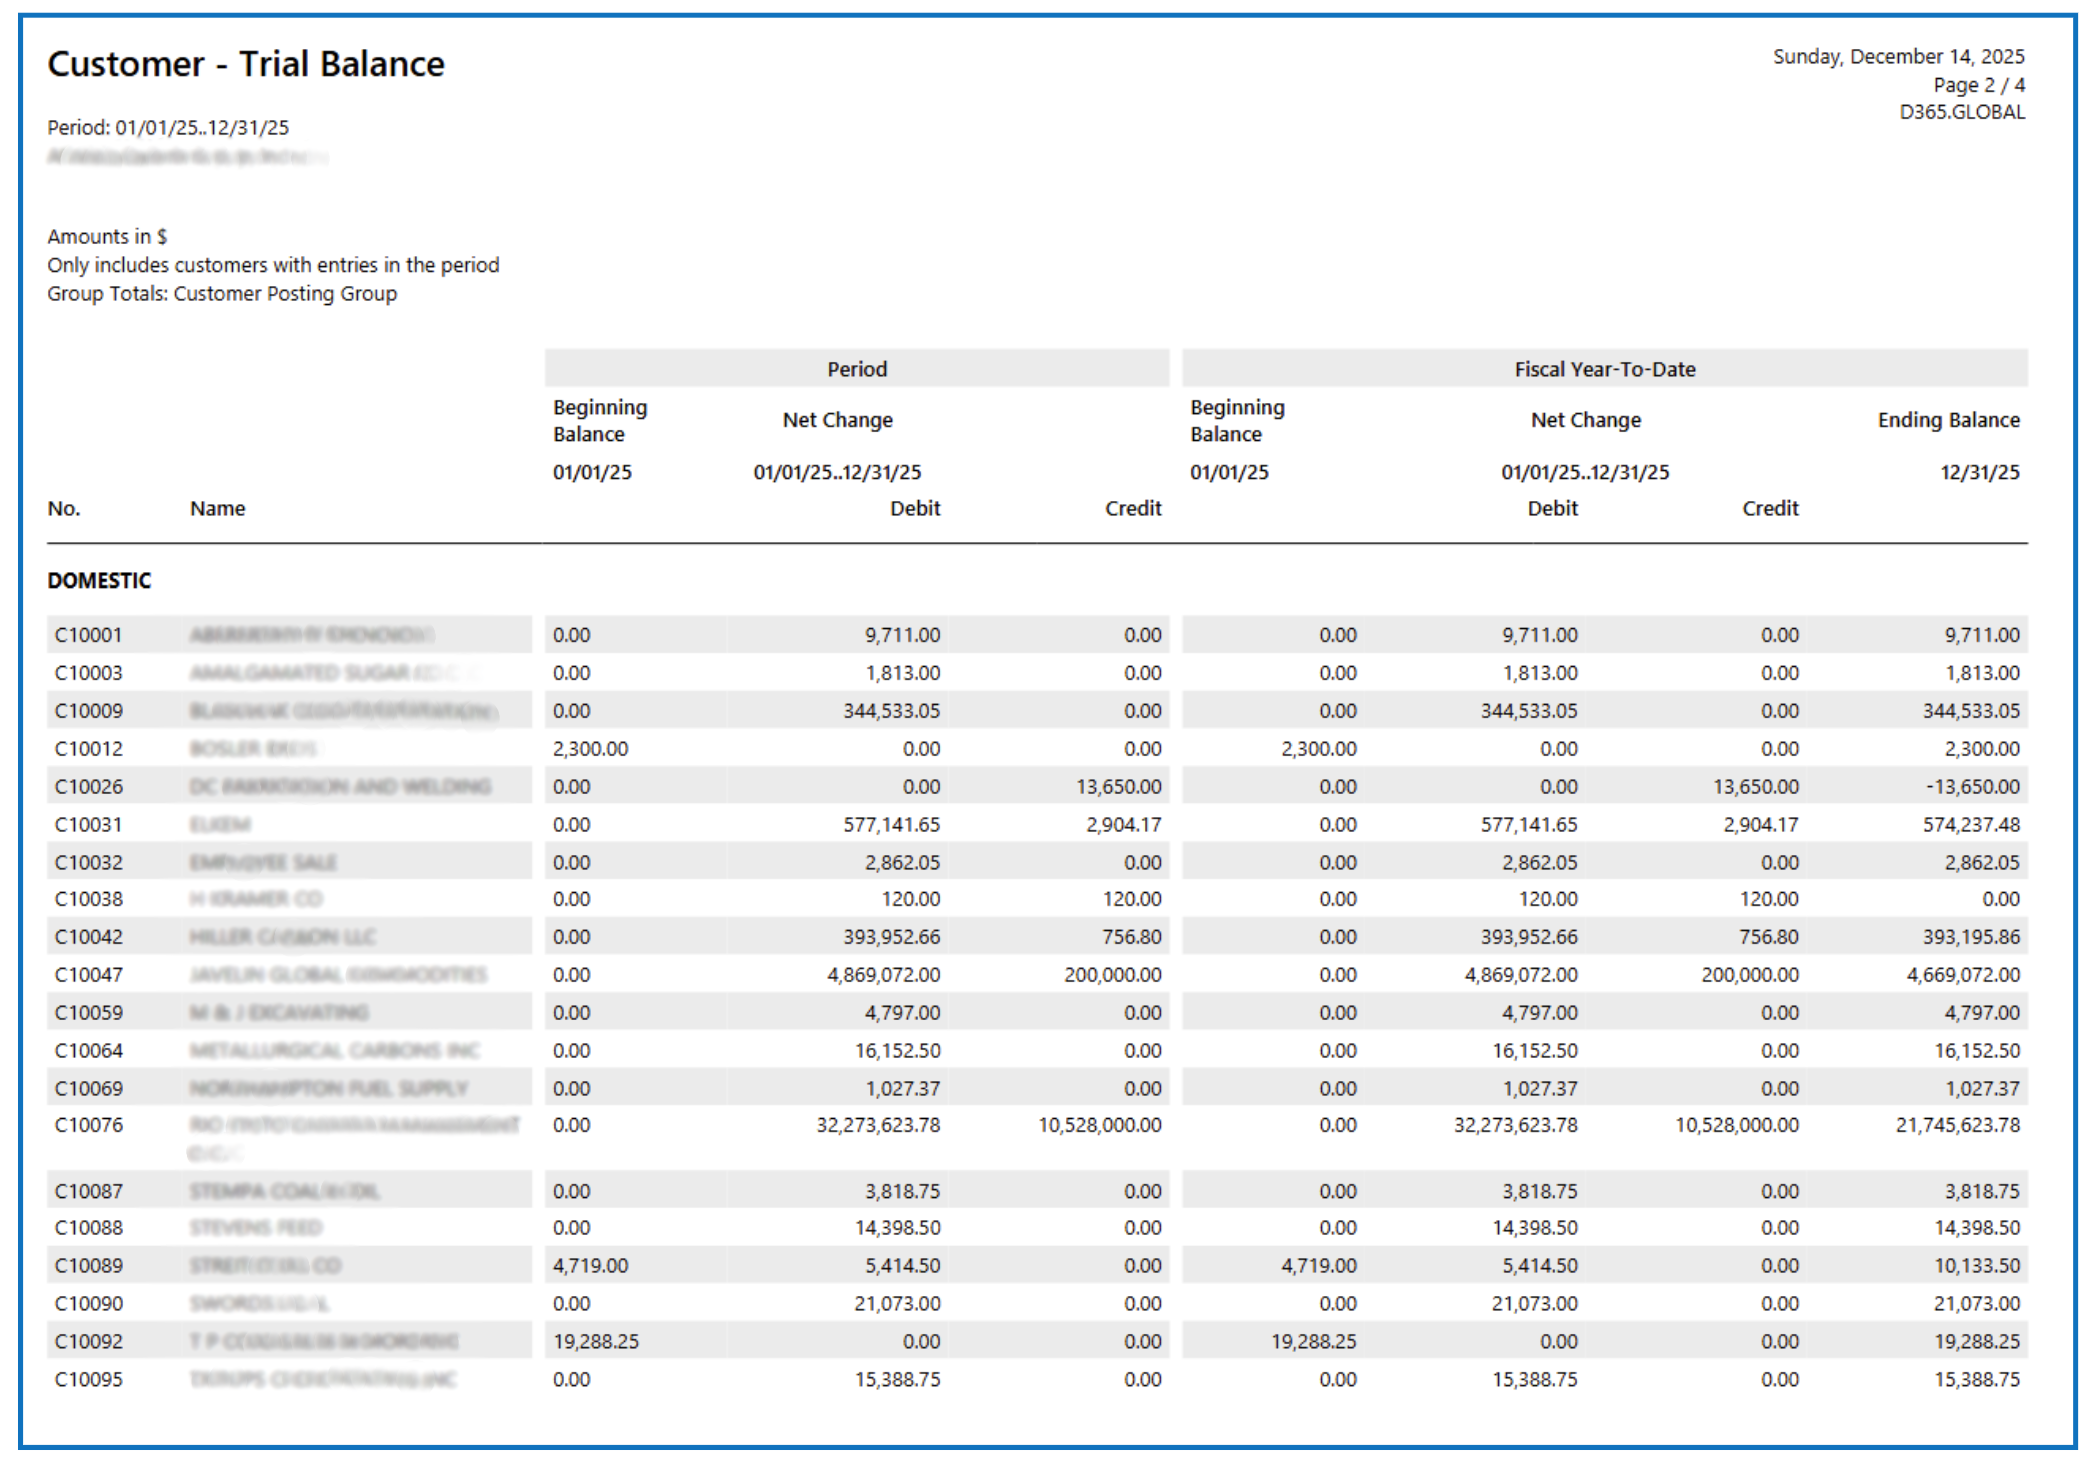
Customer Trial Balance
This is a report showing the trial balance of transactions posted to customer accounts over a date range (specified in the runtime prompt).
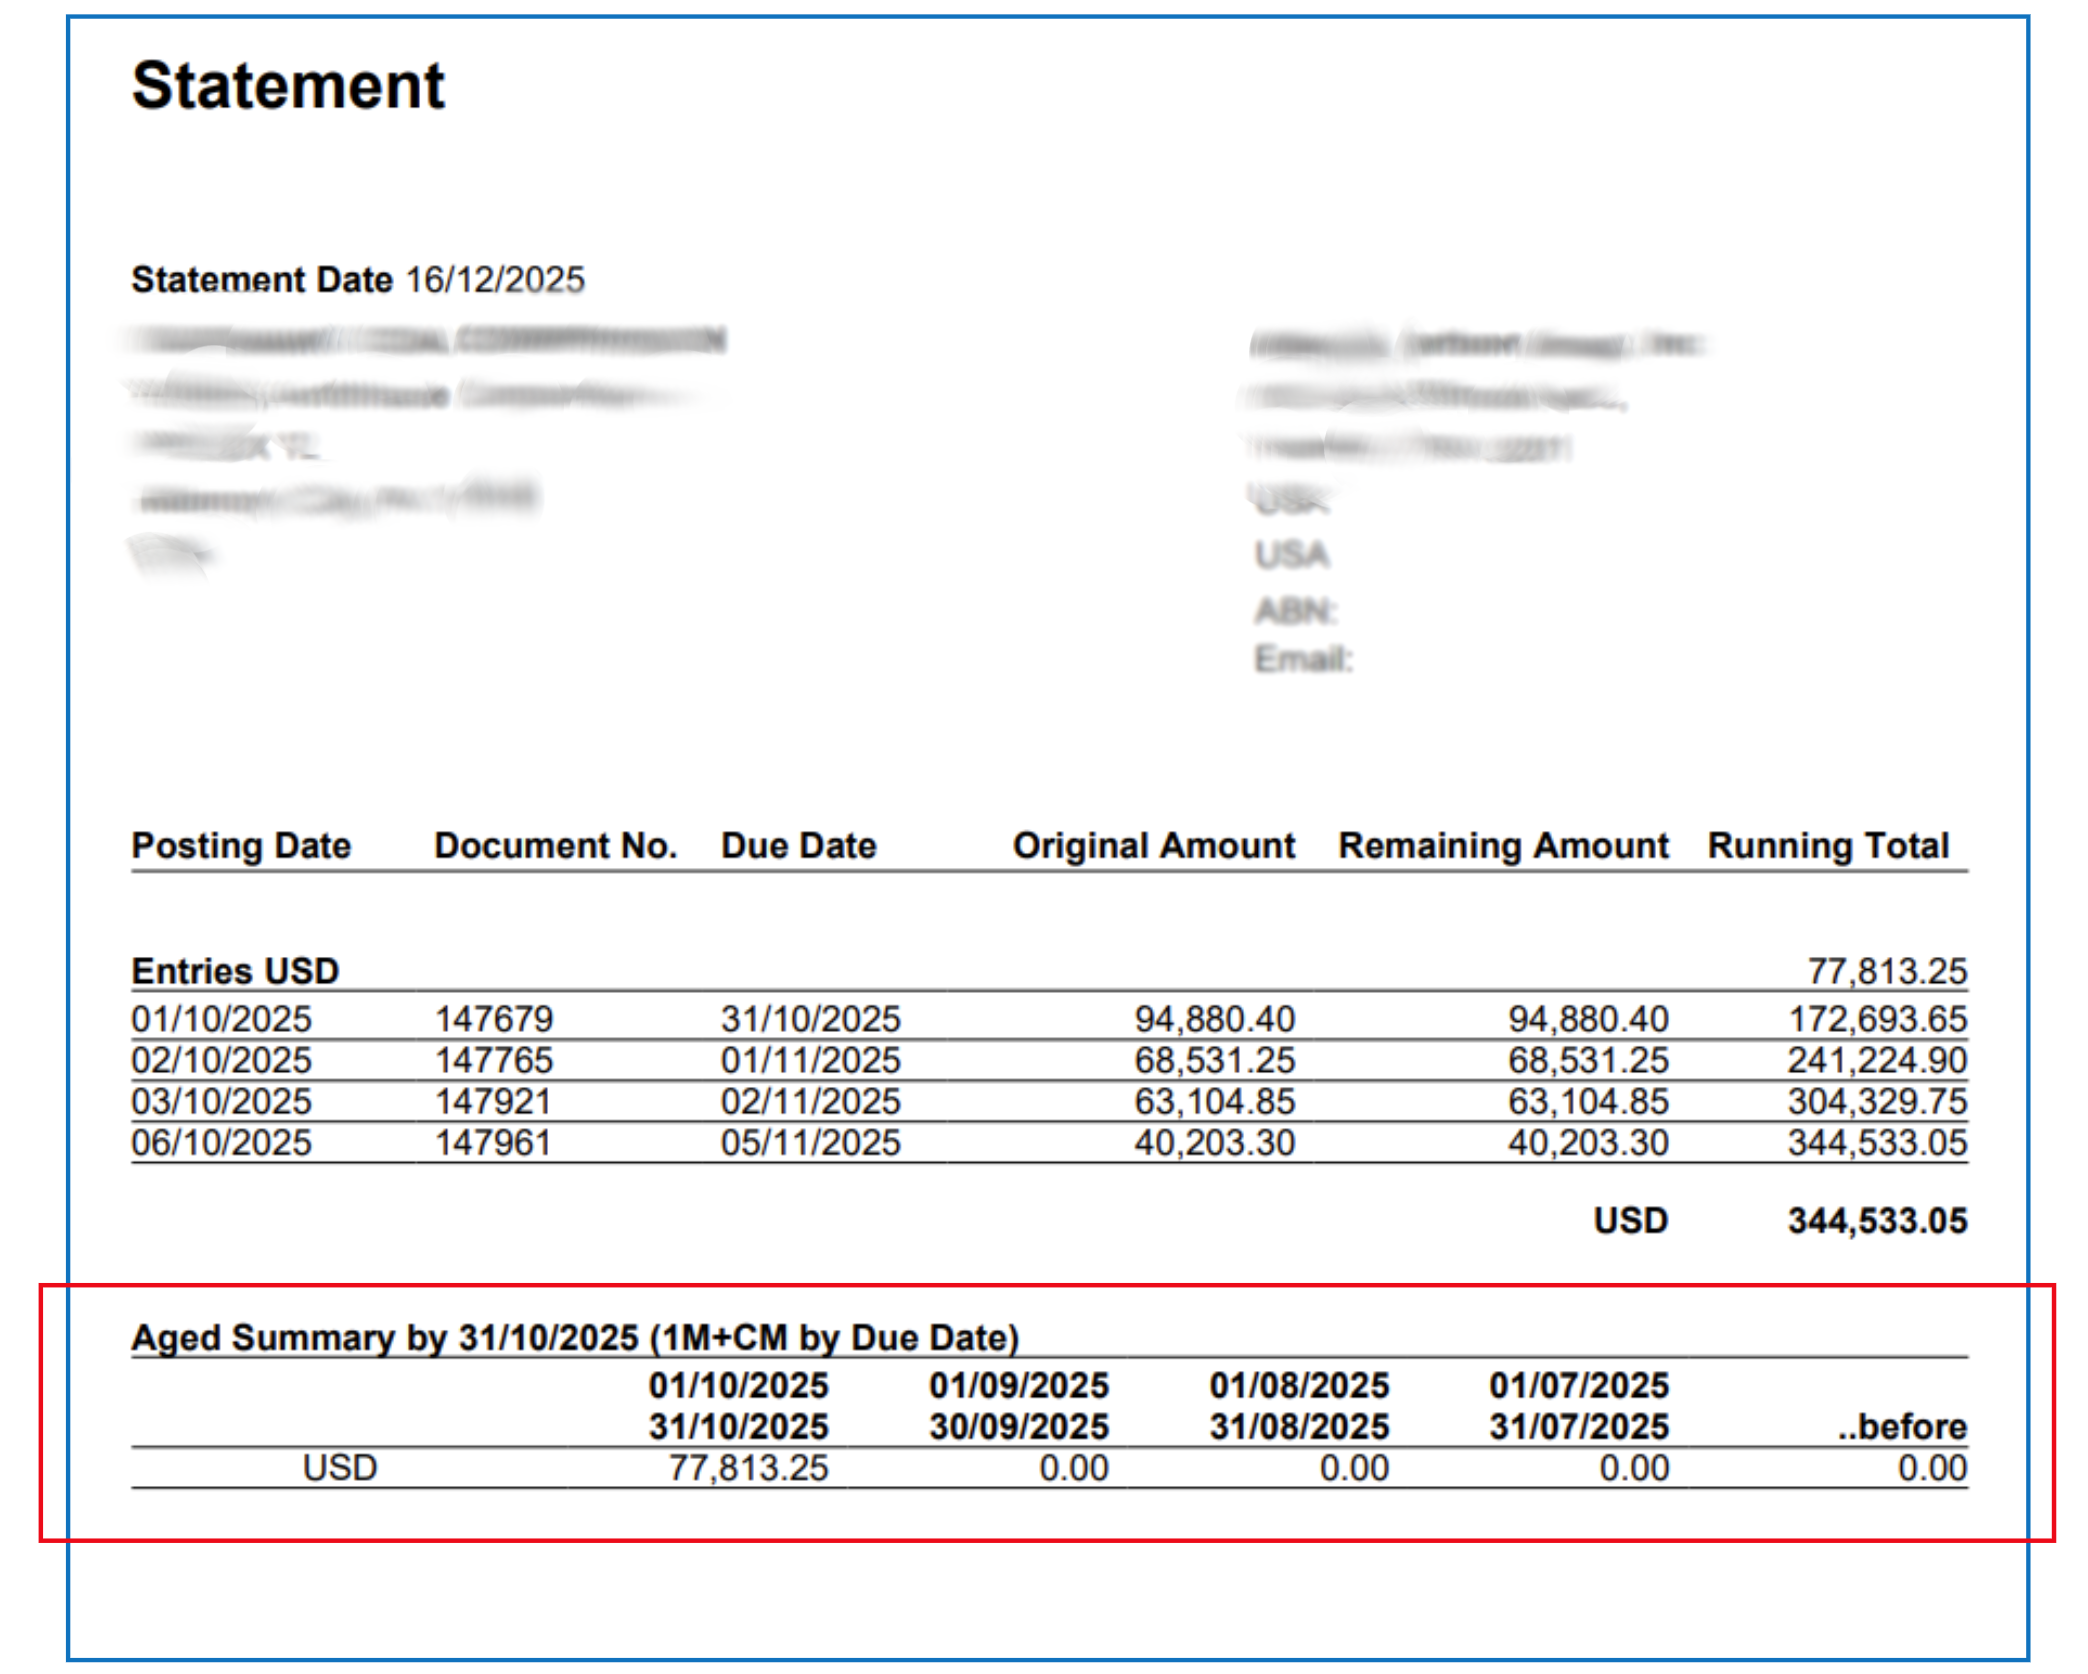
Customer Statement
The Customer Statement lists all open invoices (and credit memos) that are unmatched (applied to payments). You run the customer statement from any customer card. Navigate and open the Customer Card.
Example:
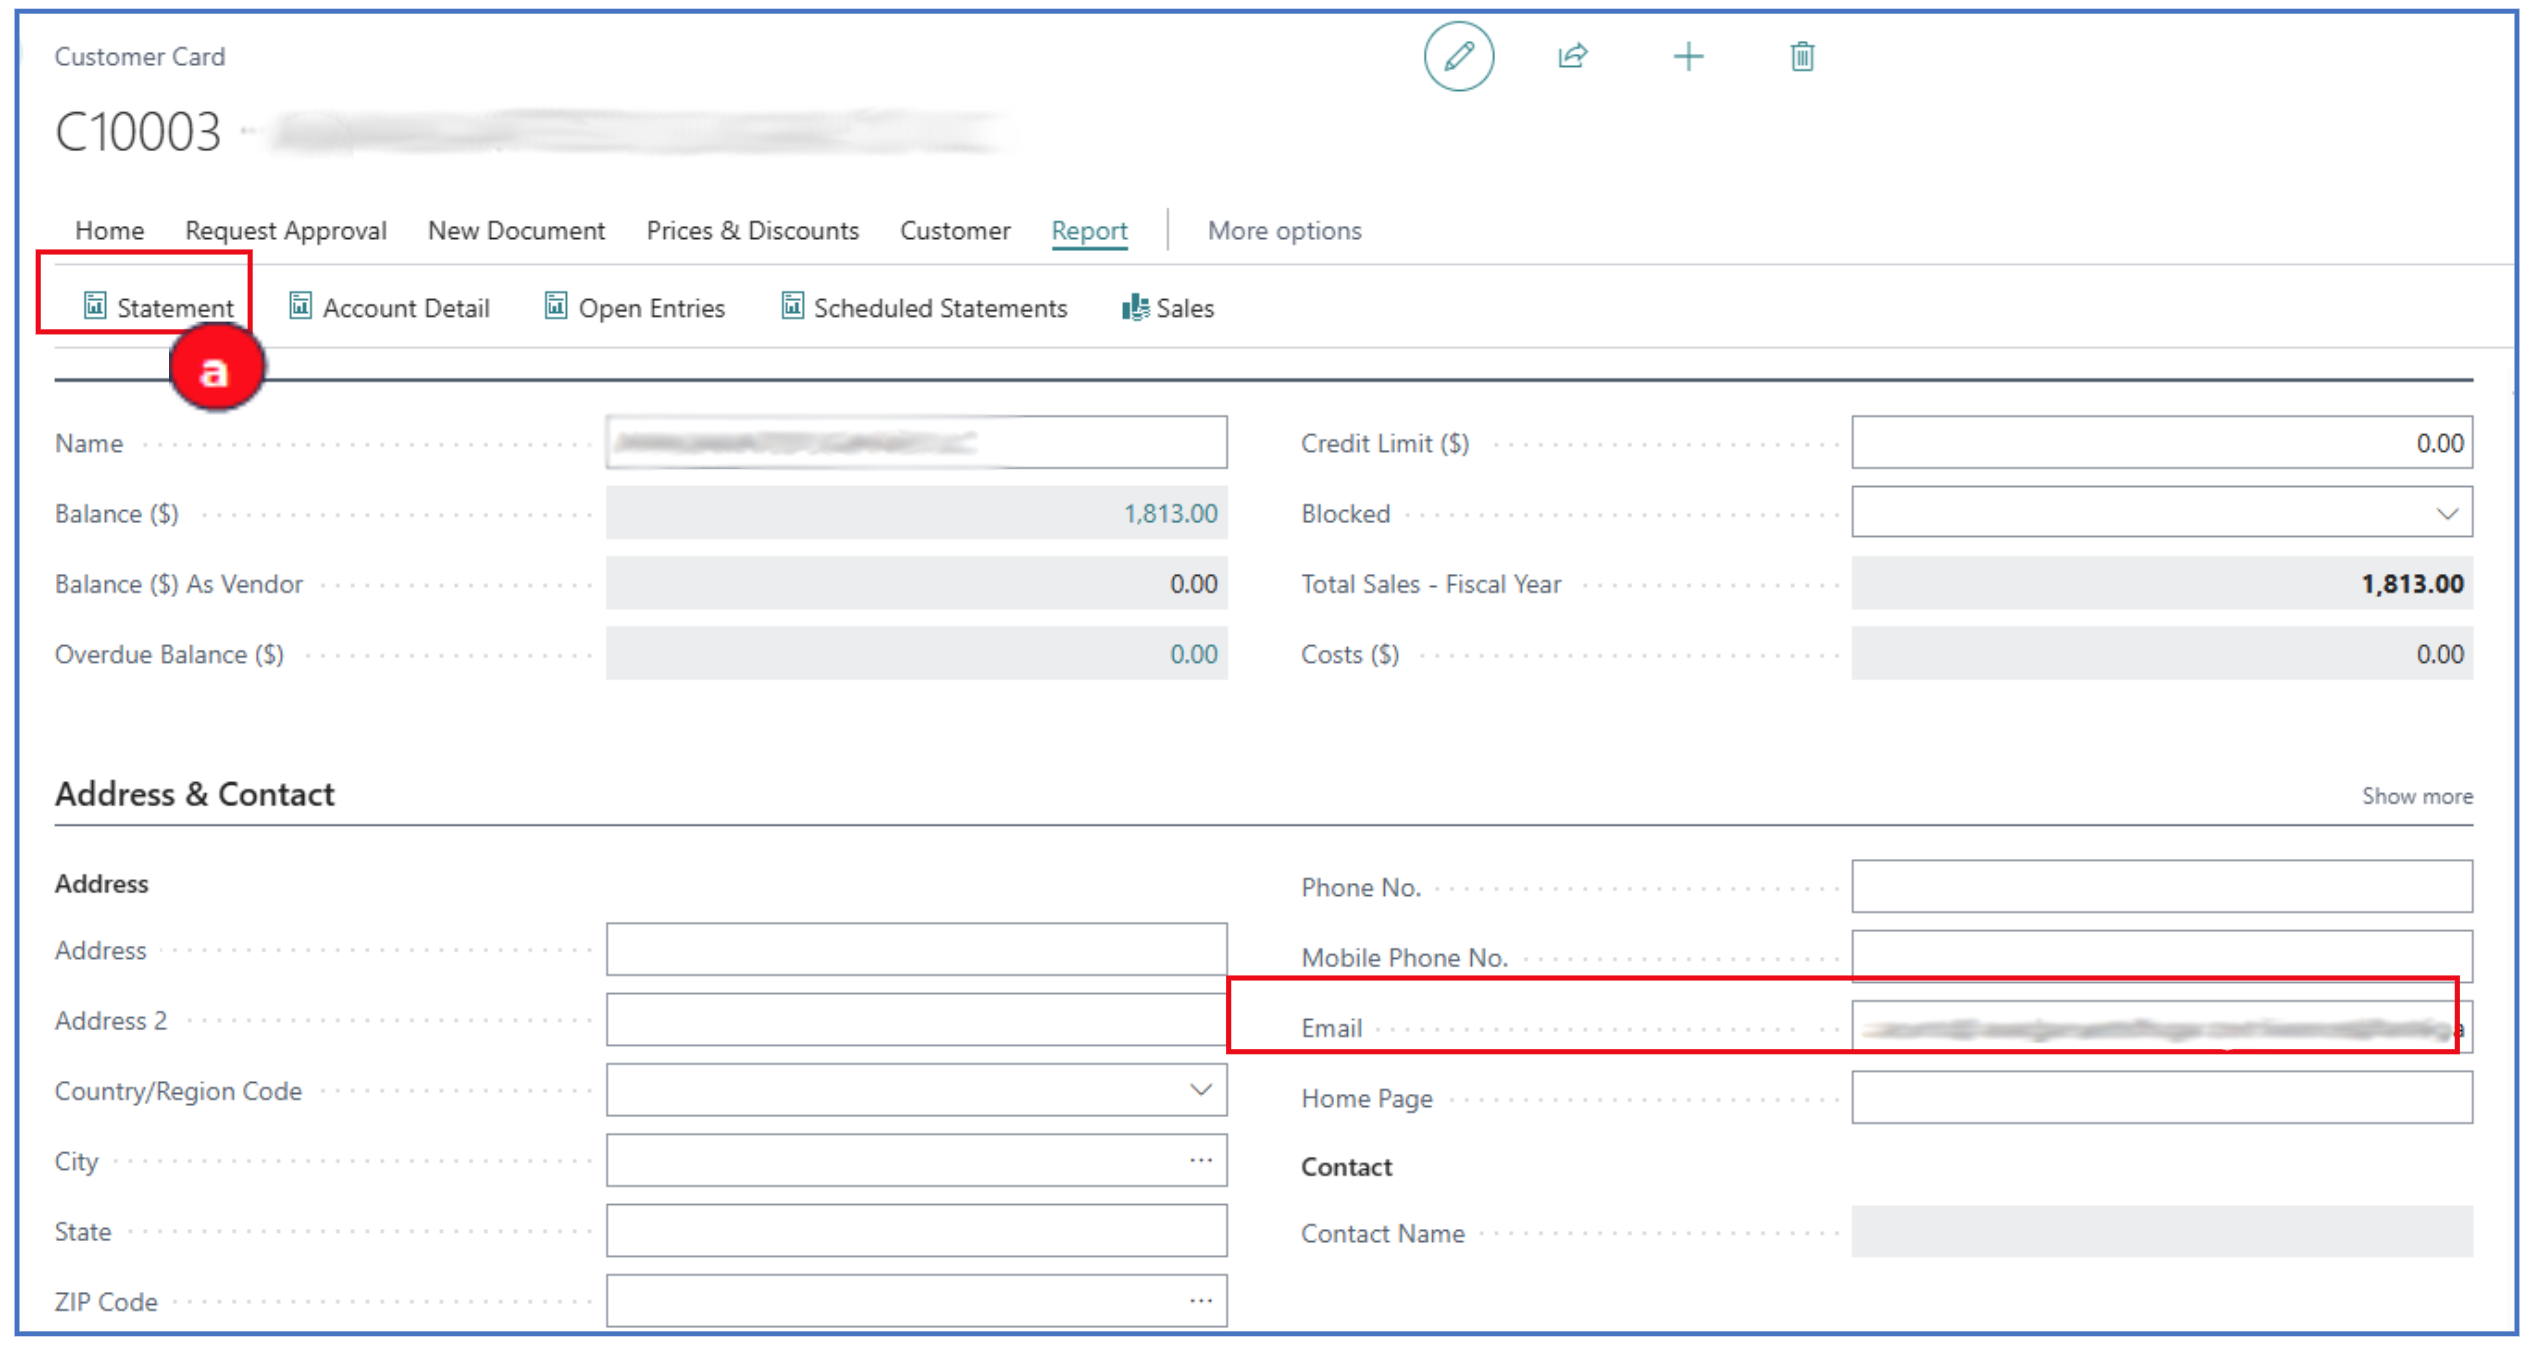
a) Click on Statement to open a prompt.
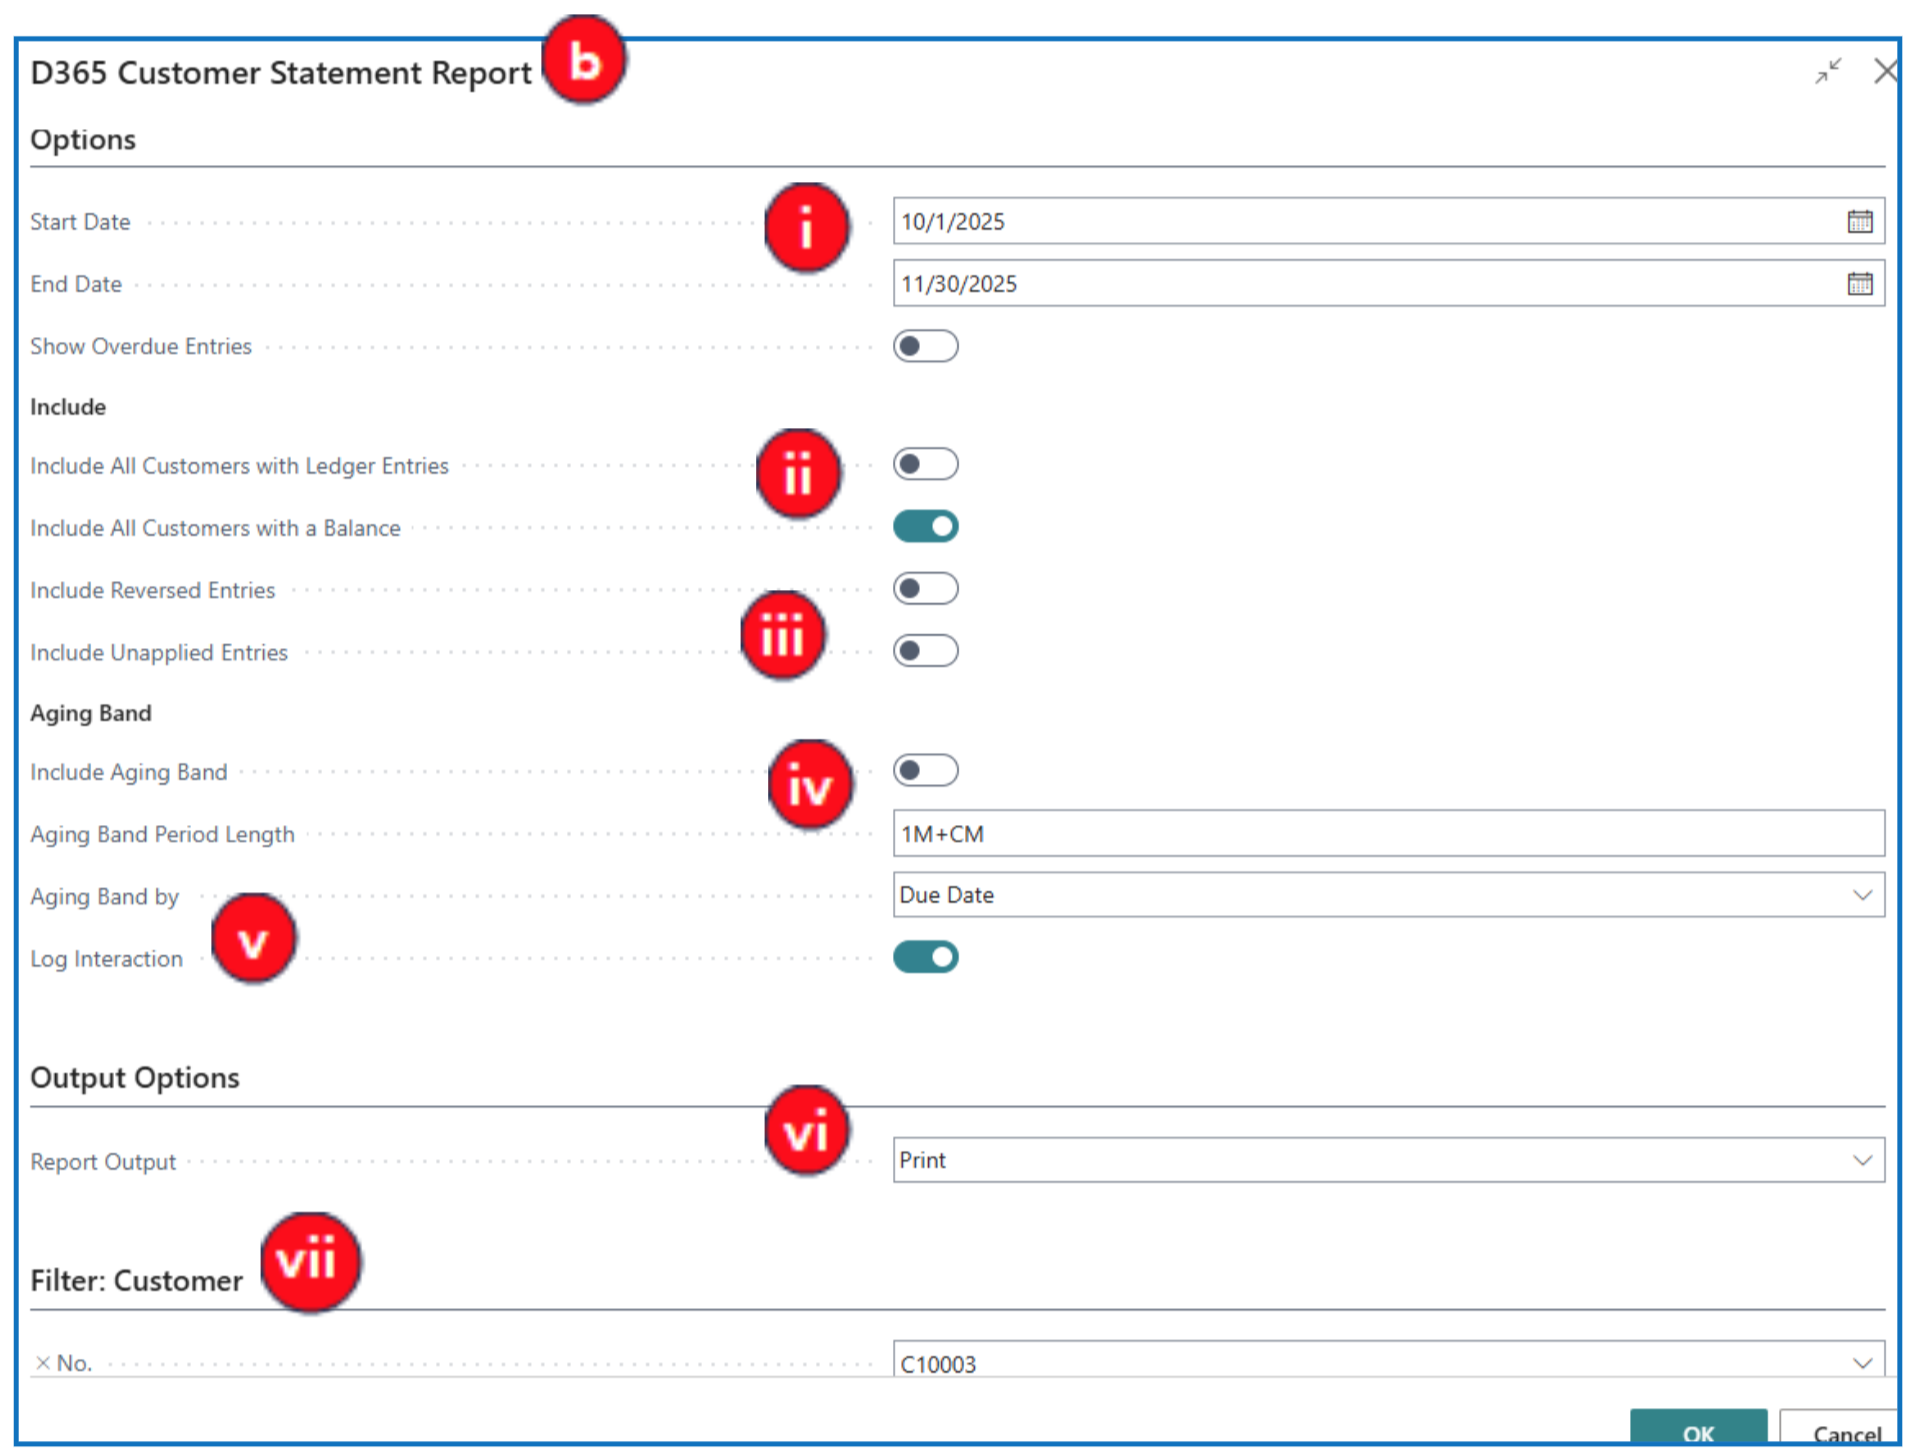
b) Complete the necessary fields:
i. Start Date and End Date — Specify the period for the statement activities.
ii. Include All Customers with a Balance (Include All Customers with Ledger Entries) — A customer with balance means an outstanding unpaid balance whilst a customer with Ledger Entries means any customer with past transactions including paid ones.
iii. Include Unapplied Entries — When payments are not matched/applied against the invoice, both invoice and payment are considered unapplied entries
iv. Include Aging Bracket — If this is enabled, the statement listing all outstanding invoices/credit memos will have a footer displaying the aging buckets for outstanding amounts.
Define the Aging band (bucket) and the Aging method (due date or posting date).
v. Log Interaction — This is enabled to include the statement printing as an interaction in the Customer contact.
vi. Report Output — Select email to send the statement to the default email addresses stated in the Customer card.
vii. Filtering — This section provides filters to select customers.
Example statement with aging bracket:
Customer Statement can also be scheduled to run at certain intervals. Click on Scheduled Statements to run the statement as a scheduled job in the background.
Example:
To run the statement for several customers, multi-select the customers on the Customers list page, and use the Statement report option.
Example:
Written By:
Peter Loo
Team Leader, Business Central
Connect on LinkedIn