Legal User Guide for Microsoft Dynamics 365
Products & Pricing
The Products and Pricing setup defines how billing is structured and calculated across the system.
Products represent the roles, services, and billable items, while Price Lists define the rates applied to those items. Together, they ensure that billing is consistent, controlled, and automatically calculated during time entry and invoicing.
This setup is used across:
-
Billing Events (time entry)
-
Quotes and proposals
-
Invoices
-
Expenses and financial reporting
By centralising pricing configuration, the system eliminates the need for manual rate entry and ensures standardised billing across all Matters.
How Pricing Works
The system uses a structured approach to automatically calculate billing rates based on predefined roles and pricing configurations.
Key Components
Pricing is driven by the following elements:
-
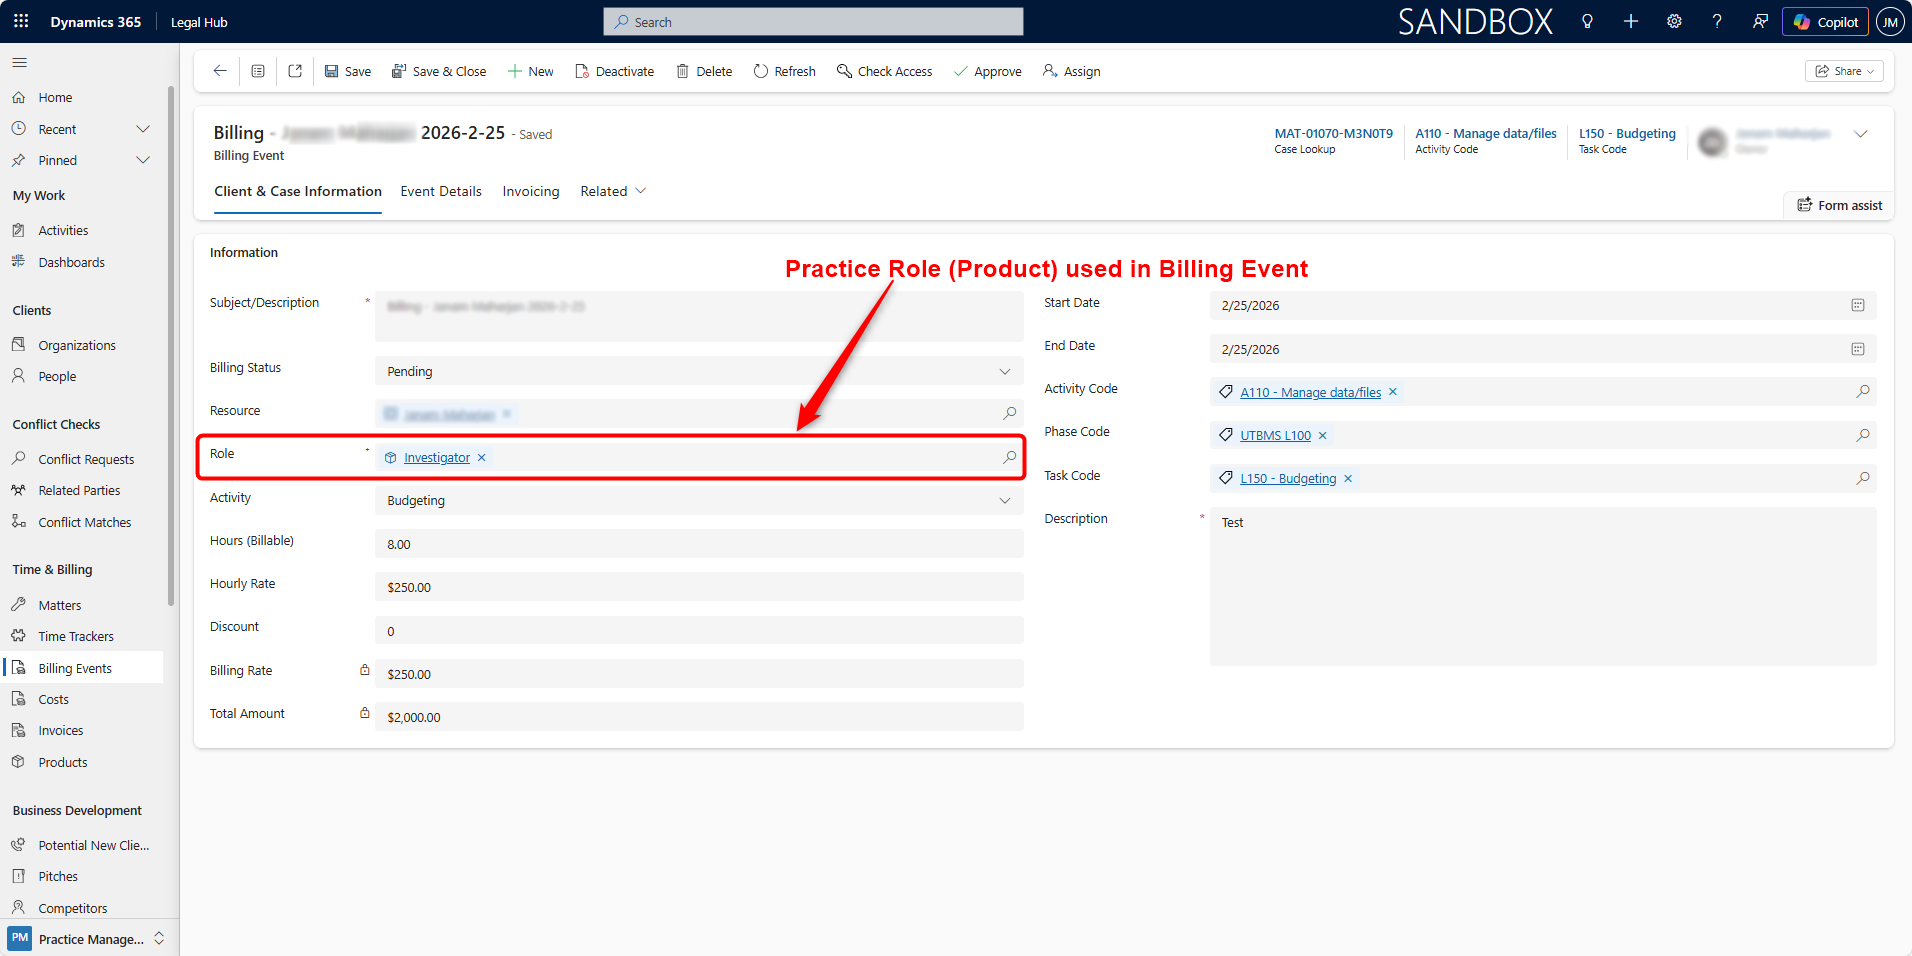
Products (Roles) — Define who is performing the work (e.g., Partner, Associate, Paralegal).
-
Price Lists — Define _how much each role costs.
-
Price List Items — Define the rate per role (e.g., Associate = $250/hour).
-
Matter (Rate List) — Each Matter is assigned a Price List, which determines the applicable rates.
-
Bookable Resources — Represent the user performing the work and are linked to a Role.
How Rates Are Calculated
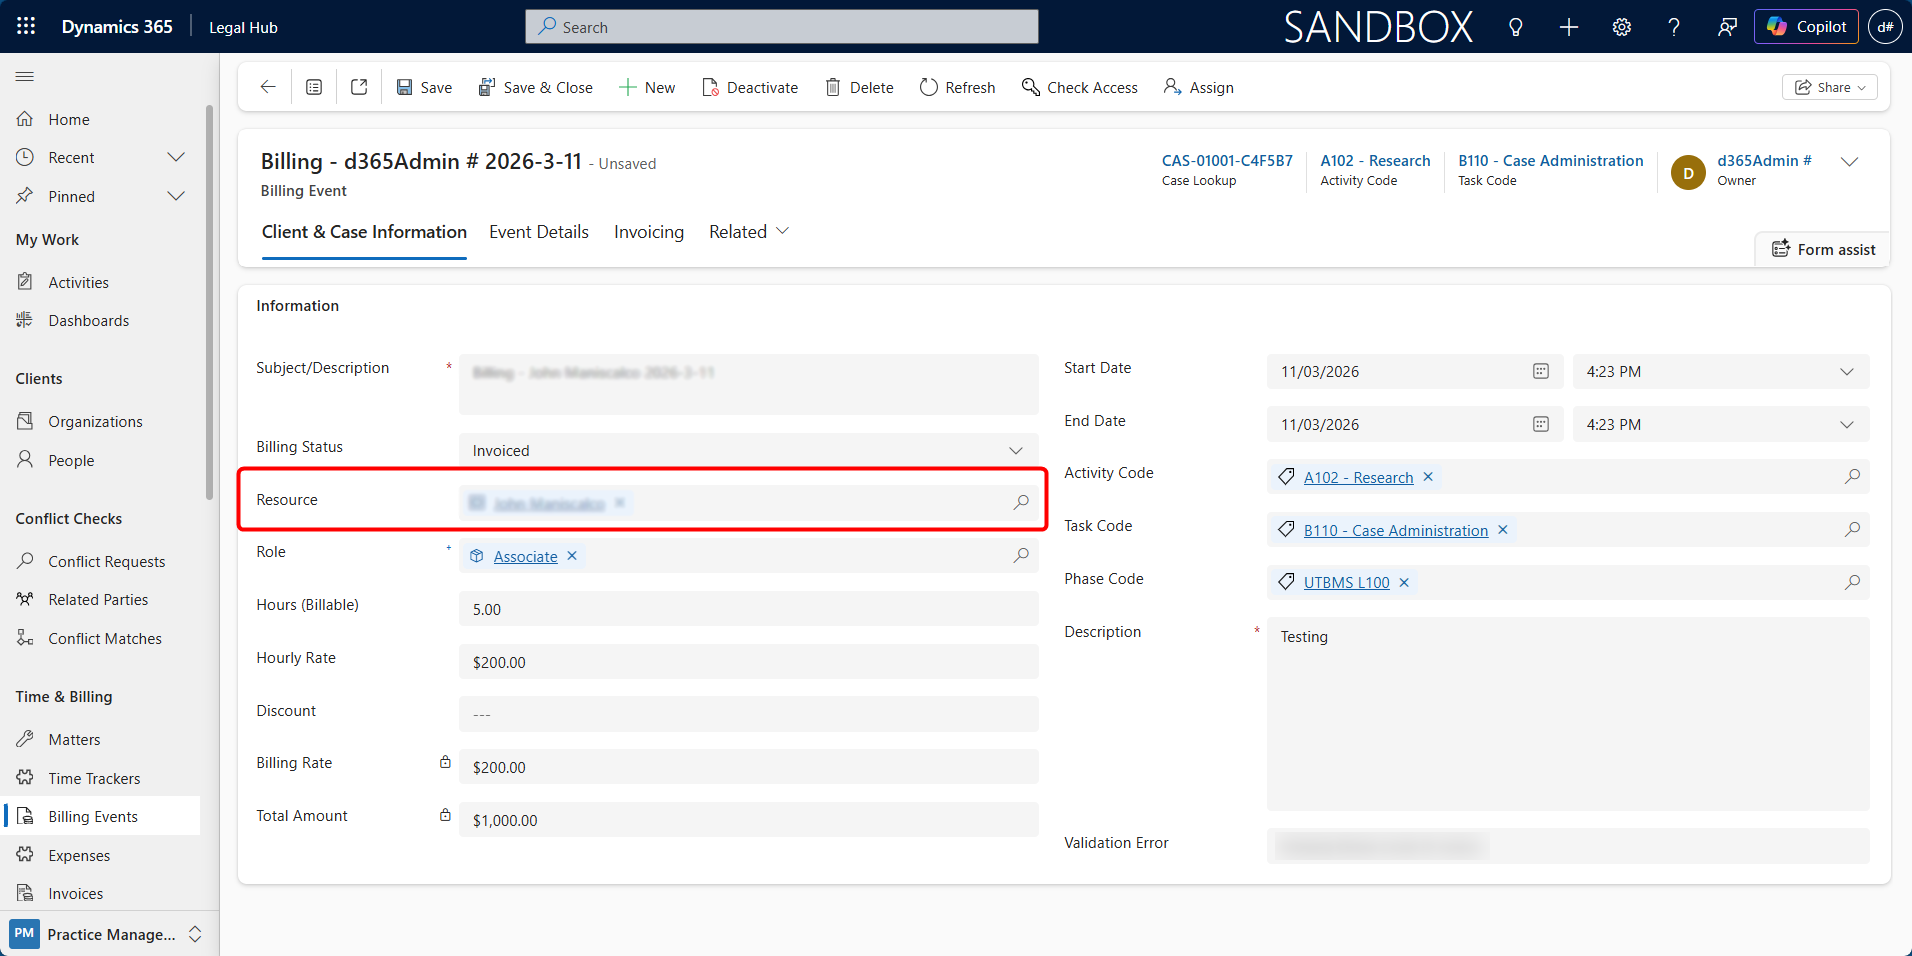
When a Billing Event is created:
-
The user selects a Resource.
-
The system identifies the Role linked to that Resource.
-
The system reads the Price List assigned to the Matter.
-
It finds the matching Price List Item (Role + Rate).
-
The Hourly Rate and Total Amount are automatically calculated.
Key Principle: Hourly Rate = Role (Product) + Price List (on Matter)
Important Notes
-
Users do not need to manually enter billing rates.
-
Rates are applied automatically during Billing Event creation.
-
If a Role is not included in the Price List, the billing rate will be $0.
-
If a Resource is not assigned a Role, the billing rate will be $0.
-
Updating pricing later does not update existing Billing Events.
Products
Products define the services, legal roles, practice areas, and disbursement items used across the system for:
- Billing Events
- Quotes
- Invoices
- Expenses
- Financial reporting, and others.
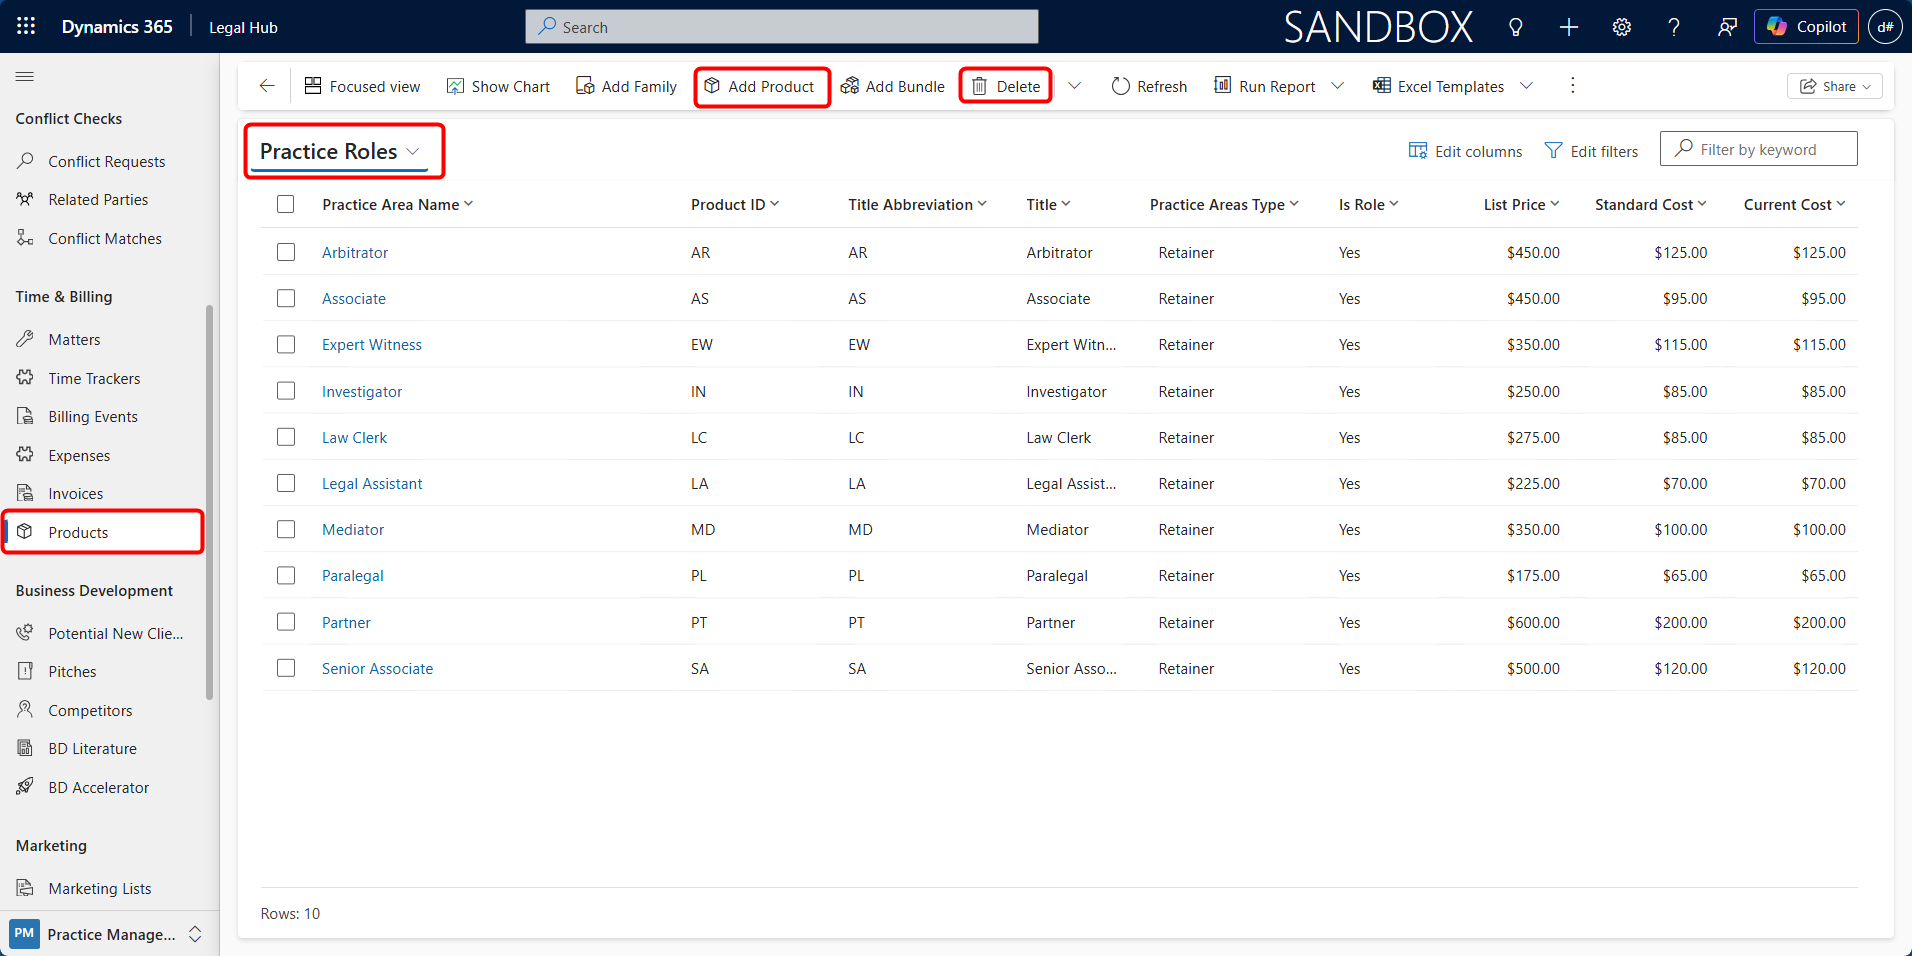
From the Products menu, you can view all active Practice Roles and related items.
Using the command bar in the Products list, you can:
-
Create a new product by selecting Add Product
-
Delete (if not required)
What Products Represent
Products can represent:
-
Legal Roles (e.g., Associate, Partner, Paralegal, Senior Associate)
-
Practice Areas / Activities (e.g., Appellate Briefs, Discovery, Court Filing)
-
Disbursements / Expense Types
-
Retainer-based services
These products are linked to Price Lists and are used when recording time, generating quotes, creating invoices, or capturing expenses.
Product Record Structure
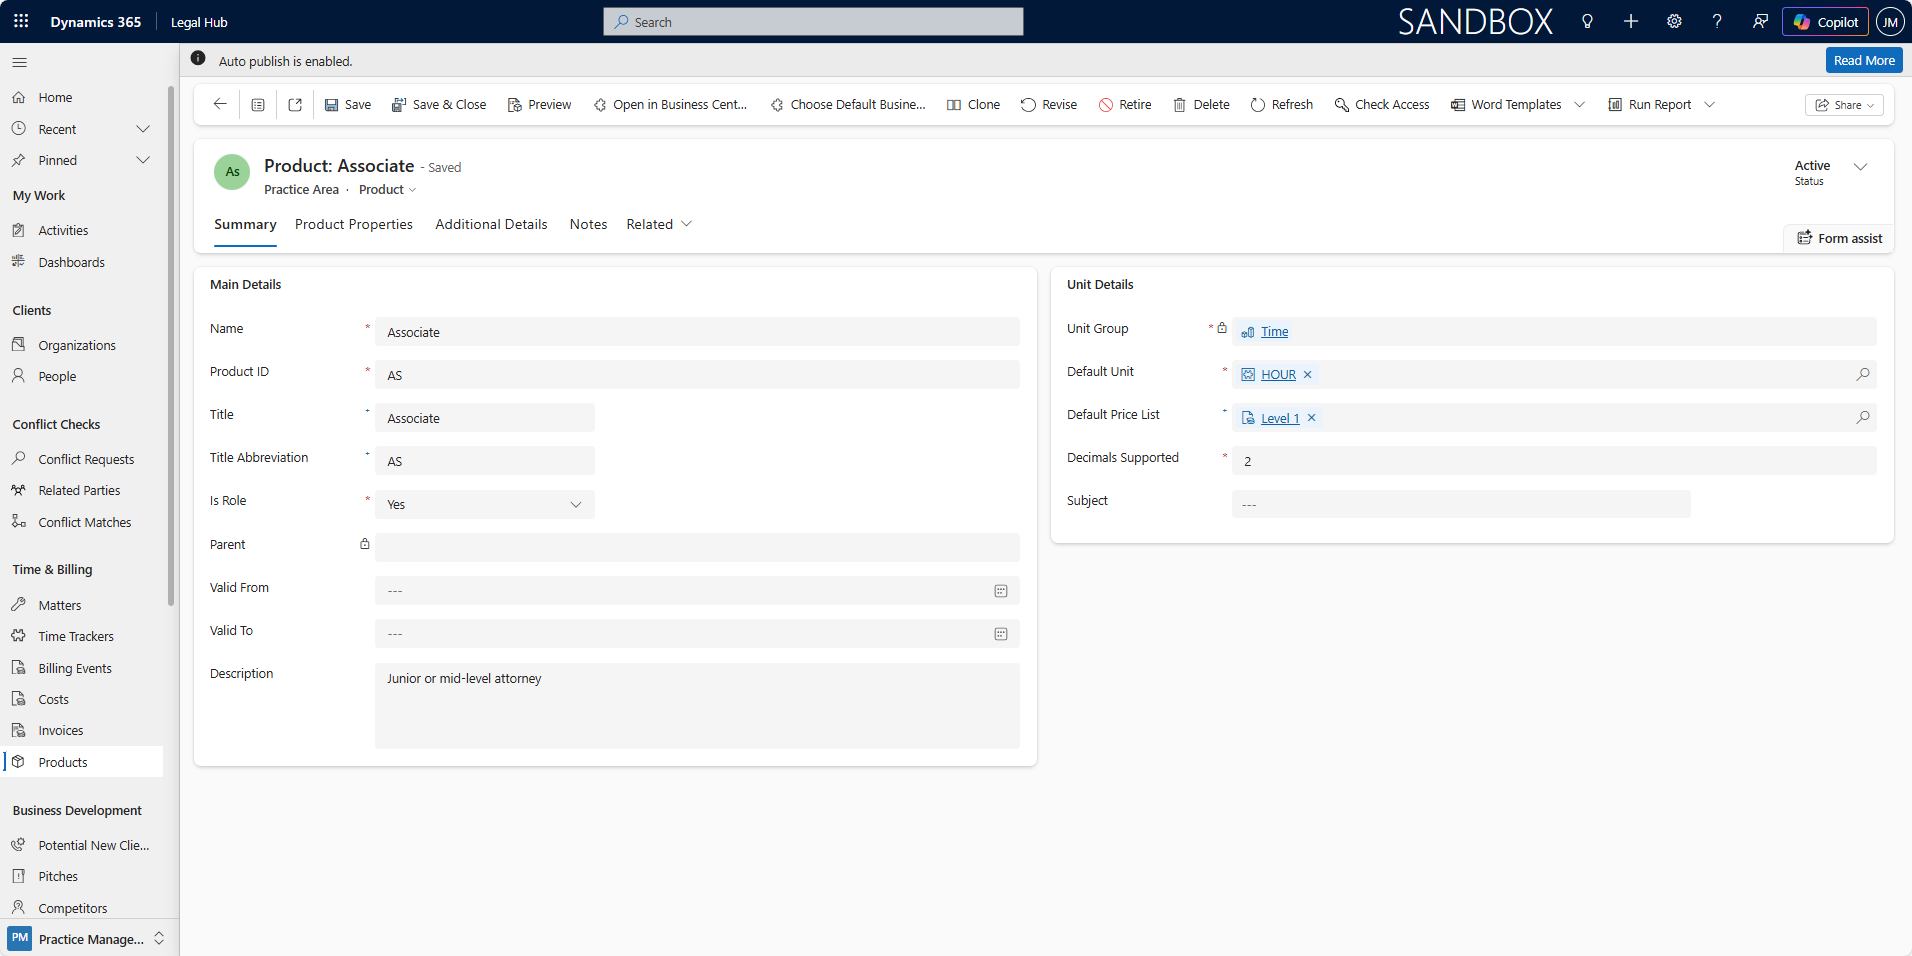
Inside a Product record, the following sections are typically configured:
Main Details: Name, Product ID, Title / Abbreviation, Is Role (Yes/No), Description, Valid From / To
If Is Role = Yes, the product represents a billable legal role (e.g., Associate, Partner).
Unit & Pricing Setup
-
Unit Group (e.g., Time)
-
Default Unit (e.g., Hour)
-
Default Price List
-
Decimal Support
Important Notes
-
If Is Role = No, the Product will not be available for role-based billing.
-
Products must be linked to Price Lists to determine billing rates.
-
If a Product (Role) is not included in a Price List, its billing rate will be $0.
Price Lists
Price Lists define the billing rates applied to Products (Roles) and determine how billing is calculated for each Matter.
Each Matter is assigned a Price List, and this controls the hourly rates used when creating Billing Events.
Price Lists are used in the following:
-
Billing Events → Role-based rate calculation
-
Quotes → Proposal pricing
-
Invoices → Line-item rate calculation
-
Expenses → Pricing structure alignment
Because pricing is centrally configured here, the system ensures:
-
Consistent billing rates
-
Standardised UTBMS / coding compliance
-
Controlled financial governance
Navigate to Price Lists
There are multiple ways to access Price Lists.
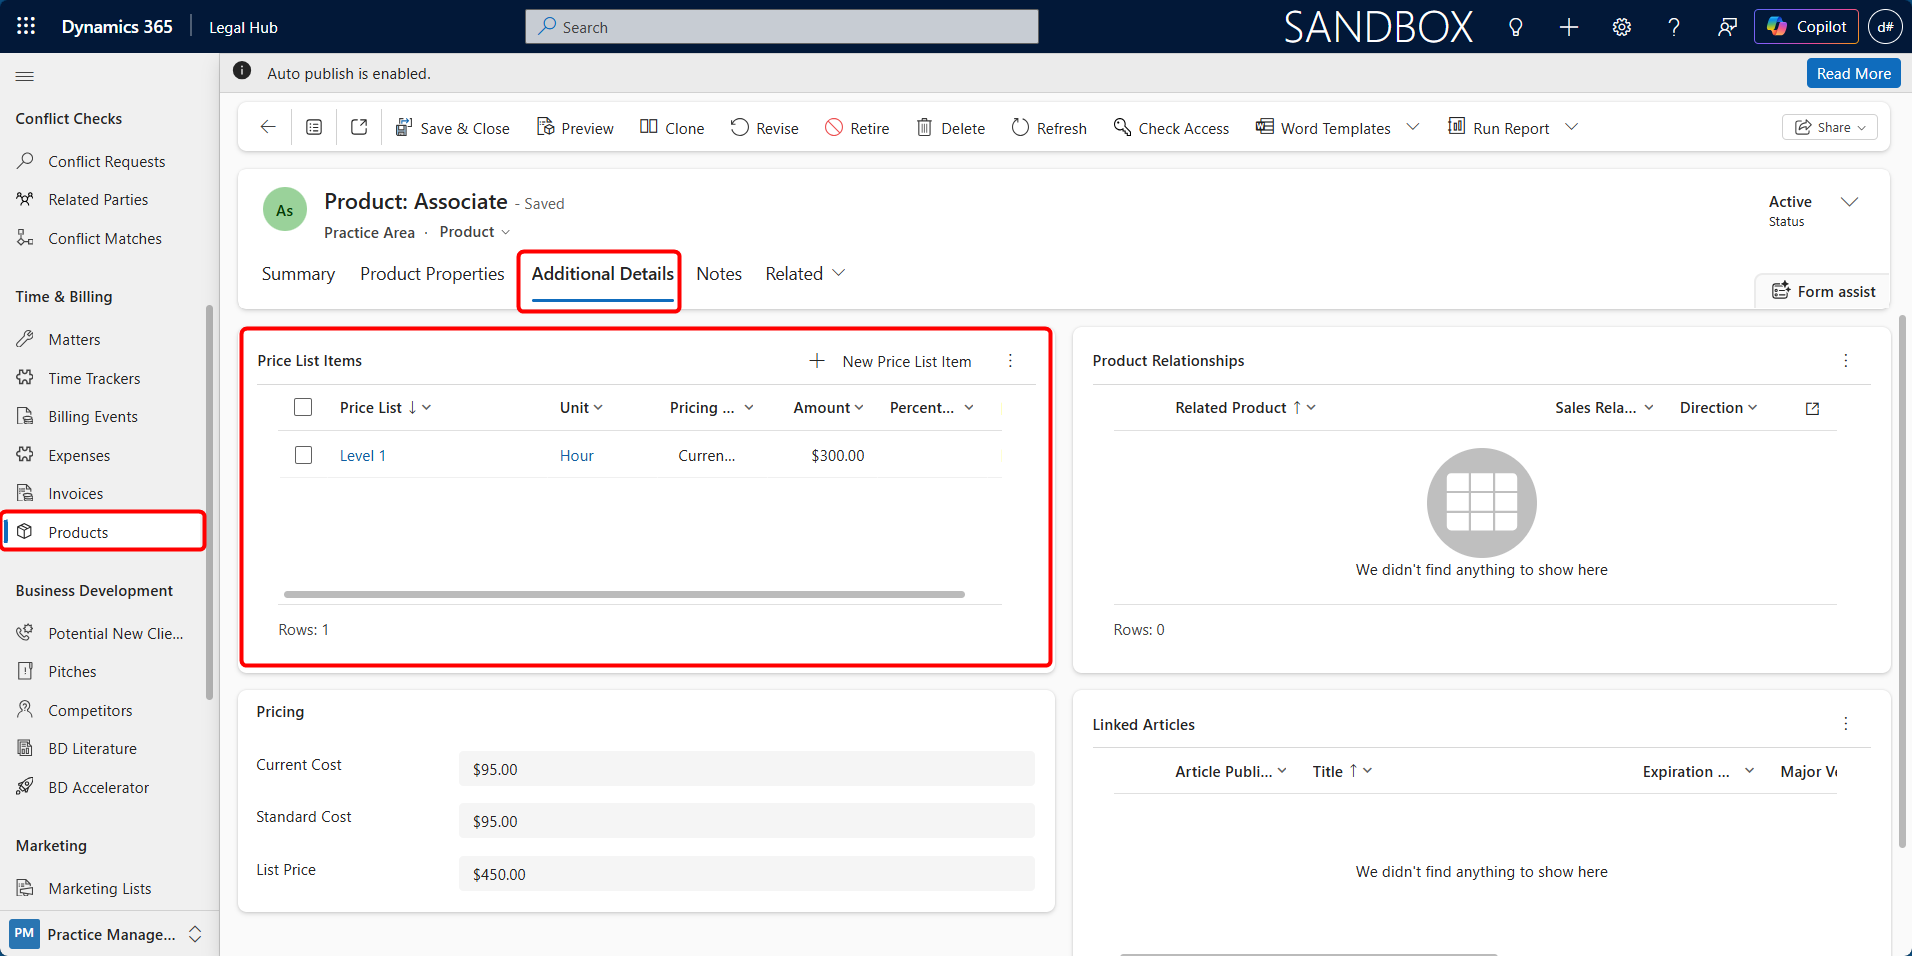
Method 1 — From Products Menu
-
Select the Products from the list.
-
Select Additional Details > Price Lists Items.
-
From here, you add a new price list or update the existing one.
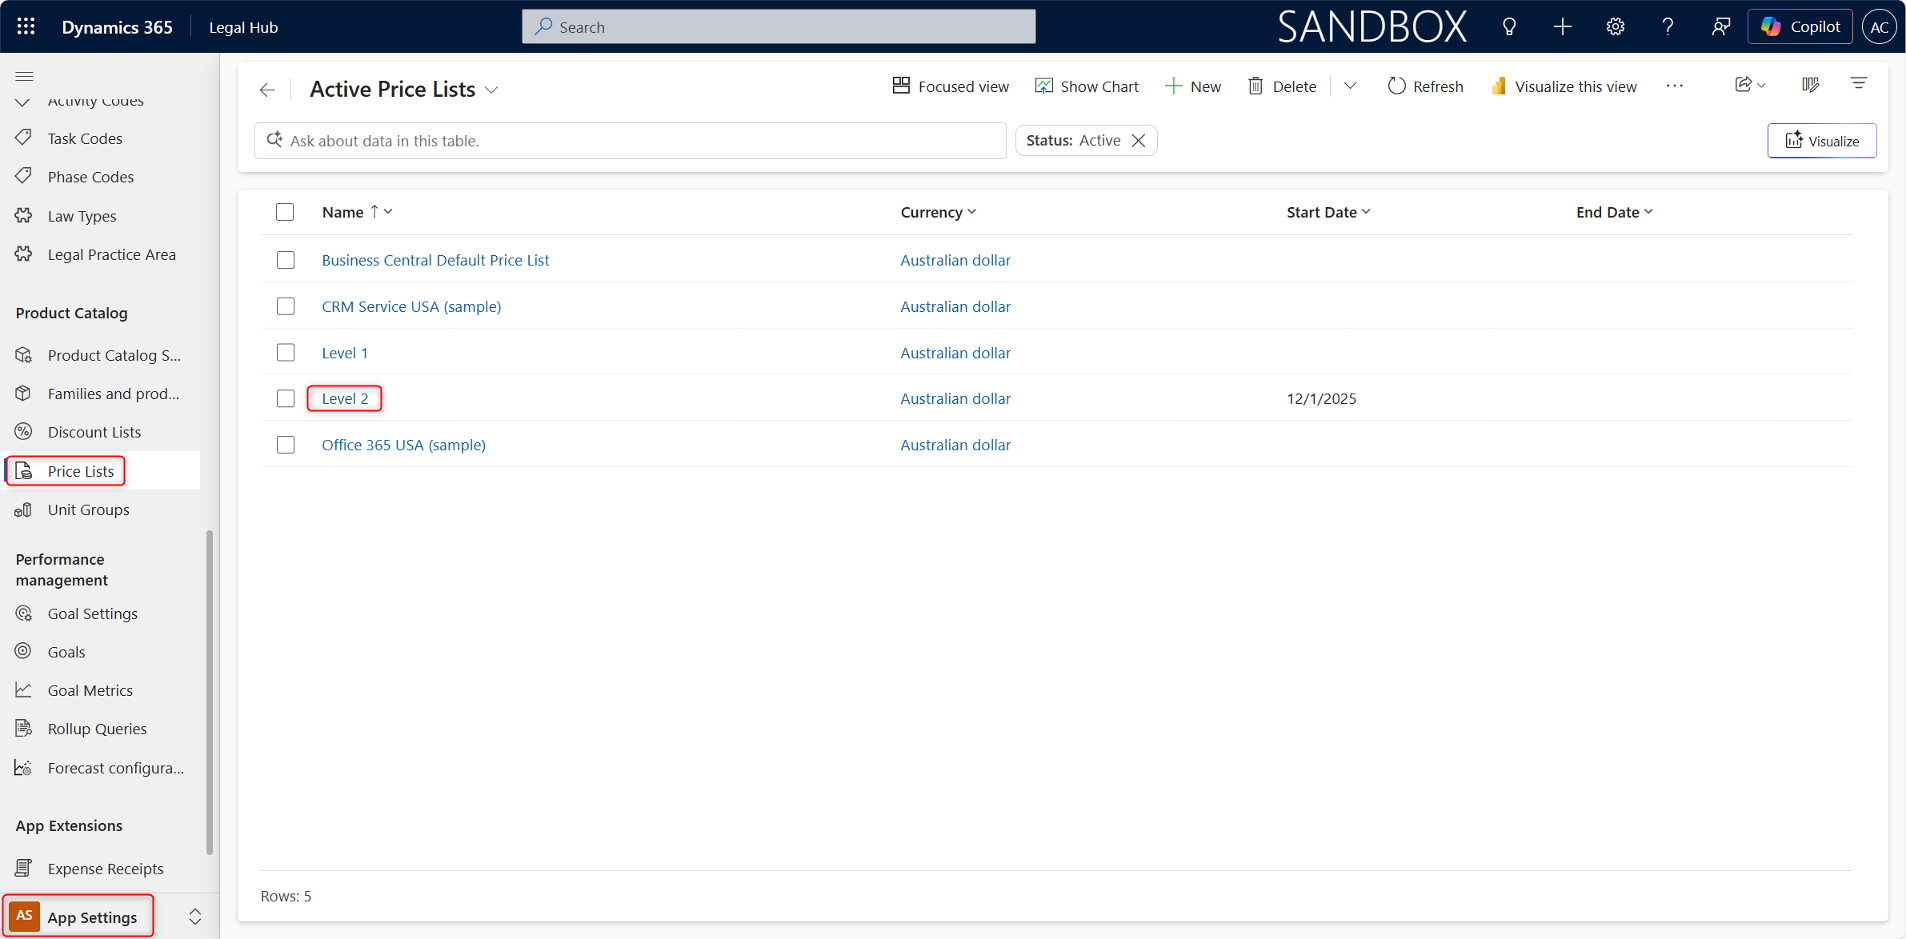
Method 2 — From App Settings (Product Catalog)
-
Go to App Settings (Bottom Left Corner of the Left Navigation Pane).
-
Under Product Catalog.
-
Select Price Lists.
-
You can add the new price list by selecting +New from the command bar.
Creating a Price List
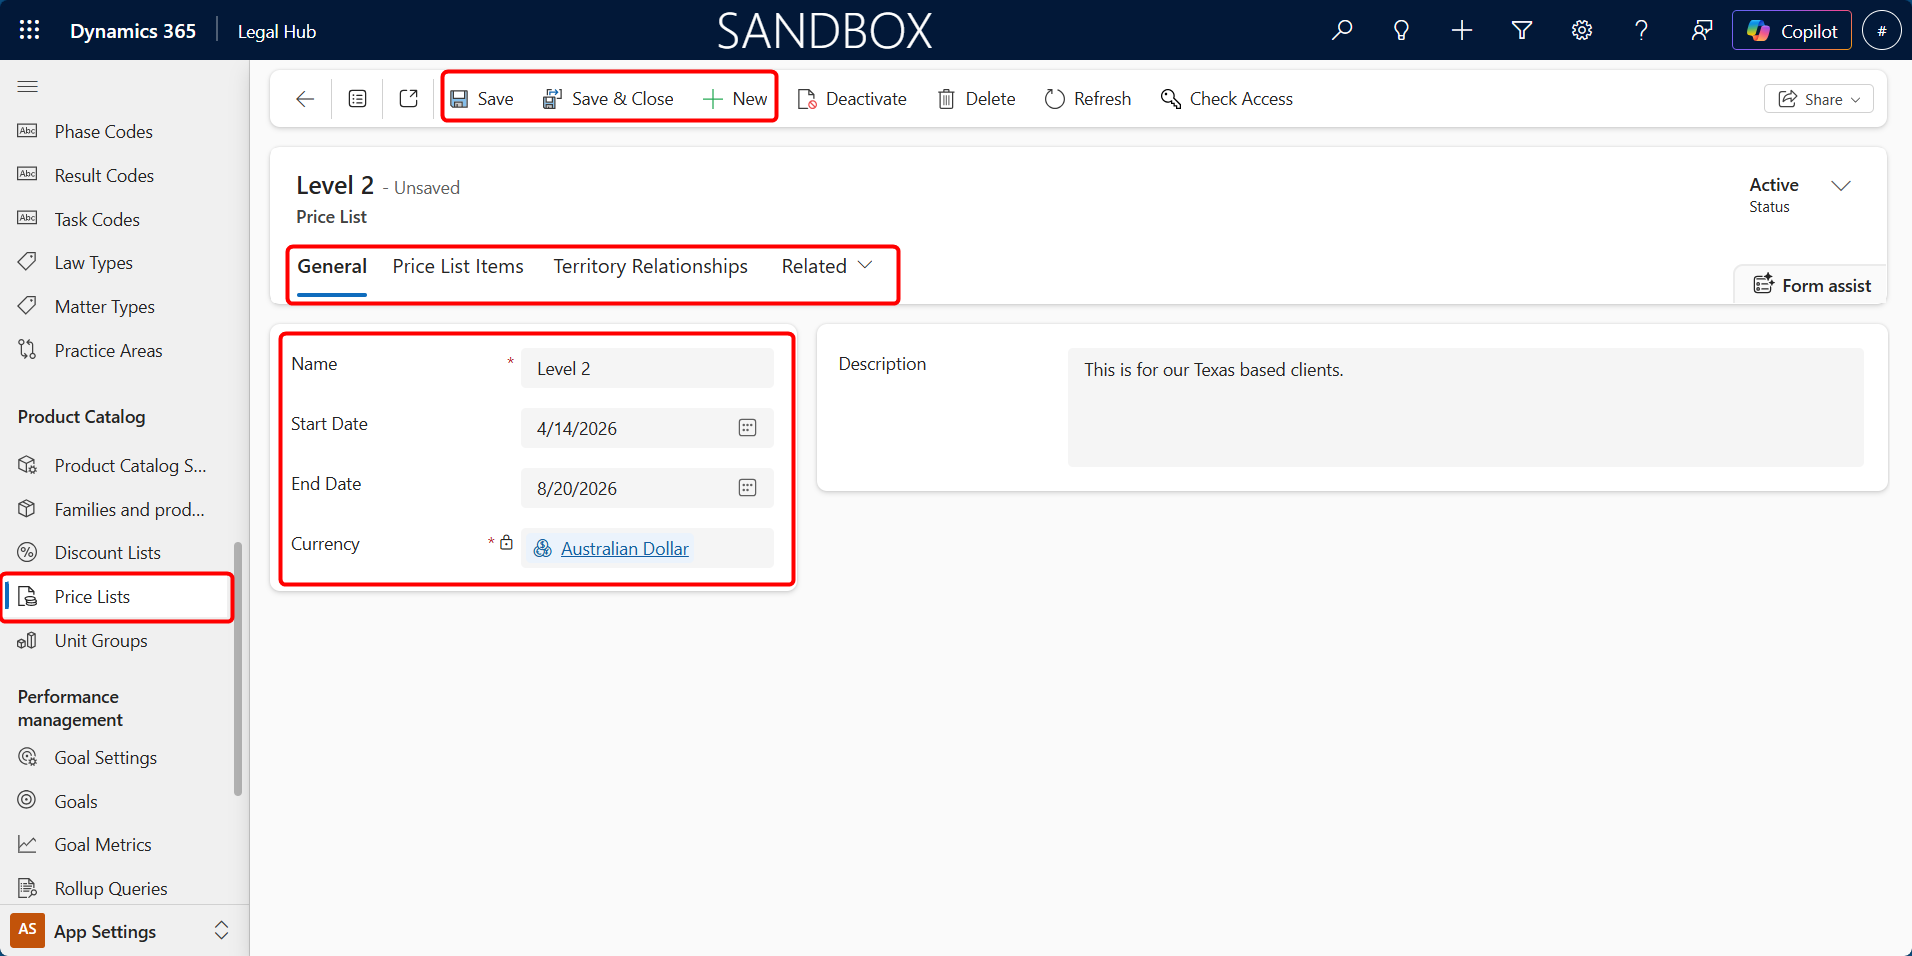
To create a new Price List:
-
Open Price Lists.
-
Click + New.
-
Enter:
a. Name (e.g., Level 1, Level 2, Client-specific)
b. Currency
c. Optional: Start Date, End Date, Description
-
Click Save.
Important Notes
-
The Price List Items tab becomes available only after saving.
-
Multiple Price Lists can be created for different clients or pricing tiers.
Creating & Managing Price List Items
Creating Price List Item
Price List Items define the billing rate for each role (Product) and are used by the system to automatically calculate amounts during Billing Events and Invoicing.
Each Price List must contain Price List Items for all roles that will be used for billing.
Follow these steps:
-
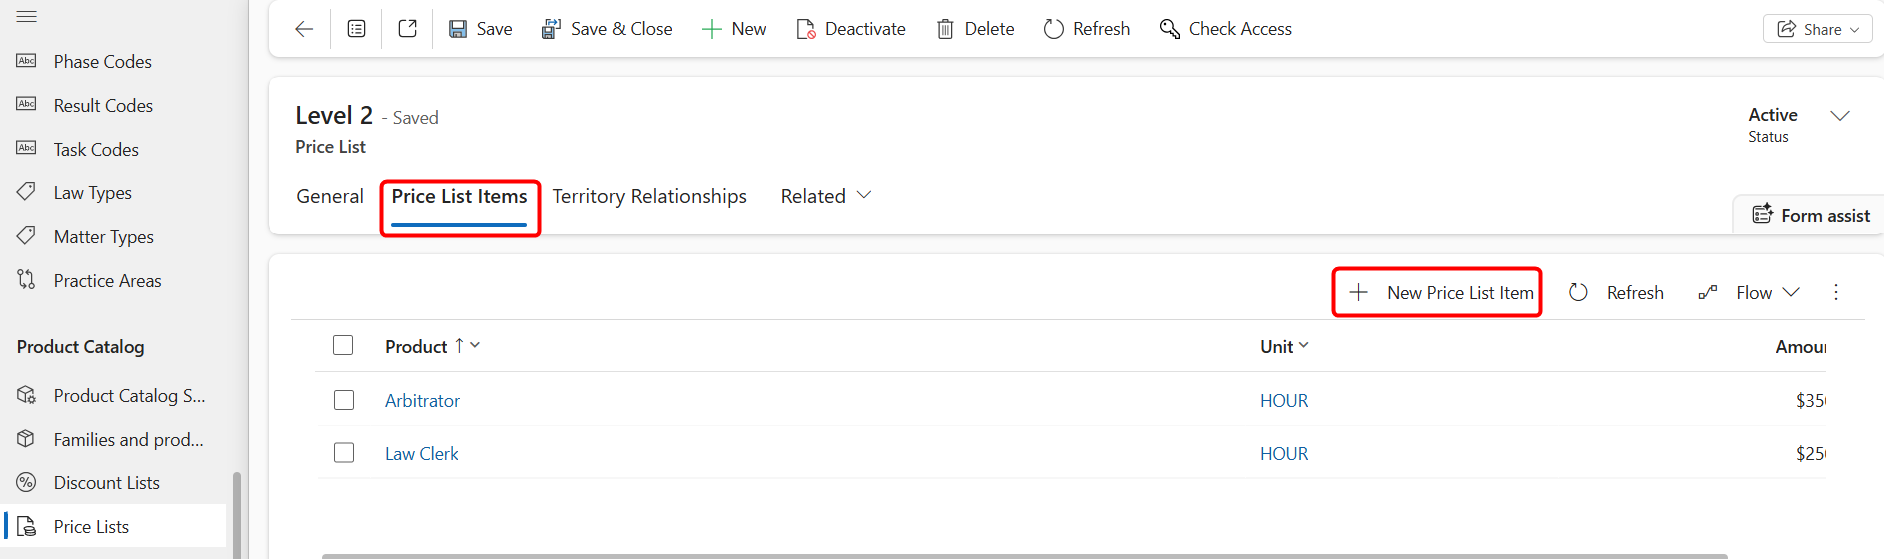
Open the required Price List.
-
Navigate to the Price List Items tab.
-
Click + New Price List Item.
-
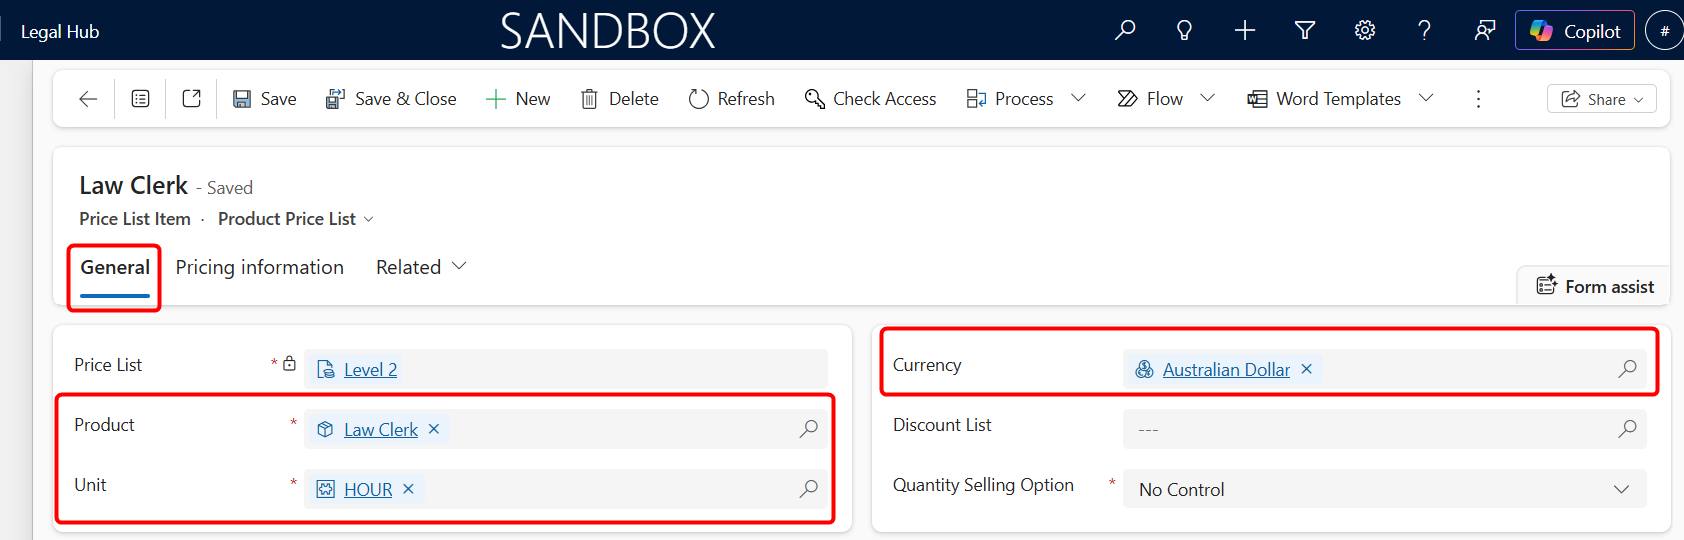
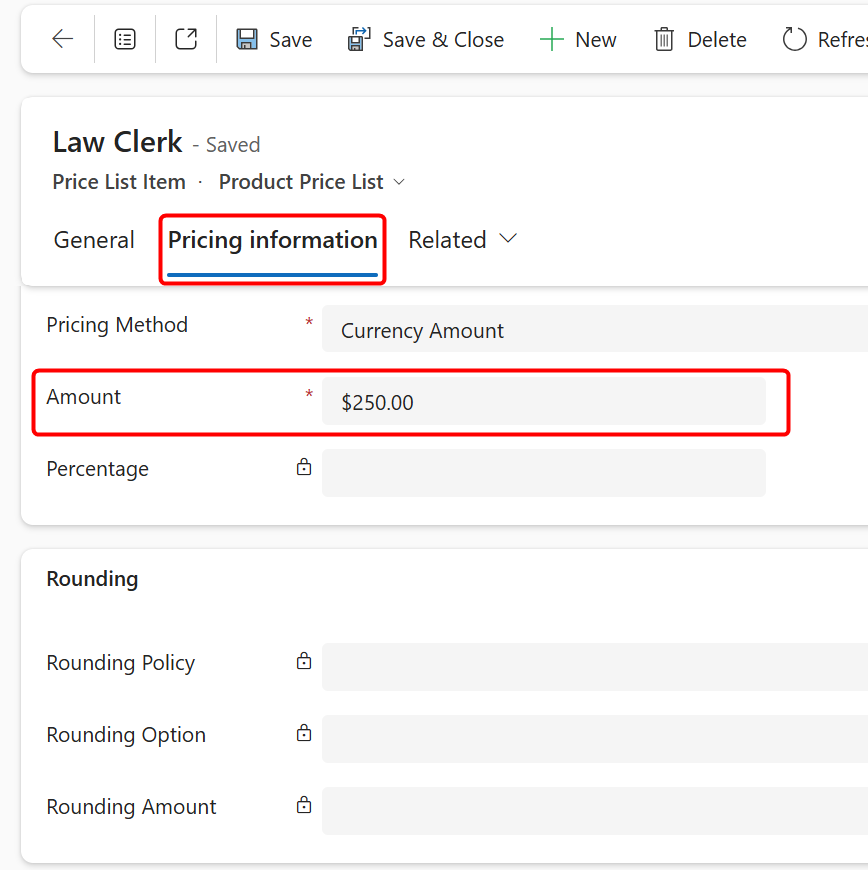
In the General tab, enter the following:
a. Product → Select the Role (e.g., Associate, Partner, Law Clerk)
b. Unit → Typically set to Hour
-
Navigate to the Pricing Information tab.
-
Enter an Amount → Define the hourly rate (e.g., $250)
-
Click Save.
Viewing Price List Items
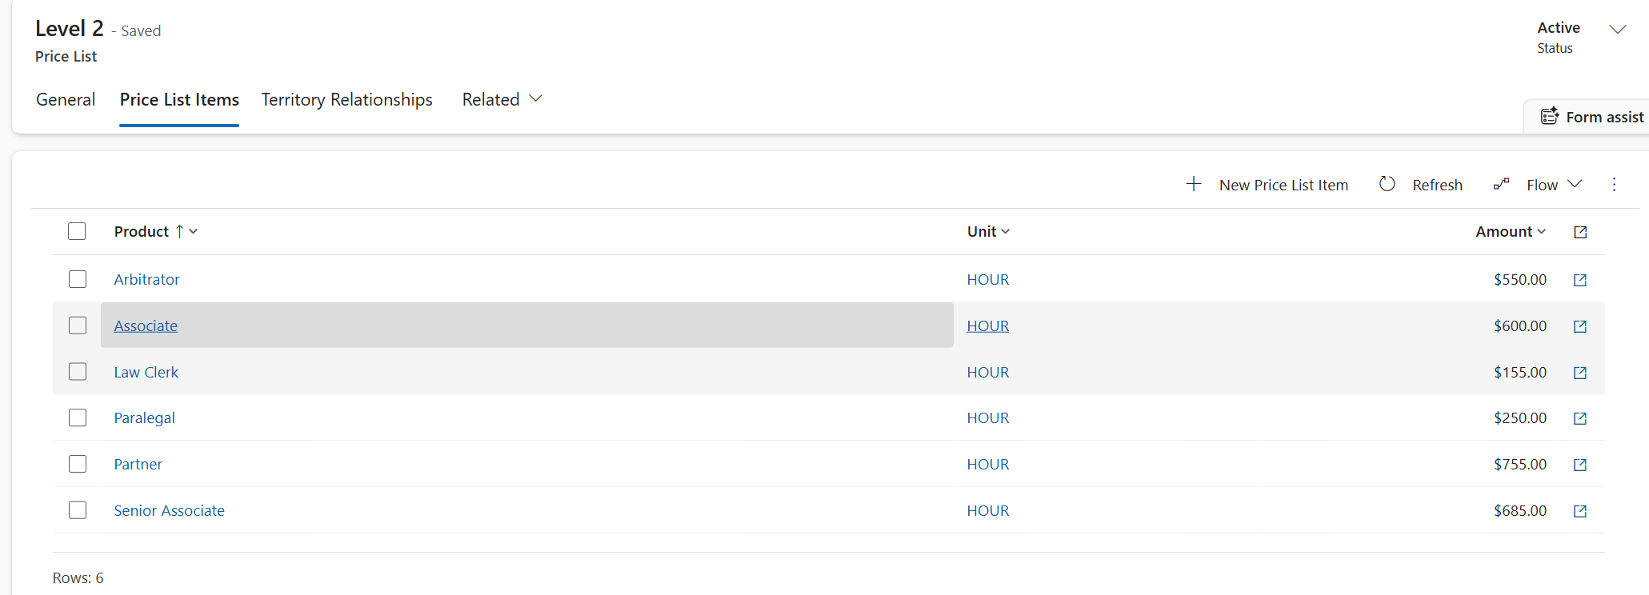
Once created, Price List Items are displayed in the Price List Items grid, showing:
-
Product (Role)
-
Unit (e.g., Hour)
-
Amount (Hourly Rate)
This allows users to quickly review all configured rates.
Updating Hourly Rates
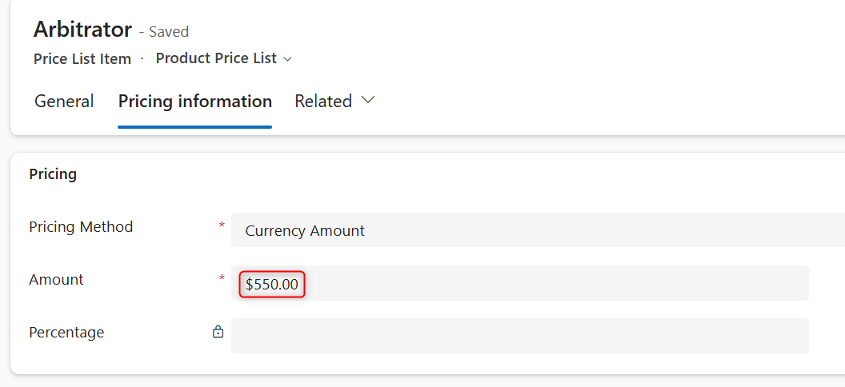
To change a Billing Rate:
-
Open the relevant Price List.
-
Navigate to Price List Items.
-
Open the Product (e.g., Arbitrator).
-
Under Pricing Information, update the Amount.
-
Save the record.
Important
-
Updating a Price List Item does not affect existing Billing Events already created.
-
The updated rate applies only to new Billing Events created after the change.
Assigning Price List to Matter
The Price List assigned to a Matter determines all billing rates used for that engagement.
This is a critical step, as it controls how Billing Events are priced and how amounts are calculated in invoices.
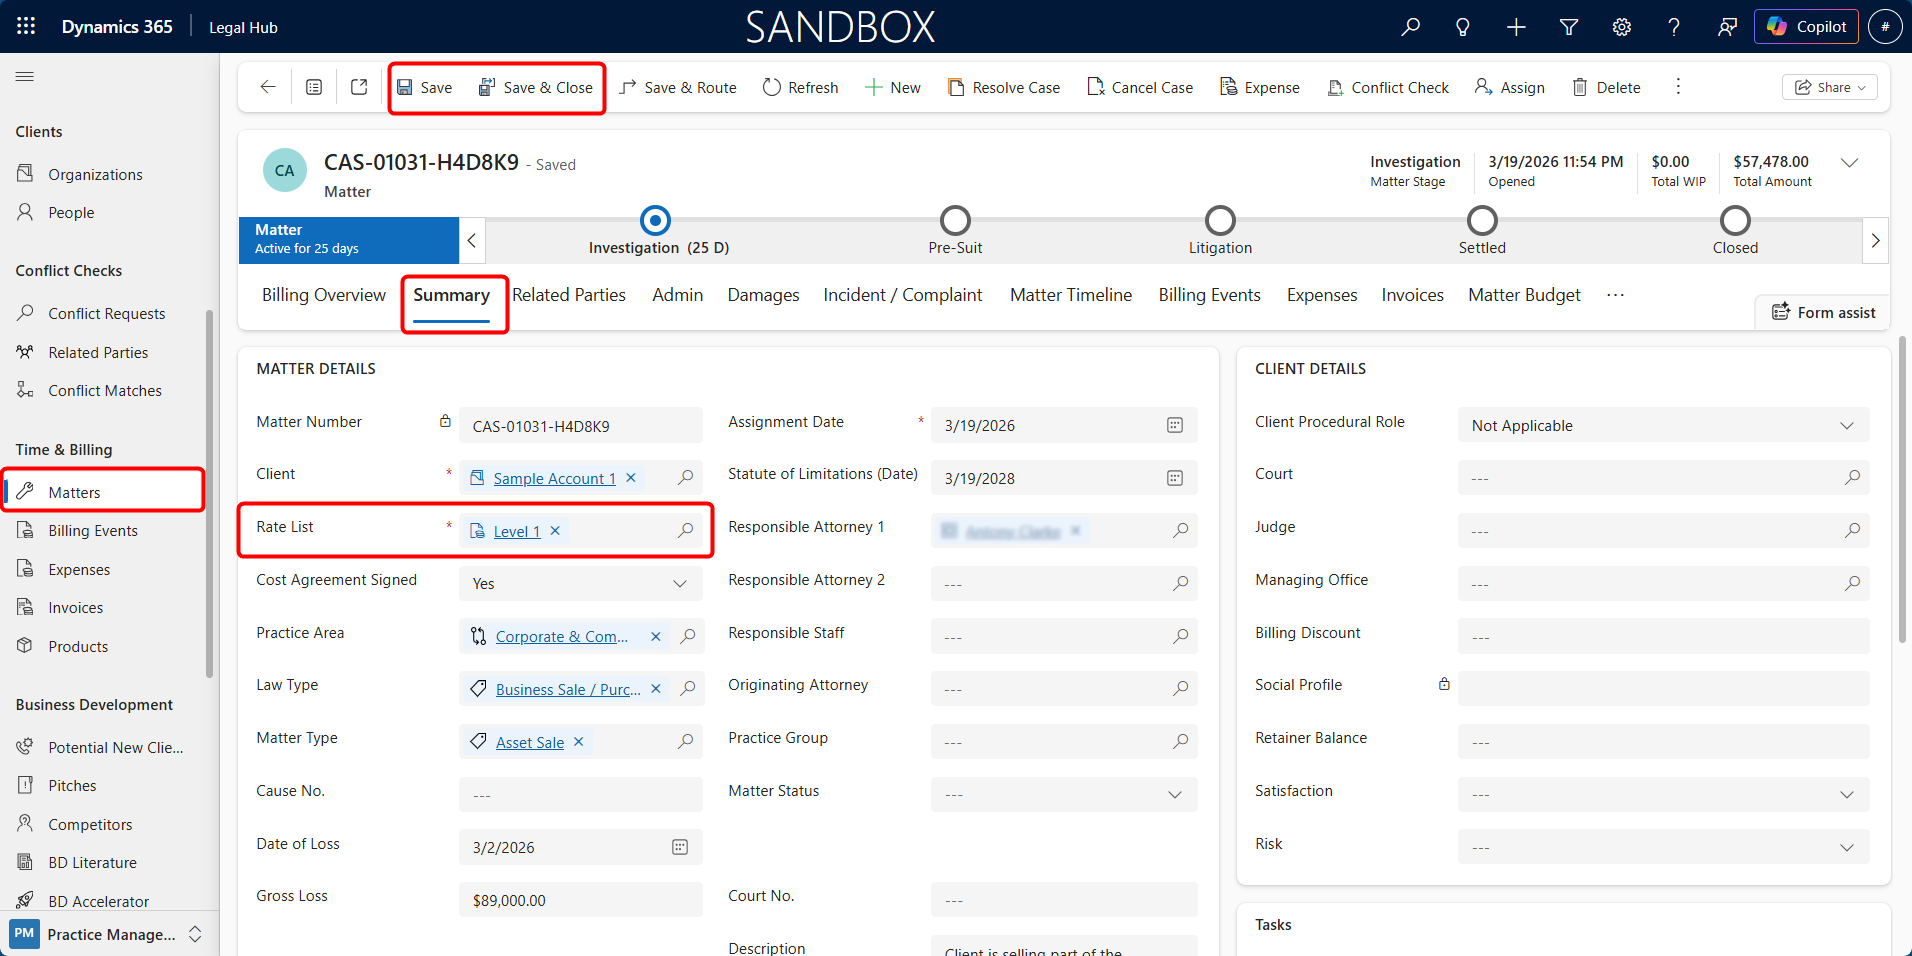
Here are the steps to Assign a Price List:
-
Open the required Matter.
-
Navigate to the Summary tab.
-
Locate the Rate List field.
-
Select the appropriate Price List.
-
Click Save.
Key Concept
- The selected Rate List (Price List) on the Matter controls all billing rates for that Matter.
Important Notes
-
Only one Price List can be assigned to a Matter at a time.
-
The selected Price List determines:
-
Billing Event rates
-
Invoice line item amounts
-
-
If a Price List is not assigned:
- Billing rates may default to $0
-
Changing the Price List after Billing Events are created:
-
Will not update existing Billing Events
-
Will apply only to new Billing Events
-
Bookable Resources (Roles & Pricing)
Bookable Resources represent the users (legal staff) who perform work on Matters.
They play a key role in pricing, as each Resource is linked to a Role (Product), which determines the billing rate.
What is a Bookable Resource? A Bookable Resource typically represents:
-
Lawyers (e.g., Partner, Associate)
-
Support staff (e.g., Paralegal)
-
Any user who records time or performs billable work
Each Resource is assigned a Role, which is configured as a Product in the system.
How Bookable Resources Affect Pricing
When a Billing Event is created:
-
A Resource is selected.
-
The system identifies the Role (Product) assigned to that Resource.
-
The system reads the Price List assigned to the Matter.
-
It finds the matching Price List Item (Role + Rate).
-
The Hourly Rate is automatically applied.
Key Relationship
- Resource → Role (Product) → Price List → Rate
This relationship ensures that billing is automatically calculated without manual input.
Assigning a Role to a Resource
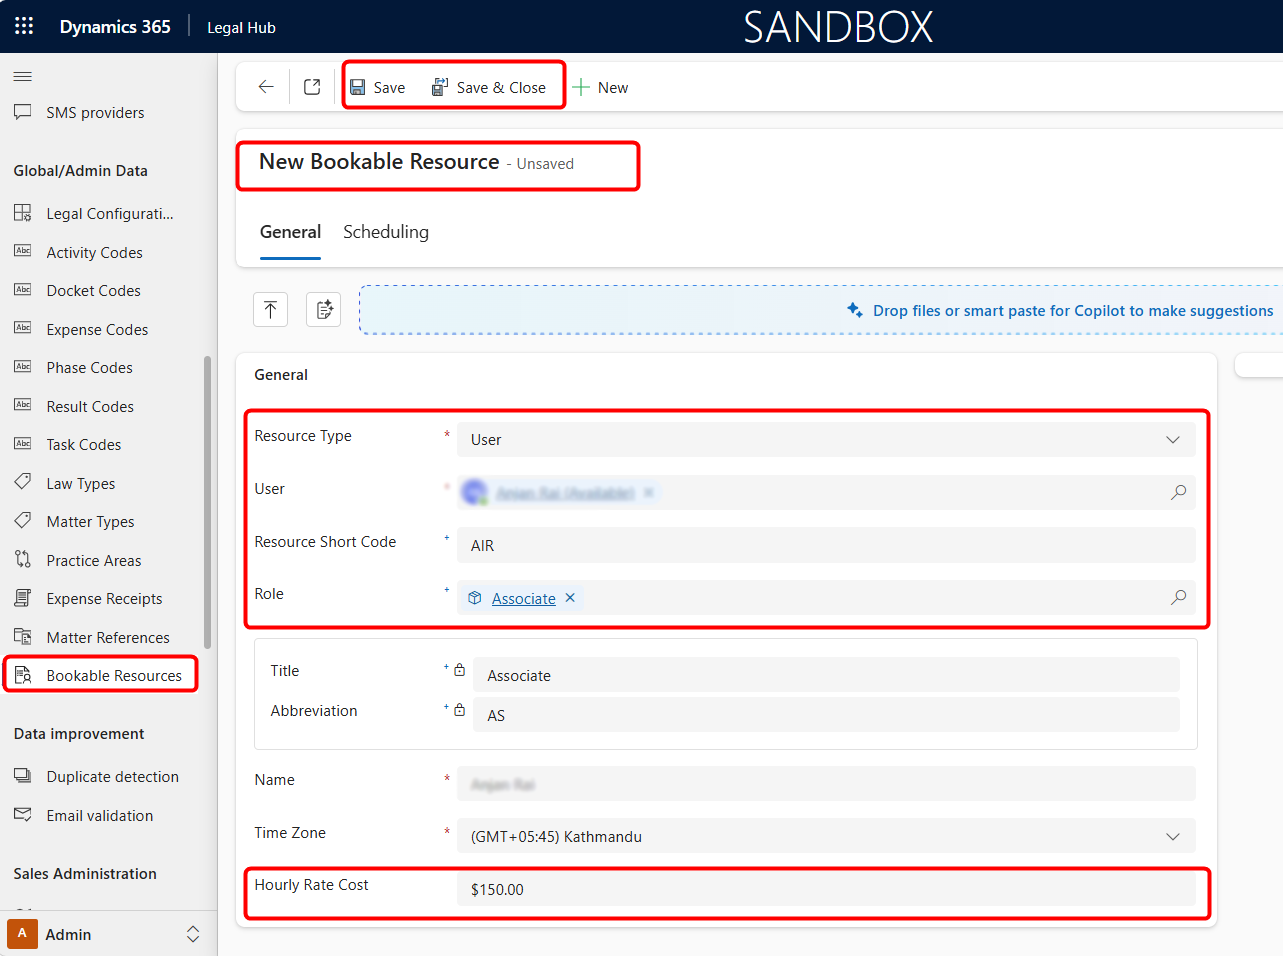
To ensure correct pricing, each Bookable Resource must be assigned a Role.
Follow these steps to assign a role to a resource:
-
Navigate to Admin and under Global/Admin Data > Bookable Resources.
-
Open the required Resource record.
-
Locate the Role / Product field.
-
Select the appropriate Role (e.g., Associate, Partner).
-
Click Save.
Important Notes
-
If a Resource does not have a Role assigned:
- Billing rate will be $0
-
If the Role is not included in the Price List:
- Billing rate will be $0
-
The Role must:
-
Exist as a Product (Is Role = Yes)
-
Be included in the Price List assigned to the Matter
-