Sales & Receivables User Guide in Dynamics 365 Business Central
Sales Process
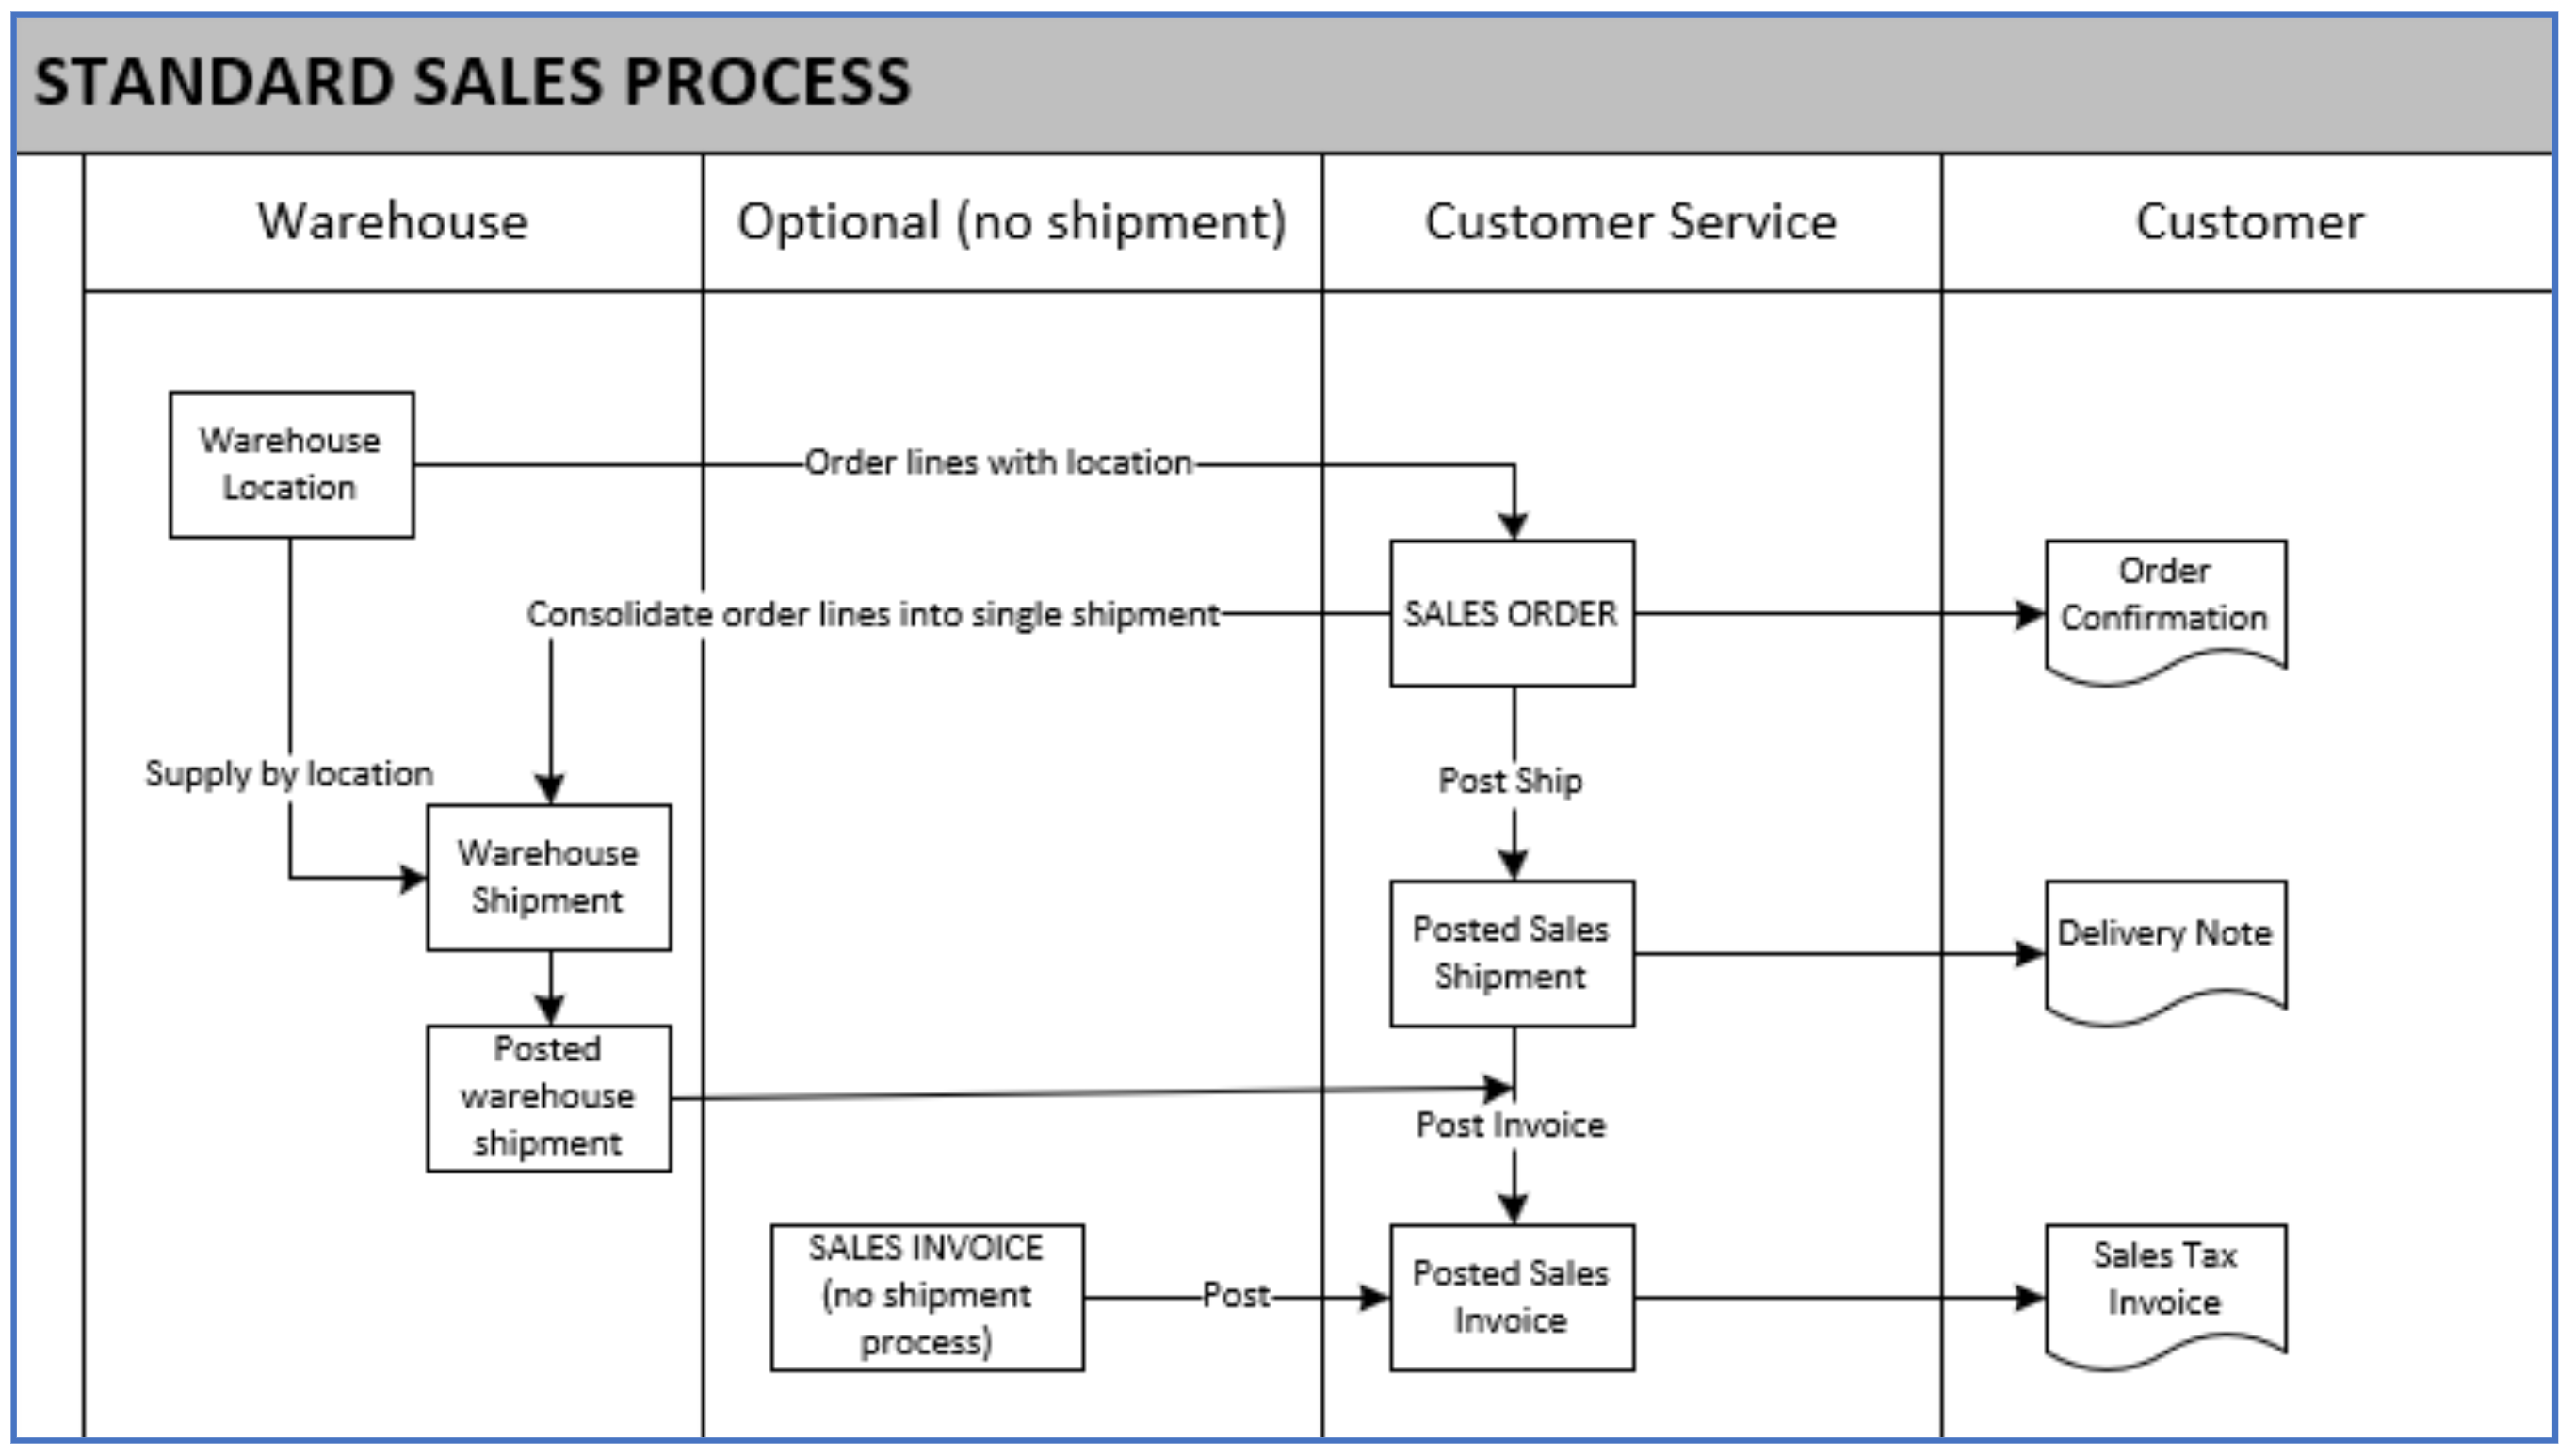
Process Overview
As shown in the diagram below, the standard sales process allows for:
-
Creation of a Sales Order with sales order lines for each item (location is optional)
-
Posting of this Sales Order to create a posted shipment and a posted sales invoice
-
(optional) Creation of a Sales Invoice
-
Combining sales invoices into one warehouse shipment
Sales Order
A Sales Order involves both shipment and invoice tracking.
To enter a new sales order:
-
Select sub-menu option Sales Orders to open the sales order list page. This page lists all unposted sales orders that can be amended (if the status is Open).

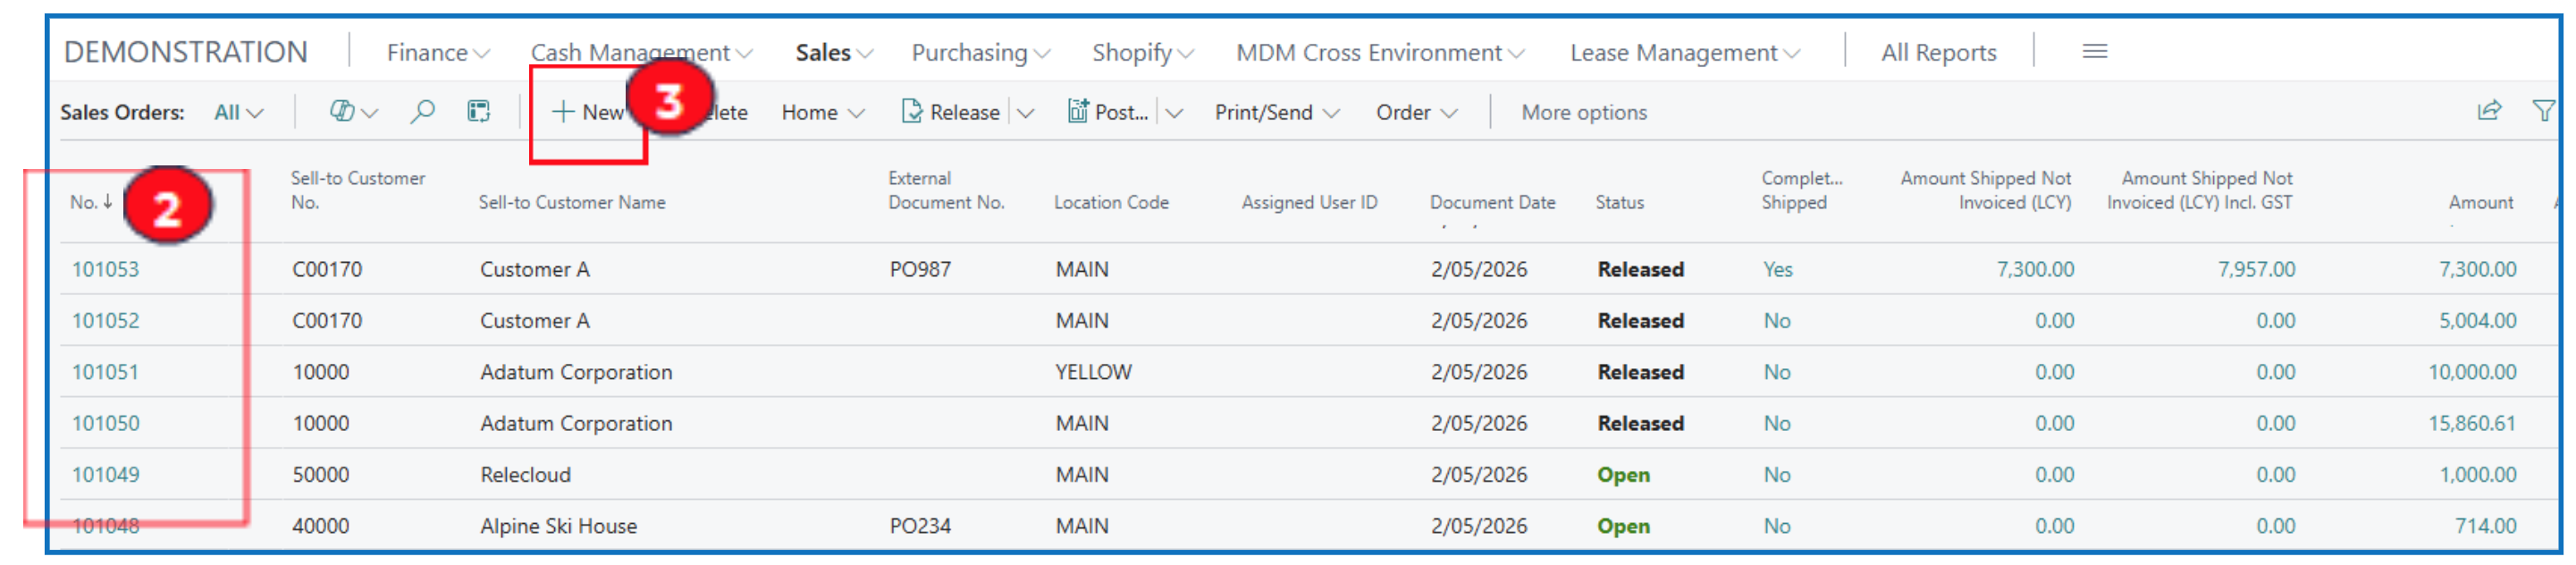
-
To edit an existing unposted sales order, click on the No. flowlink.
-
To create a new sales order, click on New in the sub-menu. This opens a new Sales Order document.
-
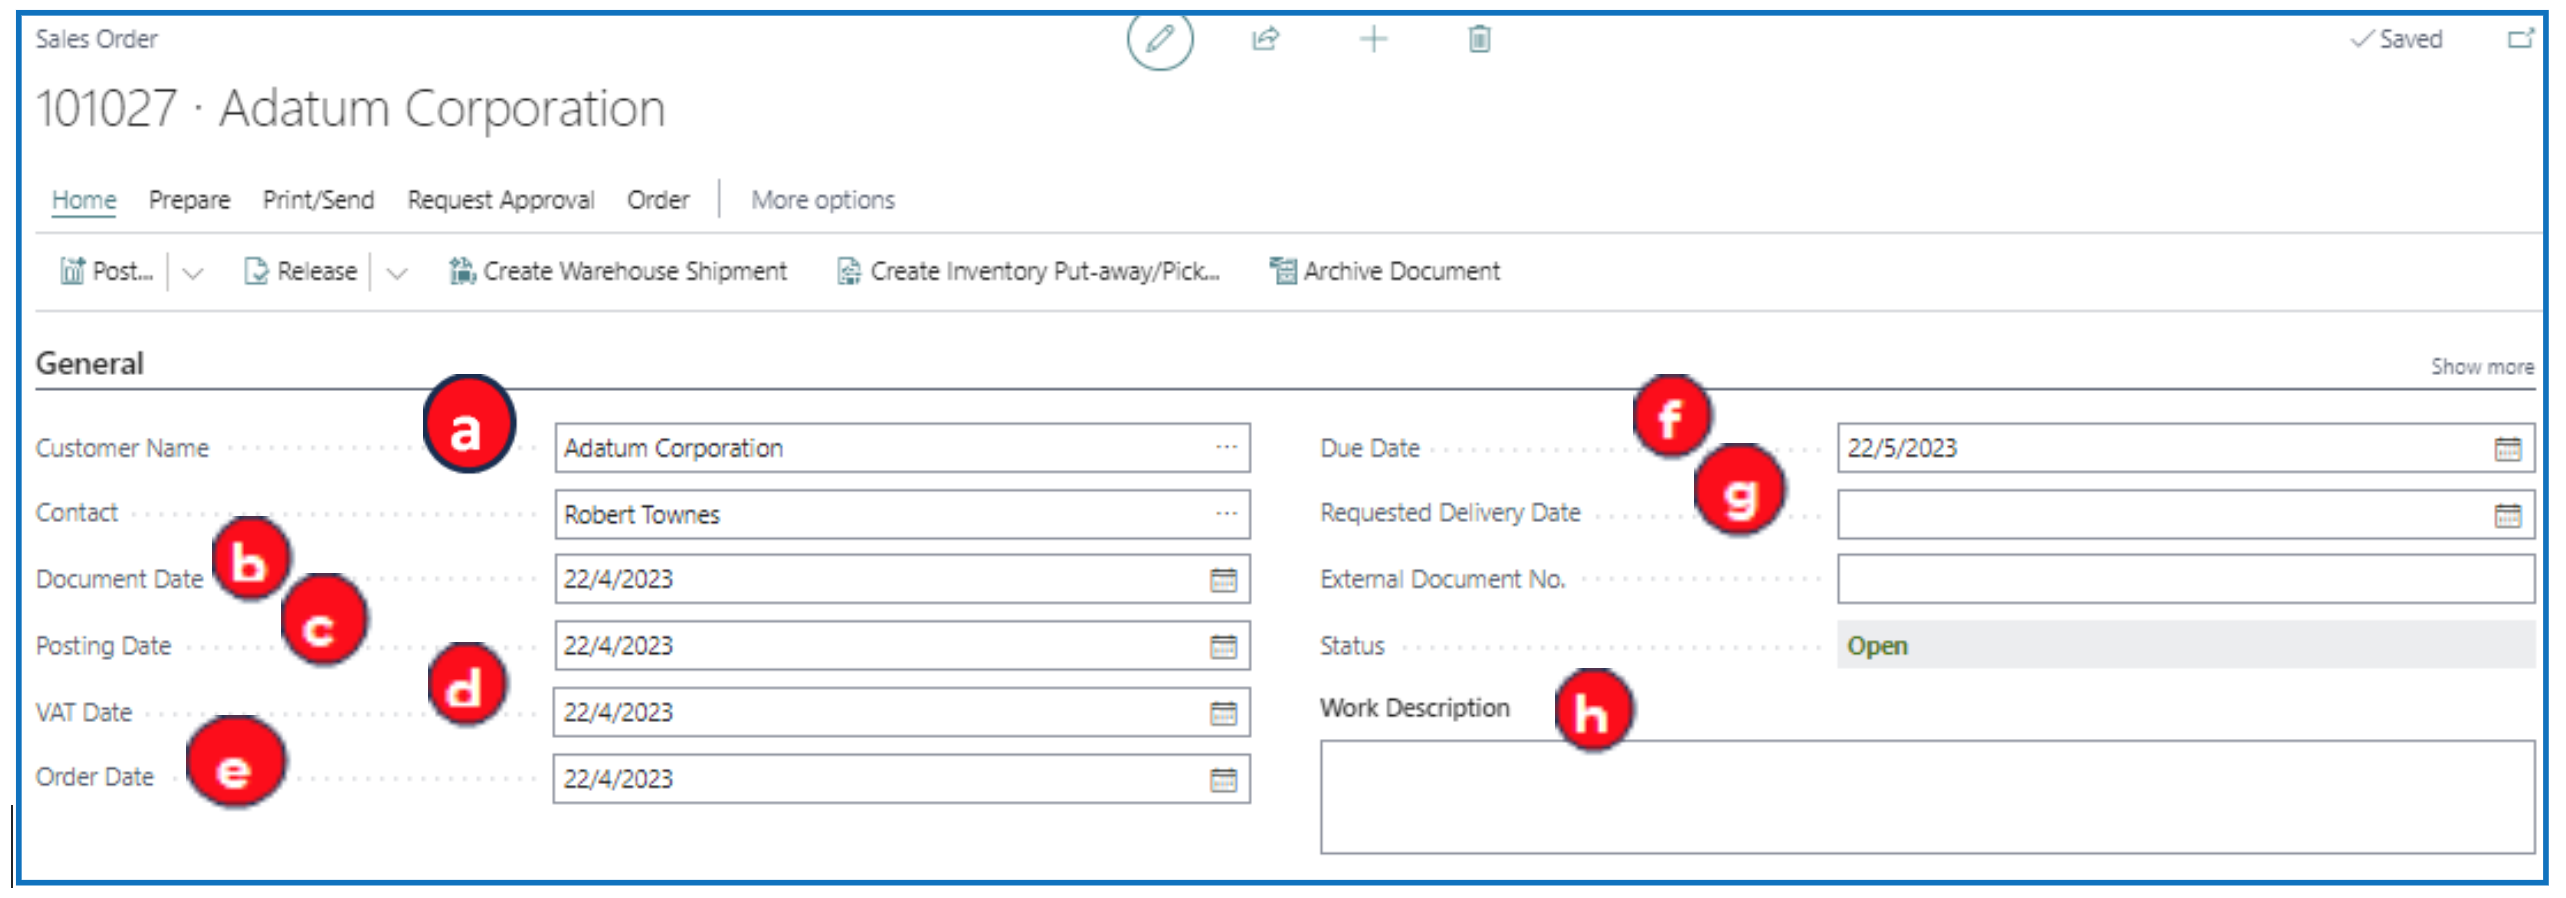
Enter the following Sales Order header information: (NB: date fields auto-populate with the working date)
a) Customer name — Enter the name or run a text search.
b) Document Date — Accept the default or enter the date of transaction.
c) Posting Date — Accept the default or enter the date to post into the accounting period.
d) VAT Date — Accept the default or enter the date to post Sales Tax into the tax reporting period.
e) Order Date — Accept the default or enter the date that the order is received.
f) Due Date — this is automatically calculated from the Document Date and the credit term of the customer.
g) Requested Delivery Date — (optional) enter the date of delivery (if available).
h) Work Description — (optional) enter any remarks for this sales order.
-
In the sales order lines FastTab (section), the Type and No. fields allow you to enter one of the following options selected:

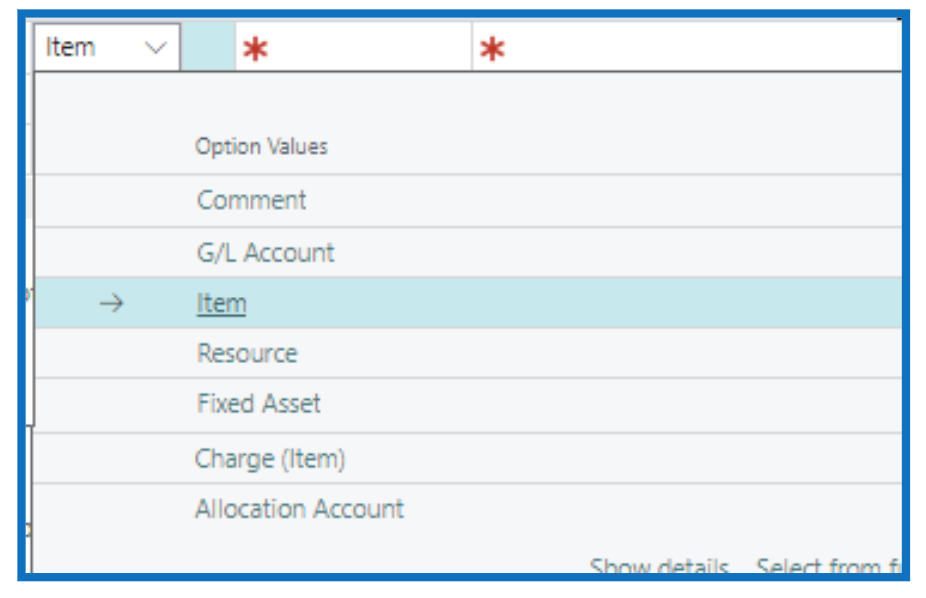
-
Comment — Select this option if the line description is to be printed as a Comment.
-
G/L Account — Select this option if the line amount is to be posted into a specific GL account code. The account code is then selected in the No. field.
-
Item — Select this option if the line is for an inventory item sold. The No. field will be used to select the item number.
-
Resource — Select this option if resource (people or equipment) is to be sold in this line. Resources must first be defined.
-
Fixed Asset — Select this option if the sales line is for a Fixed Asset. The No. field will be used to indicate the asset code sold.
-
Charge (Item) — Select this option for a pre-defined sales charge (e.g. shipping). The No. field will be used to select the pre-defined charge item. The charge item value is then pro-rated to the sales lines to assign this charge amount to the items sold.
-
Allocation Account — Select this option if the sales value is to be allocated to different departments. The allocation distribution code must be pre-defined and selected in the No. field.
-
-
After selecting and entering Type and No. fields, the following fields need to be entered (minimum):

a) Description — The item description is defaulted. You can type over a new description.
b) Location Code — Select the (warehouse) location where the item will be picked for delivery.
c) Dept Code — Select the department for reporting the sale.
d) Quantity — Enter the quantity sold and to be delivered.
e) UOM — This is defaulted from the **default UOM ** of the selected item.
f) Unit Price Excl VAT — This should be defaulted from the item price but if not, enter the sale price.
g) Line Amount Excl. VAT — This is the extended amount for the sales line.
h) Amount Including Tax — If this amount does not reflect the tax-inclusive value, check that **Tax Area Code ** and Tax Group Code fields are populated.
i) Tax Area Code — Select the tax area code for the sale (this should default from the customer master).
j) Tax Group Code — This group code defaults from the item master.
k) Qty to Ship — This is the default quantity to be delivered (it should default to the **Quantity sold **). This can be adjusted if less quantity is shipped/delivered than ordered.
l) Quantity Shipped — This field defaults the quantity once the order line is shipped and posted. If Quantity Shipped is less than **Qty to Ship **, this implies that there are unfulfilled quantities for this sales line.
m) Qty to invoice — This defaults to the Quantity and indicates the quantity to include in the Sales Invoice posted. If invoicing for less than ordered quantity, update the Qty to Invoice to reflect the correct quantities to invoice.
-
More Sales Order header information is displayed after the Sales Order line FastTab.
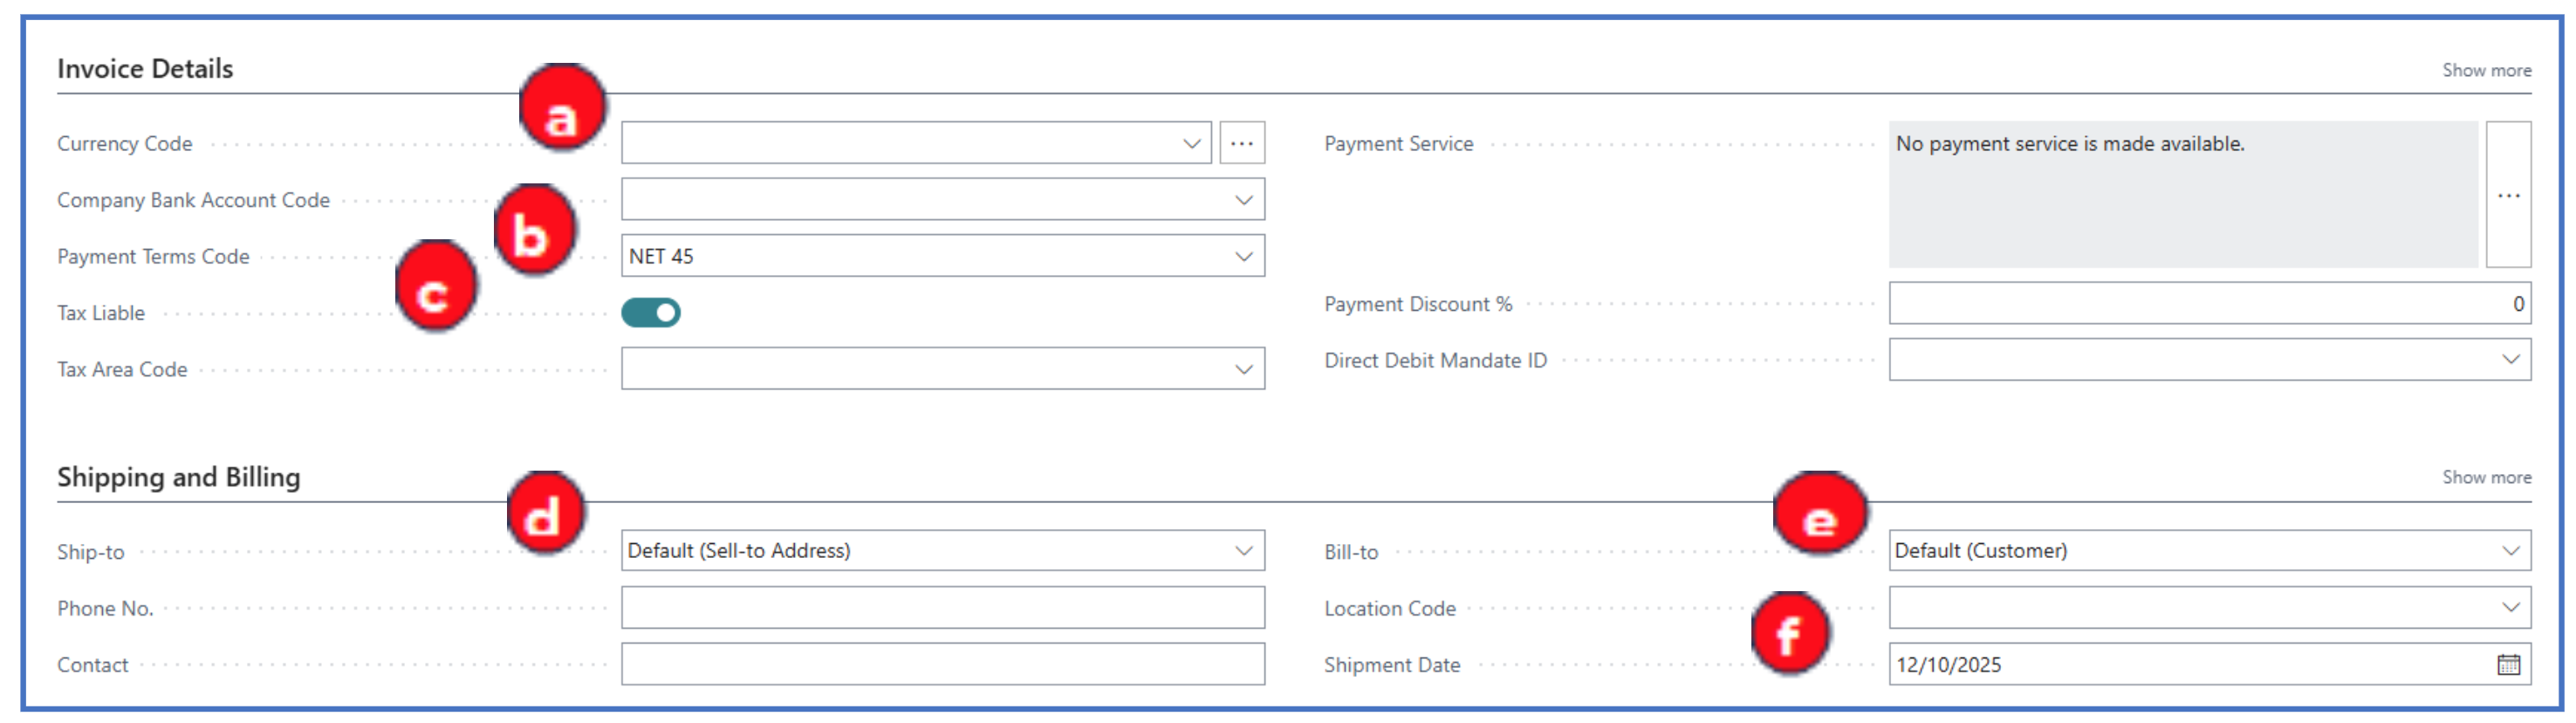
In the Invoice Details FastTab:
a) Currency Code — Leave this blank for local currency sales. If the sale is in a foreign currency, select the Currency code.
b) Payment Terms code — Confirm the default payment (credit) terms for this customer.
c) Tax Liable — Enable if the Sales Order attracts Sales Tax.
In the Shipping and Billing FastTab:
d) Ship-to — The default shipping address of the customer. If the shipping address is different, select the option for alternate shipping address (pre-defined) or custom address (manually added in the next fields that appear)
e) Bill-to — The default payee is the customer. But if there is another payee (e.g. customer head office), select Another Customer in this field and the new customer code in the next field that appears.
f) Shipment Date — Update this field to indicate the date that the stock must ship out.
-
After completing the data entry for the Sales Order header and lines FastTabs, release the Sales Order to lock it for shipment and invoice processing.
This is done in the sub-menu option:
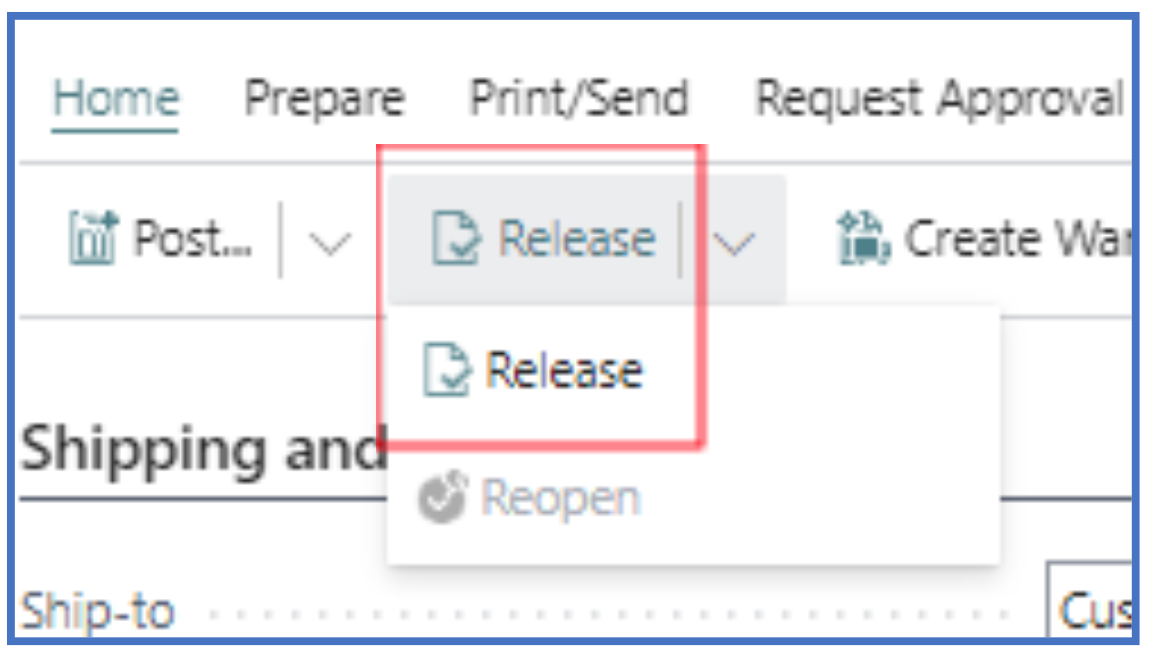
The Sales Order status will change to Released. To make further edits, the Sales Order must be Reopened.
Sales Order with Prepayment (Advance Paid)
If the sales involve prepayment from the customer (i.e. before sales shipment), the next step after entering the Sales Order is to create a proforma prepayment invoice for the customer. This prepayment invoice will be added to the customer’s account and tracked for payment received before this Sales Order can be released (i.e. shipped).
To trigger this prepayment for the Sales Order, complete the fields in the Prepayment FastTab:

a) Prepayment % — Enter the % of prepayment to invoice (from 1% to 100%). Once entered, accept the prompt to update the prepayment % for all sales lines so that the prepayment value is applied.
b) Prepayment Payment Terms Code — Confirm the credit terms applied to the prepayment or change this to CASH.
c) Prepayment Due Date — Confirm the default date or update a new date.
Sales Order Entry of Multiple Lines (Option)
-
To be able to select several items from the inventory into the Sales Order lines, click on Select Items in the Sales Lines FastTab menu to open the Items list pop-up.
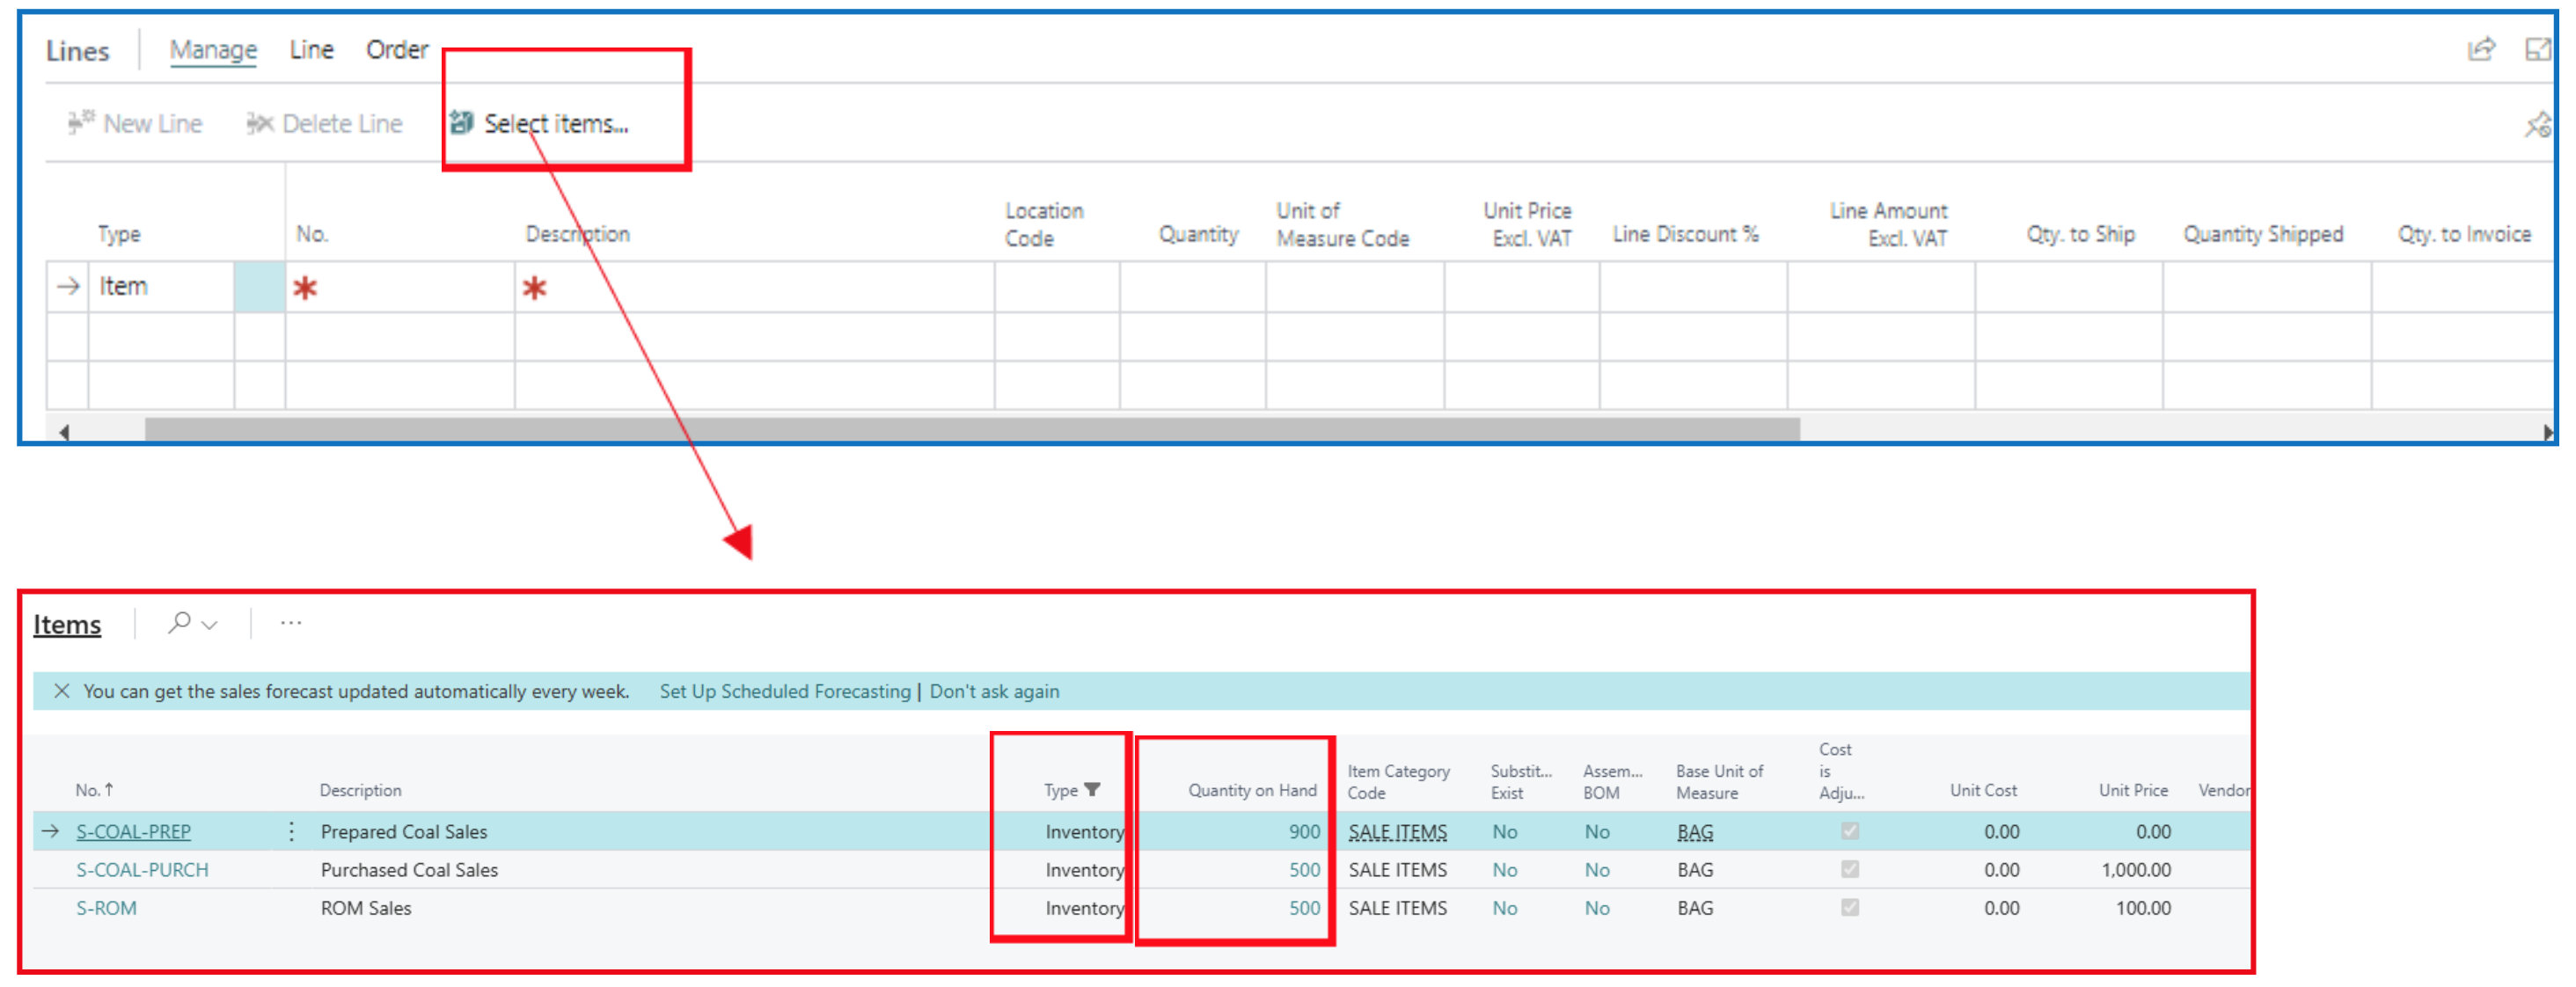
Filter by Type=Inventory and check Quantity on Hand value for the item.
-
From this Items list page, click on the 3-dot next to any item, to display the menu option and choose Select More. This action displays the selection buttons for each item row.
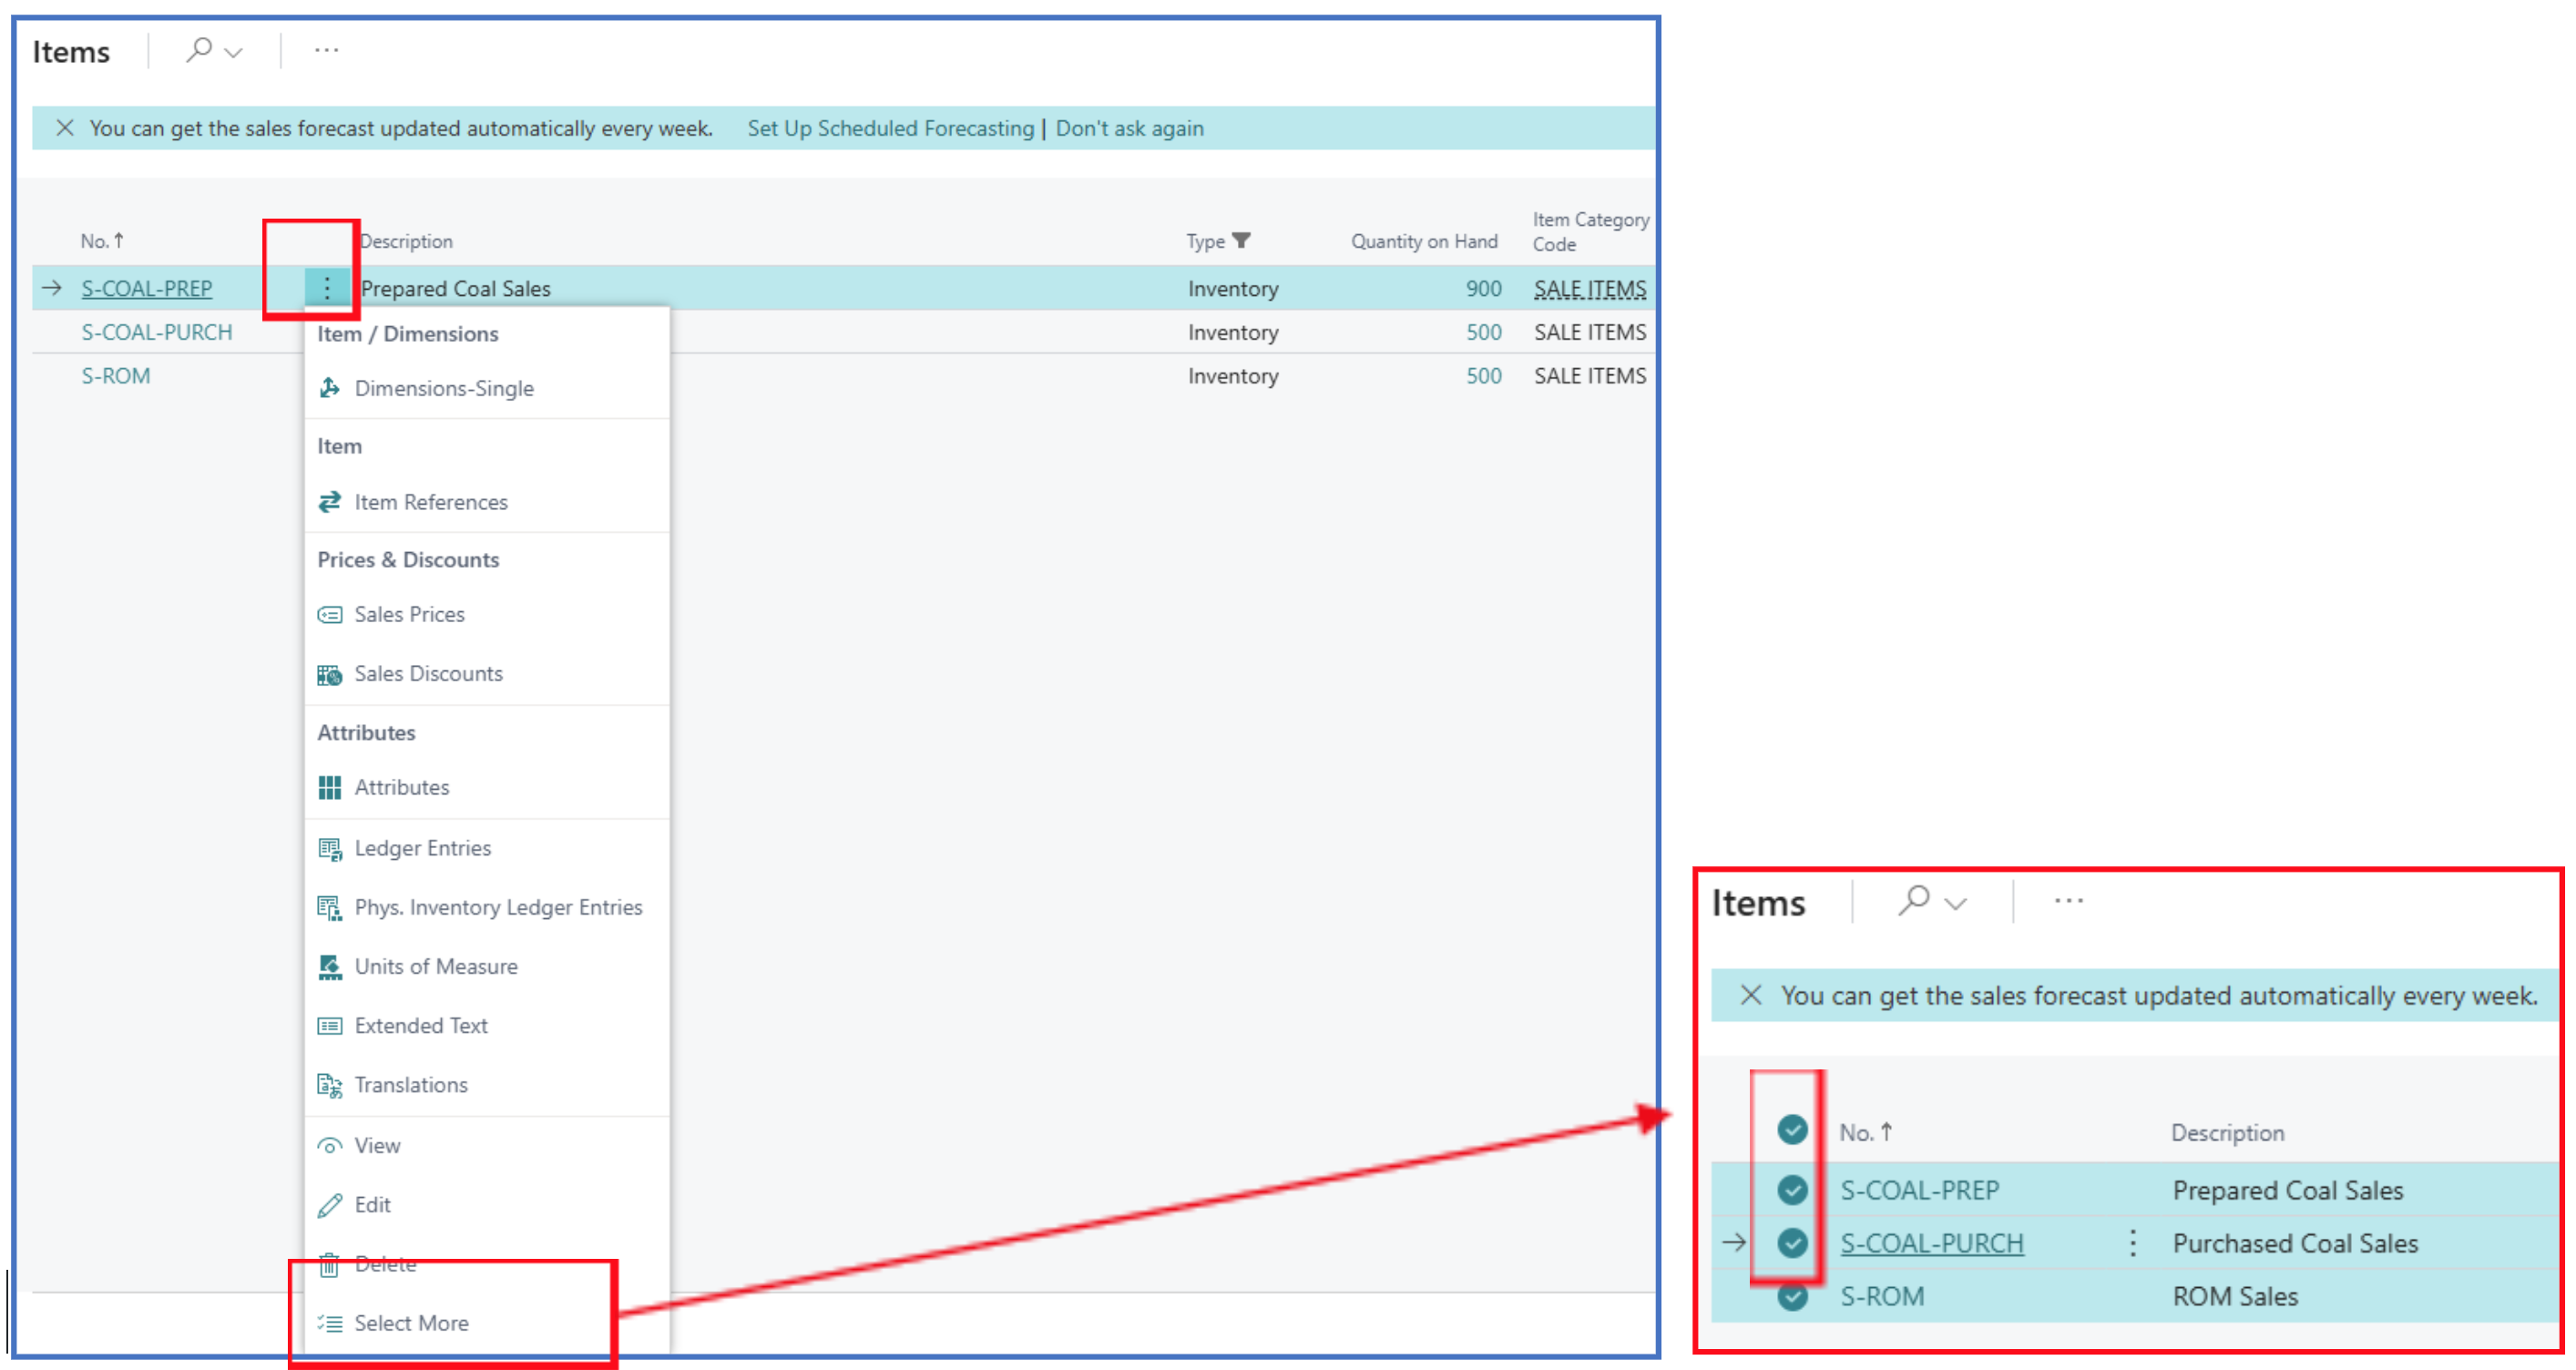
-
Click OK to add the selected lines to the Sales Order Lines FastTab, and update the quantity sold per line to complete the Sales Order.
Sales Invoice (Posted)
NB: The Location code used in the Sales Order line is configured with Require Shipment disabled.
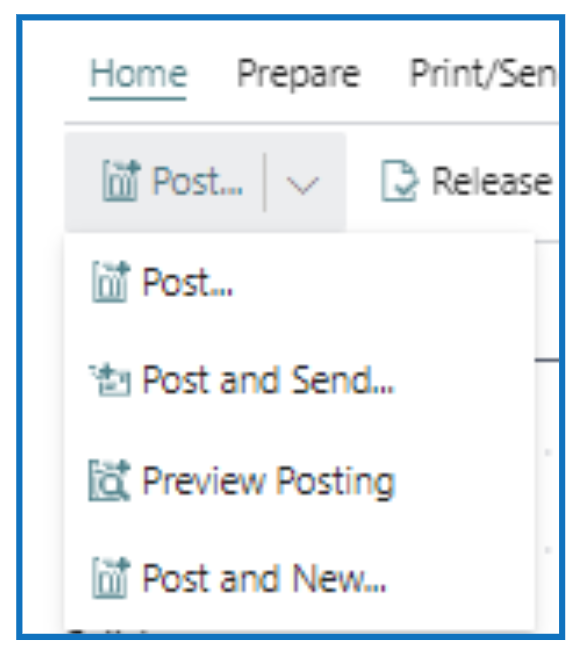
When a Sales Order is posted, it automatically creates and posts a shipment and an invoice for the order. The Post sub-menu has several options:
-
Post — Commits the Sales Order and creates shipment and invoice transactions that post into the GL.
-
Post and Send — Commits the Sales Order and prints the Tax Invoice for emailing to the customer (customer’s email account must be defined).
-
Preview Posting — This option is used to review the various GL posting accounts before final commitment through Post.
-
Post and New — This option posts the Sales Order and opens a new order for the next entry.
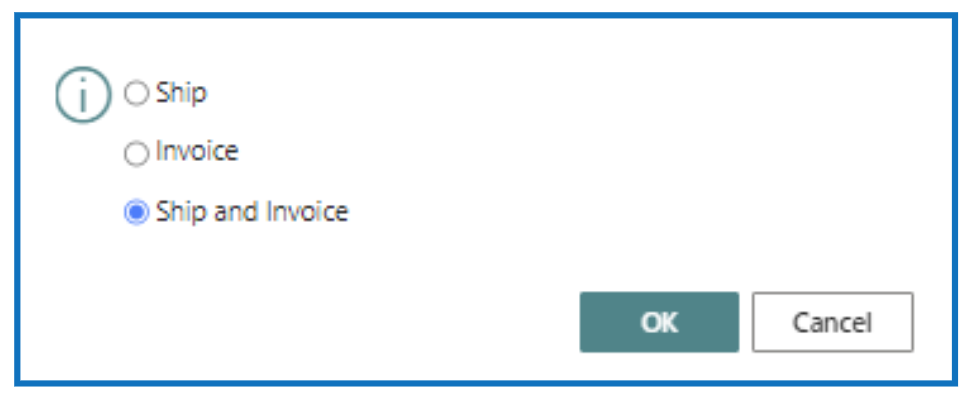
If the Post or Post and Send is selected, there will be a prompt to create either or both shipment and invoice.
-
If Ship is selected, the sales shipment is posted, and Delivery Note can be printed from the posted sales shipment list page. (i.e. shipping items before invoicing)
-
Invoice should only be selected if the Sales Order is shipped (posted). If not, the invoice will error with document does not contain a quantity.
-
Ship and Invoice — This is the default option to post both the shipment and the invoice at the same time.
After posting is completed, the posted Sales Shipment and posted Sales Invoice can be retrieved from the respective list page.
Creating Sales Invoice without a Sales Order
If the transaction does not involve shipment tracking, the sales can be completed through a Sales Invoice. This sub-menu option is selected from Sales.

Select Sales Invoices to open the Sales Invoices list page. This page will display all unposted sales invoices (not generated through Sales Orders).
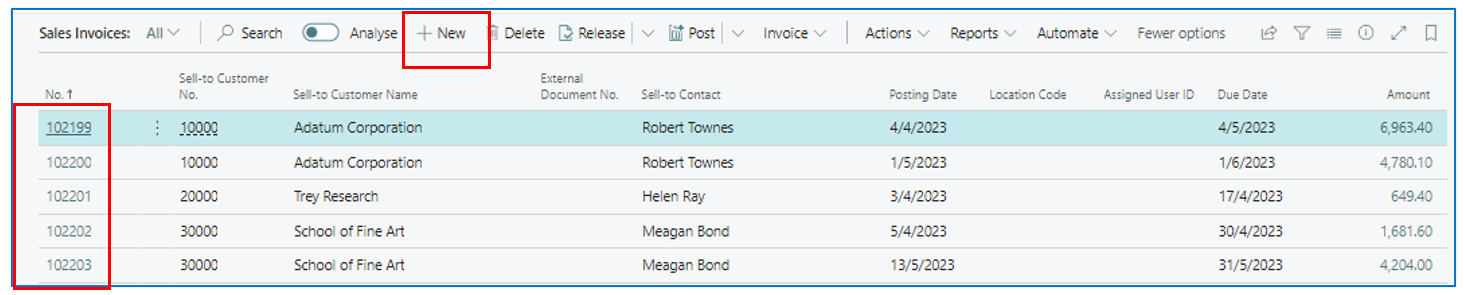
Click on any sales invoice number to open the invoice document page or click New to create a new Sales Invoice.
A new Sales Invoice document page opens. The data entry for a sales invoice is like that of sales order as mentioned above (ref: Sales Order).
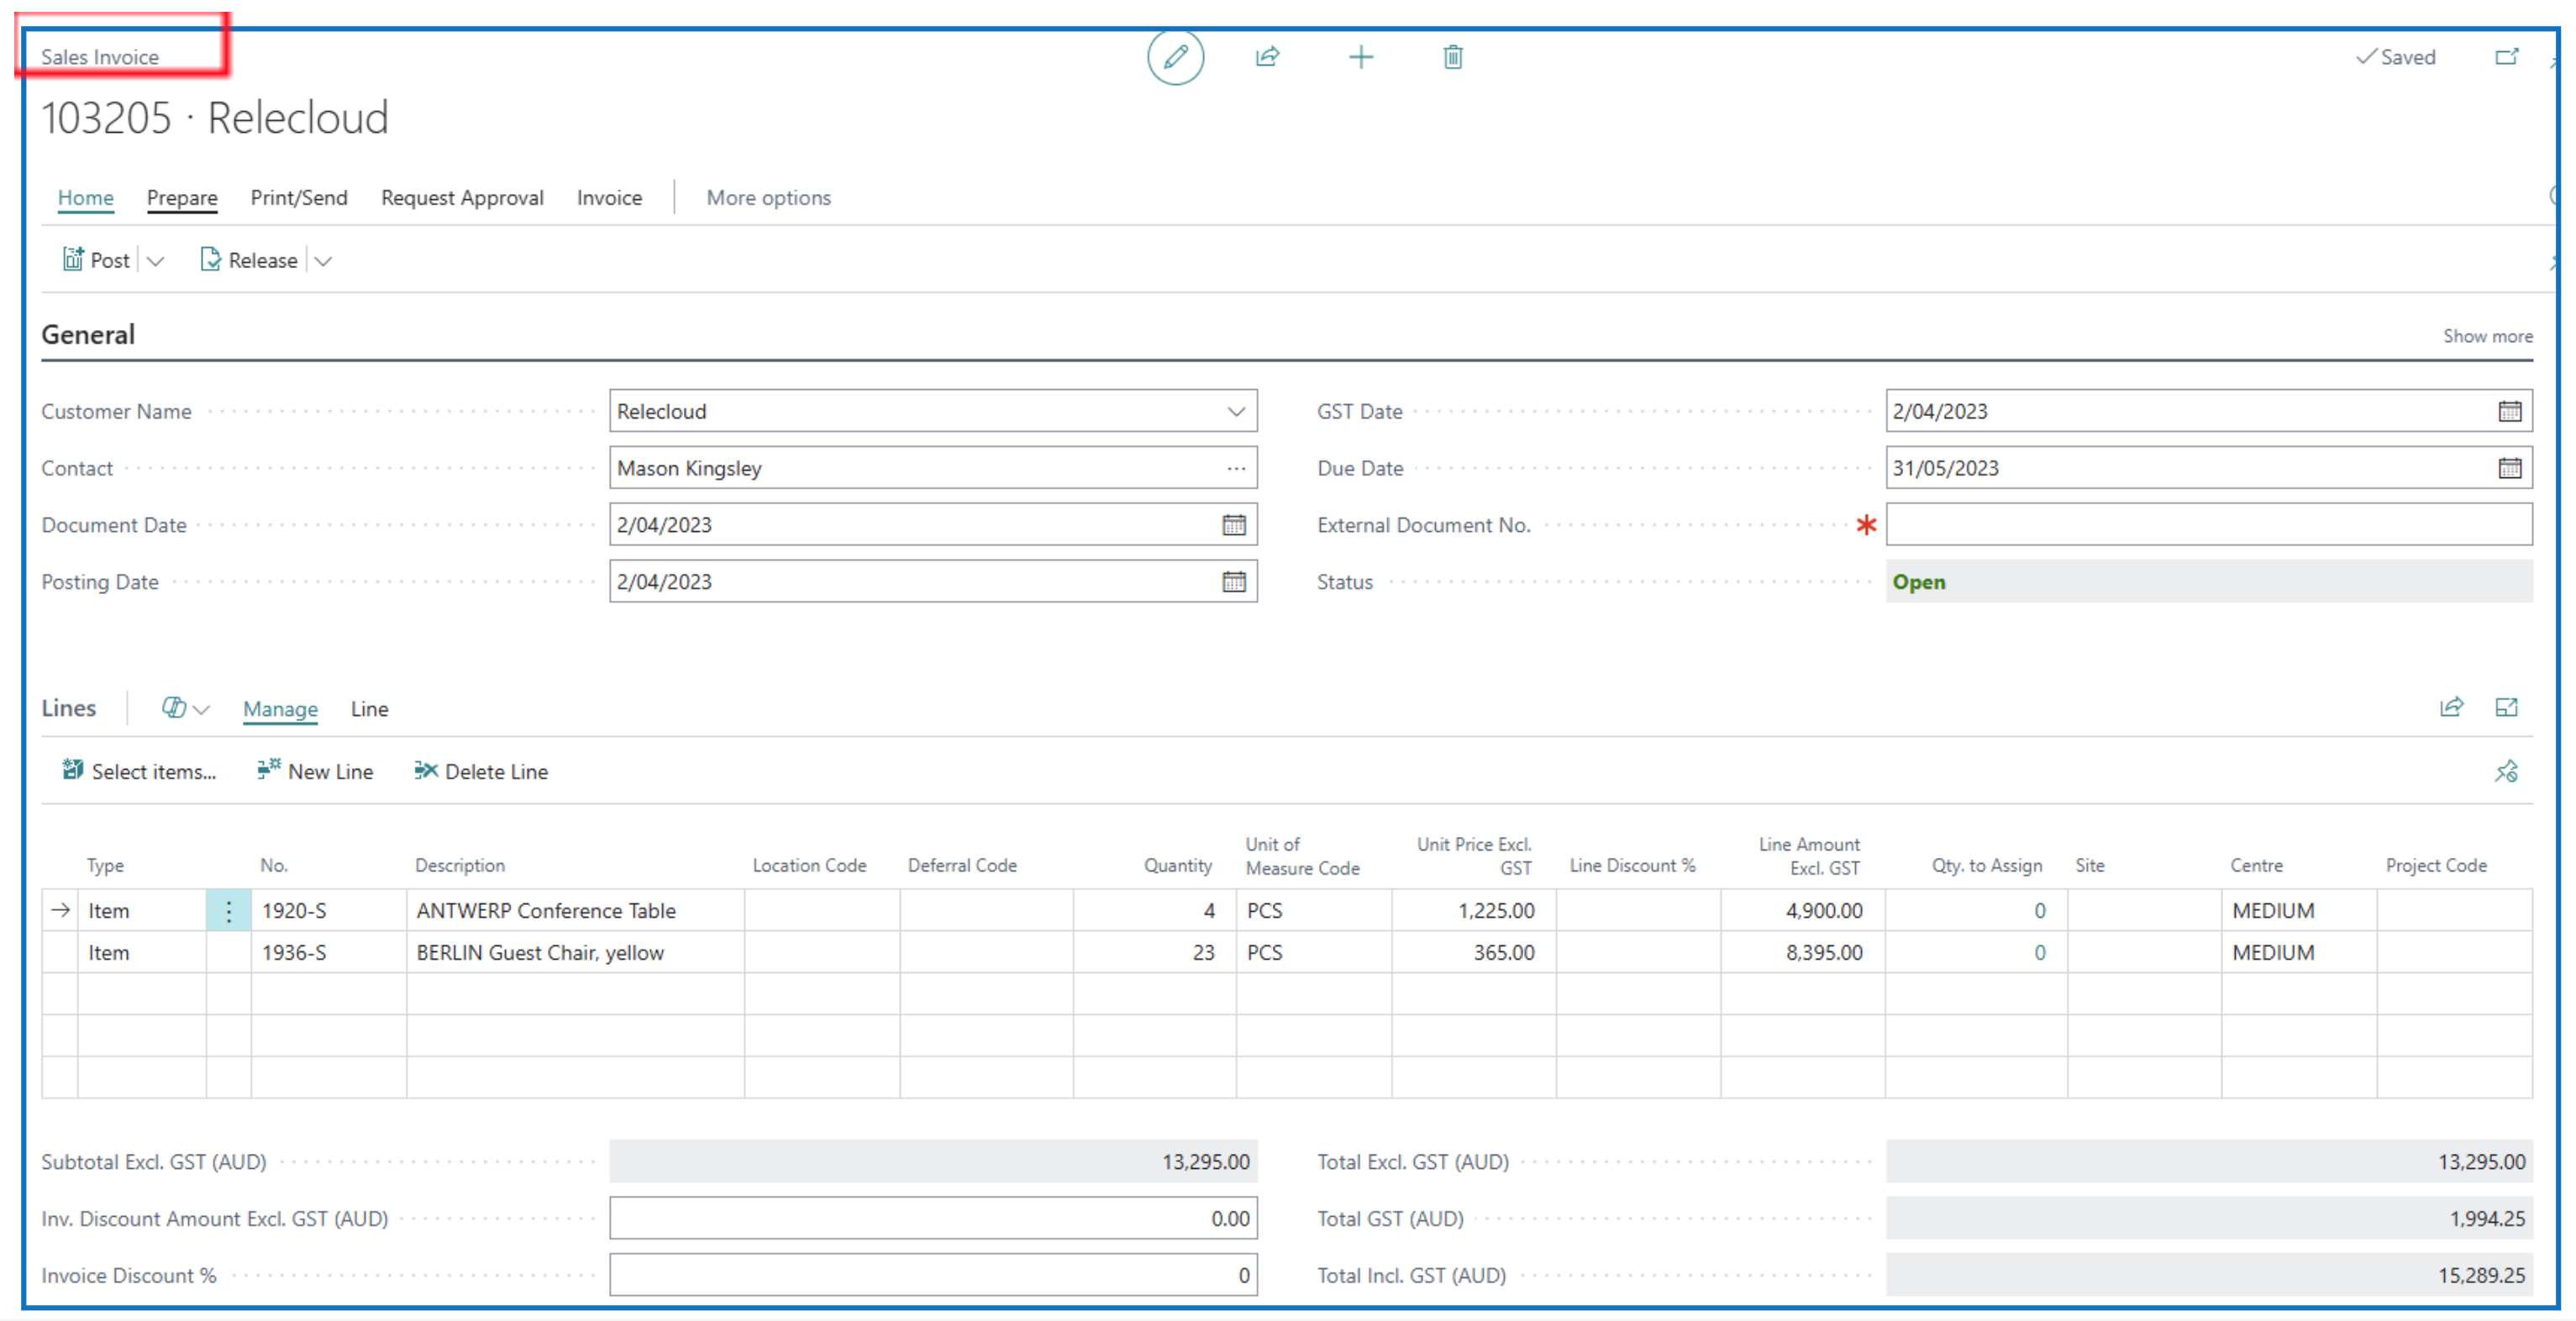
Sales Invoice header General FastTab
- Customer Name —Select or enter the customer’s name.
- Document Date, Posting Date, and VAT Date — Enter the Document Date and the Posting Date will default to this date.
- Salesperson code should default from the customer master (if defined).
Sales Invoice lines FastTab
- Select the Type and No. for the sales line (i.e. Item,Comment, G/L Account)
- Line description defaults from the Item or G/L Account. Update the line description if needed.
- Select location code (stock will be reduced from this location), Dept Code, and enter the Quantity sol.
- Item unit price should default from inventory pricing. If not defined, enter the unit sales price.
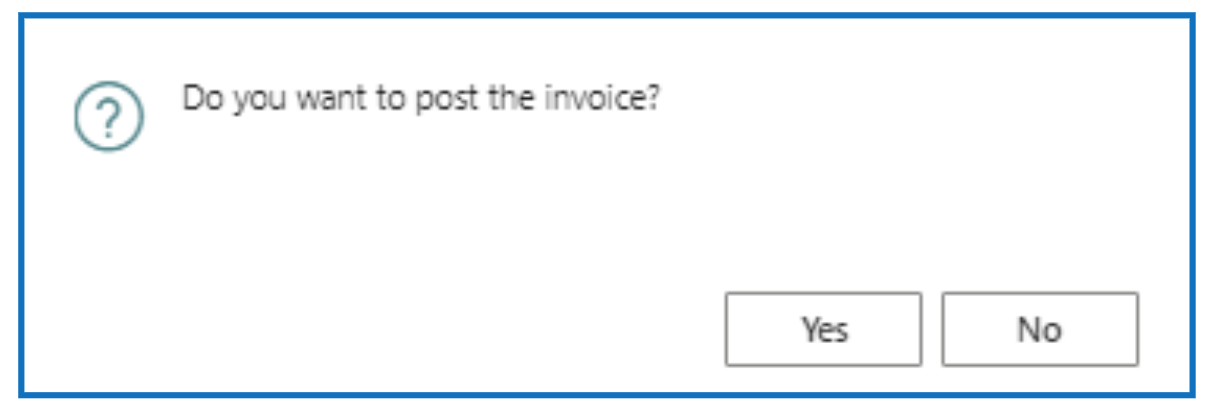
Posting a Sales Invoice
- When the sales invoice is ready, click on Post
- The posting prompt will only show the option to Post (but not to Ship).
Prepayment (Proforma) Invoice from Sales Order
After the Prepayment details are entered in the Sales Order header, the Prepayment Proforma Invoice can be generated for the prepayment % as follows:
-
In the Sales Order menu option, click Actions to navigate to the sub-menu option Posting > Prepayment.
-
Under this option, there are several Prepayment options:
a) Prepayment Test Report — This is a preview report showing all prepayment data.
b) Post Prepayment Invoice — This only posts the prepayment invoice.
c) Post and Print Prepayment Invoice — Select this to post and print the prepayment invoice when all information is correct.
d) Preview Prepayment Invoice Posting — This is a preview of the posting to GL when the proforma invoice is posted.
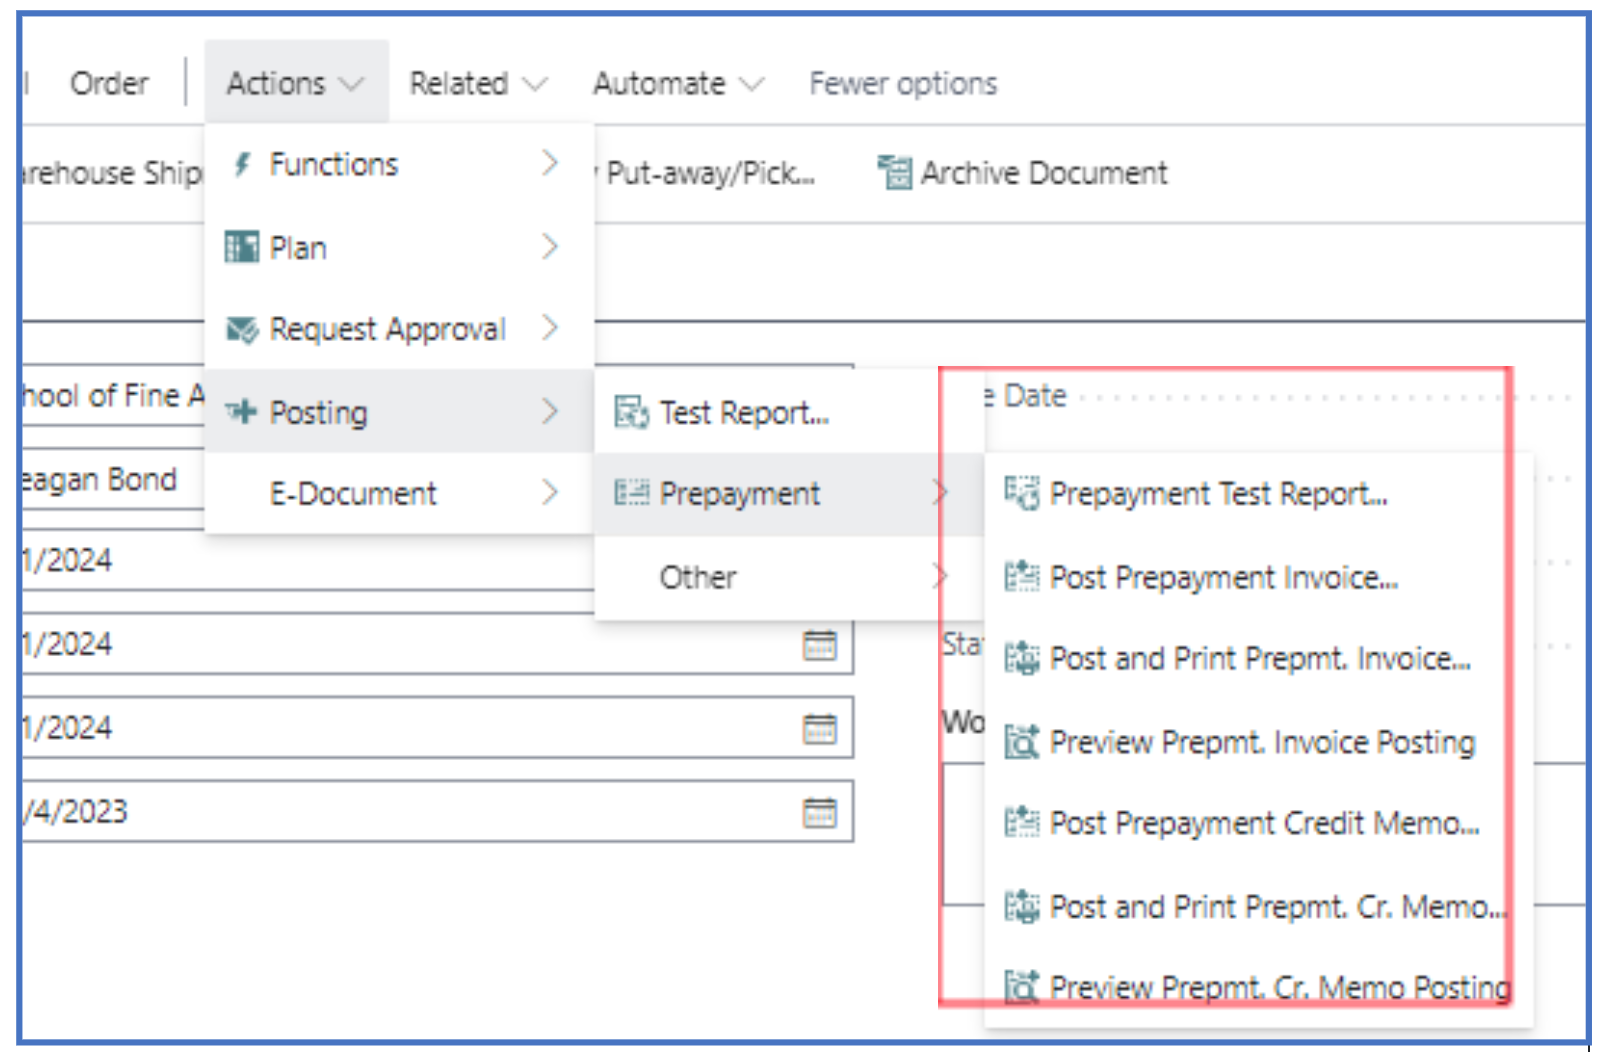
e) If a correcting credit note is needed to offset the prepayment invoice, it can also be created with the Credit Memo options.
Written By:
Peter Loo
Team Leader, Business Central
Connect on LinkedIn