Travel PO Detail Extension in Dynamics 365 Business Central User Guide
Introduction
This guide is for the Travel PO Detail extension (Version 1.0 | June 2026) for Microsoft Dynamics 365 Business Central. Learn how to create PO for travel expenses for day-to-day usage.
Vendor Card
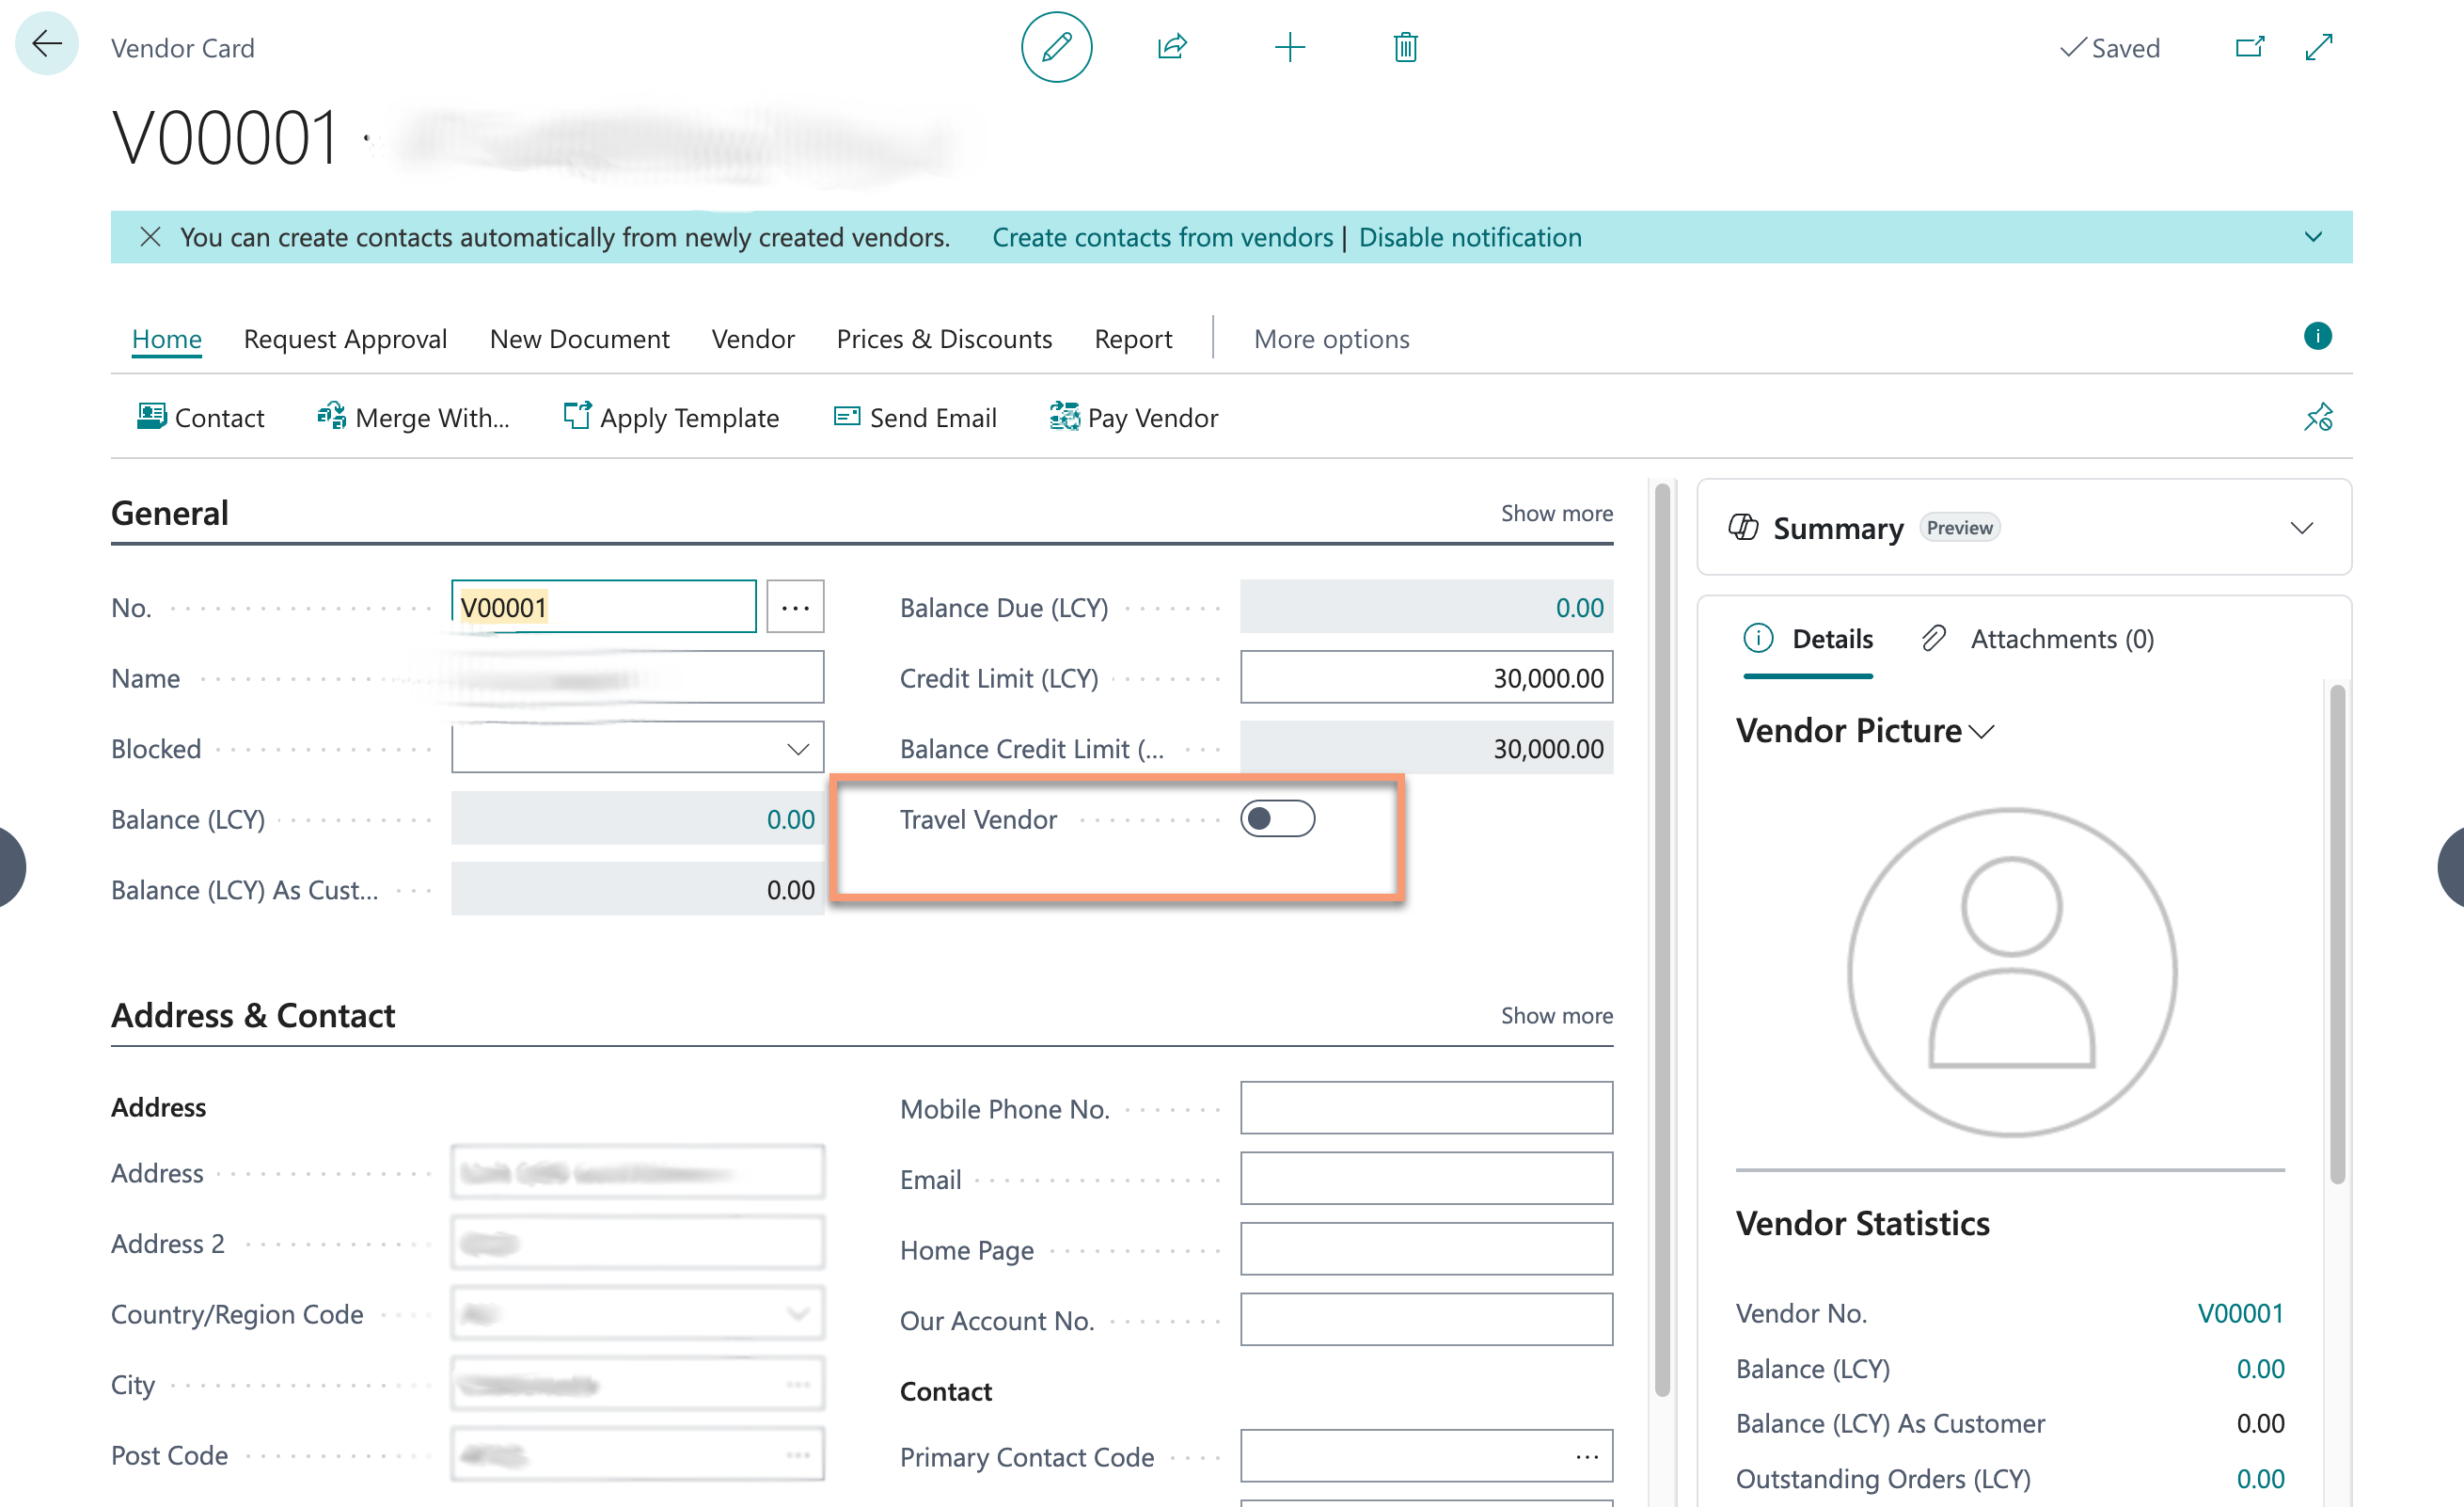
Navigate to: Search > Vendors.
On Vendor Card, there is a check mark for Travel Vendor, if this is ” = TRUE ” and when a Purchase Order is created than only the travel PO related fields are visible.
Travel PO Setup
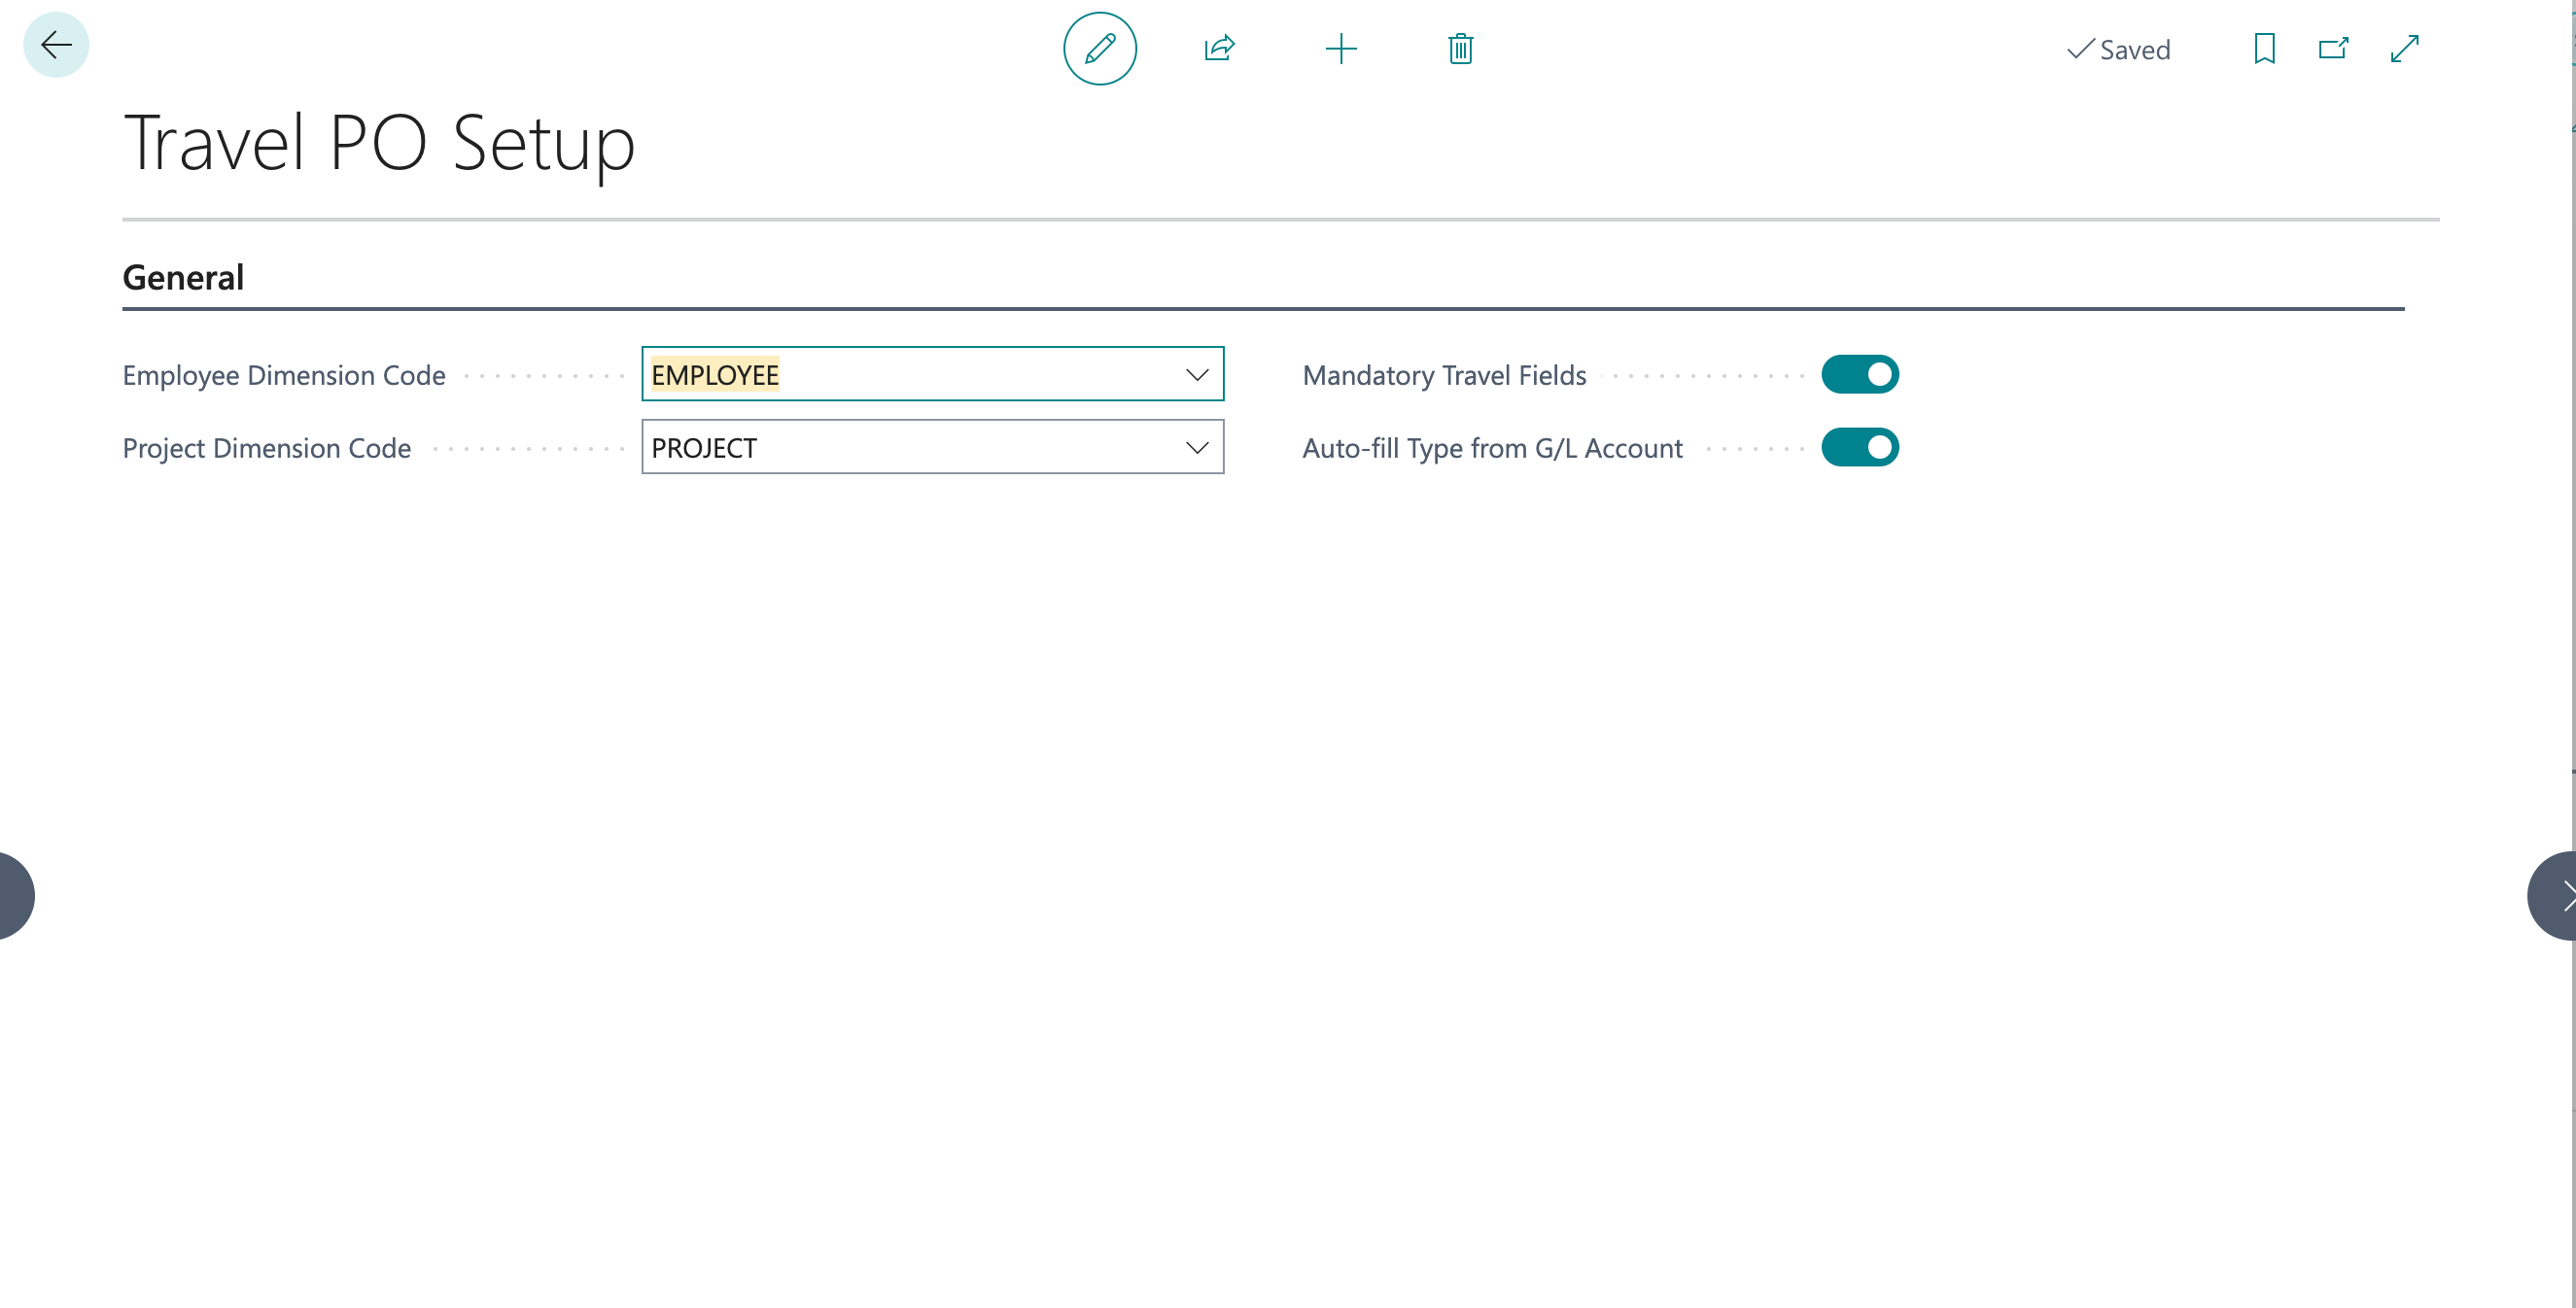
Navigate to: Search > Travel PO Setup.
This is a single-record global configuration that controls how the extension behaves across all purchase orders.
| Field | Description |
|---|---|
| Employee Dimension Code | The Dimension Code used to represent employees. The employee lookup on PO lines filters Dimension Values by this code. Typical values: EMPLOYEE. |
| Mandatory Travel Fields | When ON, the system enforces required-field validation (based on expense type configuration) at PO release and posting. When OFF, no validation is enforced — useful during initial rollout or data migration. |
| Auto-fill Type from G/L Account | When ON, the Travel Expense Type field is automatically suggested when a G/L Account is entered on a PO line, if that account matches a Default G/L Account configured in Travel Expense Type Setup. |
| Project Dimension Code | The Dimension Code used to represent Project. The Project lookup on PO lines filters Dimension Values by this code. Typical values: Project. |
Travel Expense Type Setup
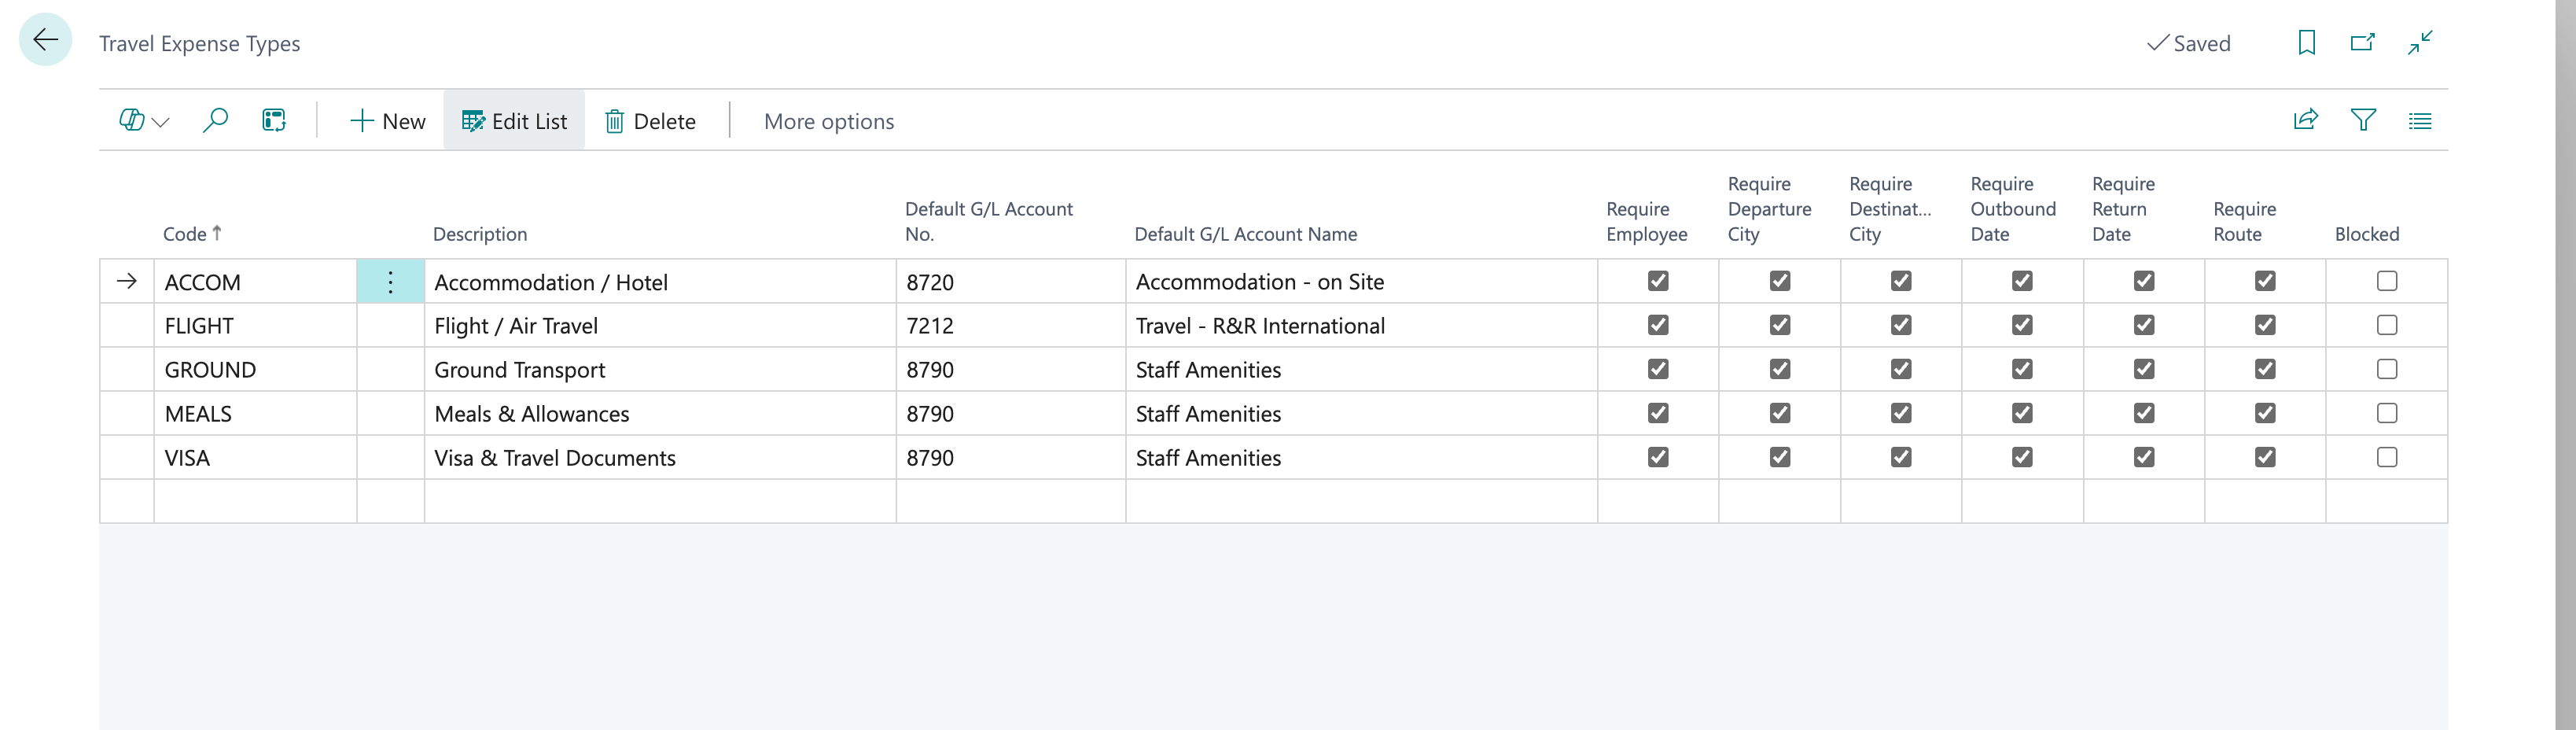
Navigate to: Search > Travel Expense Types.
Each expense type defines which fields are mandatory when that type is selected on a PO line. You can create any codes required for your organisation or start with the default set.
Insert Default Types
On the Travel Expense Types list, click Insert Default Types (under the Manage menu) to automatically create the standard set:
| Code | Description | Required Fields |
|---|---|---|
| FLIGHT | Flight / Air Travel | Employee, Departure City, Destination City, Flight/Stay Date, Date Return, Outgoing Leg. |
| ACCOM | Accommodation / Hotel | Employee, Departure City, Destination City, Flight/Stay Date, Date Return. |
| MEALS | Meals & Allowances | Employee. |
| GROUND | Ground Transport | Employee, Departure City, Flight/Stay Date, Date Return, Outgoing Leg. |
| VISA | Visa & Travel Documents | Flight/Stay Date, Date Return, Outgoing Leg. |
| OTHER | Other Travel Expense | Employee. |
Expense Type Fields
| Field | Description |
|---|---|
| Code | Short identifier (max 20 characters), e.g. FLIGHT, ACCOM. |
| Description | Full description displayed on purchase lines and in the reporting list. |
| Default G/L Account No. | G/L Account auto-suggested when Auto-fill Type from G/L Account is enabled. Map 7212 → FLIGHT, 7210 → ACCOM. |
| Require Employee | Employee must be set on any line using this type. |
| Require Departure City | Departure City is mandatory. |
| Require Destination City | Destination City is mandatory. |
| Require Outbound Date | Flight / Stay Date is mandatory. |
| Require Return Date | Date Return is mandatory. |
| Require Route | Outgoing Leg / Location is mandatory. |
| Blocked | Prevents this type from being selected on new lines. Existing records are not affected. |
Day-to-Day Usage
Travel details are entered directly on Purchase Order lines --- there is no separate screen to navigate to. The travel fields appear as additional columns on the standard PO lines subform.
Entering Travel Details on a Purchase Order
-
Open or create a Purchase Order in the usual way.
-
Add a purchase line --- set Type to G/L Account and enter the appropriate travel G/L Account (e.g. 7212 for Flight, 7210 for Accommodation).
-
The following travel columns are now available directly on the line:
| Column | Editable? | Description |
|---|---|---|
| Type | Yes — lookup | Travel Expense Type code (e.g. FLIGHT). Pick from the lookup or type directly. |
| Type Description | No (auto-filled) | Full description of the selected expense type, populated automatically. |
| Employee Code | Yes — lookup | Employee dimension code. Click ... to open the employee lookup. |
| Employee Name | No (auto-filled) | Employee full name, populated automatically from the dimension value. |
| Flight / Stay Date | Yes — date picker | Date of departure flight or start of accommodation stay. |
| Date Return | Yes — date picker | Return flight date or end of accommodation stay. |
| Departure City | Yes | City of departure (e.g. Port Moresby, Manchester). |
| Destination City | Yes | Destination city (e.g. Brisbane, Sydney). |
| Travel Notes | Yes | Free-text notes for any additional context on this travel line. |
Employee Lookup
Click the … button on the Employee column to open the Dimension Value list. This list is pre-filtered to show only values from the Employee Dimension configured in Travel PO Setup.
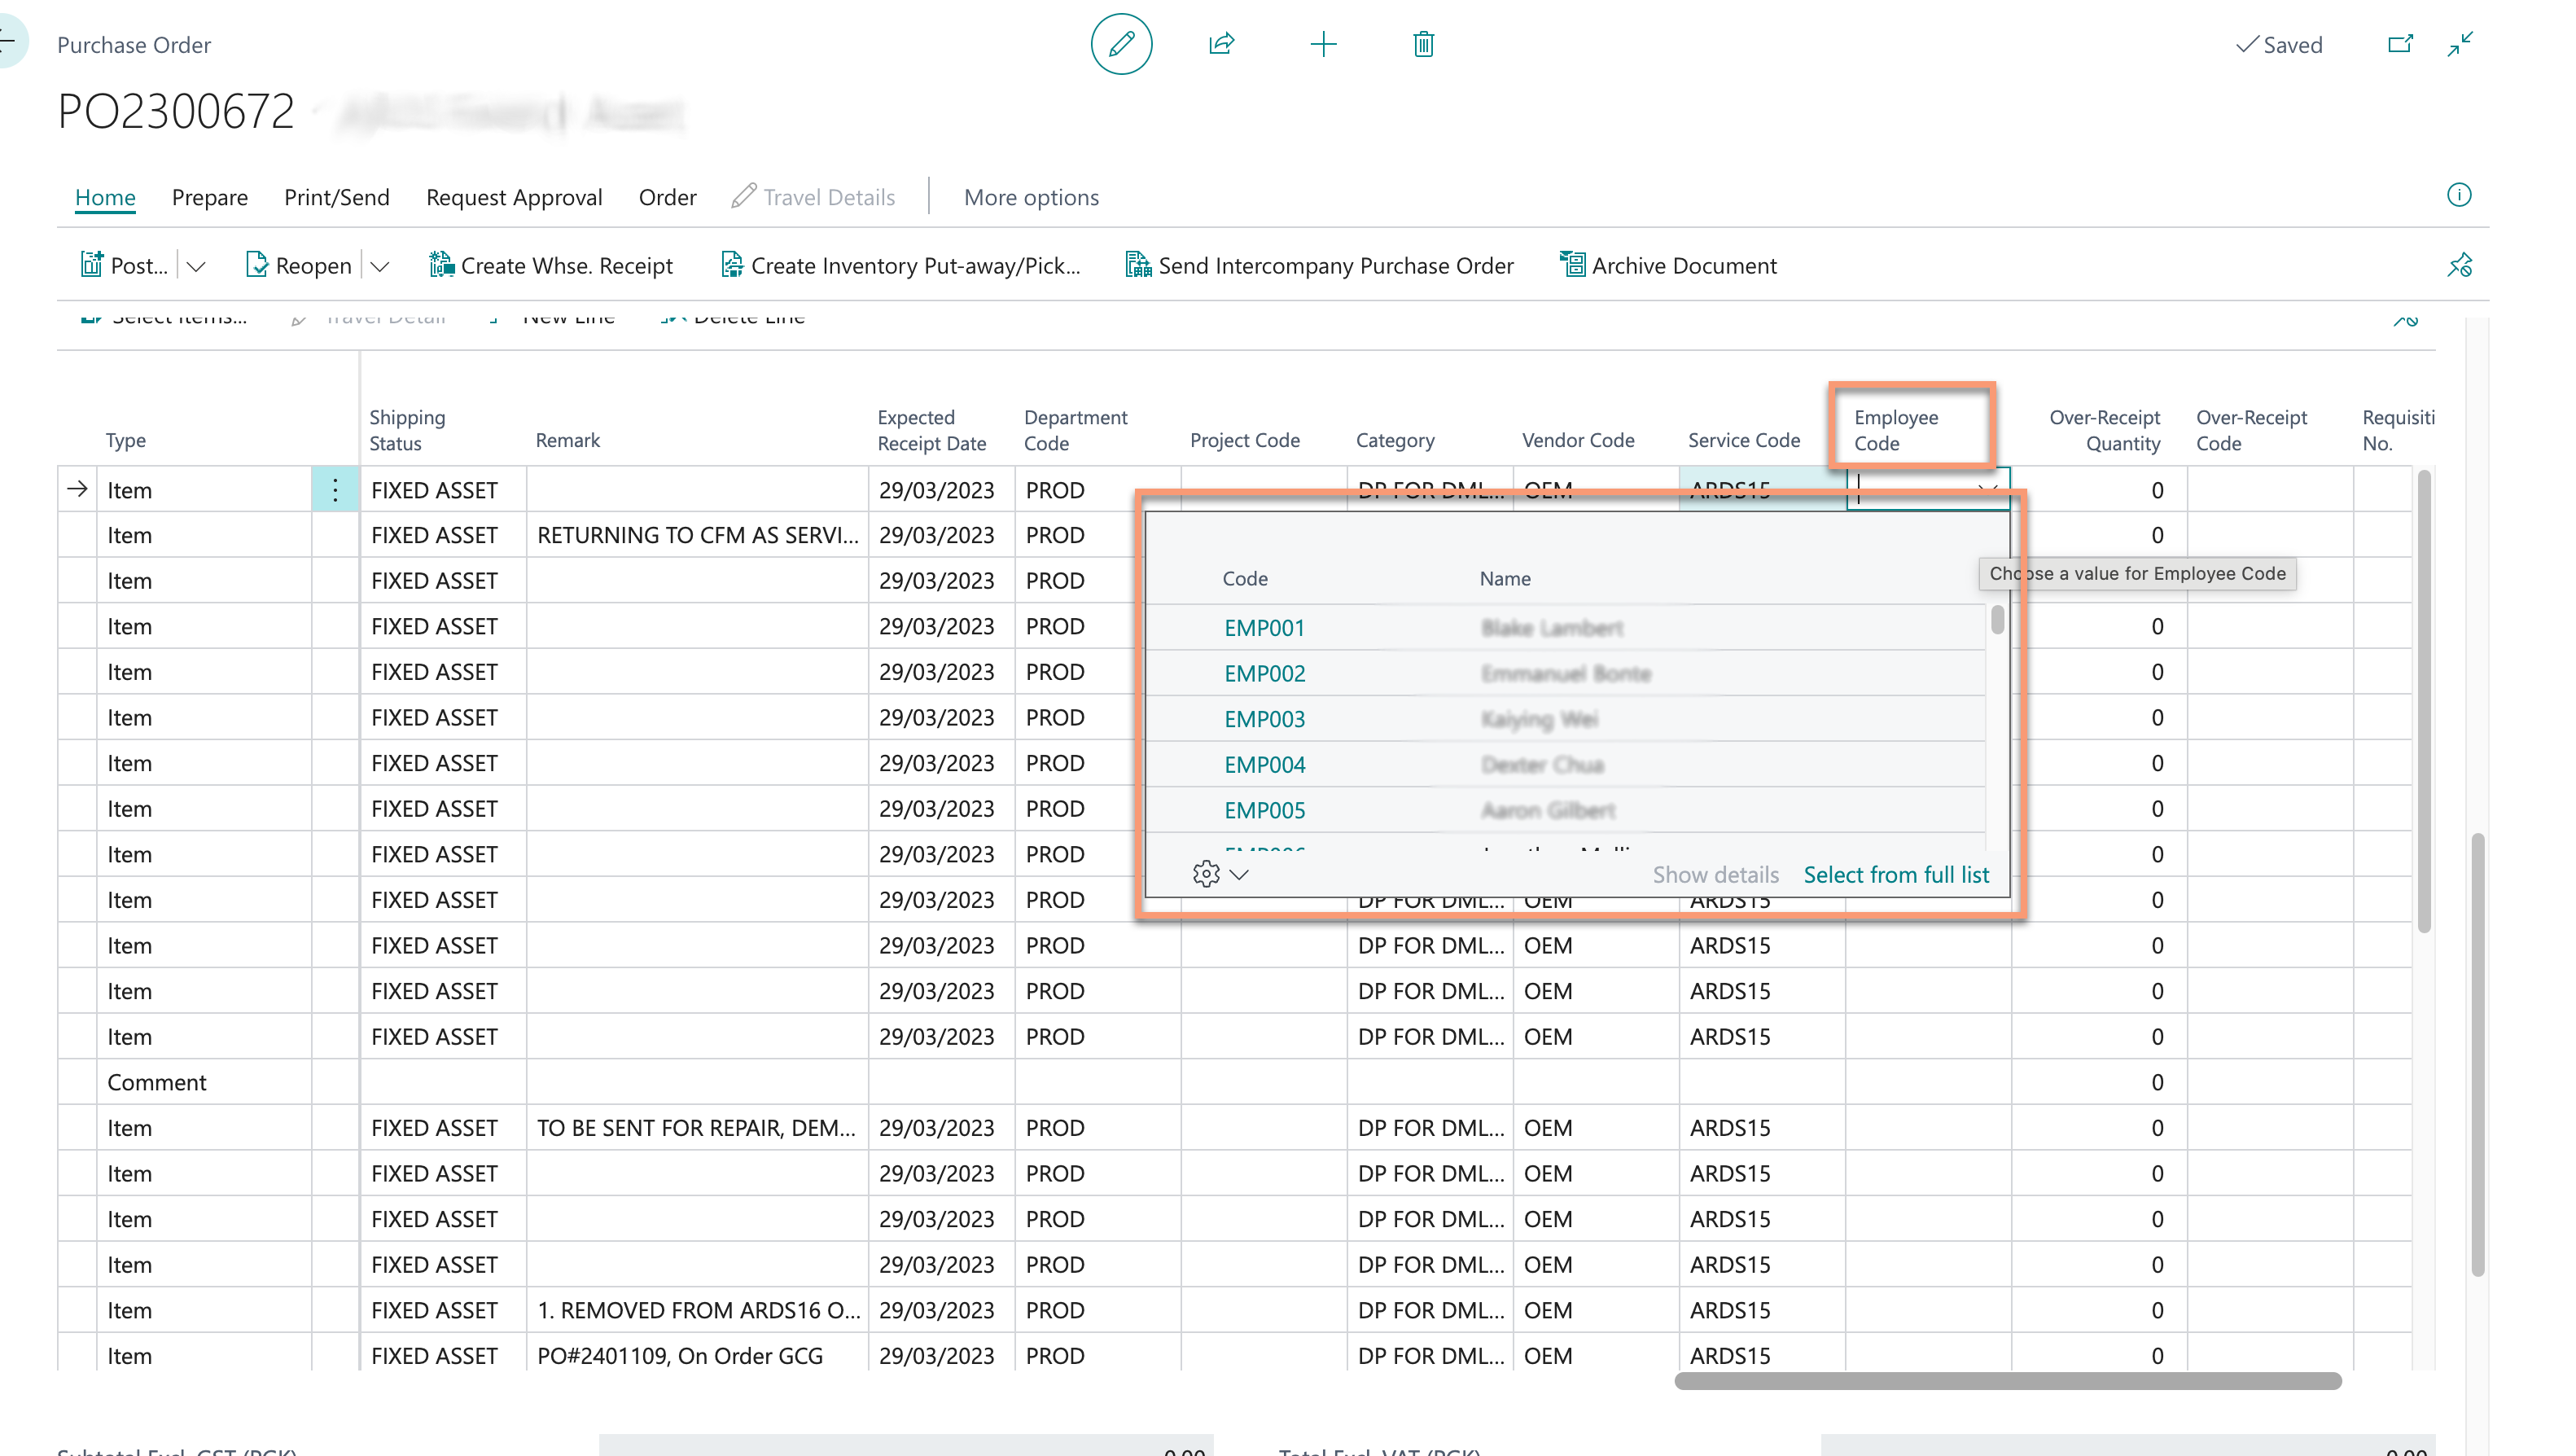
The employee lookup only shows Dimension Values from the dimension code set in Travel PO Setup > Employee Dimension Code. If the employee you need is not in the list, ask your administrator to add them to that dimension.
Auto-fill from G/L Account
If Auto-fill Type from G/L Account is enabled in Travel PO Setup, entering a G/L Account on a purchase line will automatically suggest the matching Travel Expense Type --- for example, entering G/L Account 7212 will auto-populate the Type field with FLIGHT if FLIGHT has 7212 set as its Default G/L Account.
The auto-fill is a suggestion only. You can overwrite it by selecting a different type from the lookup.
Multiple Employees on One Purchase Order
Purchase orders can contain multiple travel lines for different employees --- for example, a single PO from a travel agency covering flights for three team members. Each PO line captures its own separate travel detail record, so each employee, route, and date combination is recorded independently.
When the data is exported via the Reporting Page or Config Package, each employee trip appears as its own row, making the extract immediately usable for travel reporting.
Validation
Validation runs at two points if Mandatory Travel Fields is enabled in Travel PO Setup:
-
When releasing the PO (Release button)
-
When posting the PO (as receipt or invoice)
If required fields are missing for any line with an expense type set, an error message identifies exactly which fields are incomplete and for which line number. The release or posting is blocked until resolved.
Example: Travel detail validation failed for PO Line 10000: — Employee is required for expense type FLIGHT — Outbound Date is required.
Lines with no expense type set are skipped by validation --- only lines where a Type has been entered are checked. This means non-travel lines on the same PO are not affected.
Travel Details on Posted Documents
When a Purchase Order is posted, all travel fields are automatically copied to the resulting posted documents. No additional action is required.
| Posted Document | Fields Visible |
|---|---|
| Posted Purchase Receipt Lines | Type, Employee Name, Flight / Stay Date visible by default. All other fields available via column chooser. Read-only. |
| Posted Purchase Invoice Lines | Type, Employee Name, Flight / Stay Date visible by default. All other fields available via column chooser. Read-only. |
Reporting & Export
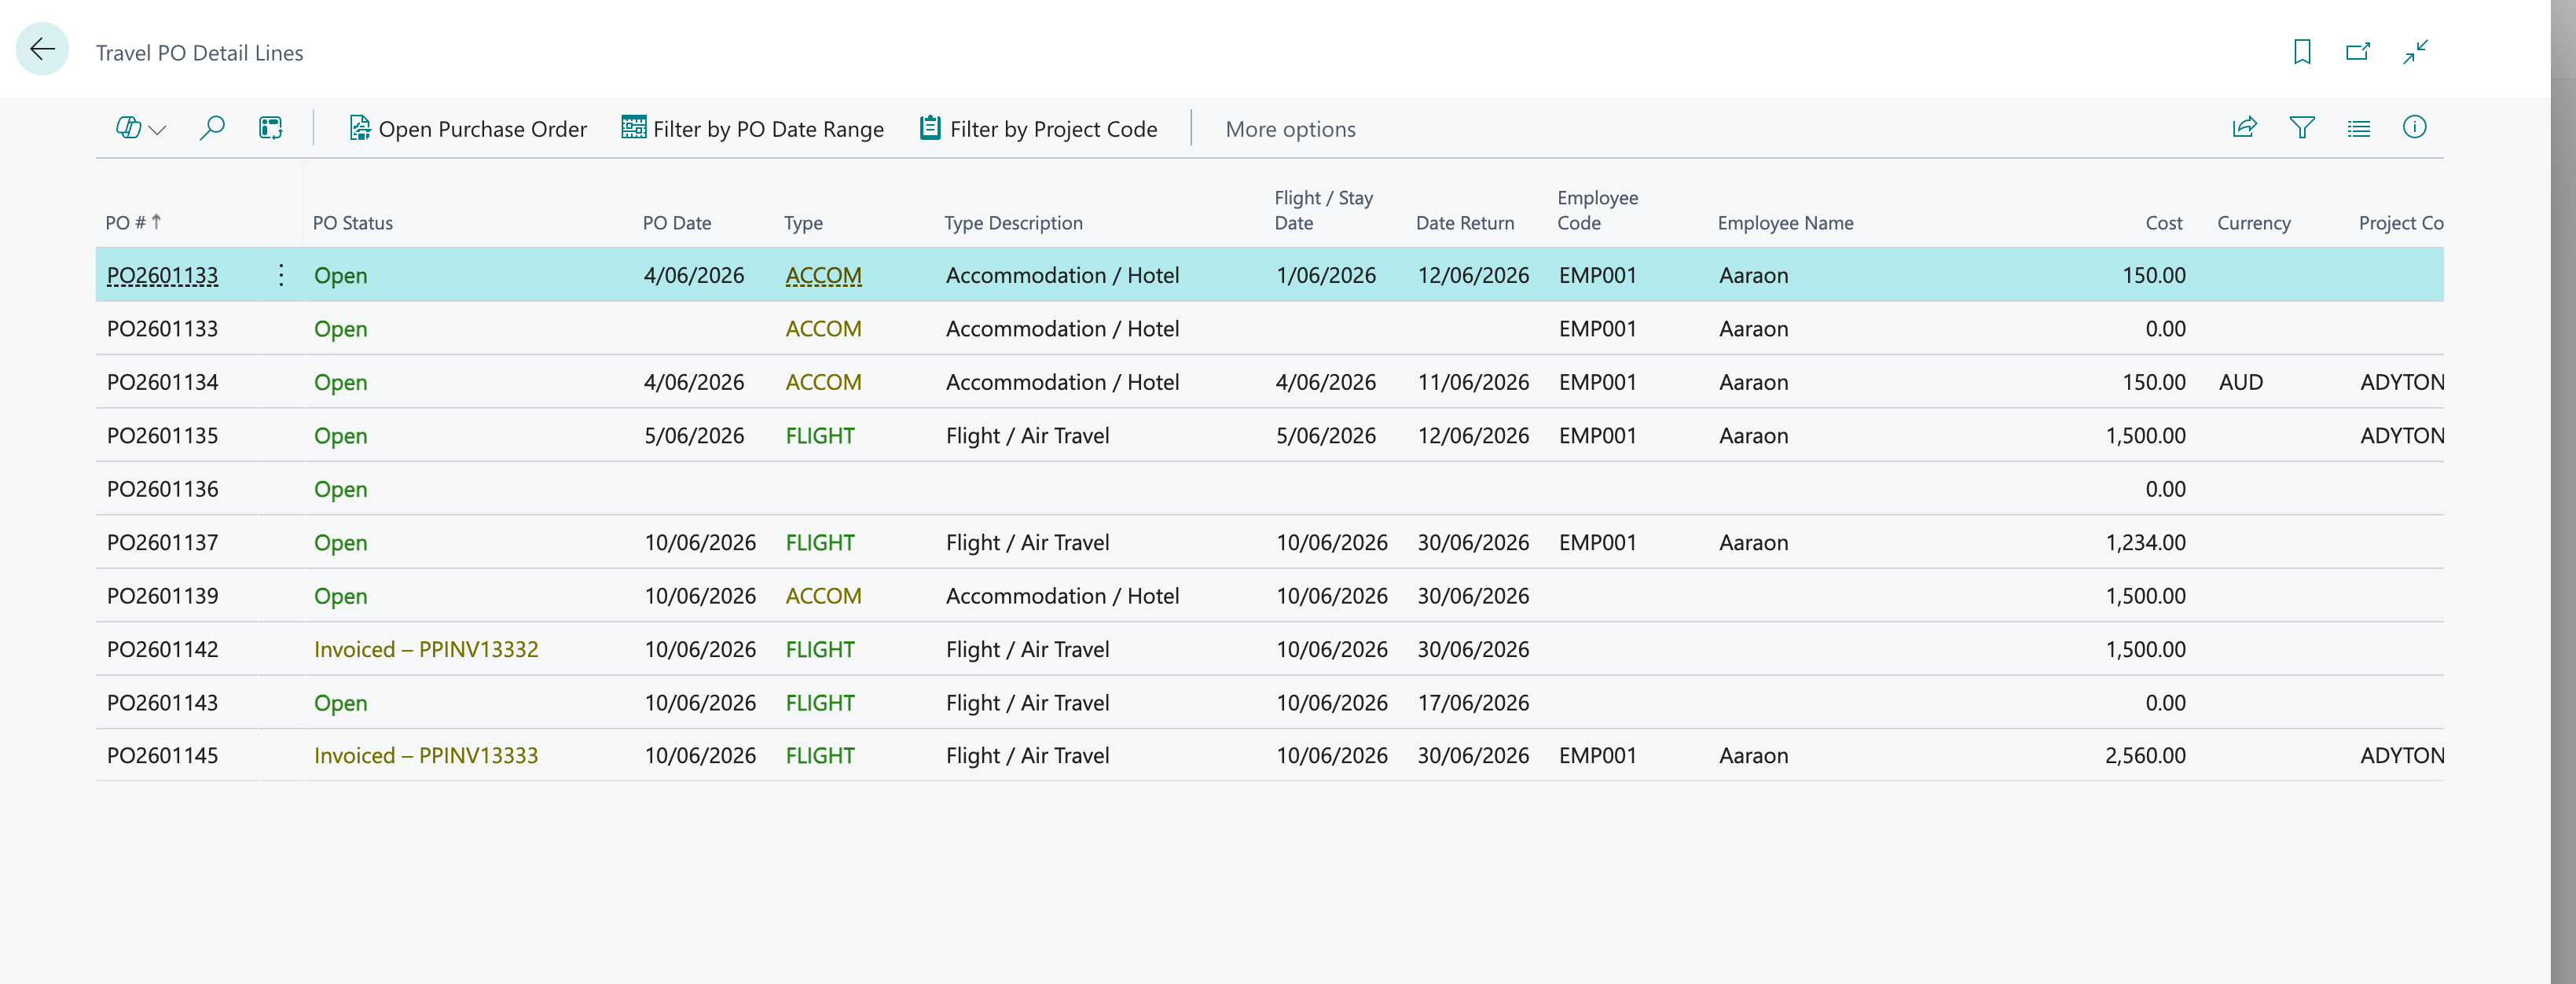
The Travel PO Detail Lines page provides a flat list of all travel detail records across all purchase orders. This is the primary reporting view and the source for Manu-style travel extracts.
Travel PO Detail Lines Page
Navigate to: Search →>Travel PO Detail Lines.
All columns are available in this view:
| Column | Description |
|---|---|
| PO # | Purchase Order number. |
| PO Date | Date on the Purchase Order header. |
| Type | Travel Expense Type code. |
| Type Description | Full expense type description. |
| Flight / Stay Date | Date of departure flight or start of stay. |
| Outgoing Leg / Location | Outbound route, e.g. POM > BNE. |
| Date Return | Return date. |
| Incoming Leg / Location | Return route, e.g. BNE > POM. |
| Employee Name | Employee full name. |
| Cost | Line amount excluding VAT, synced from the PO line. |
| Currency | Currency code from the Purchase Order. |
| Project Code | Job No. / Project Code from the PO line. |
| Project Description | Job description. |
| Vendor | Vendor name — any vendor, not restricted. |
| G/L Account | G/L Account No. from the PO line. |
| Departure City | City of departure. |
| Destination City | Destination city. |
Filtering for Export
Use the standard BC Filter pane to narrow the extract before exporting:
- Press Shift+F3 (or click the funnel icon) to open the Filter pane.
- Add a filter on PO Date for a date range, e.g. 01/01/2026 .. 31/03/2026.
- Add a filter on Project Code to restrict to a specific project.
- Combine both filters to produce a project-specific period extract.
Export to Excel
- Apply any date or project filters required.
- Click Share (the … icon in the top-right) → Open in Excel.
- BC exports all visible rows to an Excel workbook with all columns.
- The resulting file can be saved, formatted, or forwarded as required.