SharePoint Site Configuration for Microsoft Dynamics 365 User Guide
Introduction
SharePoint Site Configuration seamlessly connects your Microsoft Dynamics 365 environment with SharePoint Online, enabling robust, cloud-based document management across your business workflows. By configuring target sites and folder hierarchies, your team can attach, share, and collaborate on files directly from Dynamics 365 records while keeping database storage light and organised.
Overview of Benefits
SharePoint sites provide the following benefits:
-
Cost & Storage Optimisation: Storing files in SharePoint saves expensive Dynamics 365 database/blob capacity.
-
Unified Collaboration: *Accessing SharePoint co-authoring and file features directly inside Dynamics 365.
-
Structured Organisation: Automatic folder provisioning based on entities (Accounts, Opportunities, Cases, etc.).
Accessing SharePoint
You can open SharePoint through several routes depending on where you are working from:
Web Browser (Direct Access)
-
Microsoft 365 Portal: Go to office.com, sign in with your work or school account, click the App Launcher (the 9 dots icon in the top-left corner), and select SharePoint.
-
Direct SharePoint URL: Navigate directly to
https://<your-company-name>.sharepoint.comin any browser.
Microsoft Teams
- Channel Files Tab: Open any channel in Teams, click the Files tab at the top, and click Open in SharePoint in the action bar. This opens the exact SharePoint document library backing that channel.
Microsoft Dynamics 365
- Document Tab: On any record (such as an Account, Opportunity, or Invoice) that has document management enabled, go to the Files or Documents tab and select Open Location > Open in SharePoint.
File Explorer (Windows Desktop)
- OneDrive Sync: If this is configured or mapped to the document library, you can open SharePoint files directly from your PC’s File Explorer under your company’s name in the left sidebar.
Site Configuration
Create a New Site
First, you must have SharePoint open. We will create a new SharePoint site.
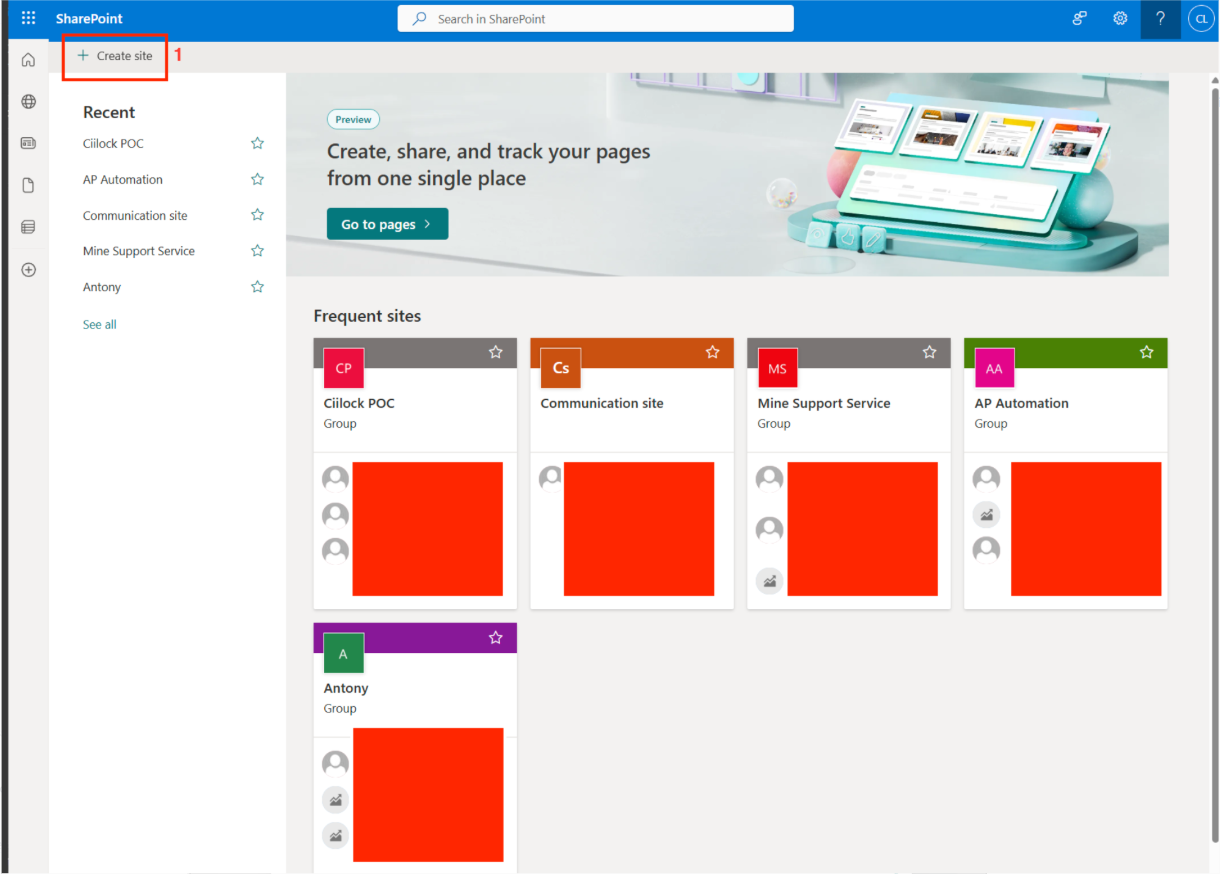
- Open SharePoint and click on Create site.
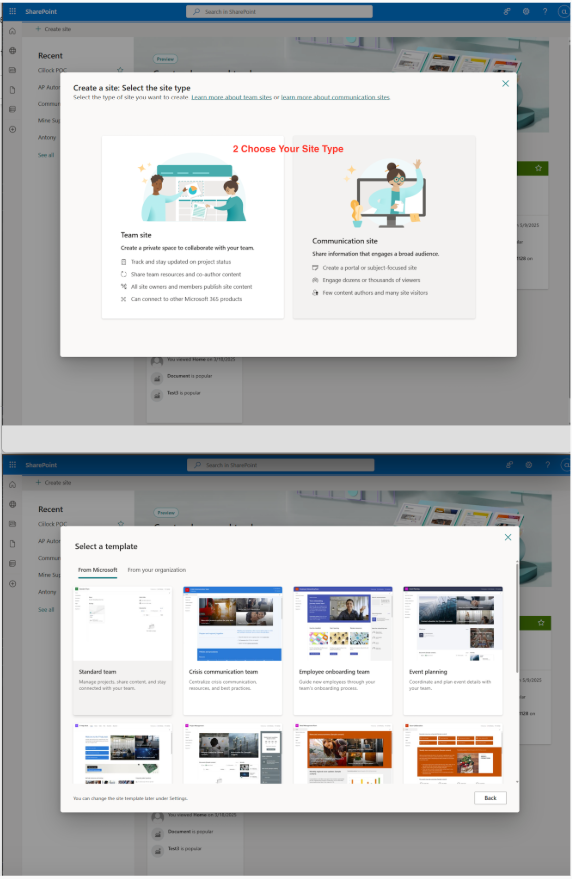
- Select the site type, Team site or Communication site. Then select a template for the site.
- Give your site a name in the Site name. Fill out the other fields. Click the Next button to continue.
When naming sites in SharePoint Online, following clear naming conventions prevents URL broken links, administrative confusion, and security/governance issues. Because a SharePoint site name directly dictates its default URL, Microsoft 365 Group, Teams channel, and Shared Mailbox, naming decisions carry broad operational impact.
Site Name Conventions
For example, you can follow these conventions for giving your site a name:
| Pattern Type | Format / Template | Example Site Name | Resulting URL |
|---|---|---|---|
| Department / Function | [Dept] - [Function] | FIN - Accounts Payable | /sites/FIN-AccountsPayable |
| Project-Based | PRJ - [Project Name] | PRJ - ERP Migration 2026 | /sites/PRJ-ERPMigration2026 |
| Regional / Location | [Region] - [Dept] | UK - Human Resources | /sites/UK-HumanResources |
| Confidential / Restricted | [Dept] - [Topic] (Private) | HR - Executive Compensation | /sites/HR-ExecutiveCompensation |
| Hub / Portal | Hub - [Topic] | Hub - Employee Portal | /sites/Hub-EmployeePortal |
(Click the Back button to return to the previous screen)
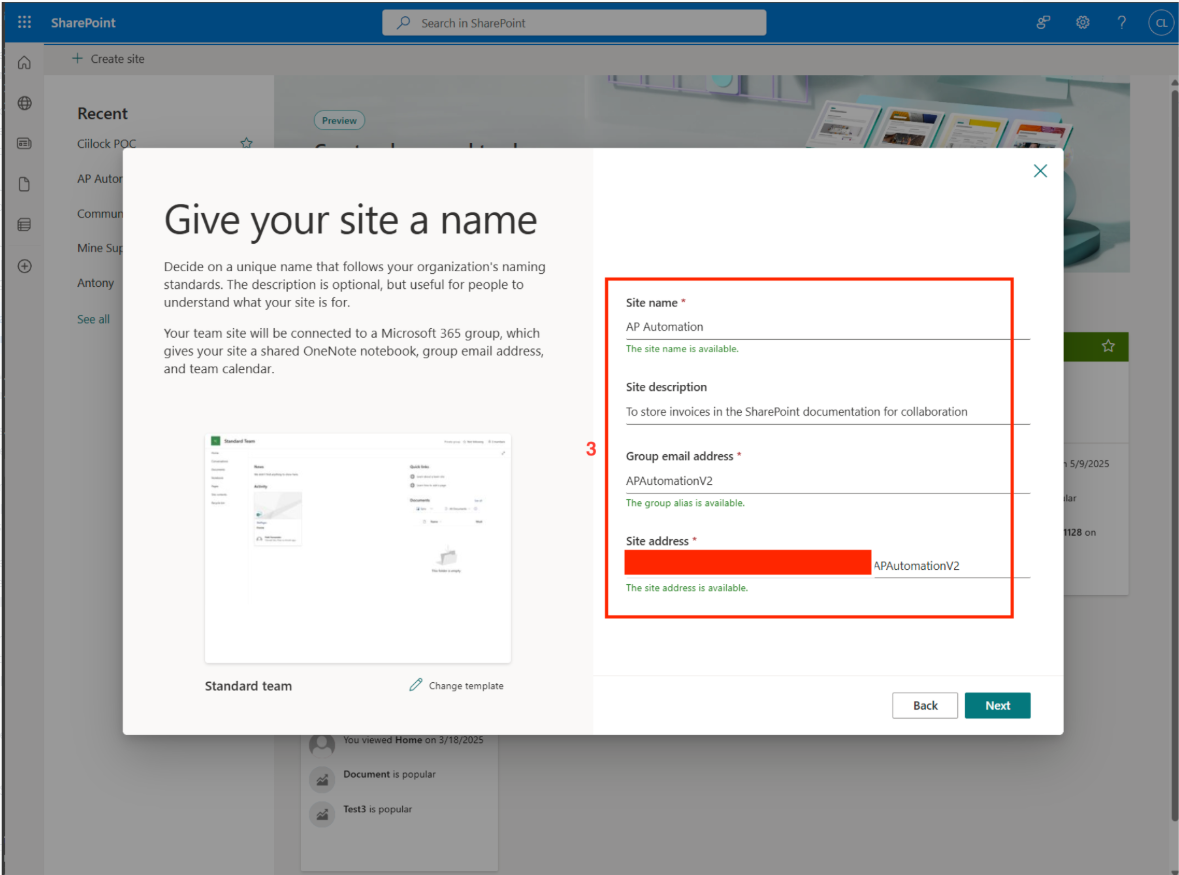
This will assign the following to your site:
- Microsoft 365 Teams Group
- OneNote Notebook
- Group Email address
- Team Calendar
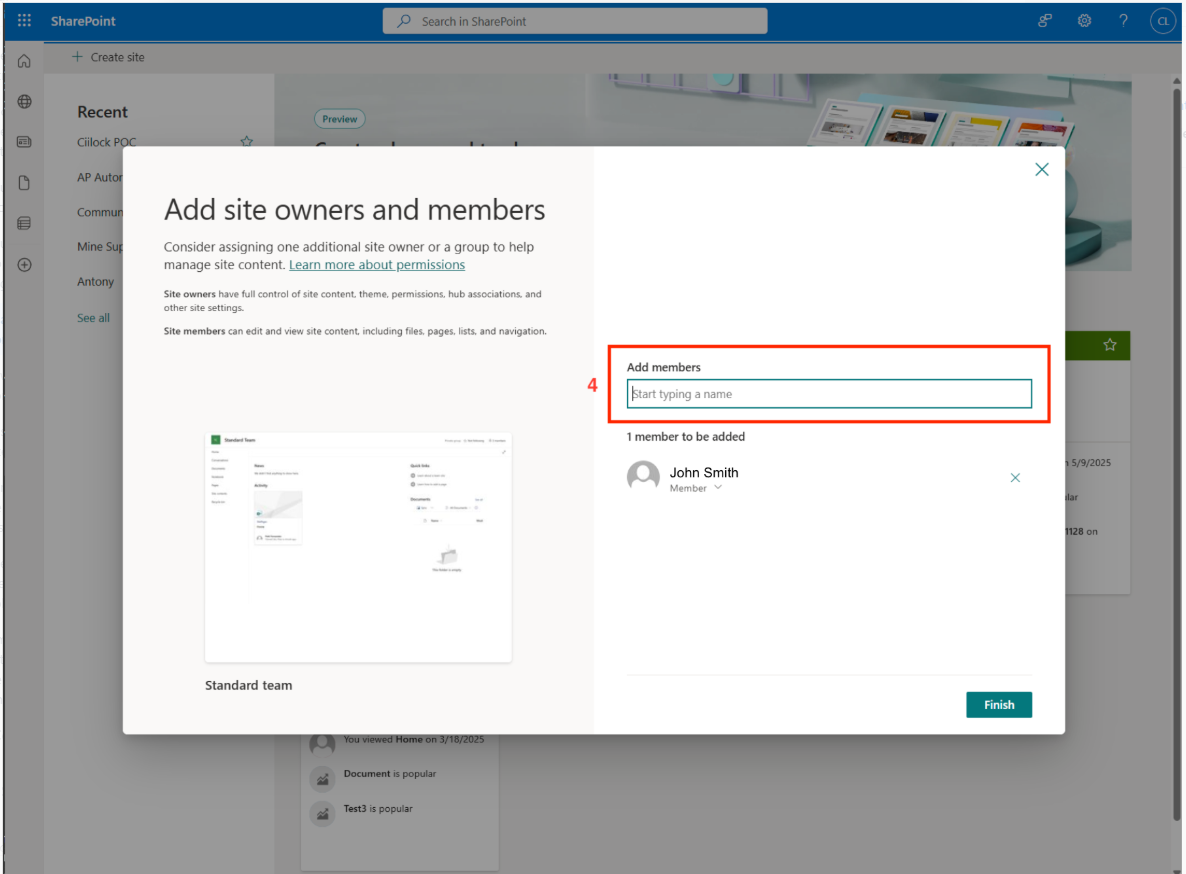
- Add your members to the site in Add site owners and members. Click the Finish button to finalize the creation of your site.
Site Owners & Members
Managing access to a SharePoint site relies on assigning users to built-in permissions groups, primarily Site Owners and Site Members.
Site Owners (Full Control): Have administrative access to manage site settings, customize layouts, modify permissions, and control who can view or edit content.
Site Members (Edit Access): Can create, edit, upload, and delete documents, lists, and pages, making them the active collaborators on the site.
Create A New Folder
We will now create a new folder.
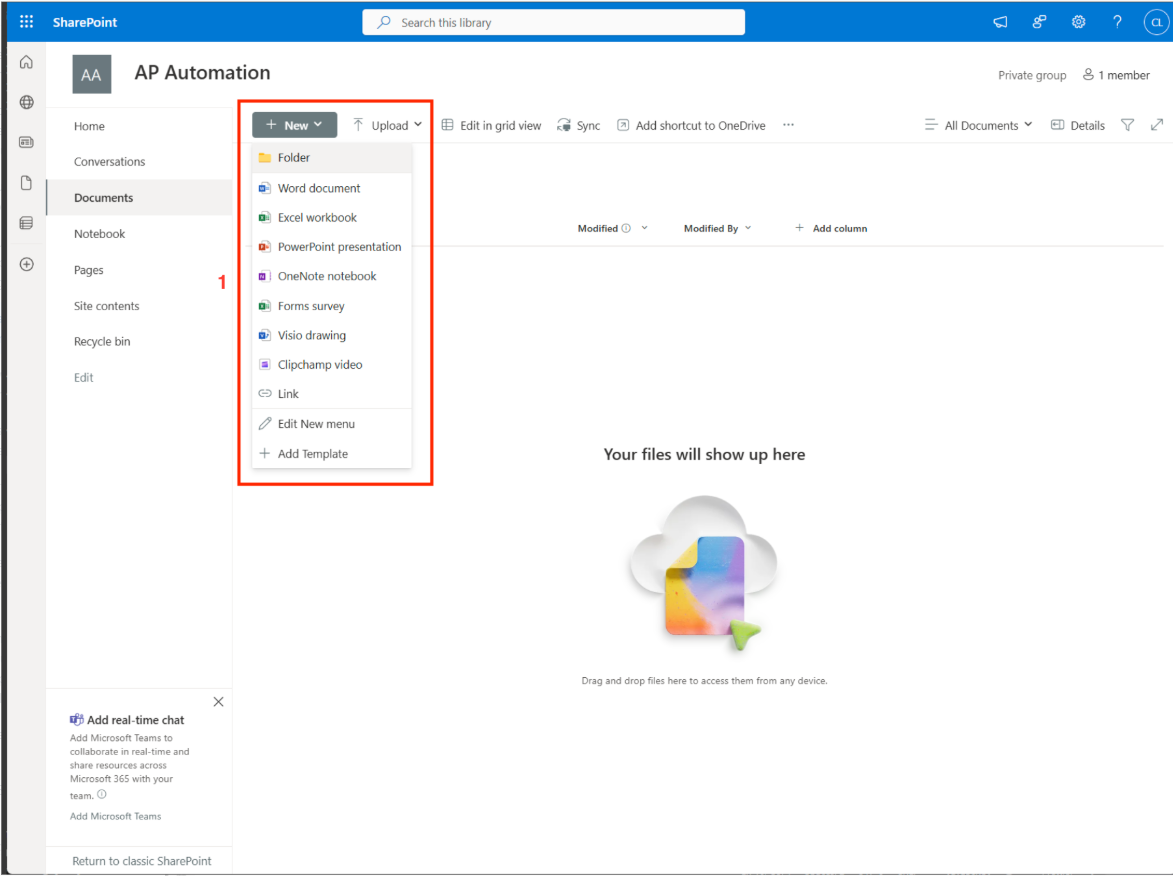
- In the Documents tab, click on New and then select Folder. You will need to give the folder a name. Give the folder a name appropriate for the app (or project).
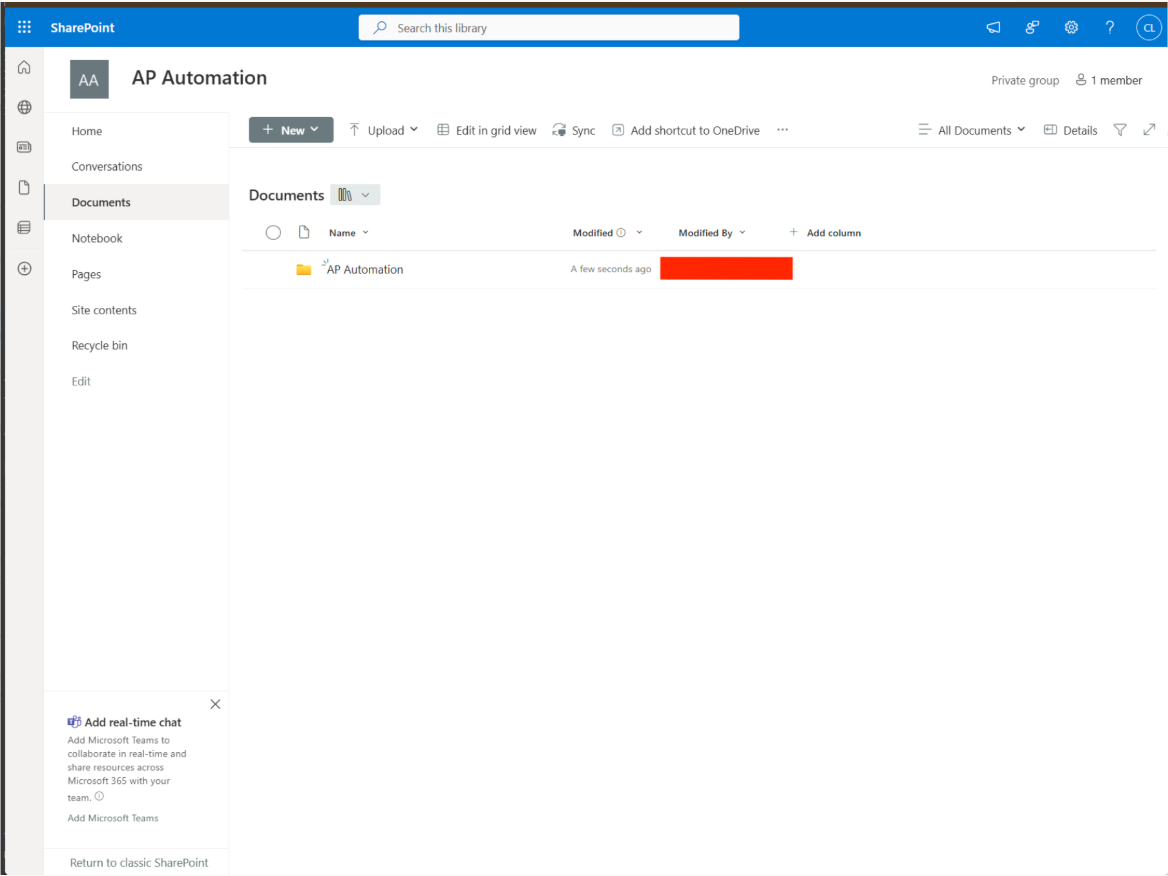
You should now see the folder appear in the Documents tab view.
Site Folders
Creating folders in a SharePoint site helps organize documents within a document library, functioning similarly to traditional file storage:
Creation: Inside any Document Library, click + New in the top action bar and select Folder, then enter a descriptive name.
Navigation & Drag-and-Drop: You can drag and drop files directly from your computer into specific SharePoint folders or subfolders.
Best Practices: Keep folder hierarchies shallow (3–4 levels max) to prevent hitting Windows’ 400-character overall path length limit.