Vendor Portal for Dynamics 365 Business Central User Guide
Are you ready to try the solution or have questions?

Introduction
A Vendor Portal for Microsoft Dynamics 365 Business Central is a secure, web-based self-service application that connects suppliers directly to an organsation’s Business Central ERP system. Instead of relying on manual email threads, phone calls, and paper invoices, the portal provides a centralized interface where vendors can view real-time data, manage orders, submit invoices, and maintain their account details.
Overview
Purpose
- A comprehensive solution for seamless vendor management.
- Simplifies the processes of vendor registration, association, and operations.
Key Features
- User Registration: Easily onboard new users.
- Vendor Registration & Association:
- Register new vendors through application forms.
- Create association requests with existing vendors.
- Centralized Dashboard:
- Manage catalogues, purchase orders, invoices, and quotes in one place.
Key Functionalities
Vendor Dashboard
- Create and manage catalogue items for display.
- Access comprehensive views of:
- Purchase Quotes
- Purchase Invoices
- Purchase Orders
Enhanced Vendor Interaction
- Pull real-time data from Business Central.
- Drill down into line items for detailed order, invoice, and quote management.
Sign Up/Sign In
In this section, we will discuss how to sign up/sign in to the portal. Follow these steps:
- Go to:
https://<URL Link>
NOTE: The URL link will be provided by d365.global for the Vendor Portal. This is specific to your organization and will be used to access the portal.
-
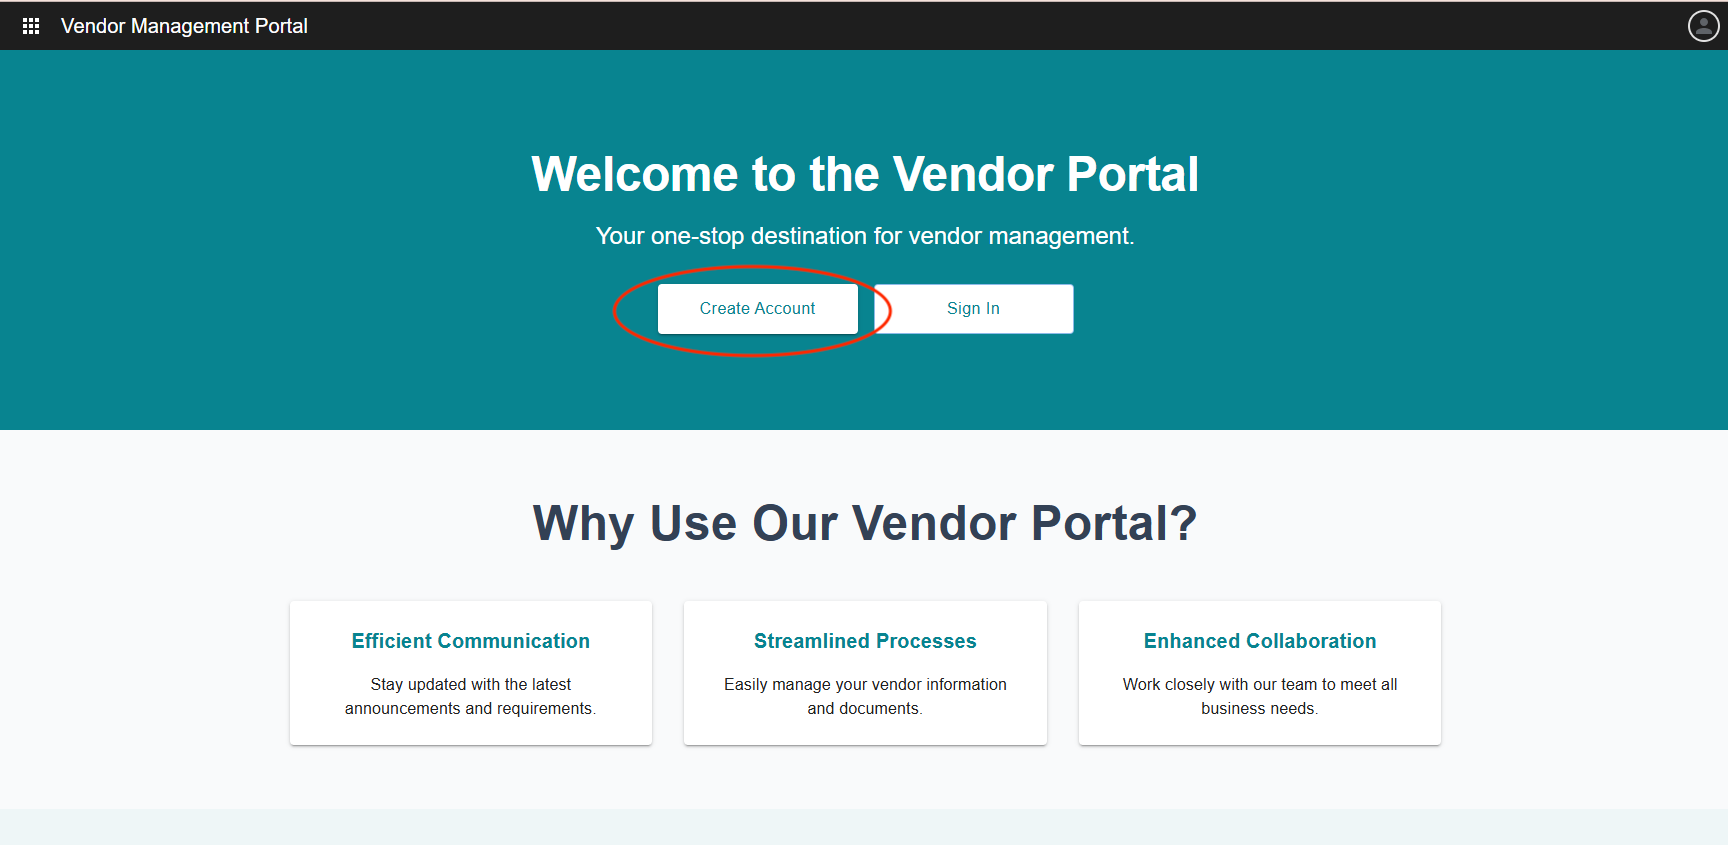
Sign up (to create a new account, if this is the first time you are accessing the portal).
-
Provide your Email Address and Password for initial sign up credentials to create account. Click the Create Account button and follow the required fields.
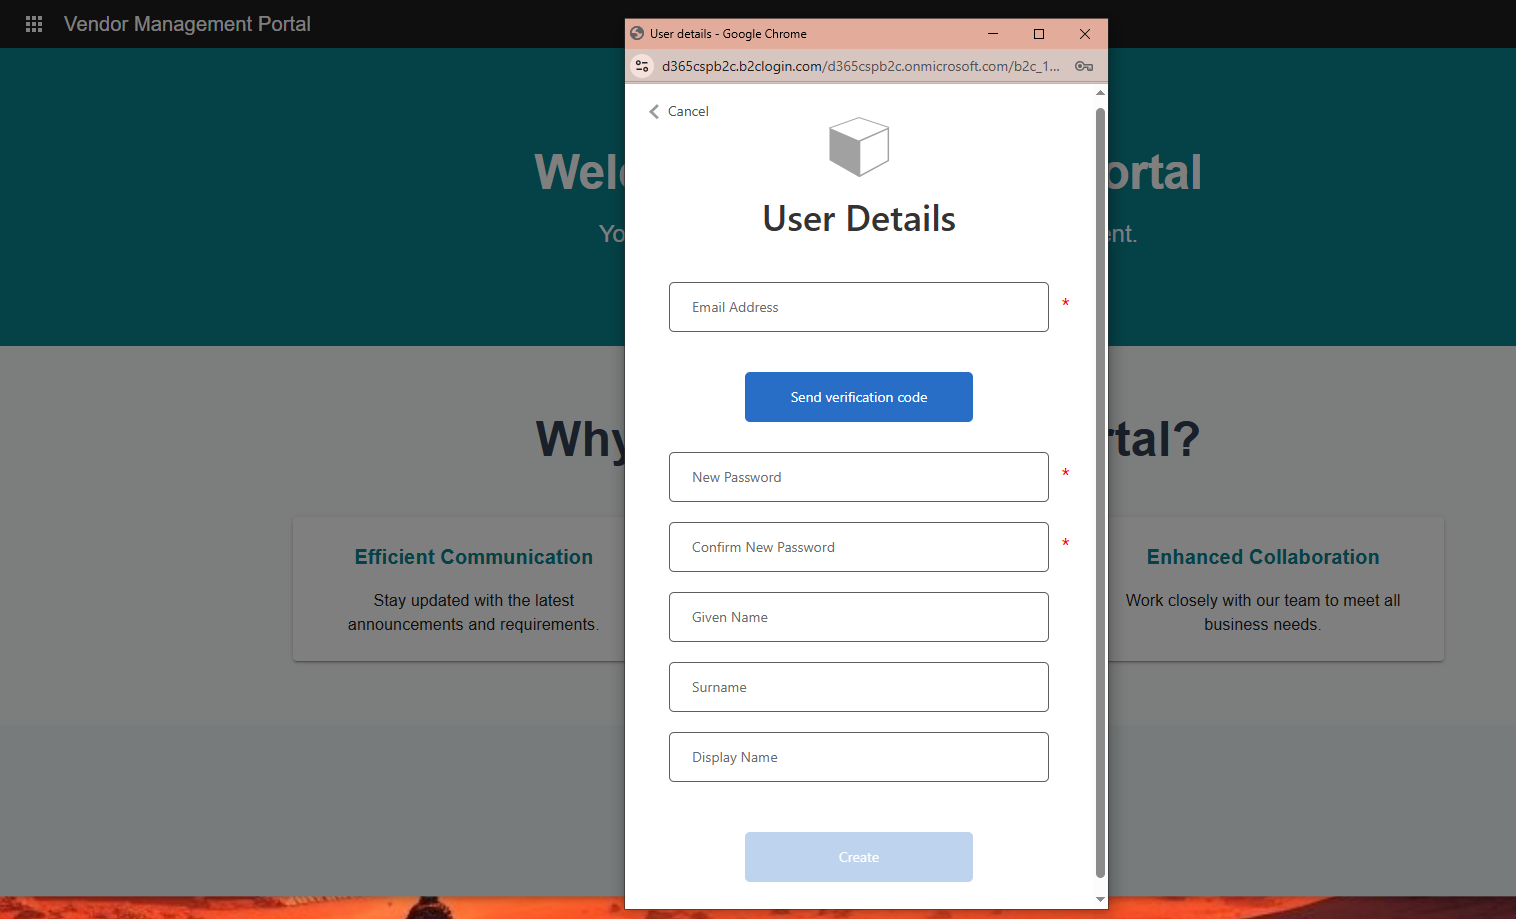
Enter the required details and click the Create button.
NOTE: Fields with an asterisk (*) are required.
Fields to Fill Up:
- Email Address* — Enter your email address.
Click Send verification code to verify and register your email address. You will receive a verification code in your email inbox. Enter the code in the Verification Code field.
- New Password* — Enter a new password for your account.
- Confirm New Password* — Re-enter the new password to confirm it.
The following fields are optional and can be filled in later:
- Given Name — Enter your first name.
- Surname — Enter your last name.
- Display Name — Enter a display name for your account.
After you fill up the required details, click the Create button to proceed. You will receive a confirmation email to verify your account. Once verified, you can sign in to the portal.
-
- Once you have signed up, you can now sign in using your credentials by clicking the Sign In button (this is in the Welcome page of the Vendor Portal i.e. Welcome to the Vendor Portal).
-
Registration Page
- Select New Vendor
- Add details - * is required fields
- Upload supporting documents
- Admin will process and confirmation will be sent via email
- Associate with existing vendor
- Enter Vendor number or name
- Admin will process and confirmation will be sent via email
- Select New Vendor
-
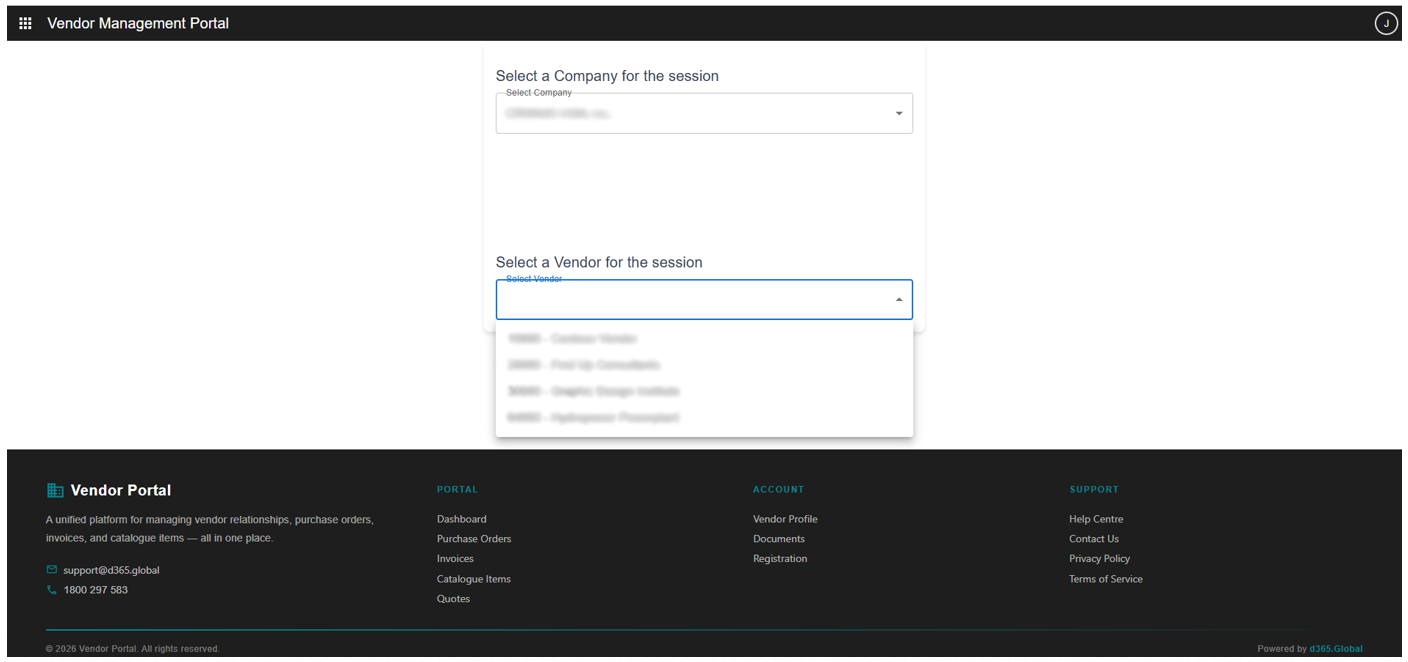
Vendor Selection Page
- Select an associated vendor from the dropdown to work with on the portal.
-
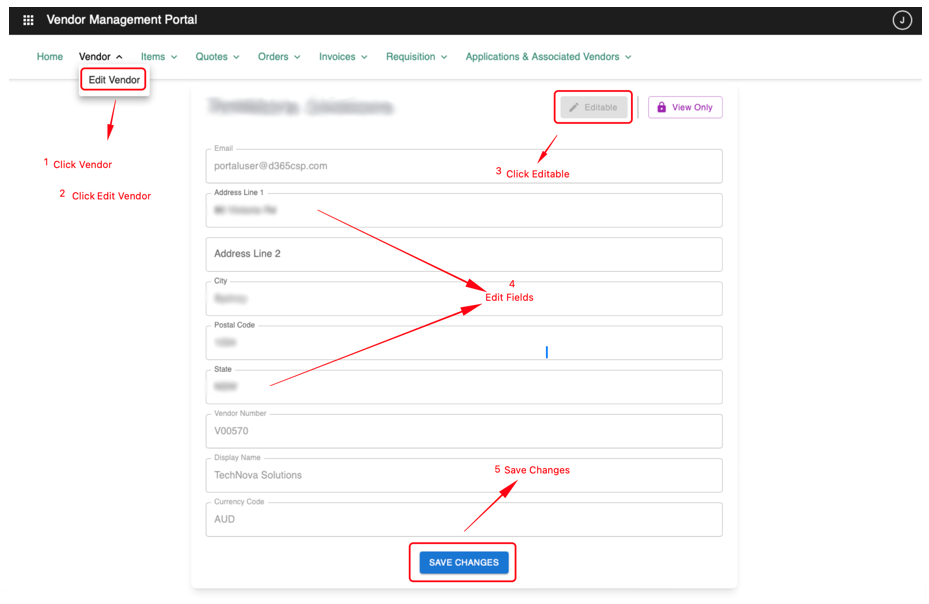
Vendor Menu
- Edit Vendor
- Can update address details
- View Vendor
- Can see Vendor details
- Edit Vendor
-
Items Menu
- Items Catalogue
- View/Edit Catalogue items
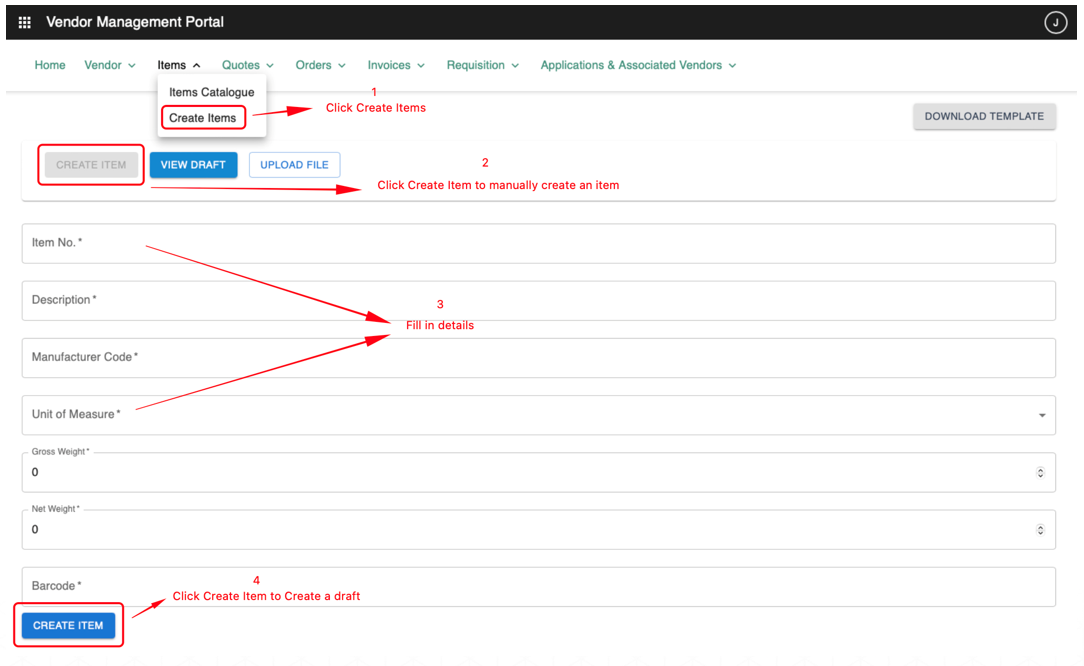
- Create Items
- Create/Bulk Upload Catalogue items
- Items Catalogue
-
Purchase Invoices Menu
- Select Draft Invoices
- View all drafted invoices.
- Select eye icon to view the related invoice lines.
- Select Open Invoices
- View all open orders.
- Select eye icon to view the related invoice line.
- Select Paid Invoices
- View all paid invoices
- Select eye icon to view the related invoice lines
- Select Draft Invoices
-
Purchase Quotes Menu
- Select All/ Draft/ Open Quotes
- Click View Icon to view the related quote lines
- Place bid on open Quotes and Save/Submit Quotes
-
Applications & Associated Vendors Menu
- Select Change Vendor Selection
- Select an associated vendor from the dropdown to navigate the portal as a different vendor
- Select Edit/View Applications
- View all applications submitted by you
- Edit Pending Applications by clicking the edit icon
- Edit fields - * is required fields
- Click Update Application
-
Create New Application
- Click New Vendor to submit a new Vendor Application form
- Click Existing Vendor to request association with an existing vendor
- After submission, user is redirected to View Applications page
Create or Associate A Vendor
In this section, we will discuss how to create a new vendor or associate with an existing vendor.
Create New Vendor Registration
This is the New Vendor Registration process.
- Click New Vendor
- Fill in details
- Submit Form by clicking Submit Application button
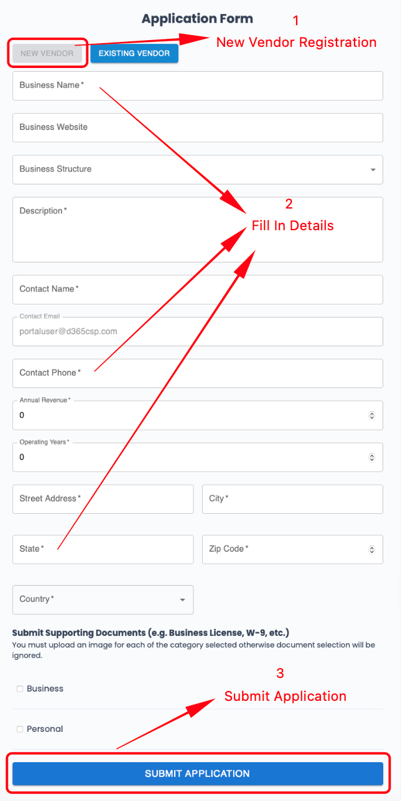
Request Association with Existing Vendor
Request Association
- Click Existing Vendor
- Fill in details
- Click Submit Request
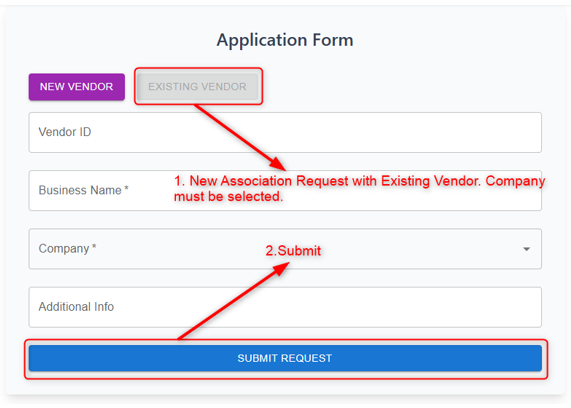
Select a Vendor for the Session
Once the Application Form or Association Request is approved by the Admin, select a vendor to work with for the session on the Portal.
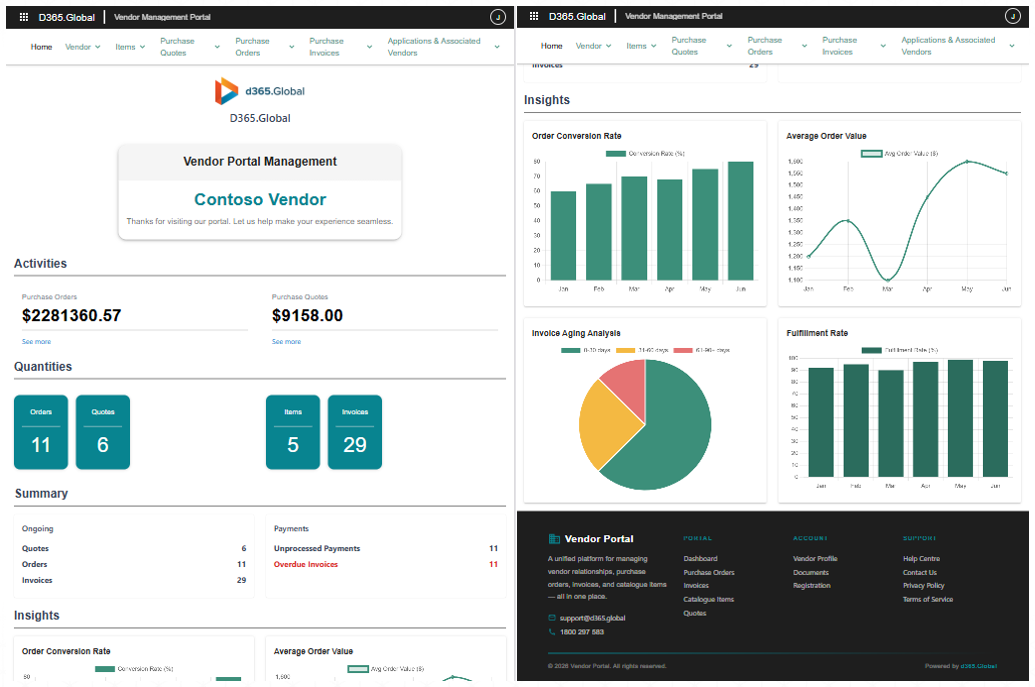
Vendor Dashboard
This is the main dashboard for the Vendor Portal. It provides a centralised view of all the functionalities available to the vendor, including managing catalogue items, purchase orders, invoices, and quotes.
Edit/View Vendor Data
To edit or view the vendor details, follow these steps:
- Click Vendor
- Click Edit Vendor
- Click Editable
- Edit fields (enter data)
- Click Save Changes
Create Catalogue Items Manually
- Navigate to Create Items to create Catalogue Items
- Click Create Item to manually create an item
- Fill in details
- Click Create Item to create a draft
Create Catalogue Items using Excel
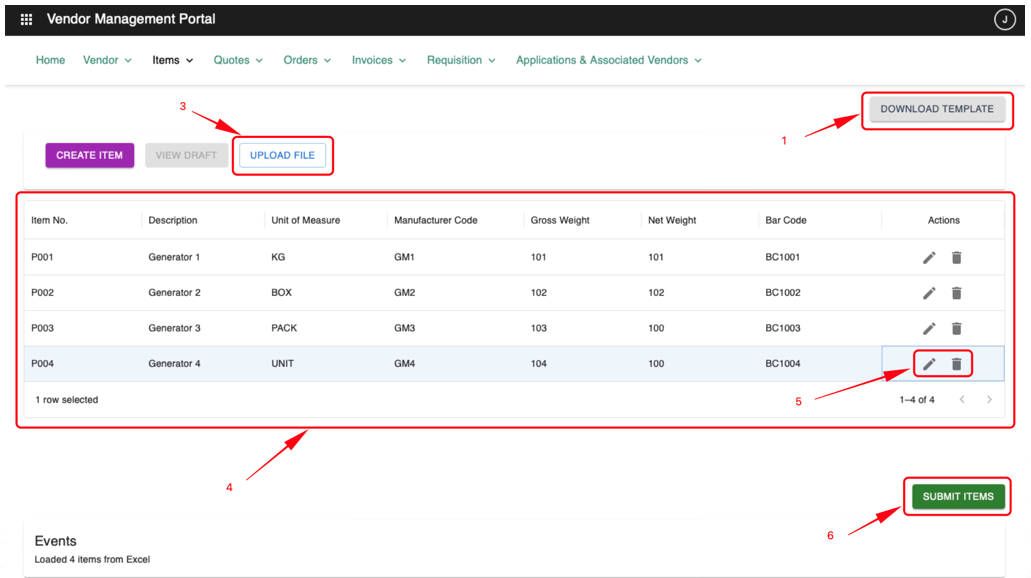
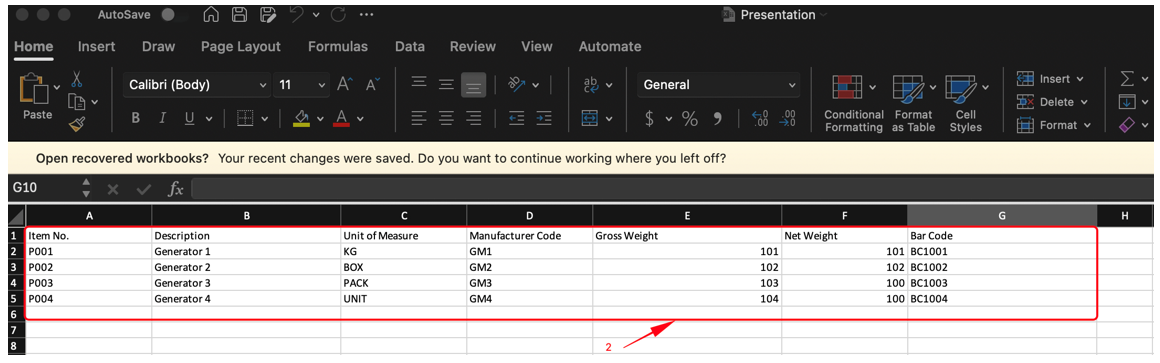
- Click Download Template to download a template excel file
- Fill in details in the excel file
- Click Upload File to upload the saved excel file
- Navigate to View Draft automatically to view the uploaded items from excel
- Click Action buttons to edit or delete items
- Click Submit Items
Edit Items
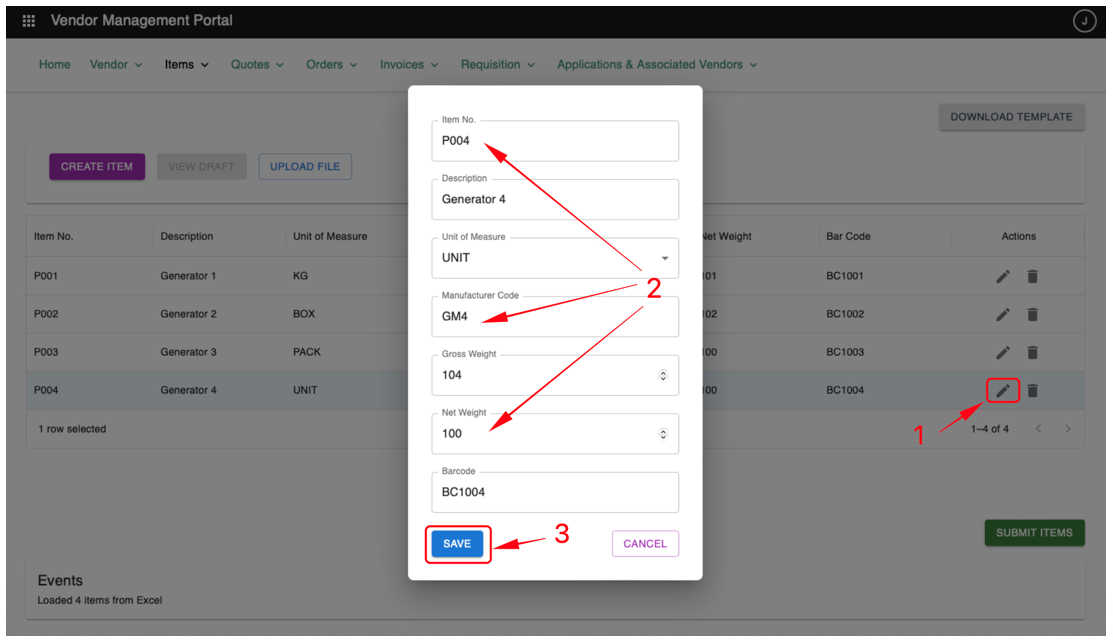
- Click Edit icon (the pen symbol) to edit an item
- Edit fields
- Click Save to save the edited item
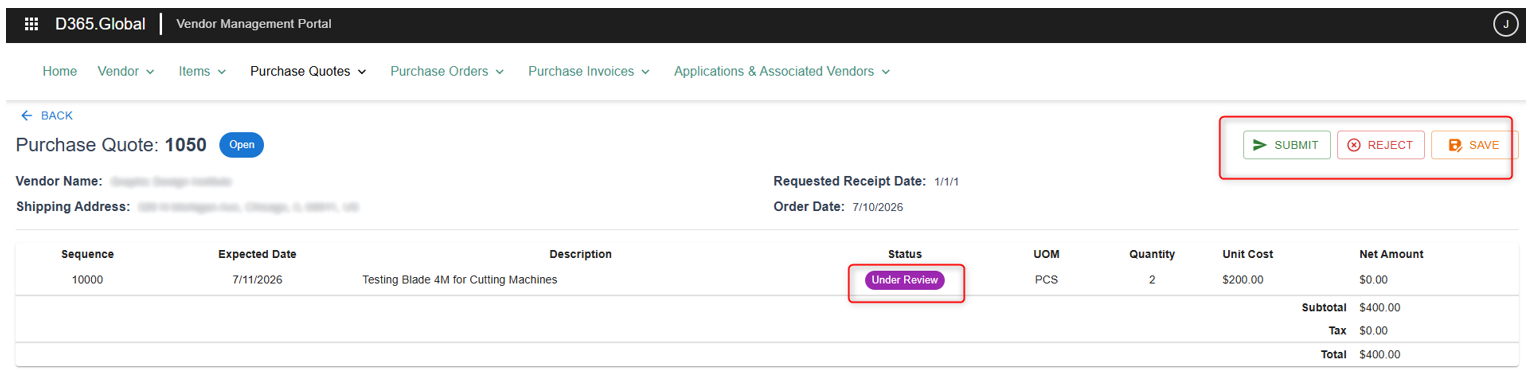
Purchase Quotes & Lines
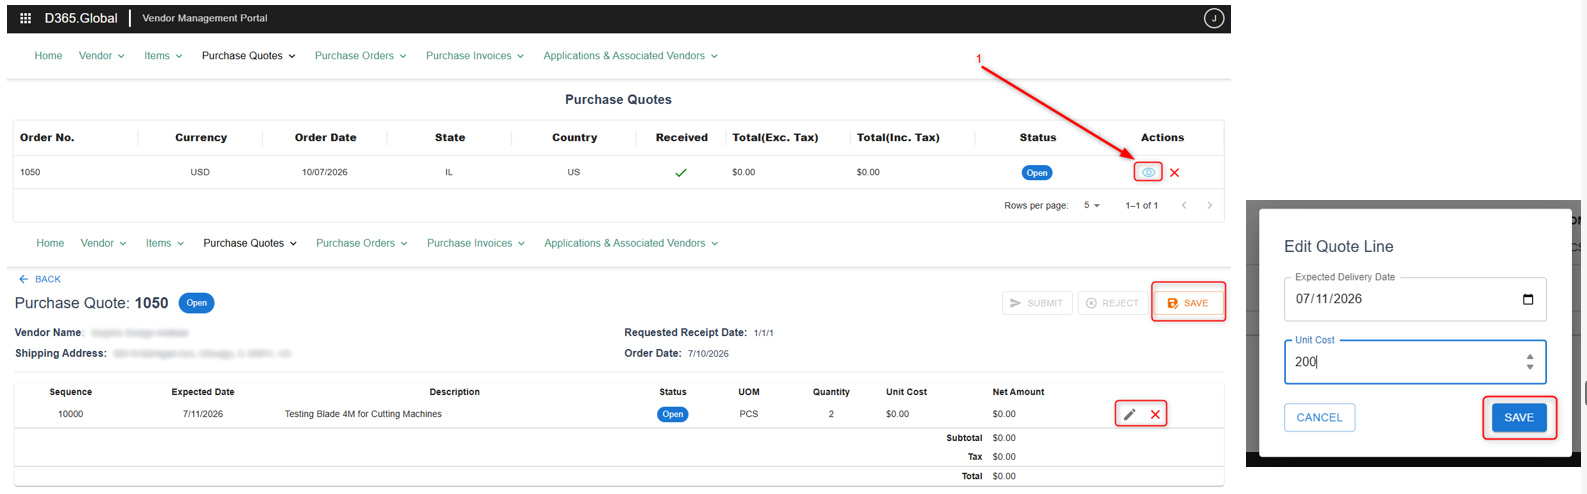
Navigate to Purchase Quotes to view all purchase quotes of the vendor.
- Click View icon to see quote lines of the Purchase Quote
- Click Edit on a line item to place bidding cost and expected delivery date & Save or Submit Quote or X to reject line item`
Navigate to Purchase Quotes to view all purchase quotes of the vendor.
- Line Item Status changes to Review after bidding
- Quote can then be submitted (Click Submit), rejected (Click X), or saved (Click Save).
Purchase Orders & Lines
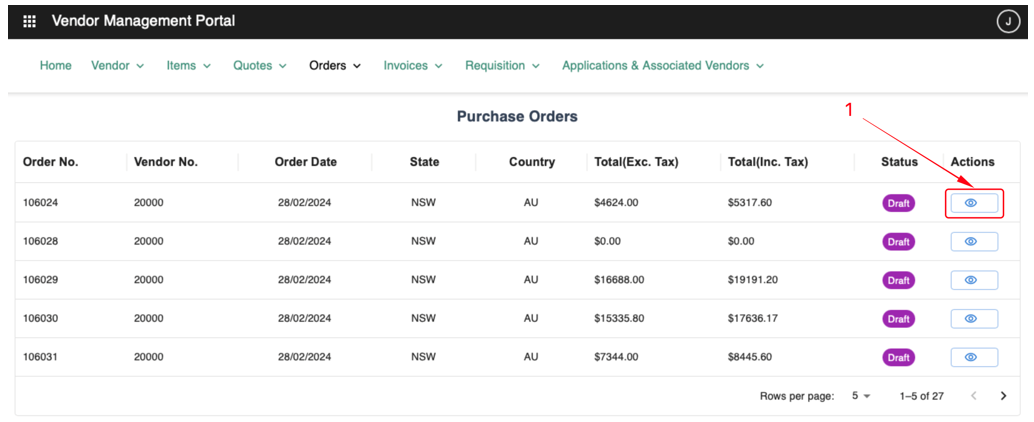
Navigate to Purchase Orders to view all purchase orders of the vendor.
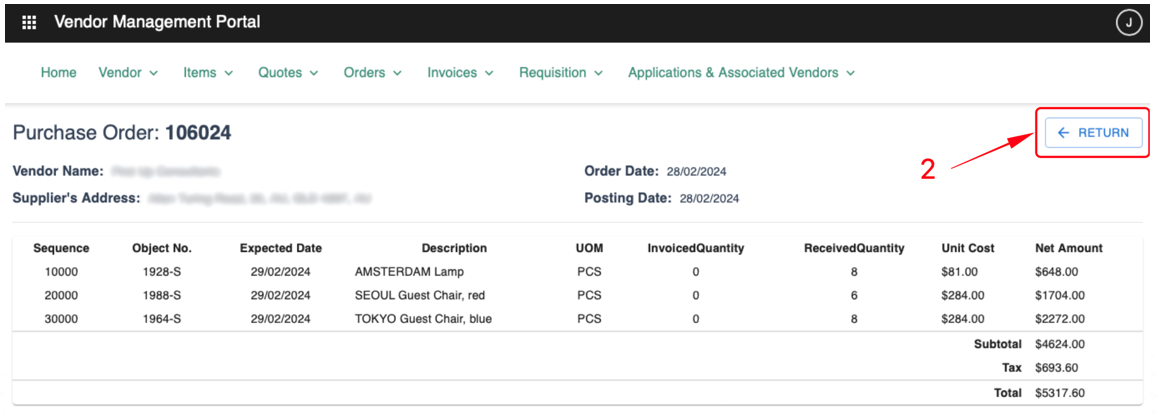
- Click View icon to see order lines of the Purchase Order
- Click Return to return to the Purchase Orders page
Purchase Invoices & Lines
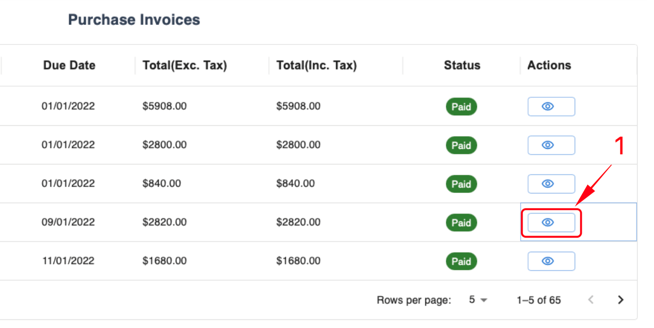
Navigate to Purchase Invoices to view all purchase invoices of the vendor.
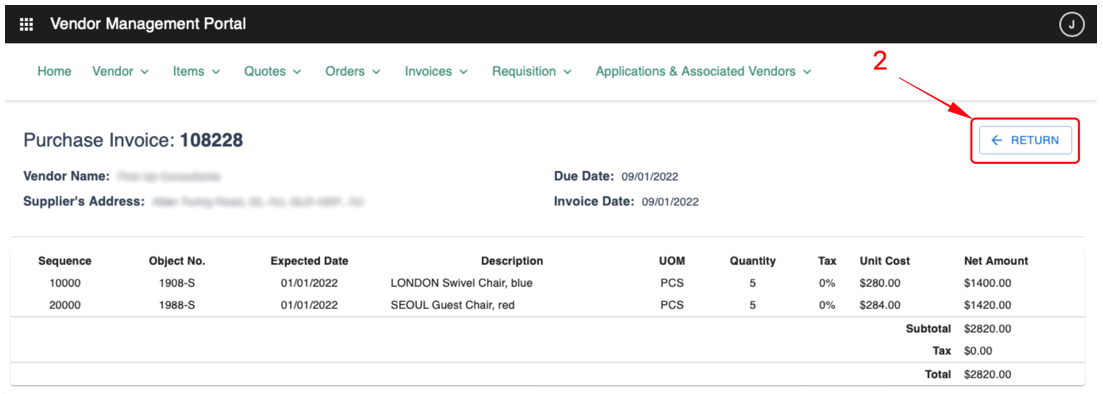
- Click View icon to see invoice lines of the Purchase Invoice
- Click Return to return to the Purchase Invoices Page
Create New Vendor Application
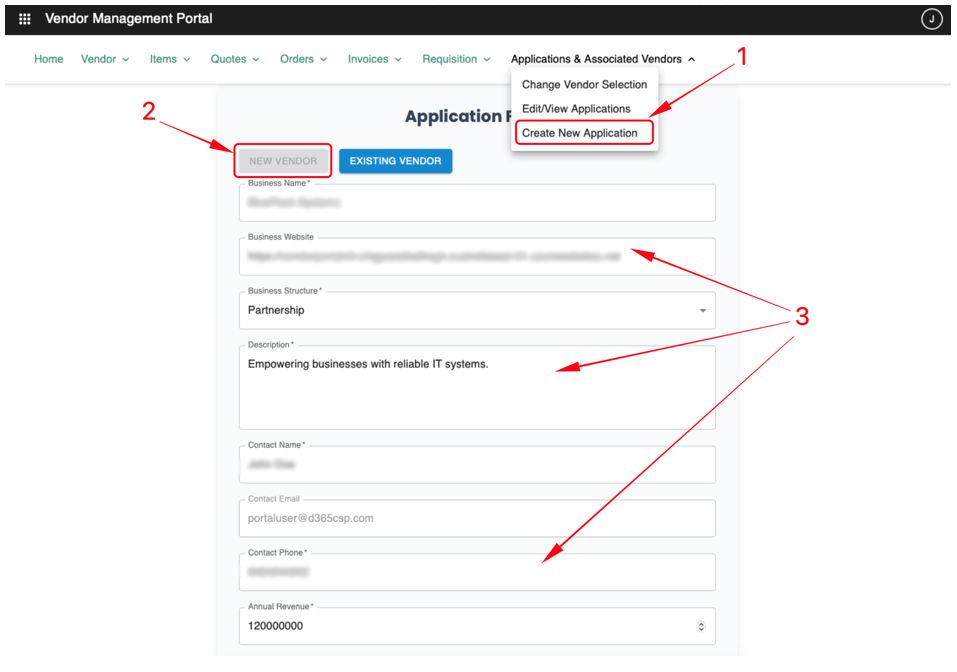
In this section, we will discuss how to create a new vendor application. Follow these steps:
- Navigate to Create New Application page (this is under Applications & Associated Vendors menu)
- Select New Vendor
- Fill in details
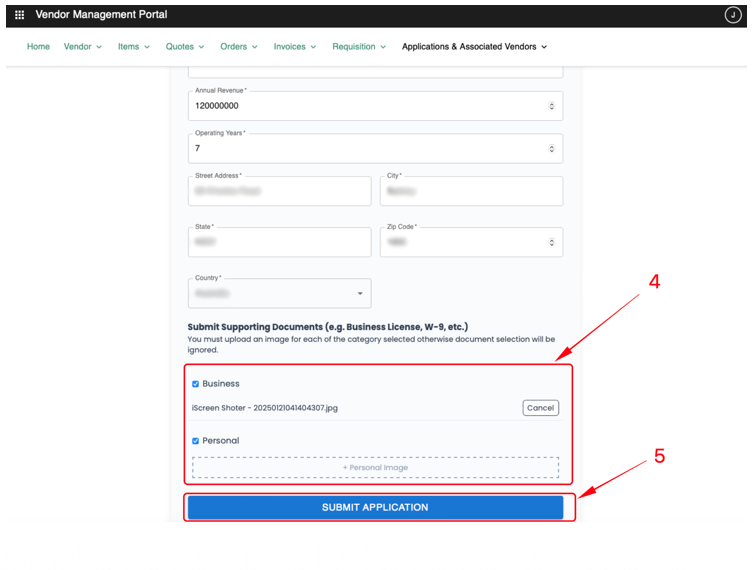
- Upload supporting documents (in Submit Supporting Documents section)
- Click the Submit Application button
View Vendor Applications
Now we will discuss how to view vendor applications. Follow these steps:
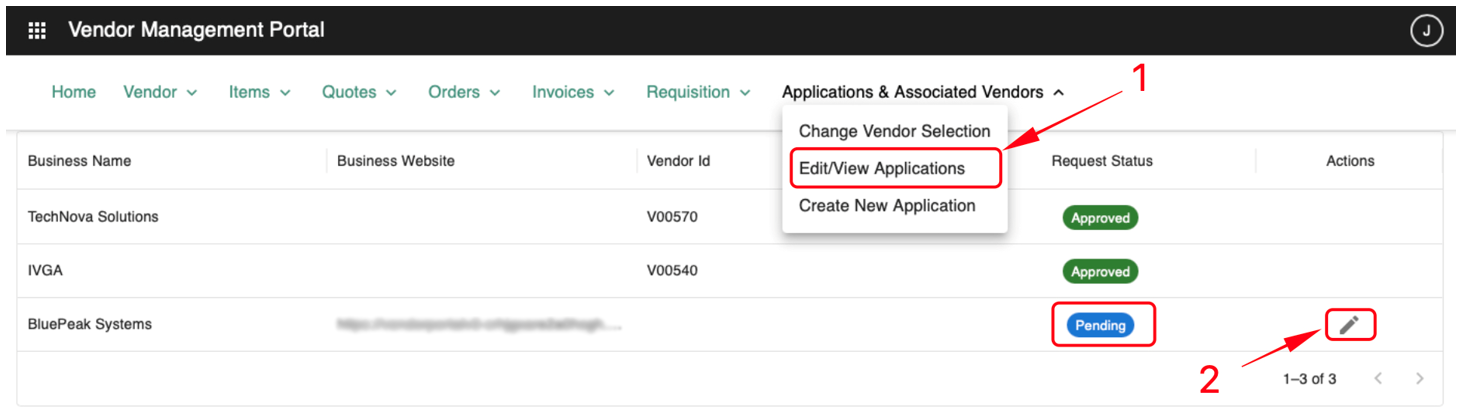
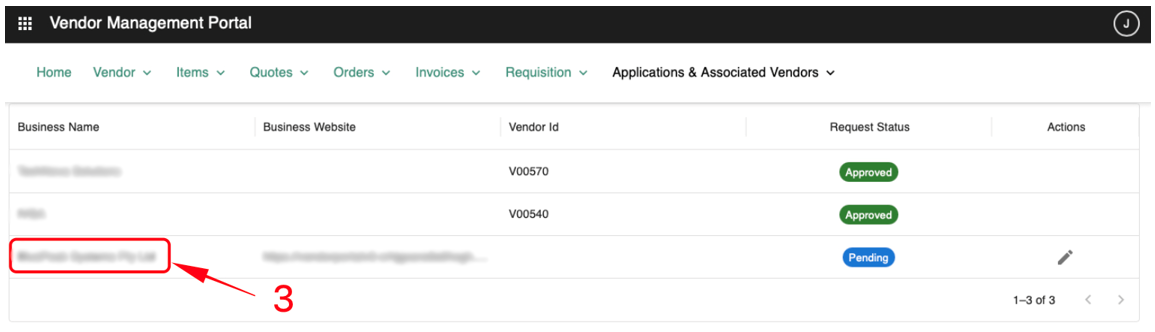
- Navigate to Edit/View Applications page (this is under Applications & Associated Vendors menu)
- Click Edit icon to edit Pending applications
Edit Pending Vendor Application
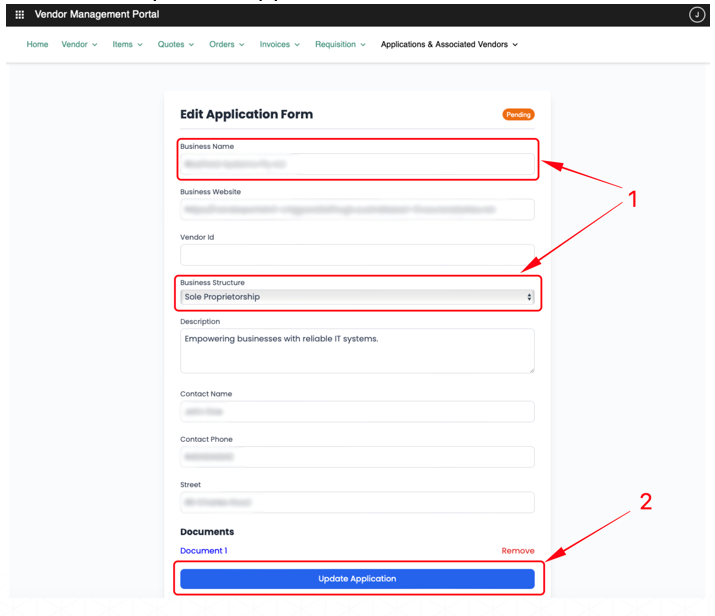
Edit Pending Vendor
Next, we will discuss how to edit pending vendor applications. Follow these steps:
- Edit the fields in the application form
- Click Update Application button to save the changes
- View updated application by clicking the Business Name
Change Vendor Selection
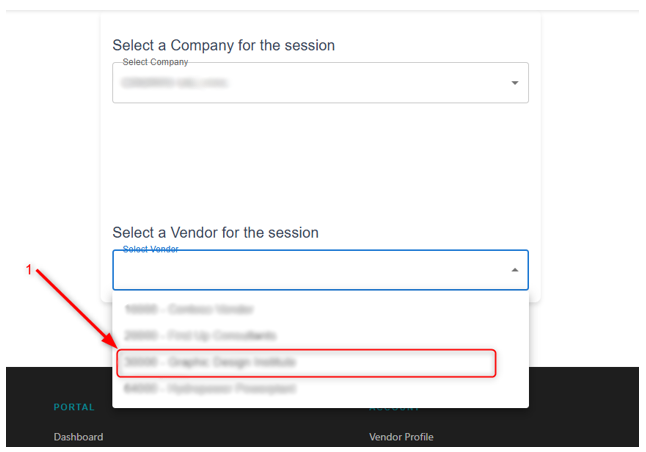
In this section, we will discuss how to change the vendor selection you want. Follow these steps:
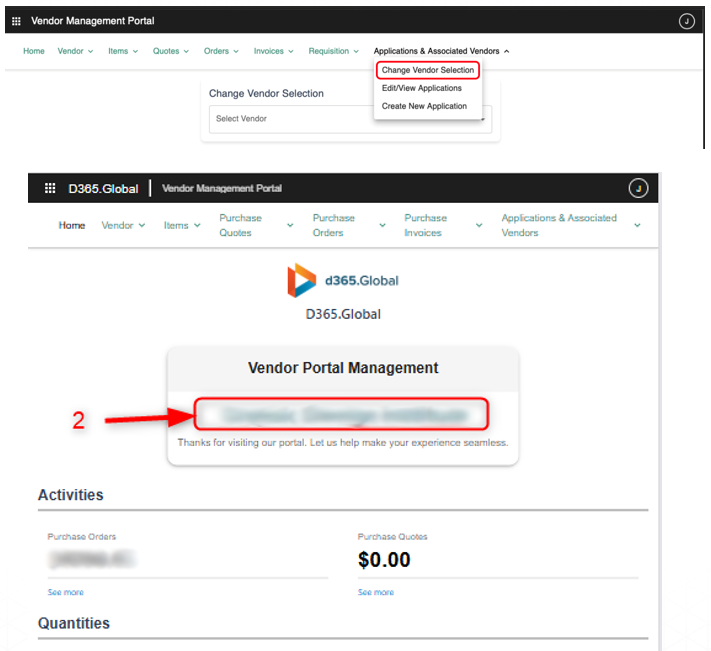
- Navigate to Change Vendor Selection page (this is under Applications & Associated Vendors menu)
- Select a vendor
- Navigate to the portal as the selected vendor
For further information, contact:
David Blumentals
David@d365.Global
+61 409 245 354